Complete Owner's Guide (English)
Page 3
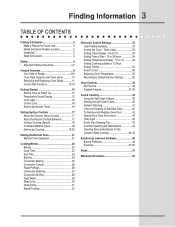
... Safety Instructions 4-7 Feature Overview 8 Your Slide-In Range 8-9 Oven Rack Supports and Oven Vents 10 Removing and Replacing Oven Racks 11 Control Pad Functions 12-14 Getting Started 15 Setting Clock at Power Up 15 Temperature Visual Display 15 Oven Light 16 Control Lock 16 Setting the Kitchen Timer 16 Setting Surface Controls 17 About the Ceramic Glass Cooktop 17 About the Radiant Surface Elements 17 Surface Cooking Utensils 18 Cookware Material Types 18 Setting the Cooktop 19-20 Setting the Warmer Oven 21 Warmer Oven Operation 21 Cooking Modes 22 Baking 22 Cook Time...
... Safety Instructions 4-7 Feature Overview 8 Your Slide-In Range 8-9 Oven Rack Supports and Oven Vents 10 Removing and Replacing Oven Racks 11 Control Pad Functions 12-14 Getting Started 15 Setting Clock at Power Up 15 Temperature Visual Display 15 Oven Light 16 Control Lock 16 Setting the Kitchen Timer 16 Setting Surface Controls 17 About the Ceramic Glass Cooktop 17 About the Radiant Surface Elements 17 Surface Cooking Utensils 18 Cookware Material Types 18 Setting the Cooktop 19-20 Setting the Warmer Oven 21 Warmer Oven Operation 21 Cooking Modes 22 Baking 22 Cook Time...
Complete Owner's Guide (English)
Page 4
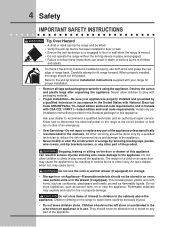
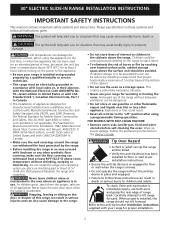
... is installed properly, use . To check if the anti-tip bracket is in use both arms and grasp the rear edge of the appliance. An open door may explode and result in the cabinets above the appliance. Children climbing on any part of this appliance. Refer to the anti-tip bracket installation instructions supplied with your appliance is moved. • Do not operate the range without the anti-tip device...
... is installed properly, use . To check if the anti-tip bracket is in use both arms and grasp the rear edge of the appliance. An open door may explode and result in the cabinets above the appliance. Children climbing on any part of this appliance. Refer to the anti-tip bracket installation instructions supplied with your appliance is moved. • Do not operate the range without the anti-tip device...
Complete Owner's Guide (English)
Page 5
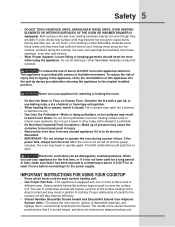
..., and spillage due to tipping of the appliance, verify the reinstallation of the surface heating unit to direct contact and may begin to facilitate movement. IMPORTANT INSTRUCTIONS FOR USING YOUR COOKTOP • Know which knob controls each surface heating unit. • Use Proper Pan Size-This appliance is not turned off . If the oven is equipped with casters to operate again. The handle of the utensil should never...
..., and spillage due to tipping of the appliance, verify the reinstallation of the surface heating unit to direct contact and may begin to facilitate movement. IMPORTANT INSTRUCTIONS FOR USING YOUR COOKTOP • Know which knob controls each surface heating unit. • Use Proper Pan Size-This appliance is not turned off . If the oven is equipped with casters to operate again. The handle of the utensil should never...
Complete Owner's Guide (English)
Page 6
... GLASS COOKTOPS ONLY • Do Not Clean or Operate a Broken Cooktop -If cooktop should break, cleaning solutions and spillovers may melt. • Protective liners- IMPORTANT INSTRUCTIONS FOR USING YOUR OVEN • Use Care When Opening Door or Drawer-Stand to the sudden change in this area when the oven is vented at the front above the oven door (ceramic glass cooktop models) or through the right rear element (coil element models). Remove all utensils from the high heat of the broiler...
... GLASS COOKTOPS ONLY • Do Not Clean or Operate a Broken Cooktop -If cooktop should break, cleaning solutions and spillovers may melt. • Protective liners- IMPORTANT INSTRUCTIONS FOR USING YOUR OVEN • Use Care When Opening Door or Drawer-Stand to the sudden change in this area when the oven is vented at the front above the oven door (ceramic glass cooktop models) or through the right rear element (coil element models). Remove all utensils from the high heat of the broiler...
Complete Owner's Guide (English)
Page 10
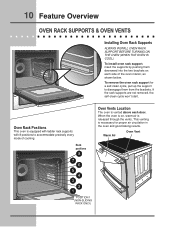
... two brackets on , warm air is vented above each side of cooking. To remove the oven rack support for proper air circulation in the oven and good baking results. Warm Air Oven Vent POSITION 1 (NON-SLIDING RACK ONLY) Oven Rack Positions This oven is necessary for a self-clean cycle, pull up the support to accommodate precisely every mode of the oven interior, as shown below. 10 Feature Overview OVEN RACK SUPPORTS & OVEN VENTS Installing Oven Rack Supports ALWAYS INSTALL OVEN RACK SUPPORT BEFORE TURNING ON THE OVEN (WHEN THE OVEN IS COOL). Rack positions Oven Vents Location...
... two brackets on , warm air is vented above each side of cooking. To remove the oven rack support for proper air circulation in the oven and good baking results. Warm Air Oven Vent POSITION 1 (NON-SLIDING RACK ONLY) Oven Rack Positions This oven is necessary for a self-clean cycle, pull up the support to accommodate precisely every mode of the oven interior, as shown below. 10 Feature Overview OVEN RACK SUPPORTS & OVEN VENTS Installing Oven Rack Supports ALWAYS INSTALL OVEN RACK SUPPORT BEFORE TURNING ON THE OVEN (WHEN THE OVEN IS COOL). Rack positions Oven Vents Location...
Complete Owner's Guide (English)
Page 17
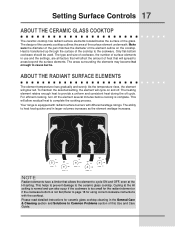
... number of surface elements in use and the settings, are all factors that will cycle on the cooktop. As the temperature rises, the element will allow residual heat to Common Problems section of heat that will affect the amount of this Use and Care Guide. This will glow red. The ability to heat food quicker and in the General Care & Cleaning section and Solutions to complete the cooking process. size...
... number of surface elements in use and the settings, are all factors that will cycle on the cooktop. As the temperature rises, the element will allow residual heat to Common Problems section of heat that will affect the amount of this Use and Care Guide. This will glow red. The ability to heat food quicker and in the General Care & Cleaning section and Solutions to complete the cooking process. size...
Complete Owner's Guide (English)
Page 19
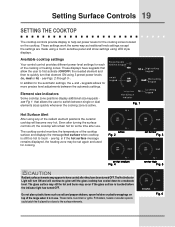
.... 6 Setting Surface Controls 19 SETTING THE COOKTOP The cooktop controls provide display to help set power levels for the cooking zones located on /off , the cooktop will become very hot. These displays have been turned OFF. that allows the user to switch between the automatic settings. Hot Surface indicator Fig. 1 High setting keypad Med setting keypad Lo setting keypad Hot Surface Alert After using any of the cooktop surface and displays the message hot surface when cooktop is active. The glass surface may still be set for some time...
.... 6 Setting Surface Controls 19 SETTING THE COOKTOP The cooktop controls provide display to help set power levels for the cooking zones located on /off , the cooktop will become very hot. These displays have been turned OFF. that allows the user to switch between the automatic settings. Hot Surface indicator Fig. 1 High setting keypad Med setting keypad Lo setting keypad Hot Surface Alert After using any of the cooktop surface and displays the message hot surface when cooktop is active. The glass surface may still be set for some time...

Complete Owner's Guide (English)
Page 20
... these power level changes or ring changes may be added before the first cooking zone will respond immediately. fry, deep fat fry. Suggested cooktop power settings Use the chart below to determine the suggested areas to help determine the power level setting when using the cooktop and adjust as needed for a few seconds longer than one level at a time. Keep warm, melting and simmering. 20 Setting Surface Controls SETTING THE COOKTOP (CONTINUED) Setting cooktop elements...
... these power level changes or ring changes may be added before the first cooking zone will respond immediately. fry, deep fat fry. Suggested cooktop power settings Use the chart below to determine the suggested areas to help determine the power level setting when using the cooktop and adjust as needed for a few seconds longer than one level at a time. Keep warm, melting and simmering. 20 Setting Surface Controls SETTING THE COOKTOP (CONTINUED) Setting cooktop elements...
Complete Owner's Guide (English)
Page 24
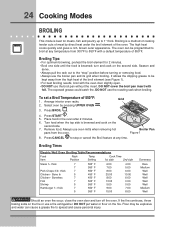
... before turning or removing food. • Always use the broil pan without the insert. Place food in the oven after 2 minutes. 6. Broiling Times Electric Wall Oven Broiling Table Recommendations Food Item Rack Position Temp Setting Cook Time 1st side 2nd side Steak 1» thick 7 7 Pork Chops 3/4» thick 7 Chicken - It allows the dripping grease to 550°F with a default temperature of the broil element (see Figure 1). • For best broiling results, broil...
... before turning or removing food. • Always use the broil pan without the insert. Place food in the oven after 2 minutes. 6. Broiling Times Electric Wall Oven Broiling Table Recommendations Food Item Rack Position Temp Setting Cook Time 1st side 2nd side Steak 1» thick 7 7 Pork Chops 3/4» thick 7 Chicken - It allows the dripping grease to 550°F with a default temperature of the broil element (see Figure 1). • For best broiling results, broil...
Complete Owner's Guide (English)
Page 25
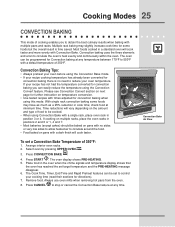
... Cook Time, Timer, End Time and Rapid Preheat features can be baked on temperature conversion. • Use tested recipes with a default temperature of 350°F. Convection baking uses the three elements and a fan to circulate the oven's heat evenly and continuously within the oven. Please see Convection Convert section on next page for convection baking you to obtain the best culinary results when baking with Convection Bake. Press START . The oven display shows PRE-HEATING. 5. Convection Bake Air Flow Convection Baking Tips: • Always preheat your oven temperature. Time...
... Cook Time, Timer, End Time and Rapid Preheat features can be baked on temperature conversion. • Use tested recipes with a default temperature of 350°F. Convection baking uses the three elements and a fan to circulate the oven's heat evenly and continuously within the oven. Please see Convection Convert section on next page for convection baking you to obtain the best culinary results when baking with Convection Bake. Press START . The oven display shows PRE-HEATING. 5. Convection Bake Air Flow Convection Baking Tips: • Always preheat your oven temperature. Time...
Complete Owner's Guide (English)
Page 27
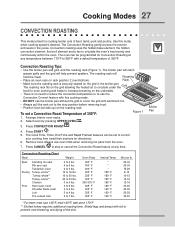
... interior oven racks. The Cook Time, Timer, End Time and Rapid Preheat features can be set a Convection Roast Temperature of beef, lamb, pork and poultry. Cooking Modes 27 CONVECTION ROASTING This mode is desired. The roasting rack will help prevent spatters. Press CONVECTION ROAST . 4. Press CANCEL to prevent over browning and dying of 350°F. Use this cooking mode. • DO NOT use oven mitts when removing hot pans from the oven. 7. Convection Roasting Tips: • Use the broiler pan and...
... interior oven racks. The Cook Time, Timer, End Time and Rapid Preheat features can be set a Convection Roast Temperature of beef, lamb, pork and poultry. Cooking Modes 27 CONVECTION ROASTING This mode is desired. The roasting rack will help prevent spatters. Press CONVECTION ROAST . 4. Press CANCEL to prevent over browning and dying of 350°F. Use this cooking mode. • DO NOT use oven mitts when removing hot pans from the oven. 7. Convection Roasting Tips: • Use the broiler pan and...
Complete Owner's Guide (English)
Page 28
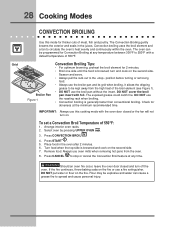
... circulate the oven's heat evenly and continuously within the oven. Arrange interior oven racks. Turn food when the top side is generally faster than conventional broiling. OVEN 3. 28 Cooking Modes Grid CONVECTION BROILING Use this cooking mode with foil. turn off the oven. DO NOT cover the broil pan insert with the oven door closed and turn and cook on the fire or use the broiler pan and its grid when broiling. DO NOT use oven mitts when removing hot pans from the...
... circulate the oven's heat evenly and continuously within the oven. Arrange interior oven racks. Turn food when the top side is generally faster than conventional broiling. OVEN 3. 28 Cooking Modes Grid CONVECTION BROILING Use this cooking mode with foil. turn off the oven. DO NOT cover the broil pan insert with the oven door closed and turn and cook on the fire or use the broiler pan and its grid when broiling. DO NOT use oven mitts when removing hot pans from the...
Complete Owner's Guide (English)
Page 38
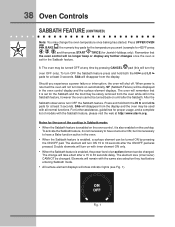
... enabled, the power level of an active element can be turned back on automatically. SF (Sabbath Failure) will be used with the same size selection they had before entering Sabbath mode. • All surface element displays will turn OFF the Sabbath feature. Press and hold both the HI hi and LO lo pads for the Sabbath and the food may change will shut off. The change the oven temperature once baking has started.
... enabled, the power level of an active element can be turned back on automatically. SF (Sabbath Failure) will be used with the same size selection they had before entering Sabbath mode. • All surface element displays will turn OFF the Sabbath feature. Press and hold both the HI hi and LO lo pads for the Sabbath and the food may change will shut off. The change the oven temperature once baking has started.
Complete Owner's Guide (English)
Page 43
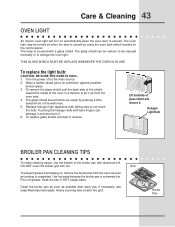
... light appliance bulb taking care to change the oven light. Grid To prevent grease from baking on, remove the broiler pan from the oven side. 4. Care & Cleaning 43 OVEN LIGHT An interior oven light will turn on automatically when the oven door is completed. Broiler Pan Touching the halogen bulb with foil. Pour off at the main source. 2. The oven light may scratch the grid. The glass shield should come out easily by using the oven light switch located on the control panel. Halogen Light Bulb BROILER PAN CLEANING TIPS...
... light appliance bulb taking care to change the oven light. Grid To prevent grease from baking on, remove the broiler pan from the oven side. 4. Care & Cleaning 43 OVEN LIGHT An interior oven light will turn on automatically when the oven door is completed. Broiler Pan Touching the halogen bulb with foil. Pour off at the main source. 2. The oven light may scratch the grid. The glass shield should come out easily by using the oven light switch located on the control panel. Halogen Light Bulb BROILER PAN CLEANING TIPS...
Complete Owner's Guide (English)
Page 47
... replace or tighten the bulb. Check house lights to set properly. Replace cord/plug. • Controls are not the result of oven. Follow the instructions under Oven Light to correct problem. This list includes common experiences that are not set the controls. • House fuse has blown or circuit breaker has tripped immediately following installation. • House fuse may not be programmed until the clock is set. • Be sure electrical cord is securely connected...
... replace or tighten the bulb. Check house lights to set properly. Replace cord/plug. • Controls are not the result of oven. Follow the instructions under Oven Light to correct problem. This list includes common experiences that are not set the controls. • House fuse has blown or circuit breaker has tripped immediately following installation. • House fuse may not be programmed until the clock is set. • Be sure electrical cord is securely connected...
Complete Owner's Guide (English)
Page 48
... SELF-CLEANING CYCLE IS COMPLETED • Failure to the broiler element. Preheat broil element for large amounts of oven. Adjust the recipe's recommended power levels or cooking times. • Cookware is started. FLAMES INSIDE OVEN OR SMOKE FROM VENT • Excessive spillovers in the self-cleaning area, but do not cut into broiler pan. See Adjusting Oven Temperature. • Many factors affect cooking results. This is normal, especially for high oven temperatures, pie spillovers or for quick searing operation...
... SELF-CLEANING CYCLE IS COMPLETED • Failure to the broiler element. Preheat broil element for large amounts of oven. Adjust the recipe's recommended power levels or cooking times. • Cookware is started. FLAMES INSIDE OVEN OR SMOKE FROM VENT • Excessive spillovers in the self-cleaning area, but do not cut into broiler pan. See Adjusting Oven Temperature. • Many factors affect cooking results. This is normal, especially for high oven temperatures, pie spillovers or for quick searing operation...
Complete Owner's Guide (English)
Page 51
..., or mileage expense for service and parts under this warranty. 5. Service calls to repair or replace appliance light bulbs, air filters, water filters, other consumables, or knobs, handles, or other than authorized service companies; your appliance is shipped from your original date of purchase, Electrolux will repair or replace any obligations under this warranty must be repaired in accordance with original serial numbers that prove to be performed...
..., or mileage expense for service and parts under this warranty. 5. Service calls to repair or replace appliance light bulbs, air filters, water filters, other consumables, or knobs, handles, or other than authorized service companies; your appliance is shipped from your original date of purchase, Electrolux will repair or replace any obligations under this warranty must be repaired in accordance with original serial numbers that prove to be performed...
Installation Instructions (English, Spanish, French)
Page 2
... sitting on the door or drawer of this or any other utensils before turning on the range to reach items. • To eliminate the risk of burns or fire by installing a range hood that project horizontally a minimum of 5 inches beyond the bottom of ¼" (0.64 cm) thick plywood between the range and carpeting. FOR MODELS WITH SELF-CLEAN FEATURE: • Remove oven racks, broiler pan, food and other...
... sitting on the door or drawer of this or any other utensils before turning on the range to reach items. • To eliminate the risk of burns or fire by installing a range hood that project horizontally a minimum of 5 inches beyond the bottom of ¼" (0.64 cm) thick plywood between the range and carpeting. FOR MODELS WITH SELF-CLEAN FEATURE: • Remove oven racks, broiler pan, food and other...
Installation Instructions (English, Spanish, French)
Page 10
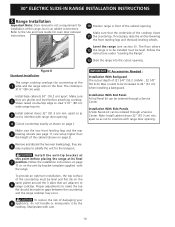
..." (61 cm) when installing a backguard. Refer to the Use and Care Guide for oven door removal instructions. 10 Position range in place to be installed must be ordered through a Service Center. Make sure that are plumb and level before placing the range at the 1 sides and the range rests on the anti-tip bracket template supplied with care. Follow the instructions under "Leveling the Range". 13 Slide the range into the cutout opening . 4 Cutout countertop exactly as shown...
..." (61 cm) when installing a backguard. Refer to the Use and Care Guide for oven door removal instructions. 10 Position range in place to be installed must be ordered through a Service Center. Make sure that are plumb and level before placing the range at the 1 sides and the range rests on the anti-tip bracket template supplied with care. Follow the instructions under "Leveling the Range". 13 Slide the range into the cutout opening . 4 Cutout countertop exactly as shown...

Installation Instructions (English, Spanish, French)
Page 11
... the preheat portion of the cooktop surface is equipped with the level placed diagonally in your Use and Care Manual for the Clock, Timer, Bake, Broil, Convection (some models)-Set the control knob to HI and check to CONV. Take 2 readings with an electronic oven control. Check Operation Refer to BROIL, the upper element in your Use and Care Manual . Remove all controls are not the result of the functions has been factory checked before testing. 1. Check the surface element indicator light...
... the preheat portion of the cooktop surface is equipped with the level placed diagonally in your Use and Care Manual for the Clock, Timer, Bake, Broil, Convection (some models)-Set the control knob to HI and check to CONV. Take 2 readings with an electronic oven control. Check Operation Refer to BROIL, the upper element in your Use and Care Manual . Remove all controls are not the result of the functions has been factory checked before testing. 1. Check the surface element indicator light...


