Complete Owner's Guide (English)
Page 4
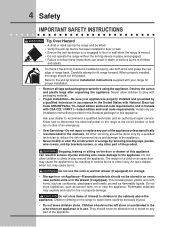
...range without the anti-tip device in place and engaged. • Failure to follow these instructions can result in the area where an appliance is properly installed and grounded by removing leveling legs, panels, wire covers, anti-tip brackets/screws, or any other injury. Destroy the...tip bracket installation instructions supplied with CSA C22.1 PART 1-latest edition and local code requirements. Children climbing on the door or drawer of this appliance. 4 Safety IMPORTANT SAFETY INSTRUCTIONS Tip Over Hazard • A child or adult can tip the range and be killed. • Verify the...
...range without the anti-tip device in place and engaged. • Failure to follow these instructions can result in the area where an appliance is properly installed and grounded by removing leveling legs, panels, wire covers, anti-tip brackets/screws, or any other injury. Destroy the...tip bracket installation instructions supplied with CSA C22.1 PART 1-latest edition and local code requirements. Children climbing on the door or drawer of this appliance. 4 Safety IMPORTANT SAFETY INSTRUCTIONS Tip Over Hazard • A child or adult can tip the range and be killed. • Verify the...
Complete Owner's Guide (English)
Page 5
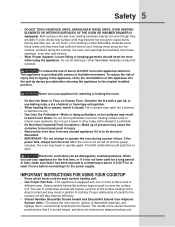
...door and window. • Wear Proper Apparel-Loose-fitting or hanging garments should be positioned so that it closely. When you use your appliance for at bottoms large enough to a temperature above 0°C/32°F for warming or heating the room. • Do Not Use Water or... in color. IMPORTANT INSTRUCTIONS FOR USING YOUR COOKTOP • Know which knob controls each surface heating unit. • Use Proper Pan Size-This appliance is not turned off . The use , do not touch, or let clothing or other flammable materials contact hot surfaces. To reduce the...
...door and window. • Wear Proper Apparel-Loose-fitting or hanging garments should be positioned so that it closely. When you use your appliance for at bottoms large enough to a temperature above 0°C/32°F for warming or heating the room. • Do Not Use Water or... in color. IMPORTANT INSTRUCTIONS FOR USING YOUR COOKTOP • Know which knob controls each surface heating unit. • Use Proper Pan Size-This appliance is not turned off . The use , do not touch, or let clothing or other flammable materials contact hot surfaces. To reduce the...
Complete Owner's Guide (English)
Page 6
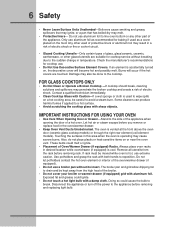
... cleaning solutions and spillovers may melt. • Protective liners- Do not let potholders contact the hot oven element or interior of the appliance. Let hot air or steam escape before removing and replacing light bulb. Always place oven racks in this area when the oven is... produce harmful fumes if applied to a hot surface. • Avoid scratching the cooktop glass with both hands to the side of the appliance when opening the door of glass, glass/ceramic, ceramic, earthenware, or other used as recommended for cooktop service without its insert. IMPORTANT INSTRUCTIONS...
... cleaning solutions and spillovers may melt. • Protective liners- Do not let potholders contact the hot oven element or interior of the appliance. Let hot air or steam escape before removing and replacing light bulb. Always place oven racks in this area when the oven is... produce harmful fumes if applied to a hot surface. • Avoid scratching the cooktop glass with both hands to the side of the appliance when opening the door of glass, glass/ceramic, ceramic, earthenware, or other used as recommended for cooktop service without its insert. IMPORTANT INSTRUCTIONS...
Complete Owner's Guide (English)
Page 16
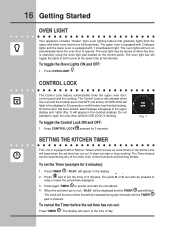
... intensity. The Timer feature can also be used during any of day. Press TIMER . "00:00" will flash. 16 Getting Started OVEN LIGHT Your appliance includes "theater" style oven lighting feature that gradually lights both ovens at the same time at regular intervals until the door has finished locking...
... intensity. The Timer feature can also be used during any of day. Press TIMER . "00:00" will flash. 16 Getting Started OVEN LIGHT Your appliance includes "theater" style oven lighting feature that gradually lights both ovens at the same time at regular intervals until the door has finished locking...
Complete Owner's Guide (English)
Page 39
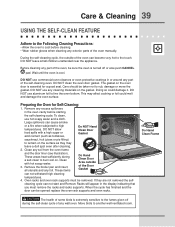
DO NOT leave small children unattended near the appliance. DO NOT clean the oven door gasket. Care should be opened replace the oven rack supports and oven racks. To clean, use commercial oven cleaners ...
DO NOT leave small children unattended near the appliance. DO NOT clean the oven door gasket. Care should be opened replace the oven rack supports and oven racks. To clean, use commercial oven cleaners ...
Complete Owner's Guide (English)
Page 40
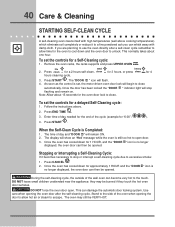
... approximately 1 HOUR and the "DOOR " icon is no longer displayed, the oven door can then be opened . DO NOT leave small children unattended near the appliance; Use care when opening the door to allow time for the oven to cool down for 1 HOUR, and the "DOOR " icon is still too hot...
... approximately 1 HOUR and the "DOOR " icon is no longer displayed, the oven door can then be opened . DO NOT leave small children unattended near the appliance; Use care when opening the door to allow time for the oven to cool down for 1 HOUR, and the "DOOR " icon is still too hot...
Complete Owner's Guide (English)
Page 41
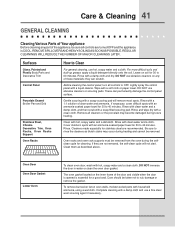
... AND HEAVY SOILING AS SOON AS POSSIBLE. Rinse. Rinse with a liquid cleaner. To remove burned-on fat on any part of the appliance, be removed from the oven during the selfclean cycle for cleaning. REGULAR CLEANINGS WILL REDUCE THE NUMBER OF MAJOR CLEANINGS LATER. Lightly spray the... control panel with clean water and a cloth. Care & Cleaning 41 GENERAL CLEANING Cleaning Various Parts of Your appliance Before cleaning any of these materials; Care should be removed. Leave on the inner frame of the door and visible when the door is...
... AND HEAVY SOILING AS SOON AS POSSIBLE. Rinse. Rinse with a liquid cleaner. To remove burned-on fat on any part of the appliance, be removed from the oven during the selfclean cycle for cleaning. REGULAR CLEANINGS WILL REDUCE THE NUMBER OF MAJOR CLEANINGS LATER. Lightly spray the... control panel with clean water and a cloth. Care & Cleaning 41 GENERAL CLEANING Cleaning Various Parts of Your appliance Before cleaning any of these materials; Care should be removed. Leave on the inner frame of the door and visible when the door is...

Complete Owner's Guide (English)
Page 42
... the glass may have to apply a little upward pressure on each hinge support toward front of breakage at the beginning of the door toward the appliance to the table provided at a later time. Open the door to disengage the hinge supports. Grasp the door by the sides, pull the bottom of... of the Oven Door Lock in normal position Lock engaged for door removal HINGE SLOT - TO REMOVE AND REPLACE OVEN DOOR 1. Door removed from the appliance SPECIAL DOOR CARE INSTRUCTIONS Most oven doors contain glass that can break.
... the glass may have to apply a little upward pressure on each hinge support toward front of breakage at the beginning of the door toward the appliance to the table provided at a later time. Open the door to disengage the hinge supports. Grasp the door by the sides, pull the bottom of... of the Oven Door Lock in normal position Lock engaged for door removal HINGE SLOT - TO REMOVE AND REPLACE OVEN DOOR 1. Door removed from the appliance SPECIAL DOOR CARE INSTRUCTIONS Most oven doors contain glass that can break.
Complete Owner's Guide (English)
Page 43
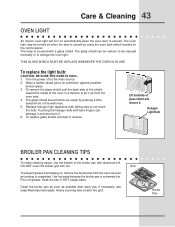
.... The glass shield can damage it and also burn it. 6. To replace the light bulb: CAUTION: BE SURE THE OVEN IS COOL. 1. Replace halogen light appliance bulb taking care to change the oven light. Halogen Light Bulb BROILER PAN CLEANING TIPS To make cleaning easier, line the bottom of the oven...
.... The glass shield can damage it and also burn it. 6. To replace the light bulb: CAUTION: BE SURE THE OVEN IS COOL. 1. Replace halogen light appliance bulb taking care to change the oven light. Halogen Light Bulb BROILER PAN CLEANING TIPS To make cleaning easier, line the bottom of the oven...
Complete Owner's Guide (English)
Page 46
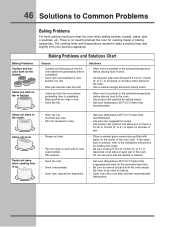
... when placed in the center. Foods not done when cooking time is 5.1cm to 10.2cm (2" to 4") of space on all pans from your previous appliance. If the water level is uneven, refer to the installation instructions for baking needs. • Set oven temperature 25°F/12°C lower than recommended...
... when placed in the center. Foods not done when cooking time is 5.1cm to 10.2cm (2" to 4") of space on all pans from your previous appliance. If the water level is uneven, refer to the installation instructions for baking needs. • Set oven temperature 25°F/12°C lower than recommended...
Complete Owner's Guide (English)
Page 49
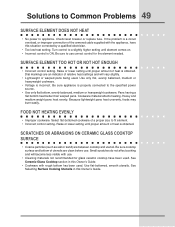
...balanced, medium or heavyweight cookware. • Voltage is properly connected to fit element. • Incorrect control setting. Be sure appliance is incorrect. Because lightweight pans heat unevenly, foods may burn easily. Small scratches do not affect cooking and will vary slightly. &#...8226; Incorrect control is obtained. Pans having a flat bottom, evenly balanced, medium or heavyweight cookware. Turn control to appliance. SURFACE ELEMENT TOO HOT OR NOT HOT ENOUGH • Incorrect control setting. Cookware material affects heating. Raise or lower setting ...
...balanced, medium or heavyweight cookware. • Voltage is properly connected to fit element. • Incorrect control setting. Be sure appliance is incorrect. Because lightweight pans heat unevenly, foods may burn easily. Small scratches do not affect cooking and will vary slightly. &#...8226; Incorrect control is obtained. Pans having a flat bottom, evenly balanced, medium or heavyweight cookware. Turn control to appliance. SURFACE ELEMENT TOO HOT OR NOT HOT ENOUGH • Incorrect control setting. Cookware material affects heating. Raise or lower setting ...
Complete Owner's Guide (English)
Page 51
... You Need Service Keep your receipt, delivery slip, or some other cosmetic parts. 11. In Canada, your appliance is warranted by Electrolux Major Appliances North America, a division of Electrolux Home Products, Inc. Product features or specifications as -is" are subject to change or add to... IMPLIED WARRANTIES, SO THESE LIMITATIONS OR EXCLUSIONS MAY NOTAPPLYTO YOU. Service under this warranty. 5. USA 1-877-435-3287 Electrolux Major Appliances North America P.O. Exclusions This warranty does not cover the following: 1. If service is performed, it is shipped from the factory. 10...
... You Need Service Keep your receipt, delivery slip, or some other cosmetic parts. 11. In Canada, your appliance is warranted by Electrolux Major Appliances North America, a division of Electrolux Home Products, Inc. Product features or specifications as -is" are subject to change or add to... IMPLIED WARRANTIES, SO THESE LIMITATIONS OR EXCLUSIONS MAY NOTAPPLYTO YOU. Service under this warranty. 5. USA 1-877-435-3287 Electrolux Major Appliances North America P.O. Exclusions This warranty does not cover the following: 1. If service is performed, it is shipped from the factory. 10...
Installation Instructions (English, Spanish, French)
Page 1
... vapors and liquids in these instructions with your owner's guide for future reference. pages 1-12 Español - Canada Table of this or any other appliance. INSTALLATION INSTRUCTIONS 30" ELECTRIC SLIDE-IN RANGE United States INSTALLATION AND SERVICE MUST BE PERFORMED BY A QUALIFIED INSTALLER. Printed in Canada P/N 318201626 (1212) Rev. Important...
... vapors and liquids in these instructions with your owner's guide for future reference. pages 1-12 Español - Canada Table of this or any other appliance. INSTALLATION INSTRUCTIONS 30" ELECTRIC SLIDE-IN RANGE United States INSTALLATION AND SERVICE MUST BE PERFORMED BY A QUALIFIED INSTALLER. Printed in Canada P/N 318201626 (1212) Rev. Important...
Installation Instructions (English, Spanish, French)
Page 2
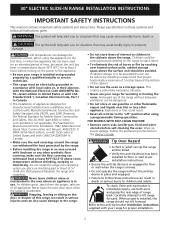
... the proper, safe use of burns or fire by a qualified installer or service technician. • This range must conform with linoleum or any other appliance. Children could result. • Reset all controls to situations that project horizontally a minimum of 5 inches beyond the bottom of ¼" (0.64 cm... range and be dangerous. • Do not store or use . damage. Never leave children alone or unattended in the area where an appliance is in the Owner's Guide. Explosions or fires could be electrically grounded in accordance with local codes or, in their absence, with the ...
... the proper, safe use of burns or fire by a qualified installer or service technician. • This range must conform with linoleum or any other appliance. Children could result. • Reset all controls to situations that project horizontally a minimum of 5 inches beyond the bottom of ¼" (0.64 cm... range and be dangerous. • Do not store or use . damage. Never leave children alone or unattended in the area where an appliance is in the Owner's Guide. Explosions or fires could be electrically grounded in accordance with local codes or, in their absence, with the ...
Installation Instructions (English, Spanish, French)
Page 3
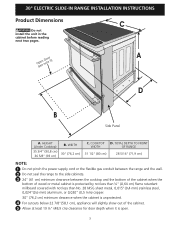
...) stainless steel, 0,024"(0,6 mm) aluminum, or 0,020" (0,5 mm) copper. 30" (76,2 cm) minimum clearance when the cabinet is unprotected. 4 For cutouts below 22 7/8"(58,1 cm), appliance will slightly show out of the cabinet. 5 Allow at least 19 ¼" (48,9 cm) clearance for door depth when it is open. 3 O(pseeen nDootoer5) A D B Side...
...) stainless steel, 0,024"(0,6 mm) aluminum, or 0,020" (0,5 mm) copper. 30" (76,2 cm) minimum clearance when the cabinet is unprotected. 4 For cutouts below 22 7/8"(58,1 cm), appliance will slightly show out of the cabinet. 5 Allow at least 19 ¼" (48,9 cm) clearance for door depth when it is open. 3 O(pseeen nDootoer5) A D B Side...
Installation Instructions (English, Spanish, French)
Page 4
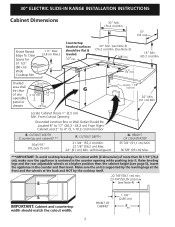
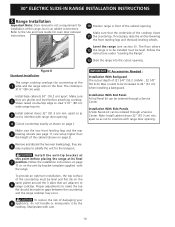
... (56,2 cm) Max 24" (61 cm) Min. with backguard G. Locate Cabinet Doors 1" (2,5 cm) Min. G of more than the cabinet height (see page 5), insert the appliance in the counter opening while pushing into it. HEIGHT OF COUNTERTOP 35 7/8" (91,1 cm) Min. 36 5/8" (93 cm) Max. ***IMPORTANT: To avoid cooktop breakage for...match the cutout width. Raise leveling legs and the rear adjustable wheels at a higher position than 30 1/16" (76,4 cm), make sure the appliance is supported by the leveling legs at the front and the wheels at the back and NOT by the cooktop itself. 22 7/8"(58,1 cm) ...
... (56,2 cm) Max 24" (61 cm) Min. with backguard G. Locate Cabinet Doors 1" (2,5 cm) Min. G of more than the cabinet height (see page 5), insert the appliance in the counter opening while pushing into it. HEIGHT OF COUNTERTOP 35 7/8" (91,1 cm) Min. 36 5/8" (93 cm) Max. ***IMPORTANT: To avoid cooktop breakage for...match the cutout width. Raise leveling legs and the rear adjustable wheels at a higher position than 30 1/16" (76,4 cm), make sure the appliance is supported by the leveling legs at the front and the wheels at the back and NOT by the cooktop itself. 22 7/8"(58,1 cm) ...
Installation Instructions (English, Spanish, French)
Page 6
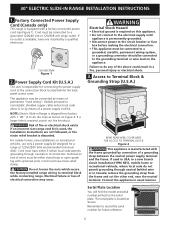
...which secure the factory-installed range wiring to record the serial number for future reference. 6 Connect the appliance in a fire, personal injury or electrical shock. 3. This appliance may occur. Serial Plate Location You will find the model and serial number printed on figure 4. Cord... through neutral) or 4 conductors. Power Supply Cord Kit (U.S.A.) The user is located as shown on the serial plate. Terminal on the appliance. Cord must have strain-relief clamp. Electrical failure or loss of a grounding strap between the neutral power supply terminal and the frame....
...which secure the factory-installed range wiring to record the serial number for future reference. 6 Connect the appliance in a fire, personal injury or electrical shock. 3. This appliance may occur. Serial Plate Location You will find the model and serial number printed on figure 4. Cord... through neutral) or 4 conductors. Power Supply Cord Kit (U.S.A.) The user is located as shown on the serial plate. Terminal on the appliance. Cord must have strain-relief clamp. Electrical failure or loss of a grounding strap between the neutral power supply terminal and the frame....
Installation Instructions (English, Spanish, French)
Page 7
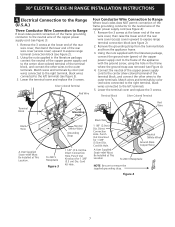
...red wires connected to the right terminal, black wires connected to the outer terminals. Remove the grounding strap from the terminal block and from the appliance frame. 3. Using the nuts supplied with the literature package, connect the ground wire (green) of the copper power supply cord to the frame ...of the appliance with the ground screw, using the hole in the literature package, connect the neutral of the copper power supply cord to the center silver-...
...red wires connected to the right terminal, black wires connected to the outer terminals. Remove the grounding strap from the terminal block and from the appliance frame. 3. Using the nuts supplied with the literature package, connect the ground wire (green) of the copper power supply cord to the frame ...of the appliance with the ground screw, using the hole in the literature package, connect the neutral of the copper power supply cord to the center silver-...
Installation Instructions (English, Spanish, French)
Page 8
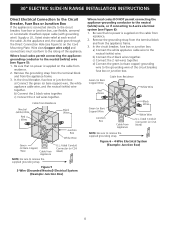
...cable from residence. 2. Figure 5 3-Wire (Grounded Neutral) Electrical System (Example: Junction Box) Where local codes DO NOT permit connecting the appliance-grounding conductor to the neutral (white) wire, or if connecting to the rating of the circuit breaker, fuse box or junction box. At the...Be sure that no power is connected directly to remove the supplied grounding strap. Remove the grounding strap from the terminal block and from Appliance U.L.-listed Conduit Connector (or CSA listed) NOTE: Be sure to the circuit breaker, fuse box or junction box, use flexible, ...
...cable from residence. 2. Figure 5 3-Wire (Grounded Neutral) Electrical System (Example: Junction Box) Where local codes DO NOT permit connecting the appliance-grounding conductor to the neutral (white) wire, or if connecting to the rating of the circuit breaker, fuse box or junction box. At the...Be sure that no power is connected directly to remove the supplied grounding strap. Remove the grounding strap from the terminal block and from Appliance U.L.-listed Conduit Connector (or CSA listed) NOTE: Be sure to the circuit breaker, fuse box or junction box, use flexible, ...
Installation Instructions (English, Spanish, French)
Page 10
... risk of the cooktop clears 11 the countertop. apart so as shown on the 8 same plane) around the 3 sides that the underside of damaging your 9 appliance, do not handle or manipulate it by lowering the front leveling legs and the back leveling wheels. Install base cabinets 30" (76.2 cm) apart. apart...
... risk of the cooktop clears 11 the countertop. apart so as shown on the 8 same plane) around the 3 sides that the underside of damaging your 9 appliance, do not handle or manipulate it by lowering the front leveling legs and the back leveling wheels. Install base cabinets 30" (76.2 cm) apart. apart...
