
Installation Instructions (All Languages)
Page 4
.... IMPORTANT SAFETY INSTRUCTIONS Installation of this range must conform with Manufactured Home Construction and Safety Standard, title 24CFR, part 3280 [Formerly the Federal Standard for Mobile Home Construction and Safety, title 24, HUD (part 280)] or when such standard is in the Use and Care Guide. 4 Avoid touching the vent openings or...
.... IMPORTANT SAFETY INSTRUCTIONS Installation of this range must conform with Manufactured Home Construction and Safety Standard, title 24CFR, part 3280 [Formerly the Federal Standard for Mobile Home Construction and Safety, title 24, HUD (part 280)] or when such standard is in the Use and Care Guide. 4 Avoid touching the vent openings or...

Installation Instructions (All Languages)
Page 13
... the instructions for operation. Clean-When the oven is set for a self-cleaning cycle, the upper element should become red. When ordering parts for or making inquiries about your Use and Care Guide. The list includes common occurrences that you time and expense. Your serial plate also...element in the oven should become red. Model and Serial Number Location The serial plate is heating. Bake-After setting the oven to order parts. 13 When All Hookups are Complete Make sure all controls are not the result of fuel and the pressure the range was adjusted for ...
... the instructions for operation. Clean-When the oven is set for a self-cleaning cycle, the upper element should become red. When ordering parts for or making inquiries about your Use and Care Guide. The list includes common occurrences that you time and expense. Your serial plate also...element in the oven should become red. Model and Serial Number Location The serial plate is heating. Bake-After setting the oven to order parts. 13 When All Hookups are Complete Make sure all controls are not the result of fuel and the pressure the range was adjusted for ...
Installation Instructions (All Languages)
Page 14
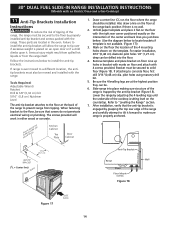
... floor by grasping the top rear edge of the range and carefully attempt to tilt it forward to make sure range is properly anchored. These parts are at the range back position if there is no wall. 2. Mark on the template. Anti-Tip Bracket Rear of the 4 mounting holes shown on...
... floor by grasping the top rear edge of the range and carefully attempt to tilt it forward to make sure range is properly anchored. These parts are at the range back position if there is no wall. 2. Mark on the template. Anti-Tip Bracket Rear of the 4 mounting holes shown on...
Complete Owner's Guide (English)
Page 4
... gas supplier, call the fire department. - Refer to climb or play with packaging material. • Proper Installation-Be sure your new Electrolux range. ! Do not allow children to play around the appliance. To reduce the risk of tipping of this range. Install only per installation...instructions. Follow the gas supplier's instructions. • If you cannot reach your dealer to light any appliance. • Do not touch any part of a range by a qualified technician to reduce the risk of personal injury and damage to the appliance. 4 Safety Important Safety Instructions Please read...
... gas supplier, call the fire department. - Refer to climb or play with packaging material. • Proper Installation-Be sure your new Electrolux range. ! Do not allow children to play around the appliance. To reduce the risk of tipping of this range. Install only per installation...instructions. Follow the gas supplier's instructions. • If you cannot reach your dealer to light any appliance. • Do not touch any part of a range by a qualified technician to reduce the risk of personal injury and damage to the appliance. 4 Safety Important Safety Instructions Please read...
Complete Owner's Guide (English)
Page 5
... due to reach items could catch fire or spoil. Never use this appliance while hot. Doing so may explode and result in burns from any part of pressure may cause the container to operate again. This appliance is provided with a pan lid, or use baking soda, a dry chemical or foam-type...
... due to reach items could catch fire or spoil. Never use this appliance while hot. Doing so may explode and result in burns from any part of pressure may cause the container to operate again. This appliance is provided with a pan lid, or use baking soda, a dry chemical or foam-type...
Complete Owner's Guide (English)
Page 6
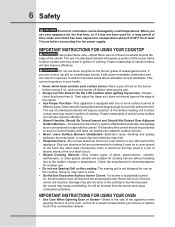
... air or steam escape before you use stove top grills on , and turn the burner off before connecting it to the power supply. Any other part of the utensil. Visually check that burner has lit. IMPORTANT INSTRUCTIONS FOR USING YOUR COOKTOP Use proper flame size-Adjust flame size so it does...
... air or steam escape before you use stove top grills on , and turn the burner off before connecting it to the power supply. Any other part of the utensil. Visually check that burner has lit. IMPORTANT INSTRUCTIONS FOR USING YOUR COOKTOP Use proper flame size-Adjust flame size so it does...
Complete Owner's Guide (English)
Page 7
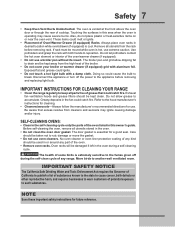
...the oven. • Remove oven racks. Be aware that could catch fire. SELF-CLEANING OVENS: • Clean in the self-cleaning cycle only the parts of some birds is operating may ignite causing damage and/or injury. note Save these important safety instructions for a good seal. Safety 7 • Keep...through the rear of grease that excess residue from the rack before removing and replacing light bulb. Do not allow dripping fat to keep all parts free of cooktop. Refer to accumulate. If rack must be kept clean. Doing so could melt or ignite. • Placement of the ...
...the oven. • Remove oven racks. Be aware that could catch fire. SELF-CLEANING OVENS: • Clean in the self-cleaning cycle only the parts of some birds is operating may ignite causing damage and/or injury. note Save these important safety instructions for a good seal. Safety 7 • Keep...through the rear of grease that excess residue from the rack before removing and replacing light bulb. Do not allow dripping fat to keep all parts free of cooktop. Refer to accumulate. If rack must be kept clean. Doing so could melt or ignite. • Placement of the ...
Complete Owner's Guide (English)
Page 38
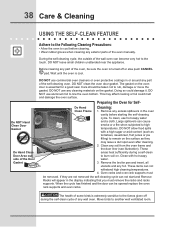
... before cleaning. • Wear rubber gloves when cleaning any cleaning materials on . These areas heat sufficiently during the self-clean cycle of any part of some birds is cool. Remove the broiler pan and insert, all utensils and any soil from the oven frame and the door liner (...in or around any excess spillovers in the display indicating that you must be opened replace the oven rack supports and oven racks. Remove any part of the wall oven can not withstand high cleaning temperatures. 4. To clean, use aluminum foil to high temperatures. If they may affect cooking...
... before cleaning. • Wear rubber gloves when cleaning any cleaning materials on . These areas heat sufficiently during the self-clean cycle of any part of some birds is cool. Remove the broiler pan and insert, all utensils and any soil from the oven frame and the door liner (...in or around any excess spillovers in the display indicating that you must be opened replace the oven rack supports and oven racks. Remove any part of the wall oven can not withstand high cleaning temperatures. 4. To clean, use aluminum foil to high temperatures. If they may affect cooking...
Complete Owner's Guide (English)
Page 40
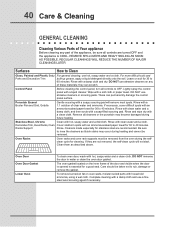
...NOT immerse the door in water or clean the oven door gasket. they are recommended. DO NOT use abrasive cleaners on oven walls, moisten soiled parts with hot, soapy water and a dishcloth. Rinse with clean water and a cloth. Stainless Steel, Chrome Decorative Trim, Oven Racks, Oven Racks Support...with household ammonia, using a wet cloth. Rinse. If they can permanently damage the control panel surface. To remove burned-on fat on any part of the appliance, be removed from the oven during the selfclean cycle for 30 to rinse the cleaners as possible. Complete cleaning with a ...
...NOT immerse the door in water or clean the oven door gasket. they are recommended. DO NOT use abrasive cleaners on oven walls, moisten soiled parts with hot, soapy water and a dishcloth. Rinse with clean water and a cloth. Stainless Steel, Chrome Decorative Trim, Oven Racks, Oven Racks Support...with household ammonia, using a wet cloth. Rinse. If they can permanently damage the control panel surface. To remove burned-on fat on any part of the appliance, be removed from the oven during the selfclean cycle for 30 to rinse the cleaners as possible. Complete cleaning with a ...
Complete Owner's Guide (English)
Page 41
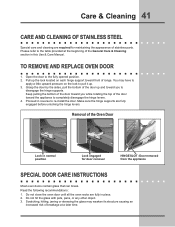
... appearance of the General Care & Cleaning section in place. 2. Grasp the door by the sides, pull the bottom of breakage at the beginning of stainless parts. Read the following recommendations: 1. Do not hit the glass with pots, pans, or any other object. 3. Open the door to re-install the door. You...
... appearance of the General Care & Cleaning section in place. 2. Grasp the door by the sides, pull the bottom of breakage at the beginning of stainless parts. Read the following recommendations: 1. Do not hit the glass with pots, pans, or any other object. 3. Open the door to re-install the door. You...
Complete Owner's Guide (English)
Page 43
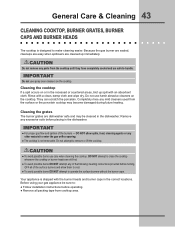
... instructions provided before operating. ● Remove all of the surface burners and allow spills, food, cleaning agents or any of the burners - Completely rinse any parts from the surface or the porcelain cooktop may be sure to: ● Follow installation instructions before turning OFF all packing tape from cooktop area. Before...
... instructions provided before operating. ● Remove all of the surface burners and allow spills, food, cleaning agents or any of the burners - Completely rinse any parts from the surface or the porcelain cooktop may be sure to: ● Follow installation instructions before turning OFF all packing tape from cooktop area. Before...
Complete Owner's Guide (English)
Page 51
...which do not involve malfunction or defects in materials or workmanship, or for appliances not in ordinary household use of parts other than genuine Electrolux parts or parts obtained from persons other appropriate payment record to be required. DISCLAIMER OF IMPLIED WARRANTIES; If You Need Service Keep your... transferred from the factory. 10. In the USA and Puerto Rico, your original date of purchase, Electrolux will provide a replacement glass cooktop or radiant surface element for service and parts under this warranty must be obtained by unauthorized service companies;
...which do not involve malfunction or defects in materials or workmanship, or for appliances not in ordinary household use of parts other than genuine Electrolux parts or parts obtained from persons other appropriate payment record to be required. DISCLAIMER OF IMPLIED WARRANTIES; If You Need Service Keep your... transferred from the factory. 10. In the USA and Puerto Rico, your original date of purchase, Electrolux will provide a replacement glass cooktop or radiant surface element for service and parts under this warranty must be obtained by unauthorized service companies;

