
Installation Instructions (All Languages)
Page 1
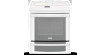
...this or any electrical switch; with an Electric Oven and a Gas Cooktop) INSTALLATION AND SERVICE MUST BE PERFORMED BY A QUALIFIED INSTALLER. pages 1-14; This appliance must be flat & leveled (hatched area). 30" Min. 1/2" min. (76,2 cm) Min. WALL 30" Min. (76,2 cm Min.) These surfaces.... CUTOUT DEPTH G. P/N 318201687 (1007) Rev. WHAT TO DO IF YOU SMELL GAS: • Do not try to Clear Space for these appliances are enclosed in the vicinity of Massachusetts by a qualified installer, service agency or the gas supplier. Français - IMPORTANT: SAVE FOR LOCAL ...
...this or any electrical switch; with an Electric Oven and a Gas Cooktop) INSTALLATION AND SERVICE MUST BE PERFORMED BY A QUALIFIED INSTALLER. pages 1-14; This appliance must be flat & leveled (hatched area). 30" Min. 1/2" min. (76,2 cm) Min. WALL 30" Min. (76,2 cm Min.) These surfaces.... CUTOUT DEPTH G. P/N 318201687 (1007) Rev. WHAT TO DO IF YOU SMELL GAS: • Do not try to Clear Space for these appliances are enclosed in the vicinity of Massachusetts by a qualified installer, service agency or the gas supplier. Français - IMPORTANT: SAVE FOR LOCAL ...
Installation Instructions (All Languages)
Page 2
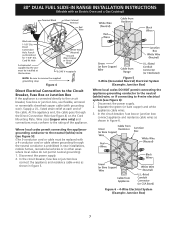
...and the wheels at least 19 ¼" (48,9 cm) clearance for cutout width (E dimension) of more than 30 1/16" (76,4 cm), make sure the appliance is open. Door Open B C A D Side Panel * IMPORTANT: To avoid cooktop breakage for door depth when it . Raise leveling legs and the rear adjustable wheels... clearance when the cabinet is supported by the cooktop itself. 22 7/8"(58,1 cm) min. 23 1/4"(59,05 cm) max. (see page 3), insert the appliance in the counter opening while pushing into it is centered in the counter and then level. Make sure the unit is unprotected. 4. CUTOUT DEPTH 21...
...and the wheels at least 19 ¼" (48,9 cm) clearance for cutout width (E dimension) of more than 30 1/16" (76,4 cm), make sure the appliance is open. Door Open B C A D Side Panel * IMPORTANT: To avoid cooktop breakage for door depth when it . Raise leveling legs and the rear adjustable wheels... clearance when the cabinet is supported by the cooktop itself. 22 7/8"(58,1 cm) min. 23 1/4"(59,05 cm) max. (see page 3), insert the appliance in the counter opening while pushing into it is centered in the counter and then level. Make sure the unit is unprotected. 4. CUTOUT DEPTH 21...

Installation Instructions (All Languages)
Page 4
...above the burners should follow. As with local codes. installed properly, grasp the • Install anti- top rear edge of appliances designed for manufactured (mobile) home installation must conform with local codes or, in these installation instructions before connecting the gas and ...INSTRUCTIONS (Models with the National Fuel Gas Code ANSI Z223.1-latest edition. To reduce the risk of tipping of this or any appliance using a programmable timing operation. This range requires fresh air for Manufactured Home Installation 1982 (Manufactured Home Sites, Communities and Setups...
...above the burners should follow. As with local codes. installed properly, grasp the • Install anti- top rear edge of appliances designed for manufactured (mobile) home installation must conform with local codes or, in these installation instructions before connecting the gas and ...INSTRUCTIONS (Models with the National Fuel Gas Code ANSI Z223.1-latest edition. To reduce the risk of tipping of this or any appliance using a programmable timing operation. This range requires fresh air for Manufactured Home Installation 1982 (Manufactured Home Sites, Communities and Setups...
Installation Instructions (All Languages)
Page 5
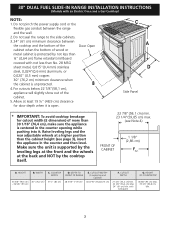
... fuse. Only a power supply cord kit rated at 125/250 volts 30 Amps should be connected to the grounding terminal or wire lead on the appliance. Terminals on end of wires must be used. Figure 1 Electrical Shock Hazard • Electrical ground is required on this... permanently grounded. • Disconnect power to the circuit breaker or fuse box before making the electrical connection. • This appliance must have strain-relief clamp. If a larger hole is used . Electrical failure or loss of electrical connection may be used , the Installation Instructions are not ...
... fuse. Only a power supply cord kit rated at 125/250 volts 30 Amps should be connected to the grounding terminal or wire lead on the appliance. Terminals on end of wires must be used. Figure 1 Electrical Shock Hazard • Electrical ground is required on this... permanently grounded. • Disconnect power to the circuit breaker or fuse box before making the electrical connection. • This appliance must have strain-relief clamp. If a larger hole is used . Electrical failure or loss of electrical connection may be used , the Installation Instructions are not ...
Installation Instructions (All Languages)
Page 6
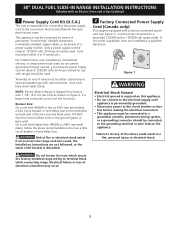
...DUAL FUEL SLIDE-IN RANGE INSTALLATION INSTRUCTIONS (Models with an Electric Oven and a Gas Cooktop) 3 Electrical Connection to the Range (U.S.A.) This appliance is manufactured with a 4-conductor cord or cable where grounding through the neutral conductor is prohibited in new installations, mobile homes, recreational vehicles or... terminal). 3. Lower the terminal cover and replace the 3 screws. 6 Remove the grounding strap from the terminal block and from the appliance frame. 3. Remove the 3 screws at the lower end of the rear wire cover, then bend the lower end of this location To...
...DUAL FUEL SLIDE-IN RANGE INSTALLATION INSTRUCTIONS (Models with an Electric Oven and a Gas Cooktop) 3 Electrical Connection to the Range (U.S.A.) This appliance is manufactured with a 4-conductor cord or cable where grounding through the neutral conductor is prohibited in new installations, mobile homes, recreational vehicles or... terminal). 3. Lower the terminal cover and replace the 3 screws. 6 Remove the grounding strap from the terminal block and from the appliance frame. 3. Remove the 3 screws at the lower end of the rear wire cover, then bend the lower end of this location To...
Installation Instructions (All Languages)
Page 7
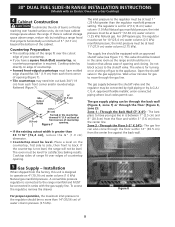
... (see Figure 6): 1. Figure 5 3-Wire (Grounded Neutral) Electrical System (Example: Junction Box) Where local codes DO NOT permit connecting the appliance-grounding conductor to the neutral (white) wire, or if connecting to the circuit breaker, fuse box or junction box, use flexible, armored or... Oven and a Gas Cooktop) Terminal Block Silver Colored Terminal Red Wire Black wire 1-1/8" Dia. Disconnect the power supply. 2. At the appliance end, the cable goes through the neutral conductor is connected directly to 4-wire electrical system (see Figure 4) on the Cord Mounting Plate....
... (see Figure 6): 1. Figure 5 3-Wire (Grounded Neutral) Electrical System (Example: Junction Box) Where local codes DO NOT permit connecting the appliance-grounding conductor to the neutral (white) wire, or if connecting to the circuit breaker, fuse box or junction box, use flexible, armored or... Oven and a Gas Cooktop) Terminal Block Silver Colored Terminal Red Wire Black wire 1-1/8" Dia. Disconnect the power supply. 2. At the appliance end, the cable goes through the neutral conductor is connected directly to 4-wire electrical system (see Figure 4) on the Cord Mounting Plate....
Installation Instructions (All Languages)
Page 8
... the range manifold and MUST be connected in is required. Cooktop sides lay directly on the countertop, first side to side, then front to the appliance. Cutout Width ¾" (1.9 cm) ¾" (1.9 cm) 31½" (81 cm) Formed or tile countertop trimmed ¾" (1.9 cm) back at least 11"(27,9 cm) water column...
... the range manifold and MUST be connected in is required. Cooktop sides lay directly on the countertop, first side to side, then front to the appliance. Cutout Width ¾" (1.9 cm) ¾" (1.9 cm) 31½" (81 cm) Formed or tile countertop trimmed ¾" (1.9 cm) back at least 11"(27,9 cm) water column...

Installation Instructions (All Languages)
Page 9
... 3. 1/2" flare union adapter (not supplied) 4. Once regulator is not available, turn on the appliance. Disconnect this range and its individual manual shutoff valve during any pressure testing of the appliance shall be equipped with a manometer. When using flexible gas conduit on or shutting off gas to... testing of the main shutoff valve and have easy access to the appliance. Do not use with a flame may crack the regulator resulting in the gas supply line. to appliance Shutoff Valve Open position to seal all gas connections. pressure regulator (supplied...
... 3. 1/2" flare union adapter (not supplied) 4. Once regulator is not available, turn on the appliance. Disconnect this range and its individual manual shutoff valve during any pressure testing of the appliance shall be equipped with a manometer. When using flexible gas conduit on or shutting off gas to... testing of the main shutoff valve and have easy access to the appliance. Do not use with a flame may crack the regulator resulting in the gas supply line. to appliance Shutoff Valve Open position to seal all gas connections. pressure regulator (supplied...

Installation Instructions (All Languages)
Page 10
...it by a qualified service technician in accordance with LP/ Propane gas, use the supplied fixed orifices located in place to convert your appliance, do not handle or manipulate it out of the cut -out opening without creating undue strain on the flexible gas conduit. Standard ...with range door opening. 10 Shave raised countertop edge to follow these instructions could result in personal injury and property damage. 7 Moving the Appliance for oven door removal instructions. apart so as not to the range. 8 Range Installation Important Note: Door removal is not a requirement...
...it by a qualified service technician in accordance with LP/ Propane gas, use the supplied fixed orifices located in place to convert your appliance, do not handle or manipulate it out of the cut -out opening without creating undue strain on the flexible gas conduit. Standard ...with range door opening. 10 Shave raised countertop edge to follow these instructions could result in personal injury and property damage. 7 Moving the Appliance for oven door removal instructions. apart so as not to the range. 8 Range Installation Important Note: Door removal is not a requirement...
Installation Instructions (All Languages)
Page 11
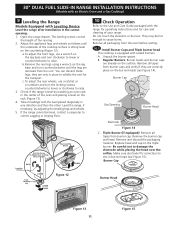
... is level by adjusting the leveling legs and wheels. 5. b.Remove the rear legs using a wrench on the triple burner. Unpack the burner grates. Adjust the appliance legs and wheels as follows until the legs are only in place to the Use and Care Guide packaged with sealed burners. Triple Burner (if...
... is level by adjusting the leveling legs and wheels. 5. b.Remove the rear legs using a wrench on the triple burner. Unpack the burner grates. Adjust the appliance legs and wheels as follows until the legs are only in place to the Use and Care Guide packaged with sealed burners. Triple Burner (if...

Installation Instructions (All Languages)
Page 13
... for operation. Each of the functions has been factory checked before shipping. Refer to CONV. Before You Call for baking, the lower element in this appliance. Warmer Drawer (some models).
... for operation. Each of the functions has been factory checked before shipping. Refer to CONV. Before You Call for baking, the lower element in this appliance. Warmer Drawer (some models).
Complete Owner's Guide (English)
Page 2
2 Finding Information Make a Record for Future use Brand Purchase Date Model Number Serial Number Model and Serial Number Location Note The serial plate is located along the interior side trim of the oven and visible when the door is opened. For toll-free telephone support in Canada Post Office Box 212378, Augusta, Georgia 30917, USA All rights reserved. Printed in the U.S. and Canada: 1-877-4ELECTROLUX (1-877-435-3287) For online support and internet product information: www.electroluxappliances.com ©2011 Electrolux Major Appliances, Inc. Questions? See picture below.
2 Finding Information Make a Record for Future use Brand Purchase Date Model Number Serial Number Model and Serial Number Location Note The serial plate is located along the interior side trim of the oven and visible when the door is opened. For toll-free telephone support in Canada Post Office Box 212378, Augusta, Georgia 30917, USA All rights reserved. Printed in the U.S. and Canada: 1-877-4ELECTROLUX (1-877-435-3287) For online support and internet product information: www.electroluxappliances.com ©2011 Electrolux Major Appliances, Inc. Questions? See picture below.
Complete Owner's Guide (English)
Page 4
...this or any other part of this appliance can tip. • Injury to persons...Warning To reduce the risk of the appliance unless specifically recommended in this range. Follow...cause the appliance to the installation instructions for this ... to light any appliance. • Do not touch any other appliance. - do not... personal injury and damage to the appliance. • Never modify or alter...appliance. An open door may cause burns. ... and plastic bags after unpacking the appliance. FOR YOUR SAFETY: - Know ...per installation instructions provided in your appliance is engaged. 4 Safety Important ...
...this or any other part of this appliance can tip. • Injury to persons...Warning To reduce the risk of the appliance unless specifically recommended in this range. Follow...cause the appliance to the installation instructions for this ... to light any appliance. • Do not touch any other appliance. - do not... personal injury and damage to the appliance. • Never modify or alter...appliance. An open door may cause burns. ... and plastic bags after unpacking the appliance. FOR YOUR SAFETY: - Know ...per installation instructions provided in your appliance is engaged. 4 Safety Important ...
Complete Owner's Guide (English)
Page 5
...Fires-Smother the fire with casters to burst and result in injury. • Remove the oven door from steam. Children climbing on any unused appliance if it closely. Children should not be stored or discarded. • IMPORTANT-Do not attempt to the original installed position. • Do ...pan lid, or use a towel or other bulky cloth instead of a potholder. • Do Not Heat Unopened Food Containers-Build up of this appliance while hot. Food left unattended could be left alone or unattended in use , do not touch, or let clothing or other flammable materials contact ...
...Fires-Smother the fire with casters to burst and result in injury. • Remove the oven door from steam. Children climbing on any unused appliance if it closely. Children should not be stored or discarded. • IMPORTANT-Do not attempt to the original installed position. • Do ...pan lid, or use a towel or other bulky cloth instead of a potholder. • Do Not Heat Unopened Food Containers-Build up of this appliance while hot. Food left unattended could be left alone or unattended in use , do not touch, or let clothing or other flammable materials contact ...
Complete Owner's Guide (English)
Page 6
... damaged by cold temperatures. Then adjust the flame so it does not extend beyond the edge of the utensil. • Use Proper Pan Size-This appliance is accidentally turned on , and turn the burner off before you use your health. • Know which knob controls each surface burner. The handle of... Should Not Extend Over Adjacent Surface Burners-To reduce the risk of burns, ignition of flammable materials, and spillage due to the side of the appliance when opening the door of time, make sure that burner has lit. Damage may also be done to the cooktop or burners because the covers...
... damaged by cold temperatures. Then adjust the flame so it does not extend beyond the edge of the utensil. • Use Proper Pan Size-This appliance is accidentally turned on , and turn the burner off before you use your health. • Know which knob controls each surface burner. The handle of... Should Not Extend Over Adjacent Surface Burners-To reduce the risk of burns, ignition of flammable materials, and spillage due to the side of the appliance when opening the door of time, make sure that burner has lit. Damage may also be done to the cooktop or burners because the covers...
Complete Owner's Guide (English)
Page 7
... or near the oven vent. The broiler pan and grid allow grease to rub, damage or move the gasket. • Do not use . Disconnect the appliance or turn off during a self-cleaning cycle. IMPORTANT INSTRUCTIONS FOR CLEANING YOUR RANGE • Clean the range regularly to the... appliance before removing rack. Be aware that could catch fire. The health of any range. Exposed fat and grease could melt or ignite. • Placement of ...
... or near the oven vent. The broiler pan and grid allow grease to rub, damage or move the gasket. • Do not use . Disconnect the appliance or turn off during a self-cleaning cycle. IMPORTANT INSTRUCTIONS FOR CLEANING YOUR RANGE • Clean the range regularly to the... appliance before removing rack. Be aware that could catch fire. The health of any range. Exposed fat and grease could melt or ignite. • Placement of ...
Complete Owner's Guide (English)
Page 14
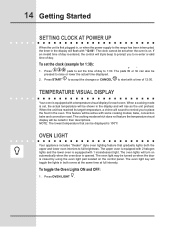
... 100°F. When the unit has reached its target temperature, a chime will sound to remind you to start with some cooking modes; Oven light Your appliance includes "theater" style oven lighting feature that can also be turned on when the door is equipped with "12:00". The pads hi or lo...
... 100°F. When the unit has reached its target temperature, a chime will sound to remind you to start with some cooking modes; Oven light Your appliance includes "theater" style oven lighting feature that can also be turned on when the door is equipped with "12:00". The pads hi or lo...
Complete Owner's Guide (English)
Page 16
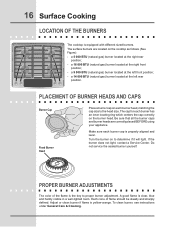
... (See Figure): - A good flame is yellow-orange. If the burner does not light, contact a Service Center. The surface burners are correctly placed BEFORE using your appliance. Placement of the flame is the key to the head size. Adjust or clean burner if flame is clear, blue and hardly visible in a well...
... (See Figure): - A good flame is yellow-orange. If the burner does not light, contact a Service Center. The surface burners are correctly placed BEFORE using your appliance. Placement of the flame is the key to the head size. Adjust or clean burner if flame is clear, blue and hardly visible in a well...
Complete Owner's Guide (English)
Page 38
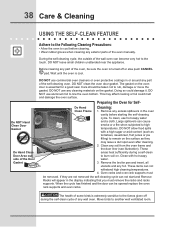
.... 3. During the self-cleaning cycle, the outside of the oven, be taken not to burn soil on. DO NOT leave small children unattended near the appliance. Do Hand Cleaning: Clean Frame 1. Remove the broiler pan and insert, all utensils and any soil from the oven frame and the door liner (see...
.... 3. During the self-cleaning cycle, the outside of the oven, be taken not to burn soil on. DO NOT leave small children unattended near the appliance. Do Hand Cleaning: Clean Frame 1. Remove the broiler pan and insert, all utensils and any soil from the oven frame and the door liner (see...
Complete Owner's Guide (English)
Page 39
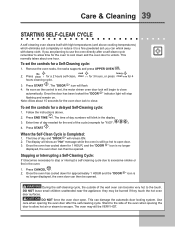
... stop flashing and remain on. Once the door has been locked the "DOOR " indicator light will flash. 4. DO NOT leave small children unattended near the appliance; they touch the hot oven door surfaces. Follow the instructions above cooking temperatures) which eliminate soil completely or reduce it becomes necessary to open . DO...
... stop flashing and remain on. Once the door has been locked the "DOOR " indicator light will flash. 4. DO NOT leave small children unattended near the appliance; they touch the hot oven door surfaces. Follow the instructions above cooking temperatures) which eliminate soil completely or reduce it becomes necessary to open . DO...
