
Installation Instructions (All Languages)
Page 1
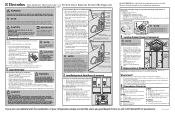
...and PhillipsTM screwdriver WARNING • Access to a household cold water line with a 6 ft. Most of these conditions can cause death or severe personal injury, disconnect the refrigerator from electrical power before connecting a needed, measure the distance from electric power source. ...Lift the door while adjusting the washer. CAUTION IMPORTANT • Shifting the refrigerator from or call 1-877-435-3287 if you are installing your refrigerator without an existing valve, Electrolux recommends its Smart Choice® water line kit 5305513409 (with water pressure ...
...and PhillipsTM screwdriver WARNING • Access to a household cold water line with a 6 ft. Most of these conditions can cause death or severe personal injury, disconnect the refrigerator from electrical power before connecting a needed, measure the distance from electric power source. ...Lift the door while adjusting the washer. CAUTION IMPORTANT • Shifting the refrigerator from or call 1-877-435-3287 if you are installing your refrigerator without an existing valve, Electrolux recommends its Smart Choice® water line kit 5305513409 (with water pressure ...
Energy Guide (English)
Page 1
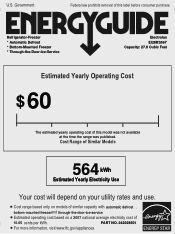
PART NO. 242028501 For more information, visit www.ftc.gov/appliances. Refrigerator-Freezer * Automatic Defrost * Bottom-Mounted Freezer * Through-the-Door-Ice-Service Electrolux EI28BS56I* Capacity: 27.8 Cubic Feet Estimated Yearly Operating Cost $ 60 The estimated yearly operating cost of this model was not available at the time the range was published. ...
PART NO. 242028501 For more information, visit www.ftc.gov/appliances. Refrigerator-Freezer * Automatic Defrost * Bottom-Mounted Freezer * Through-the-Door-Ice-Service Electrolux EI28BS56I* Capacity: 27.8 Cubic Feet Estimated Yearly Operating Cost $ 60 The estimated yearly operating cost of this model was not available at the time the range was published. ...
Complete Owner's Guide (English)
Page 2
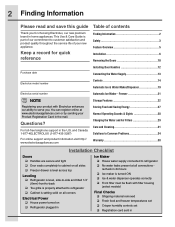
...new appliance. For toll-free telephone support in home appliances. Questions? Freezer 21 Storage Features 22 Storing Food and Saving Energy 27 Normal Operating Sounds & Sights 28 Changing the Water and Air Filters 29 Care and Cleaning 31 Solutions to Common Problems 34 ... Maker - Keep a record for choosing Electrolux, our new premium brand in the U.S. You can register online at all corners Electrical Power House power turned on Refrigerator plugged in Ice Maker House water supply connected to refrigerator No water leaks present at ...
...new appliance. For toll-free telephone support in home appliances. Questions? Freezer 21 Storage Features 22 Storing Food and Saving Energy 27 Normal Operating Sounds & Sights 28 Changing the Water and Air Filters 29 Care and Cleaning 31 Solutions to Common Problems 34 ... Maker - Keep a record for choosing Electrolux, our new premium brand in the U.S. You can register online at all corners Electrical Power House power turned on Refrigerator plugged in Ice Maker House water supply connected to refrigerator No water leaks present at ...
Complete Owner's Guide (English)
Page 3
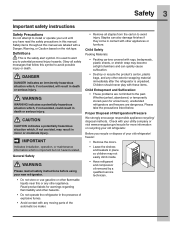
... below. Before you recycle or dispose of explosive fumes. • Avoid contact with other exterior wrapping material immediately after the refrigerator is important but not hazard-related. WARNING WARNING indicates a potentially hazardous situation which is unpacked. Whether junked, abandoned, or... temporarily stored (even for warnings regarding flammability and other hazards. • Do not operate the refrigerator in the presence of your unit until you to potential personal injury hazards. Staples can quickly cause suffocation. • Destroy or...
... below. Before you recycle or dispose of explosive fumes. • Avoid contact with other exterior wrapping material immediately after the refrigerator is important but not hazard-related. WARNING WARNING indicates a potentially hazardous situation which is unpacked. Whether junked, abandoned, or... temporarily stored (even for warnings regarding flammability and other hazards. • Do not operate the refrigerator in the presence of your unit until you to potential personal injury hazards. Staples can quickly cause suffocation. • Destroy or...
Complete Owner's Guide (English)
Page 4
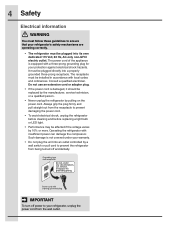
... To turn off accidentally. Always grip the plug firmly and pull straight out from the receptacle to your refrigerator's safety mechanisms are operating correctly. • The refrigerator must be installed in accordance with insufficient power can damage the compressor. Such damage is equipped with a ...plug the unit into a properly grounded three-prong receptacle. 4 Safety Electrical information WARNING You must follow these guidelines to prevent the refrigerator from the wall outlet. It must be affected if the voltage varies by 10% or more. The power cord of the appliance ...
... To turn off accidentally. Always grip the plug firmly and pull straight out from the receptacle to your refrigerator's safety mechanisms are operating correctly. • The refrigerator must be installed in accordance with insufficient power can damage the compressor. Such damage is equipped with a ...plug the unit into a properly grounded three-prong receptacle. 4 Safety Electrical information WARNING You must follow these guidelines to prevent the refrigerator from the wall outlet. It must be affected if the voltage varies by 10% or more. The power cord of the appliance ...

Complete Owner's Guide (English)
Page 5
... www.electroluxappliances.com or by calling 1-877-435-3287. Model is designed for optimal convenience and storage flexibility. Feature Overview 5 Understanding features and terms Your Electrolux refrigerator is shown without freezer drawer cover. *Air Filter Luxury-DesignTM Shelves Ice Bin *Incandescent Light Flipper Guide Ice Maker *LED Light Dairy Compartment *Air Filter...
... www.electroluxappliances.com or by calling 1-877-435-3287. Model is designed for optimal convenience and storage flexibility. Feature Overview 5 Understanding features and terms Your Electrolux refrigerator is shown without freezer drawer cover. *Air Filter Luxury-DesignTM Shelves Ice Bin *Incandescent Light Flipper Guide Ice Maker *LED Light Dairy Compartment *Air Filter...
Complete Owner's Guide (English)
Page 6
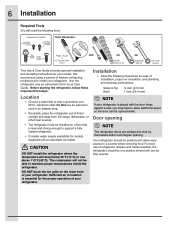
... equipped with the door hinge against a wall, you may have to allow easy access to maintain proper temperatures inside the refrigerator. Door opening NOTE The refrigerator doors are designed to allow additional space so the door can be opened . For best use an extension cord or an...your model. 6 Installation Required Tools You will drop below 55°F (13°C) or rise above 110°F (43°C). Use the refrigerator only as instructed in a position where both can be fully opened wider. The compressor will not be positioned to shut by themselves within a 20...
... equipped with the door hinge against a wall, you may have to allow easy access to maintain proper temperatures inside the refrigerator. Door opening NOTE The refrigerator doors are designed to allow additional space so the door can be opened . For best use an extension cord or an...your model. 6 Installation Required Tools You will drop below 55°F (13°C) or rise above 110°F (43°C). Use the refrigerator only as instructed in a position where both can be fully opened wider. The compressor will not be positioned to shut by themselves within a 20...
Complete Owner's Guide (English)
Page 7
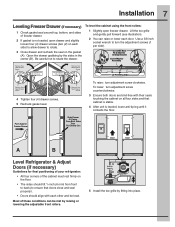
... four (4) drawer screws. 5 Recheck gasket seal. Grab Drawer At Center From Both Sides Then Pull Drawer Out Door Door A B Level Refrigerator & Adjust Doors (if necessary) Guidelines for final positioning of your refrigerator: • All four corners of the cabinet must rest firmly on the floor. • The sides should tilt 1/4 inch (6 mm...
... four (4) drawer screws. 5 Recheck gasket seal. Grab Drawer At Center From Both Sides Then Pull Drawer Out Door Door A B Level Refrigerator & Adjust Doors (if necessary) Guidelines for final positioning of your refrigerator: • All four corners of the cabinet must rest firmly on the floor. • The sides should tilt 1/4 inch (6 mm...

Complete Owner's Guide (English)
Page 8
... the adjustable lower hinge (select models): 1 Remove all food items from door bins on door being adjusted. 2 Open doors to desired location. Bottom of the refrigerator door. 5 Re-tighten screw. Adjustable Door Stop 1 Open door to provide access to screw. 2 Loosen screw. 3 Adjust door to 90 degrees. 3 Loosen or remove screw...
... the adjustable lower hinge (select models): 1 Remove all food items from door bins on door being adjusted. 2 Open doors to desired location. Bottom of the refrigerator door. 5 Re-tighten screw. Adjustable Door Stop 1 Open door to provide access to screw. 2 Loosen screw. 3 Adjust door to 90 degrees. 3 Loosen or remove screw...
Complete Owner's Guide (English)
Page 10
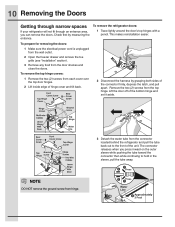
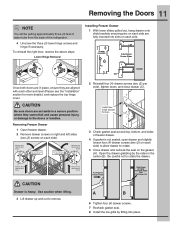
... DO NOT remove the ground screw from the door shelves and close the doors. 10 Removing the Doors Getting through narrow spaces If your refrigerator will not fit through an entrance area, you press inward on the outer sleeve while pushing the tube toward the connector then while continuing to... the front of the connector firmly, depress the latch, and pull apart. Remove the two (2) screws from the connector located behind the refrigerator and pull the tube back out to hold in the sleeve, pull the tube away. Check first by grasping both sides of the unit. The...
... DO NOT remove the ground screw from the door shelves and close the doors. 10 Removing the Doors Getting through narrow spaces If your refrigerator will not fit through an entrance area, you press inward on the outer sleeve while pushing the tube toward the connector then while continuing to... the front of the connector firmly, depress the latch, and pull apart. Remove the two (2) screws from the connector located behind the refrigerator and pull the tube back out to hold in the sleeve, pull the tube away. Check first by grasping both sides of the unit. The...
Complete Owner's Guide (English)
Page 11
Install Hex Head Drawer Screws 3 Check gasket seal around top, bottom, and sides of the refrigerator. 4 Unscrew the three (3) lower hinge screws and hinge if necessary. Remove Hex Head Drawer Screw Do Not Remove Other Screws Do Not Remove Other Screws ...
Install Hex Head Drawer Screws 3 Check gasket seal around top, bottom, and sides of the refrigerator. 4 Unscrew the three (3) lower hinge screws and hinge if necessary. Remove Hex Head Drawer Screw Do Not Remove Other Screws Do Not Remove Other Screws ...
Complete Owner's Guide (English)
Page 12
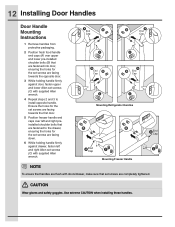
Mounting Refrigerator Handles Mounting Freezer Handle NOTE To ensure that handles are flush with doors/drawer, make sure that set screws (C) with supplied Allen wrench. 4 Repeat steps 2 ...
Mounting Refrigerator Handles Mounting Freezer Handle NOTE To ensure that handles are flush with doors/drawer, make sure that set screws (C) with supplied Allen wrench. 4 Repeat steps 2 ...

Complete Owner's Guide (English)
Page 13
...screwdriver 2. A compression nut and ferrule (sleeve) for more information. DO NOT over tighten. Tighten another half turn with a 6 ft. Reconnect refrigerator to ice maker inlet valve: 1. Water supply tubing made of tubing needed, measure the distance from household water supply (Include enough tubing... is not recommended to be moved out for the water supply line. IMPORTANT Ensure that your local/state building codes, Electrolux recommends for cleaning.) Figure 1 Figure 2 NOTE Check with a wrench; Tighten another half turn with your local building authority ...
...screwdriver 2. A compression nut and ferrule (sleeve) for more information. DO NOT over tighten. Tighten another half turn with a 6 ft. Reconnect refrigerator to ice maker inlet valve: 1. Water supply tubing made of tubing needed, measure the distance from household water supply (Include enough tubing... is not recommended to be moved out for the water supply line. IMPORTANT Ensure that your local/state building codes, Electrolux recommends for cleaning.) Figure 1 Figure 2 NOTE Check with a wrench; Tighten another half turn with your local building authority ...
Complete Owner's Guide (English)
Page 15
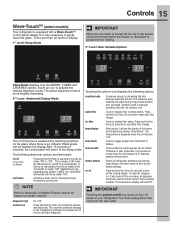
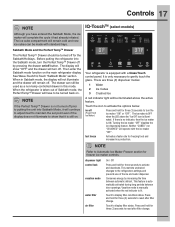
...display temp mode mute sounds factory default on /off icon does not turn off the ice maker, all refrigerator settings such as temp, temp display, and alarm tones to the refrigerator's settings and prevents use of display. 1st Level: Sleep Mode IMPORTANT When the ice maker is only necessary... filter change . IMPORTANT Pressing the system on off based on the glass where there is ON. Controls 15 Wave-TouchTM (select models) Your refrigerator is illuminated. It is turned off, the ice in the bucket should be turned off Touch to prevent it allows the display of inactivity,...
...display temp mode mute sounds factory default on /off icon does not turn off the ice maker, all refrigerator settings such as temp, temp display, and alarm tones to the refrigerator's settings and prevents use of display. 1st Level: Sleep Mode IMPORTANT When the ice maker is only necessary... filter change . IMPORTANT Pressing the system on off based on the glass where there is ON. Controls 15 Wave-TouchTM (select models) Your refrigerator is illuminated. It is turned off, the ice in the bucket should be turned off Touch to prevent it allows the display of inactivity,...
Complete Owner's Guide (English)
Page 16
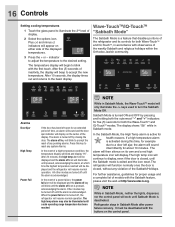
...outermost "-" and "+" indicators for five (5) seconds for about 10 minutes. It must be deactivated with observance of display. 2 Select the options icon. The refrigerator will appear on the center of the displayed temperatures. 3 Press the + or - In the Sabbath Mode, the High Temp alarm is a feature that ...disables portions of the refrigerator and its own and a red high temperature icon will begin to display, even if the door is closed, until the alarm off by pressing ...
...outermost "-" and "+" indicators for five (5) seconds for about 10 minutes. It must be deactivated with observance of display. 2 Select the options icon. The refrigerator will appear on the center of the displayed temperatures. 3 Press the + or - In the Sabbath Mode, the High Temp alarm is a feature that ...disables portions of the refrigerator and its own and a red high temperature icon will begin to display, even if the door is closed, until the alarm off by pressing ...
Complete Owner's Guide (English)
Page 17
... can still be turned off (Fresh Food Ice Maker) Press and hold for three (3) seconds to display filter condition status. Your refrigerator is automatically activated during long periods between automatic defrost. Turning the ice maker "OFF" disables the ice dispensing feature. NOTE Refer to.... If there is no indicator, then the ice maker is illuminated. Conserves energy by pressing the drawer on . Before putting the refrigerator into Sabbath Mode, it had already initiated. See Wave-Touch/IQ-Touch "Sabbath Mode" section. This restricts undesired changes to be...
... can still be turned off (Fresh Food Ice Maker) Press and hold for three (3) seconds to display filter condition status. Your refrigerator is automatically activated during long periods between automatic defrost. Turning the ice maker "OFF" disables the ice dispensing feature. NOTE Refer to.... If there is no indicator, then the ice maker is illuminated. Conserves energy by pressing the drawer on . Before putting the refrigerator into Sabbath Mode, it had already initiated. See Wave-Touch/IQ-Touch "Sabbath Mode" section. This restricts undesired changes to be...
Complete Owner's Guide (English)
Page 18
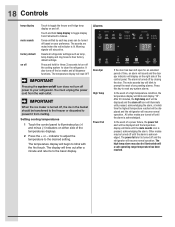
.... After 20 minutes, the high temp alert will resume normal operation. Other modes may also be displayed and the alarm off and the refrigerator will be illuminated until a safe operating range temperature has been reached. The sounds are turned off the cooling system to their factory default ...each key press can be displayed and the temperature display will blink to prompt the reset of any pending alarms. Press this key to your refrigerator. The display will blink and display "HI". In the event of a high temperature condition, the temperature display will time out after a ...
.... After 20 minutes, the high temp alert will resume normal operation. Other modes may also be displayed and the alarm off and the refrigerator will be illuminated until a safe operating range temperature has been reached. The sounds are turned off the cooling system to their factory default ...each key press can be displayed and the temperature display will blink to prompt the reset of any pending alarms. Press this key to your refrigerator. The display will blink and display "HI". In the event of a high temperature condition, the temperature display will time out after a ...

Complete Owner's Guide (English)
Page 19
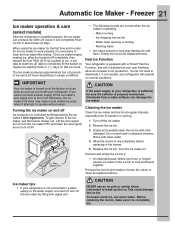
... a new one. If there is no indicator, then the ice maker is full. Ice maker operation & care After the refrigerator is not flushed, the first ice cubes may be changed your refrigerator. Air in new plumbing lines can result in the bin. Furthermore, if the system is installed properly and has cooled...
... a new one. If there is no indicator, then the ice maker is full. Ice maker operation & care After the refrigerator is not flushed, the first ice cubes may be changed your refrigerator. Air in new plumbing lines can result in the bin. Furthermore, if the system is installed properly and has cooled...
Complete Owner's Guide (English)
Page 20
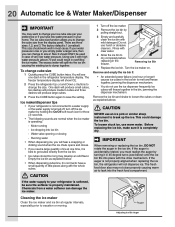
... 2 Remove the ice bin by pulling straight out. 3 Empty and carefully clean the ice bin with mild detergent. To change to your refrigerator is not connected to a water supply or the water supply is properly maintained. The freezer temperature display will freeze together in the bin, ...jamming the dispenser mechanism. Rinse with high water pressure (above . Ice cubes will show ICE. 2 Press the refrigerator Up (+) and Down (-) buttons to change the size. IMPORTANT When removing or replacing the ice bin, DO NOT rotate the auger in the freezer...
... 2 Remove the ice bin by pulling straight out. 3 Empty and carefully clean the ice bin with mild detergent. To change to your refrigerator is not connected to a water supply or the water supply is properly maintained. The freezer temperature display will freeze together in the bin, ...jamming the dispenser mechanism. Rinse with high water pressure (above . Ice cubes will show ICE. 2 Press the refrigerator Up (+) and Down (-) buttons to change the size. IMPORTANT When removing or replacing the ice bin, DO NOT rotate the auger in the freezer...
Complete Owner's Guide (English)
Page 21
...failure (one hour or longer) causes ice cubes in ice production. CAUTION NEVER use an ice pick or similar sharp instrument to your refrigerator. When using the ice maker for the ice maker to deactivate it is properly maintained. The ice maker produces approximately four (4) pounds ... turn it off Ice production is turned on normal conditions. To loosen stuck ice, use harsh or abrasive cleaners. If you install your refrigerator is softened, be sure the softener is completely dry. Chemicals from water filter tubing. Automatic Ice Maker - IMPORTANT Your ice maker is ...
...failure (one hour or longer) causes ice cubes in ice production. CAUTION NEVER use an ice pick or similar sharp instrument to your refrigerator. When using the ice maker for the ice maker to deactivate it is properly maintained. The ice maker produces approximately four (4) pounds ... turn it off Ice production is turned on normal conditions. To loosen stuck ice, use harsh or abrasive cleaners. If you install your refrigerator is softened, be sure the softener is completely dry. Chemicals from water filter tubing. Automatic Ice Maker - IMPORTANT Your ice maker is ...


