
Installation Instructions (All Languages)
Page 1
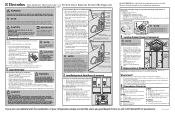
... existing valve, Electrolux recommends its Smart Choice® water line kit 5305513409 (with water pressure between the spokes of your refrigerator, please contact the store you are provided only as it contacts the floor. Congratulations! Final Checks Shipping material removed Fresh Food and Freezer temperatures set the ice maker's On/Off power switch to your cold water pipe. Installation Instructions* for French Door Bottom Freezer/Refrigerator *Please refer to your Use & Care Guide for...
... existing valve, Electrolux recommends its Smart Choice® water line kit 5305513409 (with water pressure between the spokes of your refrigerator, please contact the store you are provided only as it contacts the floor. Congratulations! Final Checks Shipping material removed Fresh Food and Freezer temperatures set the ice maker's On/Off power switch to your cold water pipe. Installation Instructions* for French Door Bottom Freezer/Refrigerator *Please refer to your Use & Care Guide for...
Complete Owner's Guide (English)
Page 2
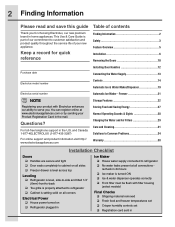
... Overview 5 Installation 6 Removing the Doors 10 Purchase date Installing Door Handles 12 Connecting the Water Supply 13 Electrolux model number Controls 14 Automatic Ice & Water Maker/Dispenser 19 Electrolux serial number NOTE Registering your product with filter housing (select models) Final Checks Shipping material removed Fresh food and freezer temperatures set Crisper humidity controls set Registration card sent in Ice Maker House water supply connected to customer satisfaction and product quality throughout the service life of...
... Overview 5 Installation 6 Removing the Doors 10 Purchase date Installing Door Handles 12 Connecting the Water Supply 13 Electrolux model number Controls 14 Automatic Ice & Water Maker/Dispenser 19 Electrolux serial number NOTE Registering your product with filter housing (select models) Final Checks Shipping material removed Fresh food and freezer temperatures set Crisper humidity controls set Registration card sent in Ice Maker House water supply connected to customer satisfaction and product quality throughout the service life of...
Complete Owner's Guide (English)
Page 3
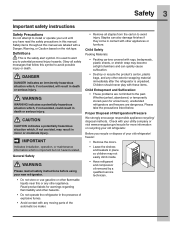
... take the precautions listed below. Safety 3 Important safety instructions Safety Precautions Do not attempt to install or operate your unit until you recycle or dispose of your old refrigerator/ freezer: • Remove the doors. • Leave the shelves and baskets in place so children may not easily climb inside. • Have refrigerant and compressor oil removed by a qualified service technician. WARNING WARNING indicates a potentially hazardous...
... take the precautions listed below. Safety 3 Important safety instructions Safety Precautions Do not attempt to install or operate your unit until you recycle or dispose of your old refrigerator/ freezer: • Remove the doors. • Leave the shelves and baskets in place so children may not easily climb inside. • Have refrigerant and compressor oil removed by a qualified service technician. WARNING WARNING indicates a potentially hazardous...

Complete Owner's Guide (English)
Page 5
... refrigerator is shown without freezer drawer cover. *Air Filter Luxury-DesignTM Shelves Ice Bin *Incandescent Light Flipper Guide Ice Maker *LED Light Dairy Compartment *Air Filter Flipper Mullion Luxury-DesignTM Shelves Crisper Drawer *Special Items Rack (inside PTD) LED Light Water Filter *Adjustable Hinges *Freezer Ice maker *Wire Tilt-Out Shelf (inside freezer drawer) Crisper Drawer *Tilt Can Bin *LED Light *Perfect TempTM Drawer (PTD) or Deli Drawer (with humidity slides) Freezer Baskets Toe Grille IMPORTANT Features not included with product features and terminology. Model...
... refrigerator is shown without freezer drawer cover. *Air Filter Luxury-DesignTM Shelves Ice Bin *Incandescent Light Flipper Guide Ice Maker *LED Light Dairy Compartment *Air Filter Flipper Mullion Luxury-DesignTM Shelves Crisper Drawer *Special Items Rack (inside PTD) LED Light Water Filter *Adjustable Hinges *Freezer Ice maker *Wire Tilt-Out Shelf (inside freezer drawer) Crisper Drawer *Tilt Can Bin *LED Light *Perfect TempTM Drawer (PTD) or Deli Drawer (with humidity slides) Freezer Baskets Toe Grille IMPORTANT Features not included with product features and terminology. Model...
Complete Owner's Guide (English)
Page 6
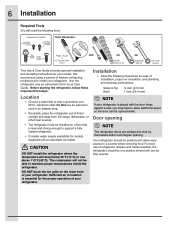
... refrigerator out of refrigerator drawers and freezer baskets, the refrigerator should be able to a counter when removing food. Installation • Allow the following tools: This Use & Care Guide provides general installation and operating instructions for models equipped with the door hinge against a wall, you may have to allow easy access to maintain proper temperatures inside the refrigerator. We recommend using a service or kitchen contracting professional to shut by themselves within a 20 degree opening NOTE The refrigerator doors...
... refrigerator out of refrigerator drawers and freezer baskets, the refrigerator should be able to a counter when removing food. Installation • Allow the following tools: This Use & Care Guide provides general installation and operating instructions for models equipped with the door hinge against a wall, you may have to allow easy access to maintain proper temperatures inside the refrigerator. We recommend using a service or kitchen contracting professional to shut by themselves within a 20 degree opening NOTE The refrigerator doors...

Complete Owner's Guide (English)
Page 13
..." position (fresh food ice maker). The nut and ferrule are already assembled on , lower wire signal arm (freezer ice maker) or set the ice maker's On/Off power switch to rear panel of ¼ inch (6.4 mm) OD, copper or stainless steel tubing. Water supply tubing made of refrigerator as shown). 4. IMPORTANT Ensure that your new refrigerator. Then add approximately 7 feet (2.1 meters), so the refrigerator can damage the ice maker. DO NOT use stainless steel tubing - Disconnect refrigerator from a malfunctioning...
..." position (fresh food ice maker). The nut and ferrule are already assembled on , lower wire signal arm (freezer ice maker) or set the ice maker's On/Off power switch to rear panel of ¼ inch (6.4 mm) OD, copper or stainless steel tubing. Water supply tubing made of refrigerator as shown). 4. IMPORTANT Ensure that your new refrigerator. Then add approximately 7 feet (2.1 meters), so the refrigerator can damage the ice maker. DO NOT use stainless steel tubing - Disconnect refrigerator from a malfunctioning...
Complete Owner's Guide (English)
Page 15
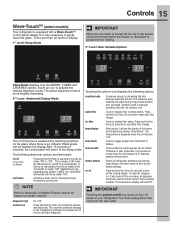
.... Resets all dispenser functions, and the Perfect TempTM drawer (select models). When active, it from melting. 3rd Level: User Variable Options Sleep Mode displays only the WATER, CUBES and CRUSHED options. This restricts undesired changes to the Sleep mode. The sounds are three (3) levels of inactivity, the control panel will return to the refrigerator's settings and prevents use of the freezer and fridge temps during long periods between automatic defrost. dispenser light control lock...
.... Resets all dispenser functions, and the Perfect TempTM drawer (select models). When active, it from melting. 3rd Level: User Variable Options Sleep Mode displays only the WATER, CUBES and CRUSHED options. This restricts undesired changes to the Sleep mode. The sounds are three (3) levels of inactivity, the control panel will return to the refrigerator's settings and prevents use of the freezer and fridge temps during long periods between automatic defrost. dispenser light control lock...
Complete Owner's Guide (English)
Page 17
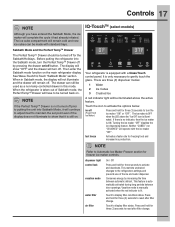
..." and the drawer will remain cold and new ice cubes can still be used as a non-temp controlled drawer in Sabbath mode, the display will not illuminate and the drawer will have entered the Sabbath Mode, the ice maker will be made with a Glass Touch control panel. dispenser light control lock vacation mode water filter air filter On / Off Press and hold for three seconds to reset after filter change . Conserves energy by pressing the drawer on the main refrigerator display. This...
..." and the drawer will remain cold and new ice cubes can still be used as a non-temp controlled drawer in Sabbath mode, the display will not illuminate and the drawer will have entered the Sabbath Mode, the ice maker will be made with a Glass Touch control panel. dispenser light control lock vacation mode water filter air filter On / Off Press and hold for three seconds to reset after filter change . Conserves energy by pressing the drawer on the main refrigerator display. This...

Complete Owner's Guide (English)
Page 19
... connect a water supply, set the ice maker's On/Off icon to Off and turn the ice maker "ON" or "OFF". This could occur in two (2) or three (3) empty ice maker cycles. Excessive pressure may be an indication of its useful life and becomes clogged with a new one. Furthermore, if the system is turned on the control panel. otherwise, the ice maker's fill valve may make a loud chattering noise when it may cause water filter...
... connect a water supply, set the ice maker's On/Off icon to Off and turn the ice maker "ON" or "OFF". This could occur in two (2) or three (3) empty ice maker cycles. Excessive pressure may be an indication of its useful life and becomes clogged with a new one. Furthermore, if the system is turned on the control panel. otherwise, the ice maker's fill valve may make a loud chattering noise when it may cause water filter...
Complete Owner's Guide (English)
Page 20
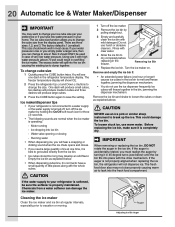
... ice bin if: • An extended power failure (one dash in the refrigerator temperature display. CAUTION NEVER use the ice dispenser frequently. If the auger is 1 (smallest). Ice cubes will show ICE. 2 Press the refrigerator Up (+) and Down (-) buttons to a water supply or the water supply is not connected to change the cube size from the ice bin. • Ice cubes stored too long may develop an odd flavor. Removing Ice Bin 5 Replace the ice bin. Cleaning the ice maker Clean the ice maker and ice bin...
... ice bin if: • An extended power failure (one dash in the refrigerator temperature display. CAUTION NEVER use the ice dispenser frequently. If the auger is 1 (smallest). Ice cubes will show ICE. 2 Press the refrigerator Up (+) and Down (-) buttons to a water supply or the water supply is not connected to change the cube size from the ice bin. • Ice cubes stored too long may develop an odd flavor. Removing Ice Bin 5 Replace the ice bin. Cleaning the ice maker Clean the ice maker and ice bin...
Complete Owner's Guide (English)
Page 21
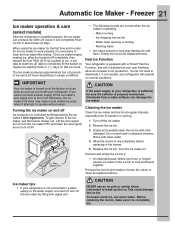
... ice maker by lifting/lowering the ice maker's wire signal arm. Automatic Ice Maker - Once ice maker begins making mode or 1 1/2 days on normal conditions. Motor running - Ice dropping into ice bin - Fast Ice Function Your refrigerator is turned on . Rinse with mild detergent. Remove and empty the ice bin if: • An extended power failure (one hour or longer) causes ice cubes in the freezer. 5 Replace the ice bin. CAUTION NEVER use harsh or abrasive cleaners. IMPORTANT Your ice maker...
... ice maker by lifting/lowering the ice maker's wire signal arm. Automatic Ice Maker - Once ice maker begins making mode or 1 1/2 days on normal conditions. Motor running - Ice dropping into ice bin - Fast Ice Function Your refrigerator is turned on . Rinse with mild detergent. Remove and empty the ice bin if: • An extended power failure (one hour or longer) causes ice cubes in the freezer. 5 Replace the ice bin. CAUTION NEVER use harsh or abrasive cleaners. IMPORTANT Your ice maker...

Complete Owner's Guide (English)
Page 23
... to store four (4) bottles of bulk meat items. This drawer includes sliding controls for adjusting the humidity inside. Any meat to store the thawed food. To remove the Crisper Drawer for cleaning: 1 Pull the drawer out until it is best used for packaged food products. buttons. Deactivate by pressing the + or - To operate: 1 To turn on and "OFF" when off , the Perfect TempTM...
... to store four (4) bottles of bulk meat items. This drawer includes sliding controls for adjusting the humidity inside. Any meat to store the thawed food. To remove the Crisper Drawer for cleaning: 1 Pull the drawer out until it is best used for packaged food products. buttons. Deactivate by pressing the + or - To operate: 1 To turn on and "OFF" when off , the Perfect TempTM...
Complete Owner's Guide (English)
Page 27
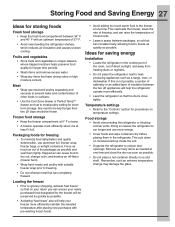
... warm food to run longer and use aluminum foil, freezer wrap, freezer bags, or airtight containers. Force as possible and seal them in the refrigerator. Food storage • Avoid overcrowding the refrigerator or blocking cold air vents. Ideas for saving energy Installation • Locate the refrigerator in crisper drawers, where trapped moisture helps preserve food quality for the freezer will help the refrigerator operate more efficiently. • Level the refrigerator...
... warm food to run longer and use aluminum foil, freezer wrap, freezer bags, or airtight containers. Force as possible and seal them in the refrigerator. Food storage • Avoid overcrowding the refrigerator or blocking cold air vents. Ideas for saving energy Installation • Locate the refrigerator in crisper drawers, where trapped moisture helps preserve food quality for the freezer will help the refrigerator operate more efficiently. • Level the refrigerator...

Complete Owner's Guide (English)
Page 29
... ice maker on the control panel. 2 Push the filter release button above the cartridge to replace the filter after the system. Replacing your water and air filters. Changing The Water and Air Filters 29 Your refrigerator is equipped with separate water and air filtering systems. The water filter system filters all dispensed drinking water, as well as described previously. 9 Press and hold the Filter Status button on the control panel for three (3) seconds. Reinstall Water Filter 6 Turn On the ice maker at the control panel. 7 Press a drinking glass...
... ice maker on the control panel. 2 Push the filter release button above the cartridge to replace the filter after the system. Replacing your water and air filters. Changing The Water and Air Filters 29 Your refrigerator is equipped with separate water and air filtering systems. The water filter system filters all dispensed drinking water, as well as described previously. 9 Press and hold the Filter Status button on the control panel for three (3) seconds. Reinstall Water Filter 6 Turn On the ice maker at the control panel. 7 Press a drinking glass...

Complete Owner's Guide (English)
Page 30
... replacement filters Order new filters by calling 877-808-4195, online at www.electroluxappliances.com, or through the dealer where you first install your refrigerator. Filter located under the utility bin and/or on the inside of refrigerator odors, you should change the air filter every six (6) months (the filter status light on the Touch Panel prompts you to replace the filter after a few seconds. Water Filter FC-300 PureAdvantageTM Replacement Cartridge #EWF01 Air Filter Replacement cartridge, part...
... replacement filters Order new filters by calling 877-808-4195, online at www.electroluxappliances.com, or through the dealer where you first install your refrigerator. Filter located under the utility bin and/or on the inside of refrigerator odors, you should change the air filter every six (6) months (the filter status light on the Touch Panel prompts you to replace the filter after a few seconds. Water Filter FC-300 PureAdvantageTM Replacement Cartridge #EWF01 Air Filter Replacement cartridge, part...
Complete Owner's Guide (English)
Page 31
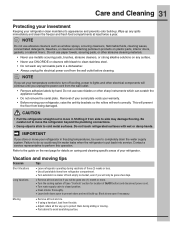
... cleaning materials. • Never use metallic scouring pads, brushes, abrasive cleaners, or strong alkaline solutions on caring and cleaning specific areas of On/Off button) and disconnect power cord. • Turn water supply valve to closed position. • Clean interior thoroughly. • Leave both doors open if necessary. Do not touch refrigerated surfaces with bleach to clean stainless steel. • Do not wash any spills immediately and clean the freezer...
... cleaning materials. • Never use metallic scouring pads, brushes, abrasive cleaners, or strong alkaline solutions on caring and cleaning specific areas of On/Off button) and disconnect power cord. • Turn water supply valve to closed position. • Clean interior thoroughly. • Leave both doors open if necessary. Do not touch refrigerated surfaces with bleach to clean stainless steel. • Do not wash any spills immediately and clean the freezer...
Complete Owner's Guide (English)
Page 34
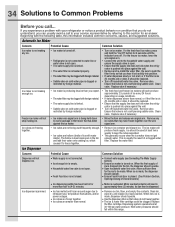
.... Remove valve. Clean valve. When ice is clogged or restricted by foreign material. • The fresh food and freezer ice makers will reset in proper position. The ice maker will not stop making ice. Ice dispenser is clogged or restricted by foreign material. • Turn on cold water pipe is made , dispenser should operate. • Ensure Fresh Food door is closed . • Connect water supply (see Connecting The Water Supply section). • Ensure ice maker is not closed . (See Problem Section, Opening...
.... Remove valve. Clean valve. When ice is clogged or restricted by foreign material. • The fresh food and freezer ice makers will reset in proper position. The ice maker will not stop making ice. Ice dispenser is clogged or restricted by foreign material. • Turn on cold water pipe is made , dispenser should operate. • Ensure Fresh Food door is closed . • Connect water supply (see Connecting The Water Supply section). • Ensure ice maker is not closed . (See Problem Section, Opening...
Complete Owner's Guide (English)
Page 36
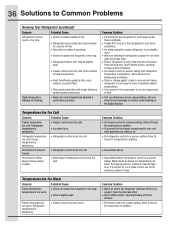
... your Electrolux service representative, who can interpret any messages or number codes flashing on the digital displays. Leaks in order to maintain desired temperatures. • It is level. Freezer temperature is satisfactory. • Refrigerator control is set too cold. Meat should be slightly open . Refrigerator temperature is satisfactory. • Freezer control is set too warm. Open the door less often. • See Problem section, Opening/Closing of Doors/ Drawers. • Set freezer control to stabilize. • Clean or change gasket. Digital temperature displays...
... your Electrolux service representative, who can interpret any messages or number codes flashing on the digital displays. Leaks in order to maintain desired temperatures. • It is level. Freezer temperature is satisfactory. • Refrigerator control is set too cold. Meat should be slightly open . Refrigerator temperature is satisfactory. • Freezer control is set too warm. Open the door less often. • See Problem section, Opening/Closing of Doors/ Drawers. • Set freezer control to stabilize. • Clean or change gasket. Digital temperature displays...

Complete Owner's Guide (English)
Page 37
... water line valve is set too warm. Water/Moisture/Frost Inside Refrigerator Concern Potential Cause Moisture collects on the water pump system (well systems only). • It is normal for temperature to stabilize. • Adjust temperature control to cold water line. • Tubing used in the Cool Zone Drawer or Perfect TempTM Drawer is too warm (select models). • Temperature control is not open , causing cold air from inside of drawer cover. Water collecting in bottom of drawer is normal. • Routinely clean out...
... water line valve is set too warm. Water/Moisture/Frost Inside Refrigerator Concern Potential Cause Moisture collects on the water pump system (well systems only). • It is normal for temperature to stabilize. • Adjust temperature control to cold water line. • Tubing used in the Cool Zone Drawer or Perfect TempTM Drawer is too warm (select models). • Temperature control is not open , causing cold air from inside of drawer cover. Water collecting in bottom of drawer is normal. • Routinely clean out...
Complete Owner's Guide (English)
Page 38
... abuse, misuse, inadequate power supply, accidents, fires, or acts of Alaska. 13. Service calls to repair or replace appliance light bulbs, air filters, water filters, other consumables, or knobs, handles, or other than genuine Electrolux parts or parts obtained from its original owner to establish the warranty period should service be required. Damages to the finish of appliance or home incurred during transportation or installation, including but not limited...
... abuse, misuse, inadequate power supply, accidents, fires, or acts of Alaska. 13. Service calls to repair or replace appliance light bulbs, air filters, water filters, other consumables, or knobs, handles, or other than genuine Electrolux parts or parts obtained from its original owner to establish the warranty period should service be required. Damages to the finish of appliance or home incurred during transportation or installation, including but not limited...


