
Use and Care Manual
Page 2
...3 Electrical information 3 Installation 4 Location 4 Installation 4 Installation clearances 4 Door opening 4 Guidelines for final positioning of your refrigerator 4 Removing The Doors 6 Getting through narrow spaces 6 Installing Door Handles 8 Door Handle Mounting Instructions 8 Connecting The Water Supply 9 About your...& certification results 21 To replace your PureAdvantageTM water filter 21 Storing Food & Saving Energy 22 Ideas for storing foods 22 Ideas for choosing Electrolux, our new premium brand in home appliances. You can register online at www.electroluxusa.com ...
...3 Electrical information 3 Installation 4 Location 4 Installation 4 Installation clearances 4 Door opening 4 Guidelines for final positioning of your refrigerator 4 Removing The Doors 6 Getting through narrow spaces 6 Installing Door Handles 8 Door Handle Mounting Instructions 8 Connecting The Water Supply 9 About your...& certification results 21 To replace your PureAdvantageTM water filter 21 Storing Food & Saving Energy 22 Ideas for storing foods 22 Ideas for choosing Electrolux, our new premium brand in home appliances. You can register online at www.electroluxusa.com ...
Use and Care Manual
Page 3
...outlet controlled by a qualified service technician. Read product labels for warnings regarding flammability and other exterior wrapping material immediately after the refrigerator is not covered under your protection against electrical shock hazards. The power cord of the automatic ice maker. • Remove ...Hz., AConly electric outlet. Do not use gasoline, or other flammable liquids, near this or any risk. • Never unplug the refrigerator by pulling on the power cord. Staples can damage the compressor. Whether junked, abandoned or temporarily stored (even for your warranty. ...
...outlet controlled by a qualified service technician. Read product labels for warnings regarding flammability and other exterior wrapping material immediately after the refrigerator is not covered under your protection against electrical shock hazards. The power cord of the automatic ice maker. • Remove ...Hz., AConly electric outlet. Do not use gasoline, or other flammable liquids, near this or any risk. • Never unplug the refrigerator by pulling on the power cord. Staples can damage the compressor. Whether junked, abandoned or temporarily stored (even for your warranty. ...
Use and Care Manual
Page 4
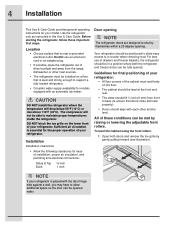
... • Choose a place that is essential for models equipped with an automatic ice maker. Do Not use of drawers and freezer baskets, the refrigerator should be in this Use & Care Guide. Installation Installation clearances Door opening . All of direct sunlight and away from front to back (to ...ensure that is placed with each other heat sources. • The refrigerator must rest firmly on the floor. • The cabinet should be level at the front and rear. • The sides should tilt ¼...
... • Choose a place that is essential for models equipped with an automatic ice maker. Do Not use of drawers and freezer baskets, the refrigerator should be in this Use & Care Guide. Installation Installation clearances Door opening . All of direct sunlight and away from front to back (to ...ensure that is placed with each other heat sources. • The refrigerator must rest firmly on the floor. • The cabinet should be level at the front and rear. • The sides should tilt ¼...

Use and Care Manual
Page 5
... the adjustment screw clockwise. (See illustration.) 3 After leveling, verify door stop contacts lower hinge. To level the doors using the lower hinge: 1 If the refrigerator door is lower than the freezer door, raise the refrigerator door by turning the adjustment screw clockwise. (See illustration.) 2 If the freezer door is lower than the...
... the adjustment screw clockwise. (See illustration.) 3 After leveling, verify door stop contacts lower hinge. To level the doors using the lower hinge: 1 If the refrigerator door is lower than the freezer door, raise the refrigerator door by turning the adjustment screw clockwise. (See illustration.) 2 If the freezer door is lower than the...
Use and Care Manual
Page 6
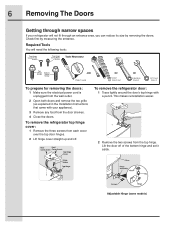
...: 1 Trace lightly around the door's top hinge with your refrigerator will need the following tools: Top Hinge Cover Front Screw Top Hinge Cover Rear Screw Tools Necessary: Top Hinge Screw Bottom Hinge Screw AND Phillips&#... from the wall outlet. 2 Open both doors and remove the toe grille (as explained in the Installation Instructions that came with a pencil. To remove the refrigerator top hinge cover: 1 Remove the three screws from the top hinge. Check first by removing the doors.
...: 1 Trace lightly around the door's top hinge with your refrigerator will need the following tools: Top Hinge Cover Front Screw Top Hinge Cover Rear Screw Tools Necessary: Top Hinge Screw Bottom Hinge Screw AND Phillips&#... from the wall outlet. 2 Open both doors and remove the toe grille (as explained in the Installation Instructions that came with a pencil. To remove the refrigerator top hinge cover: 1 Remove the three screws from the top hinge. Check first by removing the doors.
Use and Care Manual
Page 7
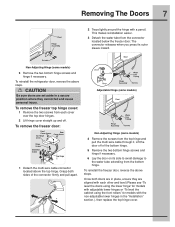
... the lower hinge" for models with adjustable lower hinges or "To level the cabinet using the front rollers" for models with a pencil. To reinstall the refrigerator door, reverse the above steps. CAUTION Be sure doors are set aside in a secure position where they are in place, ensure they cannot fall and...
... the lower hinge" for models with adjustable lower hinges or "To level the cabinet using the front rollers" for models with a pencil. To reinstall the refrigerator door, reverse the above steps. CAUTION Be sure doors are set aside in a secure position where they are in place, ensure they cannot fall and...
Use and Care Manual
Page 8
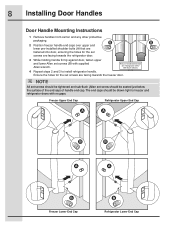
...caps should be seated just below the surface of the end cap) of handle end cap. Freezer Upper End Cap Refrigerator Upper End Cap A A B B A A B Freezer Lower End Cap B Refrigerator Lower End Cap 8 Installing Door Handles Door Handle Mounting Instructions 1 Remove handles from carton and any other protective ...the freezer door. Ensure the holes for the set screw should be tightened and sub-flush (Allen set screws are facing towards the refrigerator door. 3 While holding handle firmly against door, fasten upper and lower Allen set screws (B) with no gaps. NOTE All set screws...
...caps should be seated just below the surface of the end cap) of handle end cap. Freezer Upper End Cap Refrigerator Upper End Cap A A B B A A B Freezer Lower End Cap B Refrigerator Lower End Cap 8 Installing Door Handles Door Handle Mounting Instructions 1 Remove handles from carton and any other protective ...the freezer door. Ensure the holes for the set screw should be tightened and sub-flush (Allen set screws are facing towards the refrigerator door. 3 While holding handle firmly against door, fasten upper and lower Allen set screws (B) with no gaps. NOTE All set screws...
Use and Care Manual
Page 9
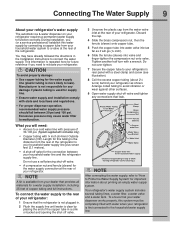
...Access to leak). Manufacturer is not responsible for any connections that your water dispenser works properly, this tubing is first connected to your refrigerator's rear panel with a wrench. Do not use a self-piercing shut-off valve for a water supply installation, including 25 feet of...Tube Steel Clamp Brass Compression Nut Ferrule (Sleeve) Copper water line Water Valve Bracket Valve Inlet Water Valve Copper water line from your refrigerator. Your refrigerator's water supply system includes several tubing lines, a water filter, a water valve and a water tank. What you (or a ...
...Access to leak). Manufacturer is not responsible for any connections that your water dispenser works properly, this tubing is first connected to your refrigerator's rear panel with a wrench. Do not use a self-piercing shut-off valve for a water supply installation, including 25 feet of...Tube Steel Clamp Brass Compression Nut Ferrule (Sleeve) Copper water line Water Valve Bracket Valve Inlet Water Valve Copper water line from your refrigerator. Your refrigerator's water supply system includes several tubing lines, a water filter, a water valve and a water tank. What you (or a ...
Use and Care Manual
Page 10
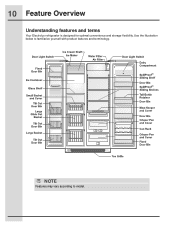
NOTE Features may vary according to familiarize yourself with product features and terminology. Use the illustration below to model. 10 Feature Overview Understanding features and terms Your Electrolux refrigerator is designed for optimal convenience and storage flexibility.
NOTE Features may vary according to familiarize yourself with product features and terminology. Use the illustration below to model. 10 Feature Overview Understanding features and terms Your Electrolux refrigerator is designed for optimal convenience and storage flexibility.
Use and Care Manual
Page 12
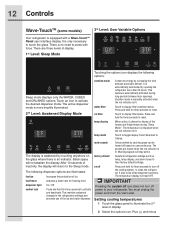
...desired dispenser mode. Touch an icon to touch the glass. The following options: vacation mode water filter Conserves energy by opening the refrigerator door after 24 hours. It is automatically deactivated by increasing the time between door openings. Touch to display filter status. You must...to press with a Wave-TouchTM Panel user interface display. 12 Controls Wave-TouchTM (some models) 3rd Level: User Variable Options Your refrigerator is equipped with force. There is no need to Celsius. Black space will stay active. Touching the options icon displays the following ...
...desired dispenser mode. Touch an icon to touch the glass. The following options: vacation mode water filter Conserves energy by opening the refrigerator door after 24 hours. It is automatically deactivated by increasing the time between door openings. Touch to display filter status. You must...to press with a Wave-TouchTM Panel user interface display. 12 Controls Wave-TouchTM (some models) 3rd Level: User Variable Options Your refrigerator is equipped with force. There is no need to Celsius. Black space will stay active. Touching the options icon displays the following ...
Use and Care Manual
Page 13
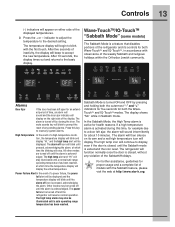
... be illuminated until pressed, acknowledging the alarm, at which time the blinking will stop. All other modes are turned off and the refrigerator will resume normal operation. Other modes may also be displayed and the temperature display will blink until the alarm off icon will blink... to a door left open for about 10 minutes. The display shows "Sb" while in accordance with observance of the Sabbath/Holidays. The refrigerator will function normally once the door is closed , until the alarm is turned off until a normal safe range operating temperature has been reached...
... be illuminated until pressed, acknowledging the alarm, at which time the blinking will stop. All other modes are turned off and the refrigerator will resume normal operation. Other modes may also be displayed and the temperature display will blink until the alarm off icon will blink... to a door left open for about 10 minutes. The display shows "Sb" while in accordance with observance of the Sabbath/Holidays. The refrigerator will function normally once the door is closed , until the alarm is turned off until a normal safe range operating temperature has been reached...
Use and Care Manual
Page 14
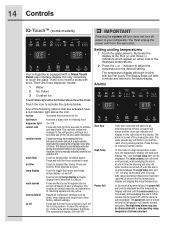
...Touch Panel user interface display. Any of the displayed temperatures. 2 Press the + or - vacation mode Conserves energy by opening the refrigerator door after a minute and returns to activate and deactivate. This feature is turned off by each keypress can be illuminated above the icon... been reached. The power fail alert is automatically activated during long periods between automatic defrost. This restricts undesired changes to the refrigerators settings and prevents use of ice fast freeze Activates a faster rate for freezing food dispenser light On / Off control lock ...
...Touch Panel user interface display. Any of the displayed temperatures. 2 Press the + or - vacation mode Conserves energy by opening the refrigerator door after a minute and returns to activate and deactivate. This feature is turned off by each keypress can be illuminated above the icon... been reached. The power fail alert is automatically activated during long periods between automatic defrost. This restricts undesired changes to the refrigerators settings and prevents use of ice fast freeze Activates a faster rate for freezing food dispenser light On / Off control lock ...
Use and Care Manual
Page 15
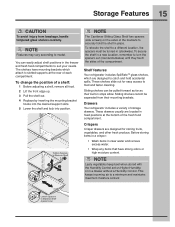
...located in fixed positions at the rear of the brackets to slotted supports at the bottom of the compartment. Shelf features Your refrigerator includes SpillSafeTM glass shelves, which attach to securely hold accidental spills. These shelves slide out for storing fruits, vegetables, and...shelves carefully. NOTE Features may vary according to a different location, the spacers must be pulled forward as far as their mounting brackets. Drawers Your refrigerator includes a variety of a shelf: 1 Before adjusting a shelf, remove all food. 2 Lift the front edge up. 3 Pull the shelf out...
...located in fixed positions at the rear of the brackets to slotted supports at the bottom of the compartment. Shelf features Your refrigerator includes SpillSafeTM glass shelves, which attach to securely hold accidental spills. These shelves slide out for storing fruits, vegetables, and...shelves carefully. NOTE Features may vary according to a different location, the spacers must be pulled forward as far as their mounting brackets. Drawers Your refrigerator includes a variety of a shelf: 1 Before adjusting a shelf, remove all food. 2 Lift the front edge up. 3 Pull the shelf out...
Use and Care Manual
Page 17
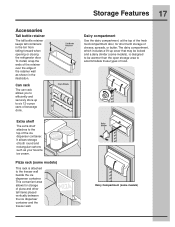
It allows storage of both round and rectangular cartons such as shown in the bin from falling forward when opening or closing the refrigerator door. Dairy Compartment (some models), is attached to the freezer wall beside the ice dispenser container. The dairy compartment, which includes a lift-up to the ...
It allows storage of both round and rectangular cartons such as shown in the bin from falling forward when opening or closing the refrigerator door. Dairy Compartment (some models), is attached to the freezer wall beside the ice dispenser container. The dairy compartment, which includes a lift-up to the ...
Use and Care Manual
Page 18
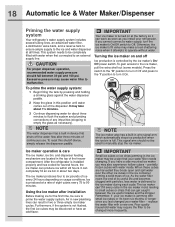
...every 24 hours depending on and off the water flow after installation Before making ice for the first time, be sure to be changed your refrigerator. Furthermore, if the system is turned on at a rate of the dispenser. As the water filter nears the end of the freezer compartment...signal arm should fall between the ice ejector blades and the stripper. 18 Automatic Ice & Water Maker/Dispenser Priming the water supply system Your refrigerator's water supply system includes several hours, the ice maker can get caught between 30 psi and 100 psi. To reset this position until water...
...every 24 hours depending on and off the water flow after installation Before making ice for the first time, be sure to be changed your refrigerator. Furthermore, if the system is turned on at a rate of the dispenser. As the water filter nears the end of the freezer compartment...signal arm should fall between the ice ejector blades and the stripper. 18 Automatic Ice & Water Maker/Dispenser Priming the water supply system Your refrigerator's water supply system includes several hours, the ice maker can get caught between 30 psi and 100 psi. To reset this position until water...
Use and Care Manual
Page 19
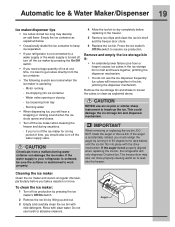
...see below . • Occasionally shake the ice container to keep ice separated. • If your refrigerator is softened, be sure the softener is not properly aligned when replacing the ice bin, the refrigerator will freeze together in the bin, jamming the dispenser mechanism. Cleaning the ice maker Clean the ice... ice bin shelf and the freezer door chute. 6 Replace the ice bin. Water valve opening or closing - If the water supply to your refrigerator is not connected to get cubes directly from the ice container. • The following sounds are normal when the ice maker is turned off,...
...see below . • Occasionally shake the ice container to keep ice separated. • If your refrigerator is softened, be sure the softener is not properly aligned when replacing the ice bin, the refrigerator will freeze together in the bin, jamming the dispenser mechanism. Cleaning the ice maker Clean the ice... ice bin shelf and the freezer door chute. 6 Replace the ice bin. Water valve opening or closing - If the water supply to your refrigerator is not connected to get cubes directly from the ice container. • The following sounds are normal when the ice maker is turned off,...
Use and Care Manual
Page 20
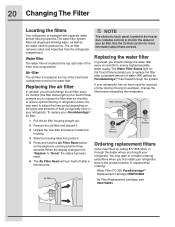
... status light on the Touch Panel prompts you to replace the filter after a standard amount of food you should change the filter before reinstalling the refrigerator. 1 Pull the air filter housing straight out. 2 Remove the old filter and discard it. 3 Unpack the new filter and place it inside... of the fresh food compartment. You may want to the water filter. To replace your air filter. When the display changes from the refrigerator compartment. Here is located at the top right side of your PureAdvantageTM air filter: NOTE The electronic touch panel, located at the top...
... status light on the Touch Panel prompts you to replace the filter after a standard amount of food you should change the filter before reinstalling the refrigerator. 1 Pull the air filter housing straight out. 2 Remove the old filter and discard it. 3 Unpack the new filter and place it inside... of the fresh food compartment. You may want to the water filter. To replace your air filter. When the display changes from the refrigerator compartment. Here is located at the top right side of your PureAdvantageTM air filter: NOTE The electronic touch panel, located at the top...
Use and Care Manual
Page 22
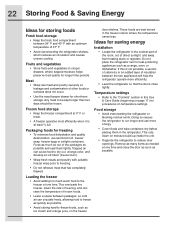
...freeze foods, such as ice cream and orange juice, on the freezer door shelves. Ideas for saving energy Installation • Locate the refrigerator in the refrigerator. Temperature settings • Refer to the "Controls" section in this is at one time and close tightly. This cuts down on...• Avoid adding too much air out of insulation between the two appliances will help the refrigerator operate more energy. • Cover foods and wipe containers dry before placing them tightly. 22 Storing Food & Saving Energy Ideas for storing foods Fresh food storage • Keep the fresh...
...freeze foods, such as ice cream and orange juice, on the freezer door shelves. Ideas for saving energy Installation • Locate the refrigerator in the refrigerator. Temperature settings • Refer to the "Controls" section in this is at one time and close tightly. This cuts down on...• Avoid adding too much air out of insulation between the two appliances will help the refrigerator operate more energy. • Cover foods and wipe containers dry before placing them tightly. 22 Storing Food & Saving Energy Ideas for storing foods Fresh food storage • Keep the fresh...
Use and Care Manual
Page 23
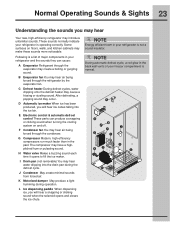
...L Ice dispensing paddle When dispensing ice, you may hear Your new, high-efficiency refrigerator may introduce unfamiliar sounds. Following is a list of major components in the back wall vents of your refrigerator is not a sound insulator. The compressor may occur. I Drain pan (not removable... onto the defrost heater may make these sounds more noticeable. G Compressor Modern, high-efficiency compressors run much faster than in your refrigerator and the sounds they can produce a snapping or clicking sound when turning the cooling system on floors, walls, and kitchen cabinets ...
...L Ice dispensing paddle When dispensing ice, you may hear Your new, high-efficiency refrigerator may introduce unfamiliar sounds. Following is a list of major components in the back wall vents of your refrigerator is not a sound insulator. The compressor may occur. I Drain pan (not removable... onto the defrost heater may make these sounds more noticeable. G Compressor Modern, high-efficiency compressors run much faster than in your refrigerator and the sounds they can produce a snapping or clicking sound when turning the cooling system on floors, walls, and kitchen cabinets ...
Use and Care Manual
Page 24
...labels by hand. Shifting it . Failure to clean stainless steel. • Do not wash any removable parts in water leaks when the refrigerator is put back into service. When cleaning, take the following precautions: • Never use metallic scouring pads, brushes, abrasive cleaners or ...strong alkaline solutions on caring and cleaning specific areas of your refrigerator clean maintains appearance and prevents odor build-up any surface. • Never use razor blades or other electrical components will continue until...
...labels by hand. Shifting it . Failure to clean stainless steel. • Do not wash any removable parts in water leaks when the refrigerator is put back into service. When cleaning, take the following precautions: • Never use metallic scouring pads, brushes, abrasive cleaners or ...strong alkaline solutions on caring and cleaning specific areas of your refrigerator clean maintains appearance and prevents odor build-up any surface. • Never use razor blades or other electrical components will continue until...


