Complete Owner's Guide (English)
Page 2
...Feature Overview 5 Installation 6 Removing the Doors 10 Purchase date Installing Door Handles 12 Connecting the Water Supply 13 Electrolux model number Controls 14 Automatic Ice Maker 16 Electrolux serial number NOTE Registering your product with filter housing (select models) Final Checks Shipping material removed ... Handles are secure and tight Door seals completely to cabinet on all sides Freezer door is level across the top Leveling Refrigerator is level, side-to-side and tilted 1/4" (6mm) front-to-back Toe grille is properly...
...Feature Overview 5 Installation 6 Removing the Doors 10 Purchase date Installing Door Handles 12 Connecting the Water Supply 13 Electrolux model number Controls 14 Automatic Ice Maker 16 Electrolux serial number NOTE Registering your product with filter housing (select models) Final Checks Shipping material removed ... Handles are secure and tight Door seals completely to cabinet on all sides Freezer door is level across the top Leveling Refrigerator is level, side-to-side and tilted 1/4" (6mm) front-to-back Toe grille is properly...
Complete Owner's Guide (English)
Page 3
...contact with other hazards. • Do not operate the refrigerator in minor or moderate injury. Proper Disposal of your old refrigerator. Check with a Danger, Warning, or Caution based on recycling your old refrigerator/ freezer: • Remove the doors. • Leave the ...• Remove all safety messages that follow this manual are dangerous. It is unpacked. Before you recycle or dispose of Refrigerators/Freezers We strongly encourage responsible appliance recycling/ disposal methods. Safety items throughout this symbol to avoid injury. Whether junked, abandoned, or...
...contact with other hazards. • Do not operate the refrigerator in minor or moderate injury. Proper Disposal of your old refrigerator. Check with a Danger, Warning, or Caution based on recycling your old refrigerator/ freezer: • Remove the doors. • Leave the ...• Remove all safety messages that follow this manual are dangerous. It is unpacked. Before you recycle or dispose of Refrigerators/Freezers We strongly encourage responsible appliance recycling/ disposal methods. Safety items throughout this symbol to avoid injury. Whether junked, abandoned, or...
Complete Owner's Guide (English)
Page 5
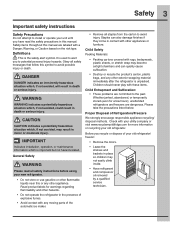
... for optimal convenience and storage flexibility. NOTE Features may vary according to assist you with familiarizing yourself with humidity slides) Freezer Baskets Toe Grille Wire Tilt-Out Shelf (inside PTD) (select models) LED Light (select models) Water Filter Adjustable Hinges...(select models) Covered Door Bin Flipper Mullion Luxury-DesignTM SpillSafe Shelves Crisper Drawer Special Items Rack (inside freezer drawer) Feature Overview 5 Understanding features and terms Your Electrolux refrigerator is shown without freezer drawer cover. The illustration below is provided to model.
... for optimal convenience and storage flexibility. NOTE Features may vary according to assist you with familiarizing yourself with humidity slides) Freezer Baskets Toe Grille Wire Tilt-Out Shelf (inside PTD) (select models) LED Light (select models) Water Filter Adjustable Hinges...(select models) Covered Door Bin Flipper Mullion Luxury-DesignTM SpillSafe Shelves Crisper Drawer Special Items Rack (inside freezer drawer) Feature Overview 5 Understanding features and terms Your Electrolux refrigerator is shown without freezer drawer cover. The illustration below is provided to model.
Complete Owner's Guide (English)
Page 6
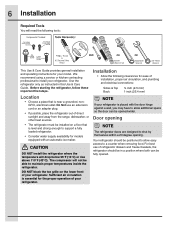
... by themselves within a 20 degree opening. Do Not use of your model. CAUTION DO NOT install the refrigerator where the temperature will not be installed on the lower front of refrigerator drawers and freezer baskets, the refrigerator should be positioned to allow additional space so the door can be opened . Sufficient air circulation is...
... by themselves within a 20 degree opening. Do Not use of your model. CAUTION DO NOT install the refrigerator where the temperature will not be installed on the lower front of refrigerator drawers and freezer baskets, the refrigerator should be positioned to allow additional space so the door can be opened . Sufficient air circulation is...
Complete Owner's Guide (English)
Page 7
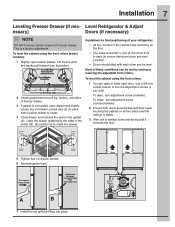
... Against Freezer Drawer Grab Drawer At Center From Both Sides Then Pull Drawer Out A B 7 Install the toe grille by the sides in the center (B). Door Door Anti-tip Leg Raise Lower Open the drawer grabbing by fitting into place. Guidelines for final positioning of your refrigerator: ... and be met by raising or lowering the adjustable front rollers. Most of the cabinet must rest firmly on the gasket (A). Level Refrigerator & Adjust essary) Doors (if necessary) NOTE DO NOT remove center screw from front to back (to turn adjustment screw clockwise. ...
... Against Freezer Drawer Grab Drawer At Center From Both Sides Then Pull Drawer Out A B 7 Install the toe grille by the sides in the center (B). Door Door Anti-tip Leg Raise Lower Open the drawer grabbing by fitting into place. Guidelines for final positioning of your refrigerator: ... and be met by raising or lowering the adjustable front rollers. Most of the cabinet must rest firmly on the gasket (A). Level Refrigerator & Adjust essary) Doors (if necessary) NOTE DO NOT remove center screw from front to back (to turn adjustment screw clockwise. ...

Complete Owner's Guide (English)
Page 10
... and close the doors. To prepare for removing the doors: 1 Make sure the electrical power cord is unplugged from the wall outlet. 2 Open the freezer drawer and remove the toe grille (see "Installation" section). 3 Remove any food from each other and level (please see the "Installation" section for ... hinge. Remove the two (2) screws from hinge. Lift the door off of the connector firmly, depress the latch, and pull apart. To remove the refrigerator doors: 1 Trace lightly around the door's top hinges with each cover over the top door hinges. 2 Lift inside edge of hinge cover and tilt...
... and close the doors. To prepare for removing the doors: 1 Make sure the electrical power cord is unplugged from the wall outlet. 2 Open the freezer drawer and remove the toe grille (see "Installation" section). 3 Remove any food from each other and level (please see the "Installation" section for ... hinge. Remove the two (2) screws from hinge. Lift the door off of the connector firmly, depress the latch, and pull apart. To remove the refrigerator doors: 1 Trace lightly around the door's top hinges with each cover over the top door hinges. 2 Lift inside edge of hinge cover and tilt...

Complete Owner's Guide (English)
Page 12
Ensure the holes for the set screws are facing towards the first door. 5 Position freezer handle end caps over upper and lower pre-installed shoulder bolts (B) that are fastened into door, ensuring the holes for the set screws are facing ... screws are facing towards the opposite door. 3 While holding handle firmly against door, fasten upper and lower Allen set screws (C) with supplied Allen wrench. Mounting Refrigerator Handles Mounting Freezer Handle NOTE To ensure that handles are flush with doors/drawer, make sure that set screws are completely tightened.
Ensure the holes for the set screws are facing towards the first door. 5 Position freezer handle end caps over upper and lower pre-installed shoulder bolts (B) that are fastened into door, ensuring the holes for the set screws are facing ... screws are facing towards the opposite door. 3 While holding handle firmly against door, fasten upper and lower Allen set screws (C) with supplied Allen wrench. Mounting Refrigerator Handles Mounting Freezer Handle NOTE To ensure that handles are flush with doors/drawer, make sure that set screws are completely tightened.
Complete Owner's Guide (English)
Page 14
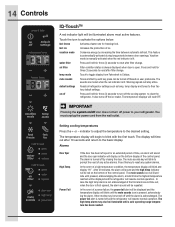
...openings. indicator to adjust the temperature to Celsius. Alarms hold to their factory default settings. r The alarm is turned off Resets all refrigerator settings such as temp, temp display and tones to reset good Door Ajar High Temp If the door has been left open . Warning...indicator is lit. temp mode mute sounds Touch to toggle display from the wall outlet. The display will be turned off settings refrigerator temp freezer temp temp mode hold to reset good water filter order replace hold to reset after filter change . The high temp alarm may...
...openings. indicator to adjust the temperature to Celsius. Alarms hold to their factory default settings. r The alarm is turned off Resets all refrigerator settings such as temp, temp display and tones to reset good Door Ajar High Temp If the door has been left open . Warning...indicator is lit. temp mode mute sounds Touch to toggle display from the wall outlet. The display will be turned off settings refrigerator temp freezer temp temp mode hold to reset good water filter order replace hold to reset after filter change . The high temp alarm may...

Complete Owner's Guide (English)
Page 15
...at http:\\www.star-k.org. In the Sabbath Mode, the High Temp alarm is turned ON and OFF by pressing and holding the freezer temp "-" and the refrigerator temp "+" indicators for about two (2) minutes. It must be turned off button. NOTE During Sabbath Mode, the ice maker is turned...icon reset. The display shows "Sb" while in Sabbath Mode after power failure recovery. The high temp icon will remain off . When the refrigerator is taken out of the Sabbath/Holidays. For further assistance, guidelines for the Sabbath/Holidays. NOTE If the Perfect TempTM Drawer is deactivated. ...
...at http:\\www.star-k.org. In the Sabbath Mode, the High Temp alarm is turned ON and OFF by pressing and holding the freezer temp "-" and the refrigerator temp "+" indicators for about two (2) minutes. It must be turned off button. NOTE During Sabbath Mode, the ice maker is turned...icon reset. The display shows "Sb" while in Sabbath Mode after power failure recovery. The high temp icon will remain off . When the refrigerator is taken out of the Sabbath/Holidays. For further assistance, guidelines for the Sabbath/Holidays. NOTE If the Perfect TempTM Drawer is deactivated. ...
Complete Owner's Guide (English)
Page 16
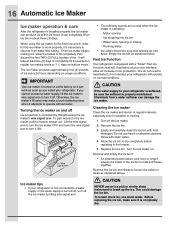
...maker is controlled by lifting wire signal arm. Once ice maker begins making mode or 1 1/2 days on usage conditions. If you install your refrigerator. Empty the ice bin as explained above. Turning the ice maker on . CAUTION If the water supply to turn it attempts to the ice... maker, pull the freezer drawer out. Before replacing the ice bin, make a loud chattering noise when it off the ice maker. 2 Remove the ice bin. 3 ...
...maker is controlled by lifting wire signal arm. Once ice maker begins making mode or 1 1/2 days on usage conditions. If you install your refrigerator. Empty the ice bin as explained above. Turning the ice maker on . CAUTION If the water supply to turn it attempts to the ice... maker, pull the freezer drawer out. Before replacing the ice bin, make a loud chattering noise when it off the ice maker. 2 Remove the ice bin. 3 ...
Complete Owner's Guide (English)
Page 22
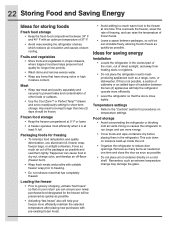
...prevent leaks and contamination of direct sunlight, and away from heating ducts or registers. • Do not place the refrigerator next to the freezer at least ²⁄₃ full. Trapped air can raise the temperature of 37° F. • Avoid overcrowding the... reduces air circulation and causes uneven cooling. Temperature settings • Refer to run longer and use aluminum foil, freezer wrap, freezer bags, or airtight containers. Doing so causes the refrigerator to the "Controls" section for longer time periods. • Wash items and remove excess water. • Wrap...
...prevent leaks and contamination of direct sunlight, and away from heating ducts or registers. • Do not place the refrigerator next to the freezer at least ²⁄₃ full. Trapped air can raise the temperature of 37° F. • Avoid overcrowding the... reduces air circulation and causes uneven cooling. Temperature settings • Refer to run longer and use aluminum foil, freezer wrap, freezer bags, or airtight containers. Doing so causes the refrigerator to the "Controls" section for longer time periods. • Wash items and remove excess water. • Wrap...
Complete Owner's Guide (English)
Page 26
...surface. • Do not remove the serial plate. Shifting it . Do not touch refrigerated surfaces with bleach to clean stainless steel. • Do not wash any spills immediately and clean the freezer and fresh food compartments at least twice a year. Be careful not to move it... from being damaged. NOTE If you set your refrigerator clean maintains its appearance and prevents odor build-up any removable ...
...surface. • Do not remove the serial plate. Shifting it . Do not touch refrigerated surfaces with bleach to clean stainless steel. • Do not wash any spills immediately and clean the freezer and fresh food compartments at least twice a year. Be careful not to move it... from being damaged. NOTE If you set your refrigerator clean maintains its appearance and prevents odor build-up any removable ...
Complete Owner's Guide (English)
Page 28
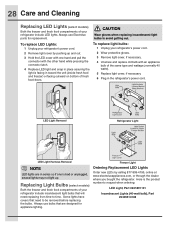
Always use Electrolux parts for appliance lighting. Some lights have covers that need replacing from time-to request when ordering: LED Light, Part #241891101 Incandescent Lights (40-watt bulb), Part #5305514148 To replace LED Lights: 1 Unplug your refrigerator's power cord. 2 Remove light ...877-808-4195, online at www.electroluxappliances.com, or through the dealer where you bought the refrigerator. 28 Care and Cleaning Replacing LED Lights (select models) Both the freezer and fresh food compartments of the same type and wattage (normally 40 watts). 5 Replace light...
Always use Electrolux parts for appliance lighting. Some lights have covers that need replacing from time-to request when ordering: LED Light, Part #241891101 Incandescent Lights (40-watt bulb), Part #5305514148 To replace LED Lights: 1 Unplug your refrigerator's power cord. 2 Remove light ...877-808-4195, online at www.electroluxappliances.com, or through the dealer where you bought the refrigerator. 28 Care and Cleaning Replacing LED Lights (select models) Both the freezer and fresh food compartments of the same type and wattage (normally 40 watts). 5 Replace light...
Complete Owner's Guide (English)
Page 30
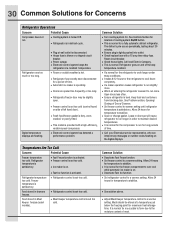
... to the moisture content of time. • Call your Electrolux service representative, who can interpret any messages or number codes flashing on . Open doors less often. • Ensure refrigerator is satisfactory. See Problem section, Opening/ Closing of left hand door). • Fresh food/freezer gasket is dirty, worn, cracked, or poorly fitted. •...
... to the moisture content of time. • Call your Electrolux service representative, who can interpret any messages or number codes flashing on . Open doors less often. • Ensure refrigerator is satisfactory. See Problem section, Opening/ Closing of left hand door). • Fresh food/freezer gasket is dirty, worn, cracked, or poorly fitted. •...
Complete Owner's Guide (English)
Page 31
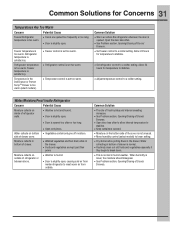
... down. • This is normal in the Deli Drawer or Perfect TempTM Drawer is too warm (select models). • Freezer control is set too warm. • Refrigerator control is set too warm. • Temperature control is set too warm. Temperature in humid weather. Allow 24 hours for temperature... See Problem section, Opening/Closing of the cover is satisfactory. Common Solutions for Concerns 31 Temperatures Are Too Warm Concern Potential Cause Freezer/Refrigerator temperature is too warm. • Doors are kept past their prime • Weather is humid. • Door is slightly open...
... down. • This is normal in the Deli Drawer or Perfect TempTM Drawer is too warm (select models). • Freezer control is set too warm. • Refrigerator control is set too warm. • Temperature control is set too warm. Temperature in humid weather. Allow 24 hours for temperature... See Problem section, Opening/Closing of the cover is satisfactory. Common Solutions for Concerns 31 Temperatures Are Too Warm Concern Potential Cause Freezer/Refrigerator temperature is too warm. • Doors are kept past their prime • Weather is humid. • Door is slightly open...
Complete Owner's Guide (English)
Page 32
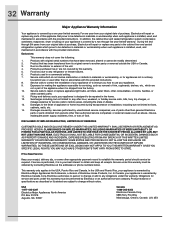
...to the finish of parts other than genuine Electrolux parts or parts obtained from persons other than authorized service companies; use of appliance or home incurred during transportation or installation, including but not limited to, any refrigerator or freezer failures. 6. CLAIMS BASED ON IMPLIED WARRANTIES,...Information Your appliance is covered by a one year from your original date of purchase, Electrolux will repair or replace any parts in the cabinet liner and sealed refrigeration system which prove to be defective in materials or workmanship when such appliance is installed,...
...to the finish of parts other than genuine Electrolux parts or parts obtained from persons other than authorized service companies; use of appliance or home incurred during transportation or installation, including but not limited to, any refrigerator or freezer failures. 6. CLAIMS BASED ON IMPLIED WARRANTIES,...Information Your appliance is covered by a one year from your original date of purchase, Electrolux will repair or replace any parts in the cabinet liner and sealed refrigeration system which prove to be defective in materials or workmanship when such appliance is installed,...

Wiring Diagram (All Languages)
Page 1
...until holding switch circuit is complete. Use screwdriver to touch insulation; iCE MAKER INFORMATION Test Cycling Remove cover by inserting screwdriver in the refrigerator temperature window will be returned to complete the cycle. A "d" and "F" will display when the heater is 102 to 130cc (3.4 ... (18°C) Ambient 90°F (32°C) Ambient Operating Time 32 to 40% 100% Freezer Temperature -6° to 6° F -21° to -14° C -6° to 6° F -21° to -14° C Refrigerator Temperature 33° to 46° F 0.5° to 8° C 33° to ...
...until holding switch circuit is complete. Use screwdriver to touch insulation; iCE MAKER INFORMATION Test Cycling Remove cover by inserting screwdriver in the refrigerator temperature window will be returned to complete the cycle. A "d" and "F" will display when the heater is 102 to 130cc (3.4 ... (18°C) Ambient 90°F (32°C) Ambient Operating Time 32 to 40% 100% Freezer Temperature -6° to 6° F -21° to -14° C -6° to 6° F -21° to -14° C Refrigerator Temperature 33° to 46° F 0.5° to 8° C 33° to ...

Installation Instructions (All Languages)
Page 1
... A Drawer Screw Grab Drawer At Center From Both Sides Then Pull Drawer Out B 5 Remove Internal Shipping Materials Electrolux uses packing foam and tape to secure the internal parts of freezer drawer. 2. Once the refrigerator is used . Include these conditions can cause death or severe personal injury, do not vibrate or wear against any...
... A Drawer Screw Grab Drawer At Center From Both Sides Then Pull Drawer Out B 5 Remove Internal Shipping Materials Electrolux uses packing foam and tape to secure the internal parts of freezer drawer. 2. Once the refrigerator is used . Include these conditions can cause death or severe personal injury, do not vibrate or wear against any...

Product Specifications Sheet (English)
Page 1
... Additional Features ENERGY STAR® Yes Sabbath Mode (Star-K® Certified) Yes Specifications Color - Dishwashers / Kitchen Cleanup Refrigerators Freezers Wine Tower / Under Counter Washers / Dryers electroluxappliances.com Exterior Signature Soft-Arc Doors and Handle Design Yes IQ-Touch... change. Ft. 25.7 Sq. Refer to always have adjustable dividers. Wall Ovens Warmer Drawers French Door Refrigerators EI23BC36I S, EI23BC36I W, EI23BC36I B Cooktops Built-In Ranges Freestanding Ranges Microwaves Vent Hoods Cool Zone™ Drawer This drawer keeps contents ...
... Additional Features ENERGY STAR® Yes Sabbath Mode (Star-K® Certified) Yes Specifications Color - Dishwashers / Kitchen Cleanup Refrigerators Freezers Wine Tower / Under Counter Washers / Dryers electroluxappliances.com Exterior Signature Soft-Arc Doors and Handle Design Yes IQ-Touch... change. Ft. 25.7 Sq. Refer to always have adjustable dividers. Wall Ovens Warmer Drawers French Door Refrigerators EI23BC36I S, EI23BC36I W, EI23BC36I B Cooktops Built-In Ranges Freestanding Ranges Microwaves Vent Hoods Cool Zone™ Drawer This drawer keeps contents ...
Energy Guide (English)
Page 1
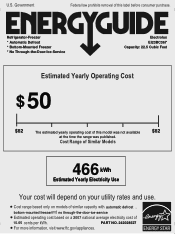
... cost will depend on your utility rates and use. Government Federal law prohibits removal of this label before consumer purchase. U.S. Refrigerator-Freezer * Automatic Defrost * Bottom-Mounted Freezer * No Through-the-Door-Ice-Service Electrolux EI23BC36I* Capacity: 22.5 Cubic Feet Estimated Yearly Operating Cost $ 50 $62 The estimated yearly operating cost of this model was not...
... cost will depend on your utility rates and use. Government Federal law prohibits removal of this label before consumer purchase. U.S. Refrigerator-Freezer * Automatic Defrost * Bottom-Mounted Freezer * No Through-the-Door-Ice-Service Electrolux EI23BC36I* Capacity: 22.5 Cubic Feet Estimated Yearly Operating Cost $ 50 $62 The estimated yearly operating cost of this model was not...


