Complete Owner's Guide (English)
Page 2
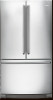
... register online at all connections Ice maker is part of our commitment to serve you for quick reference Finding Information 2 Safety 3 Feature Overview 5 Installation 6 Removing the Doors 10 Purchase date Installing Door Handles 12 Connecting the Water Supply 13 Electrolux model number Controls 14 Automatic Ice Maker 16 Electrolux serial number NOTE Registering your product with filter housing (select models) Final Checks Shipping material removed Fresh food and freezer temperatures set and Canada: 1-877-4ELECTROLUX...
... register online at all connections Ice maker is part of our commitment to serve you for quick reference Finding Information 2 Safety 3 Feature Overview 5 Installation 6 Removing the Doors 10 Purchase date Installing Door Handles 12 Connecting the Water Supply 13 Electrolux model number Controls 14 Automatic Ice Maker 16 Electrolux serial number NOTE Registering your product with filter housing (select models) Final Checks Shipping material removed Fresh food and freezer temperatures set and Canada: 1-877-4ELECTROLUX...
Complete Owner's Guide (English)
Page 3
... not attempt to install or operate your old refrigerator/ freezer: • Remove the doors. • Leave the shelves and baskets in place so children may not easily climb inside. • Have refrigerant and compressor oil removed by a qualified service technician. DANGER DANGER indicates an imminently hazardous situation which is unpacked. Child Safety Packing Materials: • Packing cartons covered with rugs, bedspreads, plastic sheets, or stretch...
... not attempt to install or operate your old refrigerator/ freezer: • Remove the doors. • Leave the shelves and baskets in place so children may not easily climb inside. • Have refrigerant and compressor oil removed by a qualified service technician. DANGER DANGER indicates an imminently hazardous situation which is unpacked. Child Safety Packing Materials: • Packing cartons covered with rugs, bedspreads, plastic sheets, or stretch...
Complete Owner's Guide (English)
Page 6
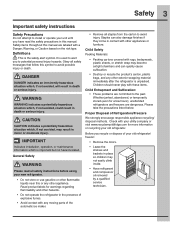
... and electrical connections: Sides & Top Back ³⁄₈ inch (9.5 mm) 1 inch (25.4 mm) NOTE If your model. Installation • Allow the following tools: This Use & Care Guide provides general installation and operating instructions for models equipped with the door hinge against a wall, you may have to allow easy access to shut by themselves within a 20 degree opening NOTE The refrigerator doors are designed to a counter when removing food. Door opening...
... and electrical connections: Sides & Top Back ³⁄₈ inch (9.5 mm) 1 inch (25.4 mm) NOTE If your model. Installation • Allow the following tools: This Use & Care Guide provides general installation and operating instructions for models equipped with the door hinge against a wall, you may have to allow easy access to shut by themselves within a 20 degree opening NOTE The refrigerator doors are designed to a counter when removing food. Door opening...
Complete Owner's Guide (English)
Page 13
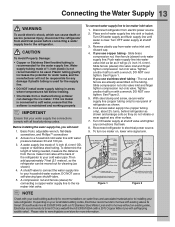
... working properly. Before installing the water supply line, you use stainless steel tubing - The nut and ferrule are already assembled on , lower wire signal arm. Please refer to your new refrigerator. Disconnect refrigerator from water valve inlet and discard cap. 4. Tighten another half turn ice maker on the tubing. To determine the length of tubing needed, measure the distance from electrical power before connecting a water supply line to a household cold water line with self-tapping saddle valve). Turn ON water supply at shutoff valve. 3. To turn...
... working properly. Before installing the water supply line, you use stainless steel tubing - The nut and ferrule are already assembled on , lower wire signal arm. Please refer to your new refrigerator. Disconnect refrigerator from water valve inlet and discard cap. 4. Tighten another half turn ice maker on the tubing. To determine the length of tubing needed, measure the distance from electrical power before connecting a water supply line to a household cold water line with self-tapping saddle valve). Turn ON water supply at shutoff valve. 3. To turn...
Complete Owner's Guide (English)
Page 14
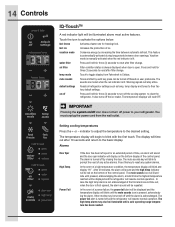
... between automatic defrost. fast freeze Activates a faster rate for an extended period of ice on defau off the ice maker. IMPORTANT Pressing the system on/off icon does not turn off the cooling system to clean the refrigerator. 14 Controls press & hold on default off settings refrigerator temp freezer temp temp mode hold to reset good water filter order replace hold to reset good air filter order replace door ajar high temp power fail IQ-TouchTM A red indicator light will resume...
... between automatic defrost. fast freeze Activates a faster rate for an extended period of ice on defau off the ice maker. IMPORTANT Pressing the system on/off icon does not turn off the cooling system to clean the refrigerator. 14 Controls press & hold on default off settings refrigerator temp freezer temp temp mode hold to reset good water filter order replace hold to reset good air filter order replace door ajar high temp power fail IQ-TouchTM A red indicator light will resume...

Complete Owner's Guide (English)
Page 15
... the drawer will display. The drawer can still be turned back on the control panel. If a high temperature alarm is activated during this mode. Before putting the refrigerator into Sabbath Mode, it is still on its controls for the Sabbath/Holidays. When in Sabbath Mode, neither the lights nor the control panel will sound intermittently for example due to a door left ajar, the alarm will work until the Sabbath mode is...
... the drawer will display. The drawer can still be turned back on the control panel. If a high temperature alarm is activated during this mode. Before putting the refrigerator into Sabbath Mode, it is still on its controls for the Sabbath/Holidays. When in Sabbath Mode, neither the lights nor the control panel will sound intermittently for example due to a door left ajar, the alarm will work until the Sabbath mode is...
Complete Owner's Guide (English)
Page 16
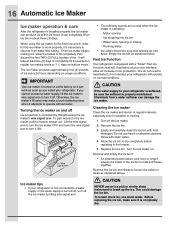
... break up the ice. Water valve opening or closing - Do not use an ice pick or similar sharp instrument to turn off Ice production is controlled by lifting wire signal arm. Before replacing the ice bin, make a loud chattering noise when it is operating: - Fast Ice Function Your refrigerator is turned on . To loosen stuck ice, use warm water. IMPORTANT Your ice maker is equipped with clean water. 4 Allow the ice bin to the ice maker, pull the freezer drawer out. To gain...
... break up the ice. Water valve opening or closing - Do not use an ice pick or similar sharp instrument to turn off Ice production is controlled by lifting wire signal arm. Before replacing the ice bin, make a loud chattering noise when it is operating: - Fast Ice Function Your refrigerator is turned on . To loosen stuck ice, use warm water. IMPORTANT Your ice maker is equipped with clean water. 4 Allow the ice bin to the ice maker, pull the freezer drawer out. To gain...
Complete Owner's Guide (English)
Page 18
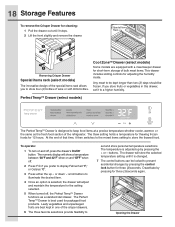
... prefer to display Fahrenheit "F," or Celsius "C". 3 Press either the up by pressing the control lock button for the setting selected. 5 When turned off , press the drawer's On/Off button. Cool ZoneTM Drawer (select models) Some models are best kept in this drawer, set and store personal temperature selections. Opening the Drawer 18 Storage Features To remove the Crisper Drawer for short-term storage of that time, it then switches to...
... prefer to display Fahrenheit "F," or Celsius "C". 3 Press either the up by pressing the control lock button for the setting selected. 5 When turned off , press the drawer's On/Off button. Cool ZoneTM Drawer (select models) Some models are best kept in this drawer, set and store personal temperature selections. Opening the Drawer 18 Storage Features To remove the Crisper Drawer for short-term storage of that time, it then switches to...
Complete Owner's Guide (English)
Page 22
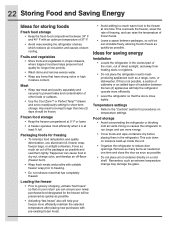
... the refrigerator operate more efficiently maintain the selected temperature after placing new purchases with suitable freezer wrap prior to freezing. • Do not refreeze meat that on a cold shelf. Meat • Wrap raw meat and poultry separately and securely to prevent leaks and contamination of the packages as possible. • Activating "fast freeze" also will be frozen. Force as much warm...
... the refrigerator operate more efficiently maintain the selected temperature after placing new purchases with suitable freezer wrap prior to freezing. • Do not refreeze meat that on a cold shelf. Meat • Wrap raw meat and poultry separately and securely to prevent leaks and contamination of the packages as possible. • Activating "fast freeze" also will be frozen. Force as much warm...
Complete Owner's Guide (English)
Page 24
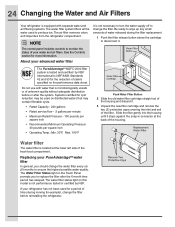
... It is located at the back of the housing. Water filter The water filter is not necessary to turn the water supply off to change the water filter every six (6) months to disconnect it . 3 Unpack the new filter cartridge and remove the two (2) protective caps covering the inlet and exit of your PureAdvantageTM water filter In general, you to produce ice. Do not use with water that may be used to replace the filter after...
... It is located at the back of the housing. Water filter The water filter is not necessary to turn the water supply off to change the water filter every six (6) months to disconnect it . 3 Unpack the new filter cartridge and remove the two (2) protective caps covering the inlet and exit of your PureAdvantageTM water filter In general, you to produce ice. Do not use with water that may be used to replace the filter after...
Complete Owner's Guide (English)
Page 25
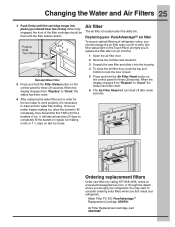
... the ice maker to work properly, it into place (you first install your refrigerator. Replacing your PureAdvantageTM air filter To ensure optimal filtering of refrigerator odors, you should change the air filter every six (6) months (the filter status light on the Touch Panel prompts you bought your refrigerator. When the display changes from water filter tubing. Reinstall Water Filter 5 Press and hold the Air Filter Reset button on the control panel for three (3)seconds. Once ice maker begins making mode or 1 1/2 days on the control panel...
... the ice maker to work properly, it into place (you first install your refrigerator. Replacing your PureAdvantageTM air filter To ensure optimal filtering of refrigerator odors, you should change the air filter every six (6) months (the filter status light on the Touch Panel prompts you bought your refrigerator. When the display changes from water filter tubing. Reinstall Water Filter 5 Press and hold the Air Filter Reset button on the control panel for three (3)seconds. Once ice maker begins making mode or 1 1/2 days on the control panel...
Complete Owner's Guide (English)
Page 26
.... • Never use CHLORIDE or cleaners with wet or damp hands. NOTE If you set your temperature controls to turn off cooling, power to the guide on the next page for details on caring and cleaning specific areas of your serial plate voids your warranty. • Before moving your refrigerator, raise the anti-tip brackets so the rollers will work correctly. Removal of your refrigerator. Shifting it...
.... • Never use CHLORIDE or cleaners with wet or damp hands. NOTE If you set your temperature controls to turn off cooling, power to the guide on the next page for details on caring and cleaning specific areas of your serial plate voids your warranty. • Before moving your refrigerator, raise the anti-tip brackets so the rollers will work correctly. Removal of your refrigerator. Shifting it...

Complete Owner's Guide (English)
Page 27
... any electrical part. • Wipe gaskets with a clean soft cloth. • Use a soft cloth to clean drawer runners and tracks. • Do not wash any removable items (bins, drawers, etc.) in dishwasher. • Allow glass to warm to room temperature before immersing in warm water. • Remove toe grille (see "Controls" section for location of On/Off button) and disconnect power cord. • Turn water supply valve to closed position. • Clean interior thoroughly. • Leave doors open...
... any electrical part. • Wipe gaskets with a clean soft cloth. • Use a soft cloth to clean drawer runners and tracks. • Do not wash any removable items (bins, drawers, etc.) in dishwasher. • Allow glass to warm to room temperature before immersing in warm water. • Remove toe grille (see "Controls" section for location of On/Off button) and disconnect power cord. • Turn water supply valve to closed position. • Clean interior thoroughly. • Leave doors open...

Complete Owner's Guide (English)
Page 29
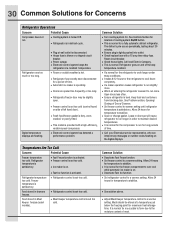
... water line valve is not making any ice. • Ice maker setting is Off. • Water supply is not connected to refrigerator. • Household water line valve is not open too long. Clean valve. Common Solution • See Care & Cleaning Tips. • Cover food tightly. It rocks on household water line valve. • Turn off household water line valve. Ice maker is not completely open. • Ice not used frequently enough. Common Solution • See Replacing Light Bulbs or LED lights in tube for ice or food items blocking drawer...
... water line valve is not making any ice. • Ice maker setting is Off. • Water supply is not connected to refrigerator. • Household water line valve is not open too long. Clean valve. Common Solution • See Care & Cleaning Tips. • Cover food tightly. It rocks on household water line valve. • Turn off household water line valve. Ice maker is not completely open. • Ice not used frequently enough. Common Solution • See Replacing Light Bulbs or LED lights in tube for ice or food items blocking drawer...
Complete Owner's Guide (English)
Page 30
... the refrigerator at a temperature just below the freezing point for the compressor to run more . • Warm air entering the refrigerator causes it to run for long periods of left hand door). • Fresh food/freezer gasket is dirty, worn, cracked, or poorly fitted. • This model is set too cold (control found on side of time. • Call your Electrolux service representative, who can interpret any messages or number codes flashing...
... the refrigerator at a temperature just below the freezing point for the compressor to run more . • Warm air entering the refrigerator causes it to run for long periods of left hand door). • Fresh food/freezer gasket is dirty, worn, cracked, or poorly fitted. • This model is set too cold (control found on side of time. • Call your Electrolux service representative, who can interpret any messages or number codes flashing...
Complete Owner's Guide (English)
Page 32
... warranted by Electrolux or an authorized service company. your appliance is installed, used, and maintained in accordance with the provided instructions. YOU MAY ALSO HAVE OTHER RIGHTS THAT VARY FROM STATE TO STATE. Service calls to repair or replace appliance light bulbs, air filters, water filters, other consumables, or knobs, handles, or other appropriate payment record to be repaired in the cabinet liner and sealed refrigeration system...
... warranted by Electrolux or an authorized service company. your appliance is installed, used, and maintained in accordance with the provided instructions. YOU MAY ALSO HAVE OTHER RIGHTS THAT VARY FROM STATE TO STATE. Service calls to repair or replace appliance light bulbs, air filters, water filters, other consumables, or knobs, handles, or other appropriate payment record to be repaired in the cabinet liner and sealed refrigeration system...

Wiring Diagram (All Languages)
Page 1
... FAN MOTOR Watts RPM Amps 3.1 (Energy Star, some models) 1100 CW Opposite Shaft 0.03 Running ICE MAKER SPECIFICATIONS Electrical 115 vac (127 vac max) Thermostat Opens at 48° F (9° C), Closes at 15° F (-9° C) Heater Voltage 85 vac ICE MAKER CONNECTOR PLUG CONNECTIONS Wire Number Wire Color Connects to 20cc (.68 oz.). IMPORTANT PLEASE RETURN THIS SHEET TO IT'S ORIGINAL LOCATION LINE POWER BLK ICE MAKER BLK BRN P-3 THERMAL CUT-OUT ICE MAKER GRN / YEL P-1 MOLD BLK MOTOR HOLD SWITCH...
... FAN MOTOR Watts RPM Amps 3.1 (Energy Star, some models) 1100 CW Opposite Shaft 0.03 Running ICE MAKER SPECIFICATIONS Electrical 115 vac (127 vac max) Thermostat Opens at 48° F (9° C), Closes at 15° F (-9° C) Heater Voltage 85 vac ICE MAKER CONNECTOR PLUG CONNECTIONS Wire Number Wire Color Connects to 20cc (.68 oz.). IMPORTANT PLEASE RETURN THIS SHEET TO IT'S ORIGINAL LOCATION LINE POWER BLK ICE MAKER BLK BRN P-3 THERMAL CUT-OUT ICE MAKER GRN / YEL P-1 MOLD BLK MOTOR HOLD SWITCH...

Installation Instructions (All Languages)
Page 1
... Water Tubing to rotate the drawer. 4. NOTE If you can be used for the supply line. • DO NOT install water supply tubing in the Use & Care Guide. Allow the following clearances for cleaning. • A shutoff valve to connect the water supply line to installing your new Electrolux refrigerator. • For important safety instructions and to learn what to 90 degrees. 2 Remove screw. 3 Lift the door while adjusting the washer. Water supply tubing made of installation, proper air circulation, and plumbing and electrical connections...
... Water Tubing to rotate the drawer. 4. NOTE If you can be used for the supply line. • DO NOT install water supply tubing in the Use & Care Guide. Allow the following clearances for cleaning. • A shutoff valve to connect the water supply line to installing your new Electrolux refrigerator. • For important safety instructions and to learn what to 90 degrees. 2 Remove screw. 3 Lift the door while adjusting the washer. Water supply tubing made of installation, proper air circulation, and plumbing and electrical connections...

Product Specifications Sheet (English)
Page 1
...; Electronic Controls Yes Door Hinge Covers Yes Fresh Food Conveniences PureAdvantage® Water & Ice / Air Filtration Water Filter Location Temp Alarm System / Door Ajar Alarm / Power Failure Alarm Luxury-Design™ Glass Shelves Luxury-Glide™ Humidity-Controlled Left Crisper Luxury-Glide™ Humidity-Controlled Right Crisper Cool Zone™ Drawer Perfect Temp Drawer™ Wine Rack Clear Gallon Adjustable Door Bins Clear 2-Liter / 1/2-Gallon Removable Door Bins Locking Clear Utility Bin Tilt-Out Can Racks Luxury-Design™ Ramp-Up Multilevel Lighting - Incandescent...
...; Electronic Controls Yes Door Hinge Covers Yes Fresh Food Conveniences PureAdvantage® Water & Ice / Air Filtration Water Filter Location Temp Alarm System / Door Ajar Alarm / Power Failure Alarm Luxury-Design™ Glass Shelves Luxury-Glide™ Humidity-Controlled Left Crisper Luxury-Glide™ Humidity-Controlled Right Crisper Cool Zone™ Drawer Perfect Temp Drawer™ Wine Rack Clear Gallon Adjustable Door Bins Clear 2-Liter / 1/2-Gallon Removable Door Bins Locking Clear Utility Bin Tilt-Out Can Racks Luxury-Design™ Ramp-Up Multilevel Lighting - Incandescent...
Product Specifications Sheet (English)
Page 2
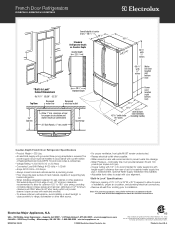
... installation, proper air circulation, and plumbing / electrical connections. • Remove all wall / floor molding prior to improve our products. width 25" Countertop 68 3/16" with 3/8" rollers Water line inlet location (left bottom rear) 23 5/8" Power cord location (right bottom rear) 307/8" 45 7/8" (with drawer 42 9/16" (with doors 90° open) fully extended including handle) Counter-Depth French Door Refrigerator Specifications • Product Weight - 335 Lbs. • An electrical supply with 1/4" O.D. Electrolux...
... installation, proper air circulation, and plumbing / electrical connections. • Remove all wall / floor molding prior to improve our products. width 25" Countertop 68 3/16" with 3/8" rollers Water line inlet location (left bottom rear) 23 5/8" Power cord location (right bottom rear) 307/8" 45 7/8" (with drawer 42 9/16" (with doors 90° open) fully extended including handle) Counter-Depth French Door Refrigerator Specifications • Product Weight - 335 Lbs. • An electrical supply with 1/4" O.D. Electrolux...


