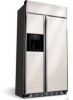
Electrolux E42BS75ETT - 42" - Refrigerator Support and Manuals
Get Help and Manuals for this Electrolux item
View All Support Options Below
Free Electrolux E42BS75ETT manuals!
Problems with Electrolux E42BS75ETT?
Ask a Question
Free Electrolux E42BS75ETT manuals!
Problems with Electrolux E42BS75ETT?
Ask a Question
Popular Electrolux E42BS75ETT Manual Pages
Owners Manual - Page 1
Drawers and Baskets
12, 13 9
Ice and Water Dispenser
..... 10, 11
Refrigerator Doors
8
Replacing the Light Bulbs .......
14
Shelves and Bins
7
Temperature
Controls ...........
5
Water Filter
6
Model 42
Electrolux Icon C6te a C6te
ROfrigOrateurs
Installation Instructions
La section franGaise commence a la page 45
Anti-Tip Brackets
30
I
Dimensions, Clearances
...........
Owners Manual - Page 2
... hgulds on the bottoin of the ejector inechanism, or with tile Installation Instructions before cleaning or maMng repairs. Set the master power switch to climb, stgu_dor hang on the shelves in...fingers out of this Owner's Manual. clearances between the doors fund between the doors and cabinet are h_ the area. IMPORTANTSAFETYINFORMATION.
Use this appliance only for its intended purpose as...
Owners Manual - Page 7
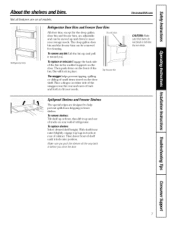
...Refrigerator Door Bins and Freezer Door Bins
All door bins, except for the deep gallon door bin and fl'eezer bins, ewe adjustable and can be inoved up and down on the door shelf.
Place a fh_ger on all models.... Toreplace shelves: Select desired shelf height. Then lower fl'ont of the bin in tile Inolded supports on the dooI: Then push down to...
Owners Manual - Page 10
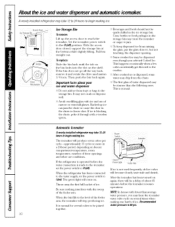
... door to ! (on).
AccessDoor/_.-IceStorag_Bin //- Set tile iceinaker power switch to the
cI'usheI',...add ice fl'oln trays or bags to tile level of ice. ...norinal.
With the access door closed, support the storage bin at the bottom while...the following ones.
NOTE: In homes with the sweep of narrow or...installed refrigerator may take 12-24 hours tobegin making ice. This is 60 ...
Owners Manual - Page 13
...water.
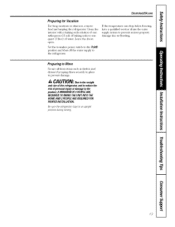
If tile teinperature can drop below fl'eezing, have a qualified servicer drain tile water supply system to prevent serious property deanage due to tile refl'igerator. Set the iceinaker power switch to the 0 (ofO position guld shut off the...
For long vacations or absences, reinove food guld tnlplug tile refrigerator. Besuretheretrigerotorstoysin on up@t positionduringmoving.
13
Owners Manual - Page 14
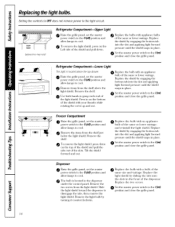
... panel. Set the master power switch to grasp each end of the same size and wattage. Reinove the shelf.
@ To remove the light shield, press clown
on ) position and close the grille pealel.
14
Replace the two screws. Refrigerator Compartment--Lower This light is located in the front of the shield with appliance bulbs...
Owners Manual - Page 15
... these instructions completely and carefully.
• IMPORTANT - For local service in your Owner's Manual for the consumer's and local inspector's use.
• Note to improper installation is required. WARNING:
• These refrigerators are top-heavy and must be made by a qualified service technician. Anti-Tip protection is not covered under the Electrolux Home Products
Warranty...
Owners Manual - Page 17
... is adjusted to 90 °. Installation of the refrigerator. If the 90 ° door stop .
copper tubing between the cold water line and water connection location. The cutout depth must be located on
Additional Specifications
• A 120 volt, 60Hz, 15 or 20 amp power supply is required.
Installation Instructions
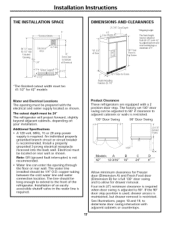
THE INSTALLATION SPACE
3"
_
Finished Width
74"
FromFloor...
Owners Manual - Page 31
... shorten the opening 83-1/2" to ensure the power cord is not, the doors may not align evenly at the top. The front and back are supported by opening refrigerator door to a properly grounded receptacle.
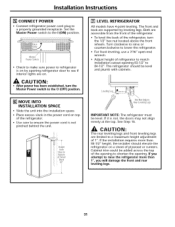
Installation Instructions
[] CONNECT POWER
• Connect refrigerator power cord plug to see if interior lights are on. I (ON} position.
Owners Manual - Page 34
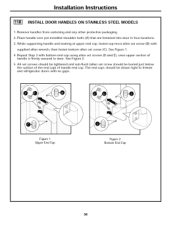
Installation Instructions
INSTALL DOOR HANDLES ON STAINLESS STEEL MODELS
1, Remove handles from cartonin 9 and any other protective packagin 9. 2, Place handle over pre-installed shoulder bolts (A) that are fastened into door in four locations, 3, While supporting handle and Iookin 9 at upper end cap, fasten top-most allen set screw (B) with
supplied allen wrench, then fasten bottom allen set ...
Owners Manual - Page 38
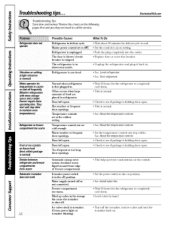
... iceinakei;
to completely
• Check to end,
• Push the plug completely into the outlet,
• Replace fuse or reset the breaker,
• Unplug the refrigerator
and plug it back in icemaker. (Green power light on setting. Troubleshooting lips Save time and money!
Too frequent or too long
door openings.
cycle to see if...
Owners Manual - Page 41
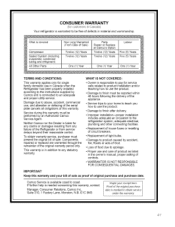
... hours following the delivery of the appliance.
• Service trips to your bill of sale as listed in Canada when the Refrigerator has been properly installed according to the instructions supplied by an Authorized Camco Service Agent. IMPORTANT Keep this warranty and your home to teach you how to use the product.
• Damage to finish after delivery...
Owners Manual - Page 42
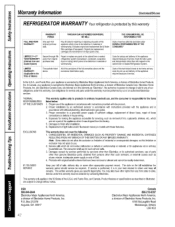
... sealed
yearsfromoriginal refrigerationsystem(compressorc,ondenser,evaporator,
purchasedate.
Electrolux Home Products, Inc. Our obligations for service and parts under this limitation or exclusion may also have been removed or altered and cannot be defectiveinmaterialsor workmanshipE. Proper installation by contacting Electrolux. Replacement of light bulbs and/or fluorescent tubes (on...
Owners Manual - Page 43
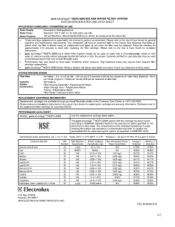
... perform as measured at the valve inlet.
• Timely cartridge replacement is essential for approximately 3-10 seconds to the Use & Care Guide for cold water use only. 100 psi Maximum. Box 212378 Augusta, GA 30907 2004 ELECTROLUX HOME PRODUCTS, INC. pH = 7.5 +/- 0.5 Temp. 20°C +/- 3°C (68°F +!- 5°F) Pressure = 60 psi (414 kPa) @ 0.5 gpm (1.9 Ipm...
Owners Manual - Page 44
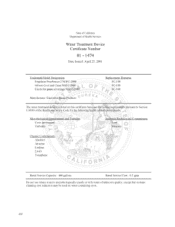
State of California Department of Health Services
Water Treatment Device Certificate Number
01 - 1474
Date Issued: April 25, 2001
Trademark/Model Designation Frigidaire PureSource 2 NGFC-2000 Gibson Cool and Clean NGFC-2000 Electrolux pure ad_7,antageNGFC-2000
ManuIhcturer: Electrolux Home Products
Replacement Elements FC-100 FC-100 FC-IO0
The water treannent device(s) listed on this ...
Electrolux E42BS75ETT Reviews
We have not received any reviews for Electrolux yet.