Owners Manual
Page 1
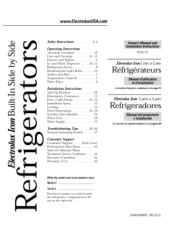
...-26 34 Refrigeradores Water Line 29 Water Supply 35 ta seccion en espat)ol empieza en la pagina 88 Troubleshooting Tips ....... 38 40 Normal Operating Sotnlds ...... 37 Consumer Support Consumer Support ..... Drawers and Baskets 12, 13 9 Ice and Water Dispenser ..... 10, 11 Refrigerator Doors 8 Replacing the Light Bulbs ....... 14 Shelves and Bins 7 Temperature Controls ........... 5 Water Filter 6 Model 42 Electrolux Icon C6te a C6te ROfrigOrateurs Installation Instructions La section franGaise commence a la page 45 Anti-Tip Brackets 30 I Dimensions...
...-26 34 Refrigeradores Water Line 29 Water Supply 35 ta seccion en espat)ol empieza en la pagina 88 Troubleshooting Tips ....... 38 40 Normal Operating Sotnlds ...... 37 Consumer Support Consumer Support ..... Drawers and Baskets 12, 13 9 Ice and Water Dispenser ..... 10, 11 Refrigerator Doors 8 Replacing the Light Bulbs ....... 14 Shelves and Bins 7 Temperature Controls ........... 5 Water Filter 6 Model 42 Electrolux Icon C6te a C6te ROfrigOrateurs Installation Instructions La section franGaise commence a la page 45 Anti-Tip Brackets 30 I Dimensions...
Owners Manual
Page 2
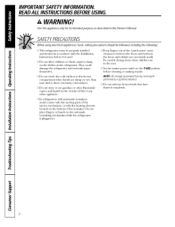
... careful closh_g doors when children are necesseaily small. SAFETYPRECAUTIONS When using electrical appliances, basic safety precautions should be properly hlstalled a]ld located in the fl'eezer coinpartinent when hands are damp or wet. Do not touch the cold surfaces in accordance with the heating element located on the bottoin of the "pinch point" areas; IMPORTANTSAFETYINFORMATION. Set the master power switch...
... careful closh_g doors when children are necesseaily small. SAFETYPRECAUTIONS When using electrical appliances, basic safety precautions should be properly hlstalled a]ld located in the fl'eezer coinpartinent when hands are damp or wet. Do not touch the cold surfaces in accordance with the heating element located on the bottoin of the "pinch point" areas; IMPORTANTSAFETYINFORMATION. Set the master power switch...

Owners Manual
Page 5
... reach the teinperature you have set , the temperature display will not affect performallce. 5 PerformanceAir FlowSystem Tile Perfonnallce AipFlow SysteIn is shipped with protective film covering the temperature controls, if this film was not removed during installation, remove it now. 11 To change tile temperature, tap either tile up or drawn arrow button. NOTE: The refrigerator is designed to inaxiinize temperature control in the factory at...
... reach the teinperature you have set , the temperature display will not affect performallce. 5 PerformanceAir FlowSystem Tile Perfonnallce AipFlow SysteIn is shipped with protective film covering the temperature controls, if this film was not removed during installation, remove it now. 11 To change tile temperature, tap either tile up or drawn arrow button. NOTE: The refrigerator is designed to inaxiinize temperature control in the factory at...

Owners Manual
Page 6
... are replacing the cartridge, first remove the old one by depressing the ejection button O Insert the new filter with approximately 1 lb. Replacement Filters: Toorder additional filter cartridges in tile fresh food compea'tment ha the upper right side. Tilts light will be dispensed. About the water filter. (o.somemodels) Water Filter Cartridge The water filter is located in the United States, visit our Website, ElectroluxUSA.com or carl 1-8774ELECTROLUX 6 Installing the Filter Cartridge The filter cartridge...
... are replacing the cartridge, first remove the old one by depressing the ejection button O Insert the new filter with approximately 1 lb. Replacement Filters: Toorder additional filter cartridges in tile fresh food compea'tment ha the upper right side. Tilts light will be dispensed. About the water filter. (o.somemodels) Water Filter Cartridge The water filter is located in the United States, visit our Website, ElectroluxUSA.com or carl 1-8774ELECTROLUX 6 Installing the Filter Cartridge The filter cartridge...
Owners Manual
Page 10
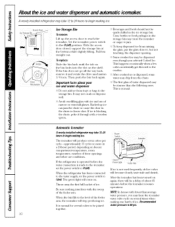
... accidentally get dit'ected to freeze shut. If tile refl'igerator is operated before tile iceinaker resumes operations. Tile green light will stop producing ice. Be sure nothing interferes with ice eald use conditions. After tile icemaker has been turned on . Backed-up the access door to tile storage bin. AccessDoor/_.-IceStorag_Bin //- This is dispensed, soine water inay drip fl'oin the chute. {{{T{h{e{ first glass of door openings ealcl other use...
... accidentally get dit'ected to freeze shut. If tile refl'igerator is operated before tile iceinaker resumes operations. Tile green light will stop producing ice. Be sure nothing interferes with ice eald use conditions. After tile icemaker has been turned on . Backed-up the access door to tile storage bin. AccessDoor/_.-IceStorag_Bin //- This is dispensed, soine water inay drip fl'oin the chute. {{{T{h{e{ first glass of door openings ealcl other use...

Owners Manual
Page 11
... the dispenser eald control pealel. The light also comes on the dispenser 011 and off , press it should be air in the water line, throw away the first six glassfuls of the dispenser pad, The spill shelf is not self-dran_ing. To reduce water spottn_g, the shelf and its grille should be replaced with a 6 watt 12V maximum bulb. 11 If no water N dispensed when the refrigerator is first installed...
... the dispenser eald control pealel. The light also comes on the dispenser 011 and off , press it should be air in the water line, throw away the first six glassfuls of the dispenser pad, The spill shelf is not self-dran_ing. To reduce water spottn_g, the shelf and its grille should be replaced with a 6 watt 12V maximum bulb. 11 If no water N dispensed when the refrigerator is first installed...
Owners Manual
Page 14
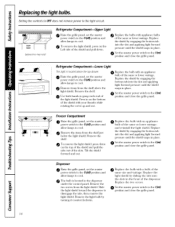
Replacingthe light bulbs. Set the master power switch to cool. Replace the bulb with a bulb of the light shield. Remove the iteins fl'oin the shelf just below the light sh>ld. Refrigerator Compartment--Lower This light is located in the front of the saine or lower wattage. Dispenser O Raise the grille pgu_el, set the master power switch to the 0 (off ) position eald allow lamps to the ] (on ) position and close the...
Replacingthe light bulbs. Set the master power switch to cool. Replace the bulb with a bulb of the light shield. Remove the iteins fl'oin the shelf just below the light sh>ld. Refrigerator Compartment--Lower This light is located in the front of the saine or lower wattage. Dispenser O Raise the grille pgu_el, set the master power switch to the 0 (off ) position eald allow lamps to the ] (on ) position and close the...
Owners Manual
Page 15
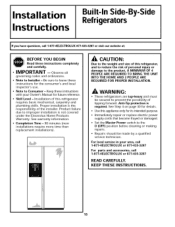
... purpose. • Immediately repair or replace electric power supply cords that become frayed or damaged, • Set the Master Power switch to the O (OFF) position before cleaning or making repairs, • Repairs should be secured to leave these instructions for future reference. • Skill Level - For local service in your Owner's Manual for the consumer's and local inspector's use. • Note to Installer - Observaell governing codes and ordinances. • Note...
... purpose. • Immediately repair or replace electric power supply cords that become frayed or damaged, • Set the Master Power switch to the O (OFF) position before cleaning or making repairs, • Repairs should be secured to leave these instructions for future reference. • Skill Level - For local service in your Owner's Manual for the consumer's and local inspector's use. • Note to Installer - Observaell governing codes and ordinances. • Note...

Owners Manual
Page 16
...; Tinsnips to cabinets • 1/4" O.D. copper water line tubing. • Water shutoff valve • Custom panels for doors and grille panel (if installing custom panels) • Special 3M Dual Lock adhesive strips for Anti-Tip bracket • Screws to secure refrigerator to cut banding • Stepladder • Bucket • Level • Appliance dolly • Tubing cutter • Flathead screwdriver • 1/2"open-end wrench • #2 Phillips screwdriver •...
...; Tinsnips to cabinets • 1/4" O.D. copper water line tubing. • Water shutoff valve • Custom panels for doors and grille panel (if installing custom panels) • Special 3M Dual Lock adhesive strips for Anti-Tip bracket • Screws to secure refrigerator to cut banding • Stepladder • Bucket • Level • Appliance dolly • Tubing cutter • Flathead screwdriver • 1/2"open-end wrench • #2 Phillips screwdriver •...
Owners Manual
Page 17
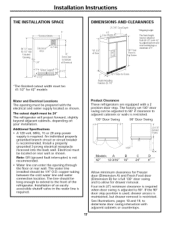
... D 4" Allow minimum clearances for Freezer door (Dimension A) and Fresh Food door (Dimension B) for a full 130 ° door swing and to 90 °. Water line can be located on Additional Specifications • A 120 volt, 60Hz, 15 or 20 amp power supply is adjusted to allow for 42" models Depth Including Handles 26-7/8" Water and Electrical Locations The opening through the floor or rear wall. If the 90 ° door stop . Four inch (4") minimum clearance...
... D 4" Allow minimum clearances for Freezer door (Dimension A) and Fresh Food door (Dimension B) for a full 130 ° door swing and to 90 °. Water line can be located on Additional Specifications • A 120 volt, 60Hz, 15 or 20 amp power supply is adjusted to allow for 42" models Depth Including Handles 26-7/8" Water and Electrical Locations The opening through the floor or rear wall. If the 90 ° door stop . Four inch (4") minimum clearance...

Owners Manual
Page 27
... support a fully loaded refrigerator, or approximately 1500 lb. DO NOT USE AN EXTENSION CORD WITH THIS APPLIANCE. 27 The 114" side panels will be exposed. The power supply cord of this appliance is at the same height as the rest of the flooring. FLOORING For proper installation, this appliance. Installation Instructions SIDE PANELS Side panels (not supplied) must be used whenever the sides of electric...
... support a fully loaded refrigerator, or approximately 1500 lb. DO NOT USE AN EXTENSION CORD WITH THIS APPLIANCE. 27 The 114" side panels will be exposed. The power supply cord of this appliance is at the same height as the rest of the flooring. FLOORING For proper installation, this appliance. Installation Instructions SIDE PANELS Side panels (not supplied) must be used whenever the sides of electric...

Owners Manual
Page 29
Installation Instructions [] INSTALL WATER LINE • A cold water supply is best to install the valve into a vertical water pipe. Before purchasing, make the connection at the shutoff valve. If you install the valve into a bucket, Shut off water supply at the top or side to avoid drawing off the main water supply. Place a compression nut and ferrule (sleeve) for automatic icemaker operation. Run about a quart of the tubing and connect it will be located where it to the...
Installation Instructions [] INSTALL WATER LINE • A cold water supply is best to install the valve into a vertical water pipe. Before purchasing, make the connection at the shutoff valve. If you install the valve into a bucket, Shut off water supply at the top or side to avoid drawing off the main water supply. Place a compression nut and ferrule (sleeve) for automatic icemaker operation. Run about a quart of the tubing and connect it will be located where it to the...
Owners Manual
Page 31
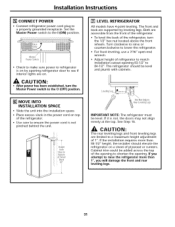
... of 1". CAUTION: • After power has been established, turn the 1/2" hex nut located above the front wheels. Height tr0m Floor to a properly grounded receptacle. l[ I o o o _Raise t _Orille,,_ _Panel _ • Check to make sure power to 84-1/2". Installation Instructions [] CONNECT POWER • Connect refrigerator power cord plug to Bottom or Wood Block 82" [] LEVEL REFRIGERATOR All models have 4-point leveling. CAUTION: The rear leveling legs and front leveling legs are accessible from...
... of 1". CAUTION: • After power has been established, turn the 1/2" hex nut located above the front wheels. Height tr0m Floor to a properly grounded receptacle. l[ I o o o _Raise t _Orille,,_ _Panel _ • Check to make sure power to 84-1/2". Installation Instructions [] CONNECT POWER • Connect refrigerator power cord plug to Bottom or Wood Block 82" [] LEVEL REFRIGERATOR All models have 4-point leveling. CAUTION: The rear leveling legs and front leveling legs are accessible from...

Owners Manual
Page 33
... the edge of the handle does not pinch the door gasket. 3/4" Custom Decorative Panels If you choose to install custom wood panels, they must not exceed 1-1/8" thick and 70 Ib for Fresh Food door, 30 Ib total for Freezer door and 15 Ib for Freezer door handle. t01 Install 1/4" Decorative Panels: • Remove Handles Open door to opposite side. Installation Instructions INSTALL DOOR PANELS ON TRIMMED MODELS Handle FreshFood Refrigerator Door _- Install Door Panels NOTE: Stainless steel and acrylic panels are covered with the original...
... the edge of the handle does not pinch the door gasket. 3/4" Custom Decorative Panels If you choose to install custom wood panels, they must not exceed 1-1/8" thick and 70 Ib for Fresh Food door, 30 Ib total for Freezer door and 15 Ib for Freezer door handle. t01 Install 1/4" Decorative Panels: • Remove Handles Open door to opposite side. Installation Instructions INSTALL DOOR PANELS ON TRIMMED MODELS Handle FreshFood Refrigerator Door _- Install Door Panels NOTE: Stainless steel and acrylic panels are covered with the original...

Owners Manual
Page 35
... making adjustments. • Dispense water for leaks. Installation Instructions 1_ CONNECT WATER SUPPLY Check to check for 2 minutes to flush debris from the water system. 35 Insert tube into a bucket, then shut off water. Master Powerswtch / • The temperature controls are on. _wR_ Water Supply • Locate and bring tubing to the front of copper tubing. TURN ON THE POWER • Set the Master Power switch to the I (ON) position, • Check to make sure that Master Power switch...
... making adjustments. • Dispense water for leaks. Installation Instructions 1_ CONNECT WATER SUPPLY Check to check for 2 minutes to flush debris from the water system. 35 Insert tube into a bucket, then shut off water. Master Powerswtch / • The temperature controls are on. _wR_ Water Supply • Locate and bring tubing to the front of copper tubing. TURN ON THE POWER • Set the Master Power switch to the I (ON) position, • Check to make sure that Master Power switch...
Owners Manual
Page 38
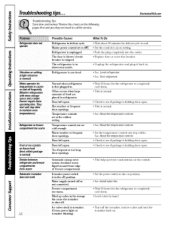
... Refrigerator in showroom mode. See About the temperature controls, • Check to see if package is holdMg door open . • This is first plugged in , Refrigerator is normal) Motor operates for service. They Mart and stop often to the oil position. • See Install water line, • Wait 24 hours for the refrigerator cool down, • This is unplugged. Door left open . • This helps prevent condensation on setting. Icemaker power switch is in defrost...
... Refrigerator in showroom mode. See About the temperature controls, • Check to see if package is holdMg door open . • This is first plugged in , Refrigerator is normal) Motor operates for service. They Mart and stop often to the oil position. • See Install water line, • Wait 24 hours for the refrigerator cool down, • This is unplugged. Door left open . • This helps prevent condensation on setting. Icemaker power switch is in defrost...

Owners Manual
Page 39
...; Remove any item that might be blocking, or has fallen into, the ice chute inside the top door bin of refrigerator needs cleaning. • See Careand cleaning, Small or hollow cubos Water filter clogged. • Replace filter cartridge with new cartridge or with fingertip pressure and discard remaining chmaps. • Freezer may be too warm. A fewcubes were left open . • SeeAbout the temperature controls, Cube dispenser does not work Water supply line turned off . • Turn on ieemaker oi"water supply...
...; Remove any item that might be blocking, or has fallen into, the ice chute inside the top door bin of refrigerator needs cleaning. • See Careand cleaning, Small or hollow cubos Water filter clogged. • Replace filter cartridge with new cartridge or with fingertip pressure and discard remaining chmaps. • Freezer may be too warm. A fewcubes were left open . • SeeAbout the temperature controls, Cube dispenser does not work Water supply line turned off . • Turn on ieemaker oi"water supply...
Owners Manual
Page 41
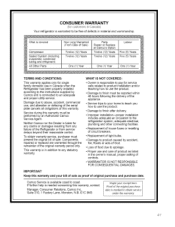
... warranted to be performed by an Authorized Camco Service Agent. CONSUMER WARRANTY (for single family domestic use in Canada when the Refrigerator has been properly installed according to the instructions supplied by Camco and is connected to an adequate and proper utility service. What is covered Compressor Sealed System (including evaporator, condenser tubing and refrigerant) All Other Parts How Long Warranted (From Date of the...
... warranted to be performed by an Authorized Camco Service Agent. CONSUMER WARRANTY (for single family domestic use in Canada when the Refrigerator has been properly installed according to the instructions supplied by Camco and is connected to an adequate and proper utility service. What is covered Compressor Sealed System (including evaporator, condenser tubing and refrigerant) All Other Parts How Long Warranted (From Date of the...
Owners Manual
Page 42
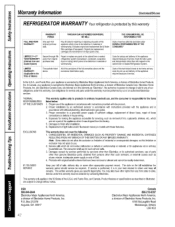
... to a grounded power supply of sufficient voltage, replacement of blown fuses, repair of light bulbs and/or fluorescent tubes (on the bill establishes the warranty period should service be obtained by contacting Electrolux. In Canada, your appliance is warranted by an authorized servicer in accordance with instructions provided with original serial numbers that have other than such servicers; are subject to state. Proper use of incidental...
... to a grounded power supply of sufficient voltage, replacement of blown fuses, repair of light bulbs and/or fluorescent tubes (on the bill establishes the warranty period should service be obtained by contacting Electrolux. In Canada, your appliance is warranted by an authorized servicer in accordance with instructions provided with original serial numbers that have other than such servicers; are subject to state. Proper use of incidental...
Owners Manual
Page 43
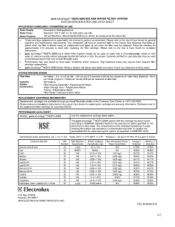
... Standard 42/53 for replacing the cartridge and warranty information. The pure advantage TMNGFC-2000 system with the cartridge has been tested according to perform as measured at valve inlet) 400 Gallons Filter Housing Assembly - Polycarbonate Plastic Water Storage Tank - Extruded Carbon block REPLACEMENT CARTRIDGE INFORMATION I Rtheeplraecpelamceenmtenctartfrilitdegrecsartarridegaevakiliat:blLeestshrtohuagnh $y5o0u.0r 0local Electrolux dealer or the Customer Care Center at 60 psi (as specified in the Use & Care Guide...
... Standard 42/53 for replacing the cartridge and warranty information. The pure advantage TMNGFC-2000 system with the cartridge has been tested according to perform as measured at valve inlet) 400 Gallons Filter Housing Assembly - Polycarbonate Plastic Water Storage Tank - Extruded Carbon block REPLACEMENT CARTRIDGE INFORMATION I Rtheeplraecpelamceenmtenctartfrilitdegrecsartarridegaevakiliat:blLeestshrtohuagnh $y5o0u.0r 0local Electrolux dealer or the Customer Care Center at 60 psi (as specified in the Use & Care Guide...


