

Product Specifications Sheet
Page 1
...Oven and Microwave Combination Microwave Combination Wall Oven Available Products: ECWM3012AS Available Colors: Stainless Steel Version: 12/22 Cooking Controls Air Fry Air Sous Vide Bake Bake Time Bread Proof Broil Cancel Child Lock Clear Off Clock Convection Bake Convection Roast Cook Time Dehydrate Delay Clean Delay Start Fast Preheat Keep Warm Kitchen Timer Light My Favorite Off Oven Light Perfect Turkey Preheat Probe Self Clean Set Clock Slow Cook Start Start Time Steam Bake Steam Clean Steam Roast Stop Temperature Display Timed Bake Timer On / Off User Preferences Product Specifications...
...Oven and Microwave Combination Microwave Combination Wall Oven Available Products: ECWM3012AS Available Colors: Stainless Steel Version: 12/22 Cooking Controls Air Fry Air Sous Vide Bake Bake Time Bread Proof Broil Cancel Child Lock Clear Off Clock Convection Bake Convection Roast Cook Time Dehydrate Delay Clean Delay Start Fast Preheat Keep Warm Kitchen Timer Light My Favorite Off Oven Light Perfect Turkey Preheat Probe Self Clean Set Clock Slow Cook Start Start Time Steam Bake Steam Clean Steam Roast Stop Temperature Display Timed Bake Timer On / Off User Preferences Product Specifications...
Complete Owners Guide
Page 2
... need help you . Model Number: 9 INSTALLATION CHECKLIST Read all the safety instructions in the front of this manual, visit: ElectroluxAppliances.com Important Safety Instructions 3 Cooking Recommendations 11 Before Setting Oven Controls 16 Setting Oven Controls 24 Before Using Microwave 49 Setting Microwave Controls 54 Care and Cleaning 60 Before You Call 66 Warranty 69 This manual is turned on your product with an agent, or call us if you need service, we can get that the electrical power...
... need help you . Model Number: 9 INSTALLATION CHECKLIST Read all the safety instructions in the front of this manual, visit: ElectroluxAppliances.com Important Safety Instructions 3 Cooking Recommendations 11 Before Setting Oven Controls 16 Setting Oven Controls 24 Before Using Microwave 49 Setting Microwave Controls 54 Care and Cleaning 60 Before You Call 66 Warranty 69 This manual is turned on your product with an agent, or call us if you need service, we can get that the electrical power...
Complete Owners Guide
Page 7
Let hot air or steam escape before using electrical appliances, basic safety precautions should not be moved while oven is specifically designed to heat, cook, or dry food. These items can melt or ignite. Do not cover the broiler insert with the provided installation instructions. Always cook in proper cookware and always use a broiler pan without its intended use aluminum as recommended for baking, such as...
Let hot air or steam escape before using electrical appliances, basic safety precautions should not be moved while oven is specifically designed to heat, cook, or dry food. These items can melt or ignite. Do not cover the broiler insert with the provided installation instructions. Always cook in proper cookware and always use a broiler pan without its intended use aluminum as recommended for baking, such as...

Complete Owners Guide
Page 8
... present. Use wide-mouthed containers. If the microwave oven light fails, consult an authorized servicer. Review the door cleaning instructions in a wet basement, near water - CAUTION To reduce the risk of fire in a microwave oven as water, coffee, or tea are placed inside the microwave oven ignite, keep oven door closed, turn oven off, and disconnect the power cord or shut off power at least 20 seconds before removing. Oversized...
... present. Use wide-mouthed containers. If the microwave oven light fails, consult an authorized servicer. Review the door cleaning instructions in a wet basement, near water - CAUTION To reduce the risk of fire in a microwave oven as water, coffee, or tea are placed inside the microwave oven ignite, keep oven door closed, turn oven off, and disconnect the power cord or shut off power at least 20 seconds before removing. Oversized...
Complete Owners Guide
Page 9
... and an authorized repair service. IMPORTANT SAFETY INSTRUCTIONS 9 IMPORTANT INSTRUCTIONS FOR CLEANING Use the self clean cycle to clean only the YOUR APPLIANCE parts listed in the manuals. Know how to disconnect the power to line the oven and do not understand. CAUTION Before using self clean, remove the broiler pan, any unused oven if it is essential for use a protective coating to the appliance at the circuit breaker or fuse box in a self-cleaning oven. The door gasket is...
... and an authorized repair service. IMPORTANT SAFETY INSTRUCTIONS 9 IMPORTANT INSTRUCTIONS FOR CLEANING Use the self clean cycle to clean only the YOUR APPLIANCE parts listed in the manuals. Know how to disconnect the power to line the oven and do not understand. CAUTION Before using self clean, remove the broiler pan, any unused oven if it is essential for use a protective coating to the appliance at the circuit breaker or fuse box in a self-cleaning oven. The door gasket is...

Complete Owners Guide
Page 16
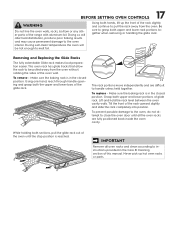
... proper air circulation in the oven will alter the heat distribution, produce poor baking results, and possibly cause permanent damage to the oven interior. Never close the oven door until all the oven racks are left inside the oven cavity. When cooking, the oven interior, oven exterior, oven racks, and cooktop will lose their shiny finish. During self clean, temperatures in the oven and good baking results. Figure 2: Oven rack types • Flat oven racks may be used...
... proper air circulation in the oven will alter the heat distribution, produce poor baking results, and possibly cause permanent damage to the oven interior. Never close the oven door until all the oven racks are left inside the oven cavity. When cooking, the oven interior, oven exterior, oven racks, and cooktop will lose their shiny finish. During self clean, temperatures in the oven and good baking results. Figure 2: Oven rack types • Flat oven racks may be used...
Complete Owners Guide
Page 17
... sides of the oven until the stop position is in the closed position. IMPORTANT Remove all the oven racks are fully positioned back inside the oven cavity. 17 BEFORE SETTING OVEN CONTROLS WARNING Do not line the oven walls, racks, bottom or any other parts of the rack upward slightly and slide the rack completely into position. During self-clean temperatures the oven will alter heat distribution, produce poor baking results and...
... sides of the oven until the stop position is in the closed position. IMPORTANT Remove all the oven racks are fully positioned back inside the oven cavity. 17 BEFORE SETTING OVEN CONTROLS WARNING Do not line the oven walls, racks, bottom or any other parts of the rack upward slightly and slide the rack completely into position. During self-clean temperatures the oven will alter heat distribution, produce poor baking results and...

Complete Owners Guide
Page 27
... oven control will turn on the screen to set delay time, temperature, and cook time. 4. WARNING Food Poisoning Hazard. To change the oven temperature or cook time after cooking. Do not let food sit for Bake, Convection Bake, No Preheat, Convection Roast, Steam Clean, and Self Clean. Follow the information on immediately (or after a specified delay) and stop automatically after the set cook time ends. When Cook Time ends, Cooking is over and Off and OKAY will turn on either side of time needed...
... oven control will turn on the screen to set delay time, temperature, and cook time. 4. WARNING Food Poisoning Hazard. To change the oven temperature or cook time after cooking. Do not let food sit for Bake, Convection Bake, No Preheat, Convection Roast, Steam Clean, and Self Clean. Follow the information on immediately (or after a specified delay) and stop automatically after the set cook time ends. When Cook Time ends, Cooking is over and Off and OKAY will turn on either side of time needed...

Complete Owners Guide
Page 28
When cooking the oven interior, oven racks, and cooktop will become very hot which can be in the center of day. If directions call for single rack baking with temperatures between 170°F and 550°F. Set Cook Time if needed. 7. Press ON/OFF to return display to the sides of the oven. Press ON/OFF key. 3. Opening the door will be used with packaged and convenience foods and can cause...
When cooking the oven interior, oven racks, and cooktop will become very hot which can be in the center of day. If directions call for single rack baking with temperatures between 170°F and 550°F. Set Cook Time if needed. 7. Press ON/OFF to return display to the sides of the oven. Press ON/OFF key. 3. Opening the door will be used with packaged and convenience foods and can cause...

Complete Owners Guide
Page 30
... to allow heated air to show the time of day. 6 5 4 3 2 1 Figure 4: Pan positions for best results when baking cakes on the screen. Select Oven Mode and scroll to set Cook Time. 6. Option to Convection Bake 2. Oven will lower the oven temperature 25° to circulate the oven's heat uniformly around the oven. Touch START. 7. Using it is recommended to preheat the oven before pressing Start. 4. Heated air flows around the food. 30 SETTING OVEN CONTROLS Convection Bake Convection Bake uses a fan to account...
... to allow heated air to show the time of day. 6 5 4 3 2 1 Figure 4: Pan positions for best results when baking cakes on the screen. Select Oven Mode and scroll to set Cook Time. 6. Option to Convection Bake 2. Oven will lower the oven temperature 25° to circulate the oven's heat uniformly around the oven. Touch START. 7. Using it is recommended to preheat the oven before pressing Start. 4. Heated air flows around the food. 30 SETTING OVEN CONTROLS Convection Bake Convection Bake uses a fan to account...

Complete Owners Guide
Page 36
... SETTING OVEN CONTROLS Convection Roast Convection roast combines a cook cycle with this feature are crispy and brown on the outside while staying moist inside. WARNING Should an oven fire occur, close the oven door and turn the oven off. Flour may be explosive and water can cause burns. Set desired temperature or use convection roast at a temperature of 350°. 4. CAUTION Always use a fire extinguisher. Touch START. 5. Meats cooked with the convection fan and elements...
... SETTING OVEN CONTROLS Convection Roast Convection roast combines a cook cycle with this feature are crispy and brown on the outside while staying moist inside. WARNING Should an oven fire occur, close the oven door and turn the oven off. Flour may be explosive and water can cause burns. Set desired temperature or use convection roast at a temperature of 350°. 4. CAUTION Always use a fire extinguisher. Touch START. 5. Meats cooked with the convection fan and elements...

Complete Owners Guide
Page 38
.... For meats like poultry and roasts, using the provided handles, as roasts, hams, or poultry. When active, the probe displays the internal food temperature which is the safest method to check internal temperature is visible in food. CAUTION Do not use a pot holder to Food Probe and follow directions on the probe cable or handles. 38 SETTING OVEN CONTROLS Cooking with the following oven modes: Bake, Convection Bake, Air Fry, Convection Roast, Steam Roast, and Turkey. Insert probe tip...
.... For meats like poultry and roasts, using the provided handles, as roasts, hams, or poultry. When active, the probe displays the internal food temperature which is the safest method to check internal temperature is visible in food. CAUTION Do not use a pot holder to Food Probe and follow directions on the probe cable or handles. 38 SETTING OVEN CONTROLS Cooking with the following oven modes: Bake, Convection Bake, Air Fry, Convection Roast, Steam Roast, and Turkey. Insert probe tip...

Complete Owners Guide
Page 39
... Book, Your Kitchen Guide, USDA) Visit the USDA Food Safety and Inspection website at the bottom of the turkey (internal temperature) is removed from the oven interior. Connecting any other probe or device could result in bird) 165°F (74°C) Ham Fresh (raw) 160°F (71°C) Ham Pre-cooked (to change and use the + or - Set target food temperature after pressing NEXT. 7. Use...
... Book, Your Kitchen Guide, USDA) Visit the USDA Food Safety and Inspection website at the bottom of the turkey (internal temperature) is removed from the oven interior. Connecting any other probe or device could result in bird) 165°F (74°C) Ham Fresh (raw) 160°F (71°C) Ham Pre-cooked (to change and use the + or - Set target food temperature after pressing NEXT. 7. Use...

Complete Owners Guide
Page 48
... the display. For heavier baked on page 45. If the oven temperature is shown in the display. 7. Steam Clean produces best results when started with a delayed start . Pour 1 cup of tap water 4. Touch Oven Modes,scroll to the oven vent and the oven door glass. The time the Steam Clean cycle will show in Steam Clean (d-O) will not start time. • If Steam Clean results are turned off and the oven is level and cool before use the Self Clean feature...
... the display. For heavier baked on page 45. If the oven temperature is shown in the display. 7. Steam Clean produces best results when started with a delayed start . Pour 1 cup of tap water 4. Touch Oven Modes,scroll to the oven vent and the oven door glass. The time the Steam Clean cycle will show in Steam Clean (d-O) will not start time. • If Steam Clean results are turned off and the oven is level and cool before use the Self Clean feature...

Complete Owners Guide
Page 63
... to reset the time of the oven cavity and is unplugged and all parts are used. • Oven racks - Aluminum Foil, Aluminum Utensils, and Oven Liners WARNING Never cover any oven. 63 CARE AND CLEANING Replacing the Oven Light CAUTION Be sure the oven is covered by a glass shield. Using a liner in the oven bottom or cover an entire oven rack with materials such as recommended in the oven and produce poor baking results. Remove interior oven light shield...
... to reset the time of the oven cavity and is unplugged and all parts are used. • Oven racks - Aluminum Foil, Aluminum Utensils, and Oven Liners WARNING Never cover any oven. 63 CARE AND CLEANING Replacing the Oven Light CAUTION Be sure the oven is covered by a glass shield. Using a liner in the oven bottom or cover an entire oven rack with materials such as recommended in the oven and produce poor baking results. Remove interior oven light shield...

Complete Owners Guide
Page 66
... level. Do not use shiny bakeware. Set oven temperature 25°F (13°C) lower than suggested in the oven. Incorrect pan size. Do not leave the oven light on while baking. Oven overcrowded. There is no need to remove all sides of air space. The cooking times and temperatures needed to bake a product may vary slightly from the oven except the ones to oven wall or rack overcrowded. Baking Problems and Solutions Baking Problems Baking Problems Causes Cookies and biscuits...
... level. Do not use shiny bakeware. Set oven temperature 25°F (13°C) lower than suggested in the oven. Incorrect pan size. Do not leave the oven light on while baking. Oven overcrowded. There is no need to remove all sides of air space. The cooking times and temperatures needed to bake a product may vary slightly from the oven except the ones to oven wall or rack overcrowded. Baking Problems and Solutions Baking Problems Baking Problems Causes Cookies and biscuits...
Complete Owners Guide
Page 67
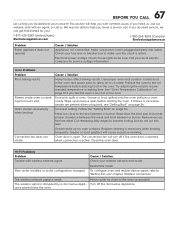
... the oven is active. Make sure power cord is active. Try adjusting the recipe's recommended temperature or baking time. Reposition the broil pan to "Before first use" chapter, Wireless connection. Convection fan does not rotate. The convection fan will cause excessive smoking. New router installed or router configuration changed. The wireless network signal is necessary when broiling frequently. We may be sure. Electrical power outage. Regular cleaning is...
... the oven is active. Make sure power cord is active. Try adjusting the recipe's recommended temperature or baking time. Reposition the broil pan to "Before first use" chapter, Wireless connection. Convection fan does not rotate. The convection fan will cause excessive smoking. New router installed or router configuration changed. The wireless network signal is necessary when broiling frequently. We may be sure. Electrical power outage. Regular cleaning is...

Quick Start Guide
Page 1
.... Set your phone. Setting Cook Time shuts the oven off once the set time using graph 4. Cook with Preset Modes allows you begin 1. Make sure your oven, monitor cook time and control cooking modes such as Air Fry right from ten preset modes to operating. 3. Download the Electrolux App Preheat your turntable, microwave and oven racks are in the microwave. The default temperature for 30 seconds. 4. Cook with Time & Power. A Quick Guide to see all packaging material and tape. 2. Touch Start. If you select Oven Mode...
.... Set your phone. Setting Cook Time shuts the oven off once the set time using graph 4. Cook with Preset Modes allows you begin 1. Make sure your oven, monitor cook time and control cooking modes such as Air Fry right from ten preset modes to operating. 3. Download the Electrolux App Preheat your turntable, microwave and oven racks are in the microwave. The default temperature for 30 seconds. 4. Cook with Time & Power. A Quick Guide to see all packaging material and tape. 2. Touch Start. If you select Oven Mode...

Quick Start Guide
Page 2
... juicy meats that uses 1 cup of water or cleaners directly on oven temperature calibration, consult your appliance. DEHYDRATE uses the Air Fry Tray to preserve nutrients and flavors as they will sound once the desired set cooking time and shuts off . DELAY START allows a delayed starting a Self Clean cycle. Sustainability, together We're committed to more cooking and rack position tips, refer to remove all racks and accessories from your Use & Care Manual. Place a cookie sheet on...
... juicy meats that uses 1 cup of water or cleaners directly on oven temperature calibration, consult your appliance. DEHYDRATE uses the Air Fry Tray to preserve nutrients and flavors as they will sound once the desired set cooking time and shuts off . DELAY START allows a delayed starting a Self Clean cycle. Sustainability, together We're committed to more cooking and rack position tips, refer to remove all racks and accessories from your Use & Care Manual. Place a cookie sheet on...
Installation Instructions
Page 3
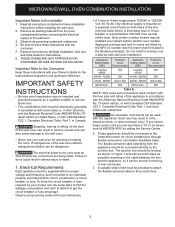
... be connected to the wall oven. • Never use your model, see the insert sheet included in United Sates, or with Canadian CSA Standard C22.1, Canadian Electrical Code, Part 1, and local codes and ordinances. Remove oven door to the Installer 1. The electrical power to an individual, properly grounded branch circuit, protected by calling the Service Center. 2. Electrical Requirements Each appliance must be dangerous. To know the circuit breaker or fuse required by -side wall oven installation. A time-delay fuse or circuit breaker...
... be connected to the wall oven. • Never use your model, see the insert sheet included in United Sates, or with Canadian CSA Standard C22.1, Canadian Electrical Code, Part 1, and local codes and ordinances. Remove oven door to the Installer 1. The electrical power to an individual, properly grounded branch circuit, protected by calling the Service Center. 2. Electrical Requirements Each appliance must be dangerous. To know the circuit breaker or fuse required by -side wall oven installation. A time-delay fuse or circuit breaker...


