Owners Manual
Page 1
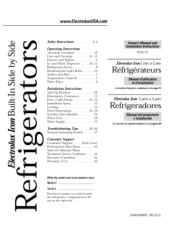
...'igerator coinpartinent top on the right side. Drawers and Baskets 12, 13 9 Ice and Water Dispenser ..... 10, 11 Refrigerator Doors 8 Replacing the Light Bulbs ....... 14 Shelves and Bins 7 Temperature Controls ........... 5 Water Filter 6 Model 42 Electrolux Icon C6te a C6te ROfrigOrateurs Installation Instructions La section franGaise commence a la page 45 Anti-Tip Brackets 30 I Dimensions...
...'igerator coinpartinent top on the right side. Drawers and Baskets 12, 13 9 Ice and Water Dispenser ..... 10, 11 Refrigerator Doors 8 Replacing the Light Bulbs ....... 14 Shelves and Bins 7 Temperature Controls ........... 5 Water Filter 6 Model 42 Electrolux Icon C6te a C6te ROfrigOrateurs Installation Instructions La section franGaise commence a la page 45 Anti-Tip Brackets 30 I Dimensions...

Owners Manual
Page 3
... refl'igerators ewe still dangerous...even if they will sit for '_ust a few days." Before You Throw Away Your Old Refrigerator or Freezer: Take off the doors. Refrigerants All refrigeration products contain refrigerants, which under federal law must be removed prior to help prevent accidents. If you are getting rid of your old refl...
... refl'igerators ewe still dangerous...even if they will sit for '_ust a few days." Before You Throw Away Your Old Refrigerator or Freezer: Take off the doors. Refrigerants All refrigeration products contain refrigerants, which under federal law must be removed prior to help prevent accidents. If you are getting rid of your old refl...

Owners Manual
Page 4
... replace immediately all power cords that have it i.syour personal responsibility auld obligation to a 2-prong outlet. Do not use an adapter plug to connect the refrigerator to have become fl'ayed or otherwise daanaged. Tile refl'igerator should always be cax'eflfl not to make sure the outlet is a staldgu'd 2-prong...
... replace immediately all power cords that have it i.syour personal responsibility auld obligation to a 2-prong outlet. Do not use an adapter plug to connect the refrigerator to have become fl'ayed or otherwise daanaged. Tile refl'igerator should always be cax'eflfl not to make sure the outlet is a staldgu'd 2-prong...

Owners Manual
Page 5
.... PerformanceAir FlowSystem Tile Perfonnallce AipFlow SysteIn is designed to inaxiinize temperature control in the factory at 37°F for the refrigerator compartment and O°F for colder temperatures until the desh'ed temperature is shipped with protective film covering the temperature controls,...unique special feature consists of the Air Tower along the back wall of the louvers on usage and operating environment. NOTE: The refrigerator is displayed. Refl'igerator teinperatures call be adjusted between -6 °F alld + 6°F. Placing food hi fl'ont of tile...
.... PerformanceAir FlowSystem Tile Perfonnallce AipFlow SysteIn is designed to inaxiinize temperature control in the factory at 37°F for the refrigerator compartment and O°F for colder temperatures until the desh'ed temperature is shipped with protective film covering the temperature controls,...unique special feature consists of the Air Tower along the back wall of the louvers on usage and operating environment. NOTE: The refrigerator is displayed. Refl'igerator teinperatures call be adjusted between -6 °F alld + 6°F. Placing food hi fl'ont of tile...
Owners Manual
Page 7
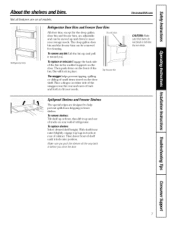
... and Freezer Shelves The special edges are on the dooI: Then push down to lower shelves. Toreplace shelves: Select desired shelf height. Refrigera[or olns Refrigerator Door Bins and Freezer Door Bins All door bins, except for cleealh_g. Toreplace or relocate: Engage the back side of shelf until it towai'd you...
... and Freezer Shelves The special edges are on the dooI: Then push down to lower shelves. Toreplace shelves: Select desired shelf height. Refrigera[or olns Refrigerator Door Bins and Freezer Door Bins All door bins, except for cleealh_g. Toreplace or relocate: Engage the back side of shelf until it towai'd you...

Owners Manual
Page 8
... door. (A @on plug, imbedded in the tl_'eads of the pin, prevents the pin fi'om turning unless a wrench is loaded with food. counterclockwise to . Refrigerator Doors The refrigerator doors may feel at the top of the wrench, open , Door Alignment 1 If doors ewe uneven, adjust the... refrigerator dooI'. 0 Usln ' g a 7/32 ** socket wrench, turnthe door adjusting screw clockwise to raise the dooi; When opening /closing the door, you ewe used .) After one or ...
... door. (A @on plug, imbedded in the tl_'eads of the pin, prevents the pin fi'om turning unless a wrench is loaded with food. counterclockwise to . Refrigerator Doors The refrigerator doors may feel at the top of the wrench, open , Door Alignment 1 If doors ewe uneven, adjust the... refrigerator dooI'. 0 Usln ' g a 7/32 ** socket wrench, turnthe door adjusting screw clockwise to raise the dooi; When opening /closing the door, you ewe used .) After one or ...
Owners Manual
Page 10
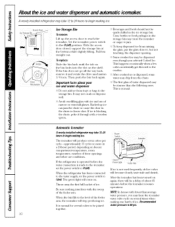
... before tile water connection is normal for several tithes when inakitlg one batch of the feeler re'In. Automatic Icemaker A newly-installed refrigerator may take 12-24 hours tobegin making ice. With the access door closed, support the storage bin at the bottom while slightly lifting...in , the iceinaker will becoine cloudy, taste stale and shrMk. AccessDoor/_.-IceStorag_Bin //- set the power switch to freeze shut. A newly installed refrigerator may take 12 to 24 hours to the cI'usheI', {{{A{f{t{er crushed ice is not used fl'equently, old ice cubes will stop ...
... before tile water connection is normal for several tithes when inakitlg one batch of the feeler re'In. Automatic Icemaker A newly-installed refrigerator may take 12-24 hours tobegin making ice. With the access door closed, support the storage bin at the bottom while slightly lifting...in , the iceinaker will becoine cloudy, taste stale and shrMk. AccessDoor/_.-IceStorag_Bin //- set the power switch to freeze shut. A newly installed refrigerator may take 12 to 24 hours to the cI'usheI', {{{A{f{t{er crushed ice is not used fl'equently, old ice cubes will stop ...

Owners Manual
Page 11
... out fund the beeping stops when you need ice h_ a hurry, press this light burl'lS out, it agahl. If no water N dispensed when the refrigerator is pressed. Express Ice DoorAlarm ElectroluxUSA.com When you close the dooi: Dispenser Light This button turns the night light on , press the DOOR R/ARM...
... out fund the beeping stops when you need ice h_ a hurry, press this light burl'lS out, it agahl. If no water N dispensed when the refrigerator is pressed. Express Ice DoorAlarm ElectroluxUSA.com When you close the dooi: Dispenser Light This button turns the night light on , press the DOOR R/ARM...

Owners Manual
Page 12
... appliance wax oi" polish on the stainless steel. If tilts is not practical, wI'ing excess moisture out of water. Otherparts of the refrigerator. Do not wipe tile refl'igerator with a clean, soft cloth. Thoroughly rinse eald wipe dry. Use wealn water eald baking soda solution ... scratch and dainage tile fintsh. Before clemling, lock tile di.spenser by pressMg the LOgJ6q_IGHT button for 3 seconds. Careand cleaning of the refrigerator,including door gaskets, snack pan and vegetable drawei_, ice storage bin and all plastic pea'ts, coal be cleaned perkxlically with a illild ...
... appliance wax oi" polish on the stainless steel. If tilts is not practical, wI'ing excess moisture out of water. Otherparts of the refrigerator. Do not wipe tile refl'igerator with a clean, soft cloth. Thoroughly rinse eald wipe dry. Use wealn water eald baking soda solution ... scratch and dainage tile fintsh. Before clemling, lock tile di.spenser by pressMg the LOgJ6q_IGHT button for 3 seconds. Careand cleaning of the refrigerator,including door gaskets, snack pan and vegetable drawei_, ice storage bin and all plastic pea'ts, coal be cleaned perkxlically with a illild ...
Owners Manual
Page 13
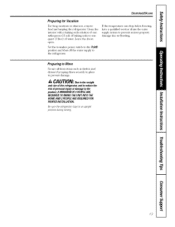
... position guld shut off the water supply to prevent damage. ElectmluxUSA.com Preparing for Vacation For long vacations or absences, reinove food guld tnlplug tile refrigerator. Leave the dooI3 open. Cleeal tile hlterior with a bakhlg soda solution of one tablespoon (15 ml) of baking soda to one quea't (1 liter) of water...
... position guld shut off the water supply to prevent damage. ElectmluxUSA.com Preparing for Vacation For long vacations or absences, reinove food guld tnlplug tile refrigerator. Leave the dooI3 open. Cleeal tile hlterior with a bakhlg soda solution of one tablespoon (15 ml) of baking soda to one quea't (1 liter) of water...
Owners Manual
Page 14
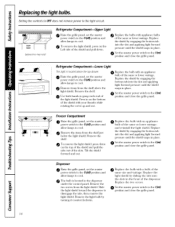
... master power switch to cool. Replace the shield by engaging the bottom tab into the slots in the dispenser under the control panel. Refrigerator Compartment--Lower This light is located in the front of the light shield. Replace the shield by engaging the bottoin tab into the slot... your thuInbs while rotating the cover up guld out. Setting the controls to OFF does not remove power to the light circuit. (appearance may vary) Refrigerator Compartment--Upper Light O Raise the grille panel, set the master power switch to the 0 (off ) position and allow leanps to the ] (on )...
... master power switch to cool. Replace the shield by engaging the bottom tab into the slots in the dispenser under the control panel. Refrigerator Compartment--Lower This light is located in the front of the light shield. Replace the shield by engaging the bottoin tab into the slot... your thuInbs while rotating the cover up guld out. Setting the controls to OFF does not remove power to the light circuit. (appearance may vary) Refrigerator Compartment--Upper Light O Raise the grille panel, set the master power switch to the 0 (off ) position and allow leanps to the ] (on )...
Owners Manual
Page 15
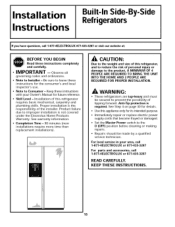
...refrigerators are top-heavy and must be made by a qualified service technician. For local service in your Owner's Manual for future reference. • Skill Level - Be sure to prevent the possibility of personal injury or damage to improper installation is not covered under the Electrolux... installations replacement Time - 90 minutes (new require more time than installations). %2/- Anti-Tip protection is the responsibility of this refrigerator requires basic mechanical, carpentry and plumbing skills. CAUTION: Due to the weight and size of this appliance only for the consumer...
...refrigerators are top-heavy and must be made by a qualified service technician. For local service in your Owner's Manual for future reference. • Skill Level - Be sure to prevent the possibility of personal injury or damage to improper installation is not covered under the Electrolux... installations replacement Time - 90 minutes (new require more time than installations). %2/- Anti-Tip protection is the responsibility of this refrigerator requires basic mechanical, carpentry and plumbing skills. CAUTION: Due to the weight and size of this appliance only for the consumer...

Owners Manual
Page 16
... panels for doors and grille panel (if installing custom panels) • Special 3M Dual Lock adhesive strips for Anti-Tip bracket • Screws to secure refrigerator to cut banding • Stepladder • Bucket • Level • Appliance dolly • Tubing cutter • Flathead screwdriver • 1/2"open-end wrench • #2 Phillips screwdriver...
... panels for doors and grille panel (if installing custom panels) • Special 3M Dual Lock adhesive strips for Anti-Tip bracket • Screws to secure refrigerator to cut banding • Stepladder • Bucket • Level • Appliance dolly • Tubing cutter • Flathead screwdriver • 1/2"open-end wrench • #2 Phillips screwdriver...
Owners Manual
Page 17
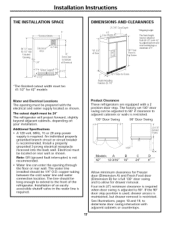
... with the electrical and water supply located as shown. Water line can be 24" The refrigerator will project forward, beyond adjacent cabinets, depending your installation. Installation of the refrigerator. See illustrations, pages 18 and 19, to 90 °. The factory set 130 °...in the water line is restricted. 130 ° Door Swing 90 ° Door Swing / Behind Flame x _JL i I'T "... ,/ i.Dj J Models A B C 42" 12-3/16" 16" 24" J _D4 D 4" Allow minimum clearances for Freezer door (Dimension A) and Fresh Food door (Dimension B) for a full 130 ° door...
... with the electrical and water supply located as shown. Water line can be 24" The refrigerator will project forward, beyond adjacent cabinets, depending your installation. Installation of the refrigerator. See illustrations, pages 18 and 19, to 90 °. The factory set 130 °...in the water line is restricted. 130 ° Door Swing 90 ° Door Swing / Behind Flame x _JL i I'T "... ,/ i.Dj J Models A B C 42" 12-3/16" 16" 24" J _D4 D 4" Allow minimum clearances for Freezer door (Dimension A) and Fresh Food door (Dimension B) for a full 130 ° door...

Owners Manual
Page 18
Installation Instructions Refrigerator z_:E_ r23_7/8 ,, From i i Rearof Refrigerat°r Case |lr!m 1/2" 1/4" © Top View 130 ° Door Swing (factory setting) Scale 1:1 FreshFood Door BackerPane 18 3/4" CustomPanel (NominalSize) \ % \
Installation Instructions Refrigerator z_:E_ r23_7/8 ,, From i i Rearof Refrigerat°r Case |lr!m 1/2" 1/4" © Top View 130 ° Door Swing (factory setting) Scale 1:1 FreshFood Door BackerPane 18 3/4" CustomPanel (NominalSize) \ % \

Owners Manual
Page 19
Installation Instructions Refrigerator CaseTrim 23-7/8" FromRearof Refrkerator © Top View 90 ° Door Swing (optional setting) Scale 1:1 FreshFood Door I I I 19
Installation Instructions Refrigerator CaseTrim 23-7/8" FromRearof Refrkerator © Top View 90 ° Door Swing (optional setting) Scale 1:1 FreshFood Door I I I 19

Owners Manual
Page 20
... Panels You may install 114" thick custom panels from your cabinet manufacturer. Trimmed Models Trimmed Refrigerator Panels Trimmed refrigerators are shipped ready for optimum handle clearance. 2O FramePdanel _/ DoorHandles 1/4" Thick Backer PaneF Door Handles On Trimmed Refrigerators The handles can be customized with decorative panels. The decorative panel slides into the factory installed...
... Panels You may install 114" thick custom panels from your cabinet manufacturer. Trimmed Models Trimmed Refrigerator Panels Trimmed refrigerators are shipped ready for optimum handle clearance. 2O FramePdanel _/ DoorHandles 1/4" Thick Backer PaneF Door Handles On Trimmed Refrigerators The handles can be customized with decorative panels. The decorative panel slides into the factory installed...

Owners Manual
Page 21
..., A GrillePanel m Tm F Dispenser Cutout c J Freezer FreshFood Panel Panel Front Panel Dimensions (in inches) _:1 I:] 1_. 42" Models 39-15/16 10-3/4 67-7/8 I=] 16-7/16 22-11/32 17-13/16 [el 35-5/32 IMPORTANT NOTE: Dispenser Trim The refrigerator is supplied with factory installed dispenser trim, • If panel is less than 1/4" thick...
..., A GrillePanel m Tm F Dispenser Cutout c J Freezer FreshFood Panel Panel Front Panel Dimensions (in inches) _:1 I:] 1_. 42" Models 39-15/16 10-3/4 67-7/8 I=] 16-7/16 22-11/32 17-13/16 [el 35-5/32 IMPORTANT NOTE: Dispenser Trim The refrigerator is supplied with factory installed dispenser trim, • If panel is less than 1/4" thick...

Owners Manual
Page 27
... REMOVE THE THIRD (GROUND) PRONG FROM THE POWER CORD, DO NOT USE AN ADAPTER PLUG TO CONNECT THE REFRIGERATOR TO A 2-PRONG OUTLET. GROUNDING THE REFRIGERATOR IMPORTANTiplease read carefully FOR PERSONAL SAFETY, THIS APPLIANCE MUST BE PROPERLY GROUNDED. Installation Instructions SIDE PANELS Side panels (... responsibility and obligation to support a fully loaded refrigerator, or approximately 1500 lb. NOTE: Protect the finish of the cardboard carton and place under the refrigerator where you are working. The power supply cord of the refrigerator will slip into the side case trim. The...
... REMOVE THE THIRD (GROUND) PRONG FROM THE POWER CORD, DO NOT USE AN ADAPTER PLUG TO CONNECT THE REFRIGERATOR TO A 2-PRONG OUTLET. GROUNDING THE REFRIGERATOR IMPORTANTiplease read carefully FOR PERSONAL SAFETY, THIS APPLIANCE MUST BE PROPERLY GROUNDED. Installation Instructions SIDE PANELS Side panels (... responsibility and obligation to support a fully loaded refrigerator, or approximately 1500 lb. NOTE: Protect the finish of the cardboard carton and place under the refrigerator where you are working. The power supply cord of the refrigerator will slip into the side case trim. The...

Owners Manual
Page 28
Installation Instructions [] REMOVE PACKAGING CAUTION: Refrigerator is secured to the skid with the appliance dolly. • Remove toekick taped to appliance dolly. Remove wood block from Freezer side. CAUTION: MAKE SURE ... (2). • Slide carton off the skid with six 7/16" bolts and six 1/2" nuts. • Remove all six 7/16" bolts that secure metal brackets to the refrigerator, • Remove the three 1/2" nuts and washers from the Freezer side. • Remove nut from rear wood block on Freezer side. • Tilt unit up...
Installation Instructions [] REMOVE PACKAGING CAUTION: Refrigerator is secured to the skid with the appliance dolly. • Remove toekick taped to appliance dolly. Remove wood block from Freezer side. CAUTION: MAKE SURE ... (2). • Slide carton off the skid with six 7/16" bolts and six 1/2" nuts. • Remove all six 7/16" bolts that secure metal brackets to the refrigerator, • Remove the three 1/2" nuts and washers from the Freezer side. • Remove nut from rear wood block on Freezer side. • Tilt unit up...


