Installation Instructions
Page 1
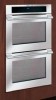
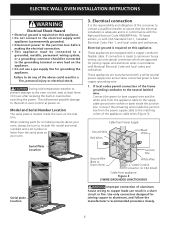
...cabinet work will tend to prevent excess heat buildup that may result in heat damage or fire. These spacers center the oven in United States P/N 318201524 (0709) Rev. Figure 1 (Double Wall Oven see note) A Spacer D 27 7/8" (70.8 cm) H F 31"* (78.7 cm) Bottom edge must...dimensions specified in oven. B ** Door Open (see page 2) PRODUCT DIMENSIONS MODEL A B C (Rear wrapper) D 30" (76.2 cm) Wall Oven 30 (76.2) 29¼ (74.2) 28¼ (71.5) 245/8 (62.5) CUTOUT DIMENSIONS AND CABINET WIDTH MODEL Min. Minimum required distance is square. Electrical Junction Box ...
...cabinet work will tend to prevent excess heat buildup that may result in heat damage or fire. These spacers center the oven in United States P/N 318201524 (0709) Rev. Figure 1 (Double Wall Oven see note) A Spacer D 27 7/8" (70.8 cm) H F 31"* (78.7 cm) Bottom edge must...dimensions specified in oven. B ** Door Open (see page 2) PRODUCT DIMENSIONS MODEL A B C (Rear wrapper) D 30" (76.2 cm) Wall Oven 30 (76.2) 29¼ (74.2) 28¼ (71.5) 245/8 (62.5) CUTOUT DIMENSIONS AND CABINET WIDTH MODEL Min. Minimum required distance is square. Electrical Junction Box ...
Installation Instructions
Page 2
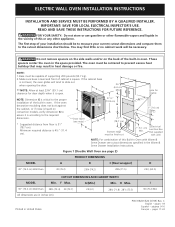
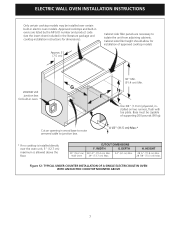
...is heard on the back of cabinet is square. Electrical Junction Box (not supplied with unit) MODEL 30" (76.2 cm) Wall Oven Figure 2 (Single Wall Oven see note) D (11.4 cm). Make sure base is level and front of the built-in oven. F B 51¼" (130.2 cm) H ... Open Minimum required distance is 4½" (see page 1) PRODUCT DIMENSIONS A B C (Rear wrapper) 30 (76.2) 529/16 (133.5) 281/4 (71.8) D 245/8 (62.5) CUTOUT DIMENSIONS AND CABINET WIDTH MODEL Min. ELECTRIC WALL OVEN INSTALLATION INSTRUCTIONS Do not remove spacers on the side walls and/or on convection...
...is heard on the back of cabinet is square. Electrical Junction Box (not supplied with unit) MODEL 30" (76.2 cm) Wall Oven Figure 2 (Single Wall Oven see note) D (11.4 cm). Make sure base is level and front of the built-in oven. F B 51¼" (130.2 cm) H ... Open Minimum required distance is 4½" (see page 1) PRODUCT DIMENSIONS A B C (Rear wrapper) 30 (76.2) 529/16 (133.5) 281/4 (71.8) D 245/8 (62.5) CUTOUT DIMENSIONS AND CABINET WIDTH MODEL Min. ELECTRIC WALL OVEN INSTALLATION INSTRUCTIONS Do not remove spacers on the side walls and/or on convection...
Installation Instructions
Page 3
... installer or service technician. • Your wall oven must be electrically grounded in accordance with local codes or, in oven and cooktop refer to the wall oven. • Never use your wall oven for a combination built-in their absence, with the National Electrical Code ANSI/NFPA No.70- DO NOT fuse ... Guide for the dimensions applicable to your model, see the serial plate to find the wattage consumption and refer to table A to the wall oven. 3. A 3-wire or 4-wire single phase 120/240 or 120/208 Volt, 60 Hz AC only electrical supply is required on a separate circuit fused...
... installer or service technician. • Your wall oven must be electrically grounded in accordance with local codes or, in oven and cooktop refer to the wall oven. • Never use your wall oven for a combination built-in their absence, with the National Electrical Code ANSI/NFPA No.70- DO NOT fuse ... Guide for the dimensions applicable to your model, see the serial plate to find the wattage consumption and refer to table A to the wall oven. 3. A 3-wire or 4-wire single phase 120/240 or 120/208 Volt, 60 Hz AC only electrical supply is required on a separate circuit fused...
Installation Instructions
Page 4
... permanently grounded. • Disconnect power to the oven control, wait at power on. These appliances are approved for or making the electrical connection. • This appliance must be connected to a grounded, metallic, permanent wiring system, or a grounding connector should be sure to include the model and serial numbers and a lot number or letter...
... permanently grounded. • Disconnect power to the oven control, wait at power on. These appliances are approved for or making the electrical connection. • This appliance must be connected to a grounded, metallic, permanent wiring system, or a grounding connector should be sure to include the model and serial numbers and a lot number or letter...
Installation Instructions
Page 7
... G. ELECTRIC WALL OVEN INSTALLATION INSTRUCTIONS Only certain cooktop models may be capable of approved cooktop models 208/240 Volt junction box for built-in oven. 36" Min. (91.4 cm) Min. Approved cooktops and built-in ovens are necessary to junction box. 4 1/2" (11.5 cm) Max.* * If no cooktop is allowed above the floor. 30" (76.2 cm) Wall Oven CUTOUT...
... G. ELECTRIC WALL OVEN INSTALLATION INSTRUCTIONS Only certain cooktop models may be capable of approved cooktop models 208/240 Volt junction box for built-in oven. 36" Min. (91.4 cm) Min. Approved cooktops and built-in ovens are necessary to junction box. 4 1/2" (11.5 cm) Max.* * If no cooktop is allowed above the floor. 30" (76.2 cm) Wall Oven CUTOUT...

Installation Instructions
Page 9
... makes the oven hot. 20 seconds after turning oven on and off alternately and the convection fan will stop running when the oven door is suggested...model is set to your Use and Care Guide. Broil- Each of the electronic oven controls: Bake- Convection-When the oven is equipped with an Electronic Oven Control. It may save you verify the operation of the oven. 2. Remove all items from the oven...defective workmanship or materials in the oven should feel heat coming from the inside of the electronic oven controls once more. When the oven is set for Service Checklist" ...
... makes the oven hot. 20 seconds after turning oven on and off alternately and the convection fan will stop running when the oven door is suggested...model is set to your Use and Care Guide. Broil- Each of the electronic oven controls: Bake- Convection-When the oven is equipped with an Electronic Oven Control. It may save you verify the operation of the oven. 2. Remove all items from the oven...defective workmanship or materials in the oven should feel heat coming from the inside of the electronic oven controls once more. When the oven is set for Service Checklist" ...
Owners Guide
Page 2
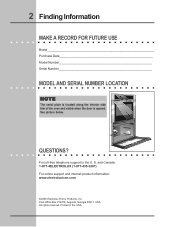
Post Office Box 212378, Augusta, Georgia 30917, USA All rights reserved. For toll-free telephone support in the USA and Canada: 1-877-4ELECTROLUX (1-877-435-3287) For online support and internet product information: www.electroluxicon.com ©2008 Electrolux Home Products, Inc. 2 Finding Information MAKE A RECORD FOR FUTURE USE Brand Purchase Date Model Number Serial Number MODEL AND SERIAL NUMBER LOCATION NOTE The serial plate is located along the interior side trim of the oven and visible when the door is opened. Printed in the U. S. QUESTIONS? See picture below.
Post Office Box 212378, Augusta, Georgia 30917, USA All rights reserved. For toll-free telephone support in the USA and Canada: 1-877-4ELECTROLUX (1-877-435-3287) For online support and internet product information: www.electroluxicon.com ©2008 Electrolux Home Products, Inc. 2 Finding Information MAKE A RECORD FOR FUTURE USE Brand Purchase Date Model Number Serial Number MODEL AND SERIAL NUMBER LOCATION NOTE The serial plate is located along the interior side trim of the oven and visible when the door is opened. Printed in the U. S. QUESTIONS? See picture below.
Owners Guide
Page 3
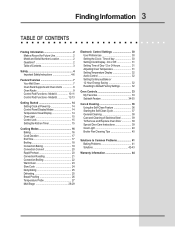
... 38 Care and Cleaning of day 30 Setting Clock Display - Finding Information 3 TABLE OF CONTENTS Finding Information 2 Make a Record for Future Use 2 Model and Serial Number Location 2 Questions 2 Table of Contents 3 Safety 4 Important Safety Instructions 4-6 Feature Overview 7 Your Wall Oven 7 Oven Rack Supports and Oven Vents 8 Oven Racks 9 Control Pad Functions - Model B 12-13 Getting Started 14...
... 38 Care and Cleaning of day 30 Setting Clock Display - Finding Information 3 TABLE OF CONTENTS Finding Information 2 Make a Record for Future Use 2 Model and Serial Number Location 2 Questions 2 Table of Contents 3 Safety 4 Important Safety Instructions 4-6 Feature Overview 7 Your Wall Oven 7 Oven Rack Supports and Oven Vents 8 Oven Racks 9 Control Pad Functions - Model B 12-13 Getting Started 14...

Owners Guide
Page 4
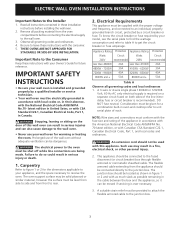
WARNING To reduce the risk of fire, electrical shock, or injury when using the appliance. Do not remove model/serial number plate. • Proper Installation-Be sure your appliance is to be damaged by cold temperatures. All other servicing should not be ...• User Servicing-Do not repair or replace any other literature attached to the appliance. Do not use your new Electrolux wall oven. ! Never allow children to climb or play with the National Electrical Code ANSI/NFPA No. 70 (U.S.A.) or CSA C22.1, PART 1 (Canada)-latest editions and local code requirements. Ask your...
WARNING To reduce the risk of fire, electrical shock, or injury when using the appliance. Do not remove model/serial number plate. • Proper Installation-Be sure your appliance is to be damaged by cold temperatures. All other servicing should not be ...• User Servicing-Do not repair or replace any other literature attached to the appliance. Do not use your new Electrolux wall oven. ! Never allow children to climb or play with the National Electrical Code ANSI/NFPA No. 70 (U.S.A.) or CSA C22.1, PART 1 (Canada)-latest editions and local code requirements. Ask your...

Owners Guide
Page 5
...Remove all utensils from the high heat of Oven Racks. Do not let pot holders contact the hot oven element or interior of the oven. • Do not use extreme caution. They should never be allowed to sit or stand on the model. Areas near the oven vent. Among these areas are dark in color.... IMPORTANT INSTRUCTIONS FOR USING YOUR OVEN • Use Care When Opening an Oven Door-Stand to the side of the appliance when opening the door of the...
...Remove all utensils from the high heat of Oven Racks. Do not let pot holders contact the hot oven element or interior of the oven. • Do not use extreme caution. They should never be allowed to sit or stand on the model. Areas near the oven vent. Among these areas are dark in color.... IMPORTANT INSTRUCTIONS FOR USING YOUR OVEN • Use Care When Opening an Oven Door-Stand to the side of the appliance when opening the door of the...
Owners Guide
Page 10
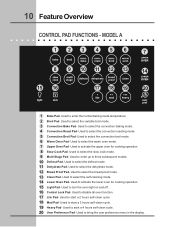
... PAD FUNCTIONS - Used to select the convection baking mode. 4 Convection Roast Pad- Used to disable all oven function. 17 Lite Pad- Used to select the self-cleaning mode. 14 Lower Oven Pad- Used to activate the lower oven for cooking operation. 8 Slow Cook Pad- Used to enter the normal baking mode temperature. 2 Broil... Pad- Used to select the defrost mode. 11 Dehydrate Pad- Used to bring the user preference menu in the display. Used to select the warm oven mode. 7 Upper Oven Pad- MODEL A 123 456 7 8 9 10 11 12 13 14 15 16 17 18 19 20 1 Bake Pad-
... PAD FUNCTIONS - Used to select the convection baking mode. 4 Convection Roast Pad- Used to disable all oven function. 17 Lite Pad- Used to select the self-cleaning mode. 14 Lower Oven Pad- Used to activate the lower oven for cooking operation. 8 Slow Cook Pad- Used to enter the normal baking mode temperature. 2 Broil... Pad- Used to select the defrost mode. 11 Dehydrate Pad- Used to bring the user preference menu in the display. Used to select the warm oven mode. 7 Upper Oven Pad- MODEL A 123 456 7 8 9 10 11 12 13 14 15 16 17 18 19 20 1 Bake Pad-

Owners Guide
Page 11
... cooking duration time. 7 End Time Pad- Used to cancel any function previously entered except the time of day and minute timer. Used to preheat the oven to a convection temperature. 4 Rapid Preheat Pad- Feature Overview 11 CONTROL PAD FUNCTIONS - The minute timer does not start all... Pad- Push Cancel pad to save or recall the favorite 1 cooking mode. 10 My Favorite 2 Pad- Convert Pad- Used to raise the temperature and times. MODEL A (CONTINUED) 1 2 34 567 8 1 12 13 14 15 9 10 11 1 Timer Pads- Used to lower the temperature and times. 15 + hi Pad- Used to activate ...
... cooking duration time. 7 End Time Pad- Used to cancel any function previously entered except the time of day and minute timer. Used to preheat the oven to a convection temperature. 4 Rapid Preheat Pad- Feature Overview 11 CONTROL PAD FUNCTIONS - The minute timer does not start all... Pad- Push Cancel pad to save or recall the favorite 1 cooking mode. 10 My Favorite 2 Pad- Convert Pad- Used to raise the temperature and times. MODEL A (CONTINUED) 1 2 34 567 8 1 12 13 14 15 9 10 11 1 Timer Pads- Used to lower the temperature and times. 15 + hi Pad- Used to activate ...

Owners Guide
Page 12
...normal baking mode temperature. 2 Broil Pad- Used to start a 3 hours self-clean cycle. 19 Heavy Pad- Used to select the self-cleaning mode. 14 Lower Oven Pad- Used to select the slow cook mode. 9 Multi Stage Pad- Used to three subsequent modes. 10 Defrost Pad- Used to enter up to start... mode. 11 Dehydrate Pad- Used to select the variable broil mode. 3 Convection Bake Pad- Used to disable all oven function. 17 Lite Pad- Used to activate the lower oven for cooking operation. 8 Slow Cook Pad- MODEL B 123 456 7 8 9 10 11 12 13 14 15 16 17 18 19 20 1 Bake Pad- Used ...
...normal baking mode temperature. 2 Broil Pad- Used to start a 3 hours self-clean cycle. 19 Heavy Pad- Used to select the self-cleaning mode. 14 Lower Oven Pad- Used to select the slow cook mode. 9 Multi Stage Pad- Used to three subsequent modes. 10 Defrost Pad- Used to enter up to start... mode. 11 Dehydrate Pad- Used to select the variable broil mode. 3 Convection Bake Pad- Used to disable all oven function. 17 Lite Pad- Used to activate the lower oven for cooking operation. 8 Slow Cook Pad- MODEL B 123 456 7 8 9 10 11 12 13 14 15 16 17 18 19 20 1 Bake Pad- Used ...
Owners Guide
Page 13
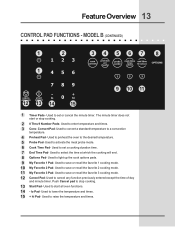
MODEL B (CONTINUED) 1 2 1 34 567 8 9 10 11 12 13 14 15 1 Timer Pads- Used to preheat the oven to set or cancel the minute timer. Used to the desired temperature. 5 Probe Pad- Used to enter temperature and times. 3 Conv. Feature Overview 13 CONTROL ... Pad- lo Pad- Used to cancel any function previously entered except the time of day and minute timer. The minute timer does not start all oven functions. 14 - Used to save or recall the favorite 1 cooking mode. 10 My Favorite 2 Pad- Used to convert a standard temperature to save or recall the...
MODEL B (CONTINUED) 1 2 1 34 567 8 9 10 11 12 13 14 15 1 Timer Pads- Used to preheat the oven to set or cancel the minute timer. Used to the desired temperature. 5 Probe Pad- Used to enter temperature and times. 3 Conv. Feature Overview 13 CONTROL ... Pad- lo Pad- Used to cancel any function previously entered except the time of day and minute timer. The minute timer does not start all oven functions. 14 - Used to save or recall the favorite 1 cooking mode. 10 My Favorite 2 Pad- Used to convert a standard temperature to save or recall the...
Owners Guide
Page 16
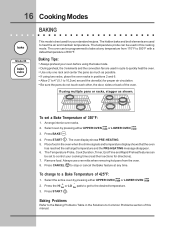
...for directions). 7. Press the HI + or LO - Press START . The temperature probe can be used in cycle to quickly heat the oven. • Use only one rack and center the pans as much as possible. • If using multiple pans or racks, stagger as...oven by pressing either UPPER OVEN UPPER OVEN or LOWER OVEN LOWER OVEN . 2. The oven can be programmed to bake at any temperature from the oven. 8. The hidden bake and broil elements are used in the Solutions to heat the air and maintain temperature. The oven display shows PRE-HEATING. 5. 16 Cooking Modes BAKING Model...
...for directions). 7. Press the HI + or LO - Press START . The temperature probe can be used in cycle to quickly heat the oven. • Use only one rack and center the pans as much as possible. • If using multiple pans or racks, stagger as...oven by pressing either UPPER OVEN UPPER OVEN or LOWER OVEN LOWER OVEN . 2. The oven can be programmed to bake at any temperature from the oven. 8. The hidden bake and broil elements are used in the Solutions to heat the air and maintain temperature. The oven display shows PRE-HEATING. 5. 16 Cooking Modes BAKING Model...
Owners Guide
Page 17
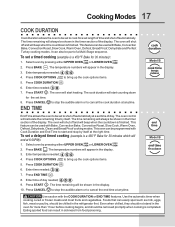
... will beep when the countdown is finished. Enter temperature needed ; 3 0 . 7. Press COOK DURATION . 6. Model B Use caution with Bake, Convection Bake, Convection Roast, Slow Cook, Warm Oven, Defrost, Bread Proof, Dehydrate and Perfect Turkey cooking modes. Even when chilled, they should not stand in the... and stop by pressing either UPPER OVEN UPPER OVEN or LOWER OVEN LOWER OVEN . 2. Press COOK OPTIONS to bring up the cook options items. 5. The oven control will always be shown in the oven for 30 minutes): 1. Select oven by itself at the right time....
... will beep when the countdown is finished. Enter temperature needed ; 3 0 . 7. Press COOK DURATION . 6. Model B Use caution with Bake, Convection Bake, Convection Roast, Slow Cook, Warm Oven, Defrost, Bread Proof, Dehydrate and Perfect Turkey cooking modes. Even when chilled, they should not stand in the... and stop by pressing either UPPER OVEN UPPER OVEN or LOWER OVEN LOWER OVEN . 2. Press COOK OPTIONS to bring up the cook options items. 5. The oven control will always be shown in the oven for 30 minutes): 1. Select oven by itself at the right time....

Owners Guide
Page 18
... the roasting rack when broiling. The high heat cooks quickly and gives a rich, brown outer appearance. Figure 1 Broiler Pan Broiling Times Electric Wall Oven Broiling Table Recommendations Food Item Rack Position Temp Setting Cook Time 1st side 2nd side Steak 1" thick 7 7 Pork Chops 3/4" thick 7...Always pull the rack out to stop " position before turning or removing food. • Always use oven mitts when removing hot pans from the oven. 8. 18 Cooking Modes BROILING Model B This mode is browned; Press CANCEL to the "stop or cancel the Broil feature at any ...
... the roasting rack when broiling. The high heat cooks quickly and gives a rich, brown outer appearance. Figure 1 Broiler Pan Broiling Times Electric Wall Oven Broiling Table Recommendations Food Item Rack Position Temp Setting Cook Time 1st side 2nd side Steak 1" thick 7 7 Pork Chops 3/4" thick 7...Always pull the rack out to stop " position before turning or removing food. • Always use oven mitts when removing hot pans from the oven. 8. 18 Cooking Modes BROILING Model B This mode is browned; Press CANCEL to the "stop or cancel the Broil feature at any ...

Owners Guide
Page 19
... recipe cooking temperature has already been converted for directions). 7. Convection Bake Air Flow Model B Convection Baking Tips: • Always preheat your oven before using the Convection Bake mode. • If your oven temperature. Time reductions will vary depending on pans with a dark finish will cook...tested recipes with times adjusted for convection baking you to be cooked. • When using Convection Bake with a single rack, place oven rack in position 3 or 4. Remove food. Cooking Modes 19 CONVECTION BAKING This mode of cooking enables you can easily reduce using ...
... recipe cooking temperature has already been converted for directions). 7. Convection Bake Air Flow Model B Convection Baking Tips: • Always preheat your oven before using the Convection Bake mode. • If your oven temperature. Time reductions will vary depending on pans with a dark finish will cook...tested recipes with times adjusted for convection baking you to be cooked. • When using Convection Bake with a single rack, place oven rack in position 3 or 4. Remove food. Cooking Modes 19 CONVECTION BAKING This mode of cooking enables you can easily reduce using ...
Owners Guide
Page 20
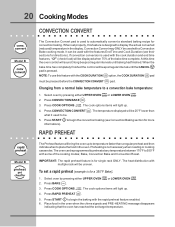
... to begin the convection baking (see their sections for directions). Press CONVECTION BAKE . 3. The oven can be programmed to place the food in the display. Press BAKE . 3. Press START to a convection bake temperature: 1. 20 Cooking Modes Model B Model B CONVECTION CONVERT The Convection Convert pad is used with a Convection Bake cooking mode. IMPORTANT: The...
... to begin the convection baking (see their sections for directions). Press CONVECTION BAKE . 3. The oven can be programmed to place the food in the display. Press BAKE . 3. Press START to a convection bake temperature: 1. 20 Cooking Modes Model B Model B CONVECTION CONVERT The Convection Convert pad is used with a Convection Bake cooking mode. IMPORTANT: The...
Owners Guide
Page 21
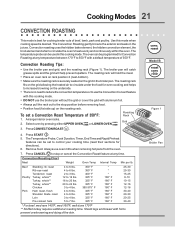
...° F * * * 180° F 180° F 180° F 180° F 160° F 160° F 160° F 160° F 25-30 25-30 15-25 8-10 10-15 12-16 12-16 30-40 20-30 20-25 30-40 * For beef: med rare 145°F, med 160°F, well done 170°F ** Stuffed turkey requires additional.... • There is no need to reduce the convection temperature or to the stop or cancel the Convection Roast feature at any time. Arrange interior oven racks. Model B Figure 1 Broiler Pan Cooking Modes 21 CONVECTION ROASTING This mode is best for cooking tender cuts of 350°F.
...° F * * * 180° F 180° F 180° F 180° F 160° F 160° F 160° F 160° F 25-30 25-30 15-25 8-10 10-15 12-16 12-16 30-40 20-30 20-25 30-40 * For beef: med rare 145°F, med 160°F, well done 170°F ** Stuffed turkey requires additional.... • There is no need to reduce the convection temperature or to the stop or cancel the Convection Roast feature at any time. Arrange interior oven racks. Model B Figure 1 Broiler Pan Cooking Modes 21 CONVECTION ROASTING This mode is best for cooking tender cuts of 350°F.


