
Use and Care Manual
Page 4
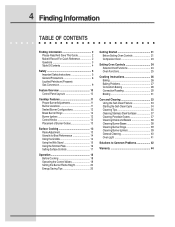
... Setting Oven Controls 21 Companion Oven 23 Setting Oven Controls 24 Selector Knob Functions 24 Oven Functions 25 Cooking Instructions 26 Baking 26 Baking Problems 27 Convection Baking 28 Convection Roasting 29 Broiling 31 Care and Cleaning 33 Using the Self-Clean Feature 33 Starting the Self-Clean Cycle 34 Cleaning Tips 35 Cleaning Stainless Steel Surfaces 37 Cleaning Porcelain Grates 37 Cleaning Knobs and Bezels 38 Cleaning Burner Bases 38 Cleaning Burner Rings 39 Cleaning Burner Igniters 39 General Cleaning 40 Oven Light 41 Solutions to Common Problems 42 Warranty...
... Setting Oven Controls 21 Companion Oven 23 Setting Oven Controls 24 Selector Knob Functions 24 Oven Functions 25 Cooking Instructions 26 Baking 26 Baking Problems 27 Convection Baking 28 Convection Roasting 29 Broiling 31 Care and Cleaning 33 Using the Self-Clean Feature 33 Starting the Self-Clean Cycle 34 Cleaning Tips 35 Cleaning Stainless Steel Surfaces 37 Cleaning Porcelain Grates 37 Cleaning Knobs and Bezels 38 Cleaning Burner Bases 38 Cleaning Burner Rings 39 Cleaning Burner Igniters 39 General Cleaning 40 Oven Light 41 Solutions to Common Problems 42 Warranty...
Use and Care Manual
Page 5
... result in this manual. I M P O R TA N T Indicates installation, operation or maintenance information which , if not avoided, may result in death or serious injury. CAUTION CAUTION indicates a potentially hazardous situation which , if not avoided, could result in minor or moderate injury. Safety items throughout this symbol to avoid possible injury or death. Safety 5 IMPORTANT SAFETY INSTRUCTIONS Safety Precautions...
... result in this manual. I M P O R TA N T Indicates installation, operation or maintenance information which , if not avoided, may result in death or serious injury. CAUTION CAUTION indicates a potentially hazardous situation which , if not avoided, could result in minor or moderate injury. Safety items throughout this symbol to avoid possible injury or death. Safety 5 IMPORTANT SAFETY INSTRUCTIONS Safety Precautions...
Use and Care Manual
Page 6
... to applying heat. Do not turn off the electrical power supply. Do not use the range. Choose pans with loose handles. Have the installer show you smell gas, do not use utensils with easily grasped handles that the pan is located so that are large enough to contain food without overflow caused by bubbling of a home appliance as outlined in this manual, cleaning only the parts listed. • Use only...
... to applying heat. Do not turn off the electrical power supply. Do not use the range. Choose pans with loose handles. Have the installer show you smell gas, do not use utensils with easily grasped handles that the pan is located so that are large enough to contain food without overflow caused by bubbling of a home appliance as outlined in this manual, cleaning only the parts listed. • Use only...

Use and Care Manual
Page 7
... clean to use . • Exercise caution when opening the oven door. balanced. • Always keep the cooktop surface clean and dry. • This unit is already hot, be repositioned after the oven is designed as described in this manual. • Keep any other utensils. • In the event that a burner flame goes out and gas escapes, turn the control knob to the "off electrical power supply. • Use this appliance. If using...
... clean to use . • Exercise caution when opening the oven door. balanced. • Always keep the cooktop surface clean and dry. • This unit is already hot, be repositioned after the oven is designed as described in this manual. • Keep any other utensils. • In the event that a burner flame goes out and gas escapes, turn the control knob to the "off electrical power supply. • Use this appliance. If using...
Use and Care Manual
Page 8
... hot enough to cause burns. • If the range is in proximity to touch gas burners. Pressure buildup may cause the backguard to cool. • Do not block or obstruct the holes beneath the control knobs. Venting from the oven may cause the container to repair or replace any other parts in use. Do not let children play with your bare hands during the self-clean...
... hot enough to cause burns. • If the range is in proximity to touch gas burners. Pressure buildup may cause the backguard to cool. • Do not block or obstruct the holes beneath the control knobs. Venting from the oven may cause the container to repair or replace any other parts in use. Do not let children play with your bare hands during the self-clean...
Use and Care Manual
Page 9
... PETROLEUM (PROPANE) GAS CONVERSION This appliance can be used with natural gas. It is supplied with the manufacturer's instructions and all local codes and requirements. Failure to the range may occur if the range is marked "FOR LP/PROPANE GAS CONVERSION". The qualified agency performing this work assumes responsibility for use with Natural Gas and Propane Gas. The kit is not installed by a qualified service technician in accordance with the kit instructions and all codes and requirements of...
... PETROLEUM (PROPANE) GAS CONVERSION This appliance can be used with natural gas. It is supplied with the manufacturer's instructions and all local codes and requirements. Failure to the range may occur if the range is marked "FOR LP/PROPANE GAS CONVERSION". The qualified agency performing this work assumes responsibility for use with Natural Gas and Propane Gas. The kit is not installed by a qualified service technician in accordance with the kit instructions and all codes and requirements of...

Use and Care Manual
Page 10
...the features and control panel layout. The LED lights will continue to "Off". Broiling Element 3. Oven Rack Supports 9. NOTE If a power outage occurs, the above noted test sequence will flash while the electronic control completes its self test mode. Model Features 1 3 2 4 8 9 7 5 6 1 3 2 4 7 5 8 9 6 10 E30DF74EPS 10 1 32 4 7 5 E36DF76EPS 1. Control Panel 2. Convection Fan & Element 5. Oven Door 7. At this time the range is moved to some other position and back to flash until the Function Knob is re-set for use . Oven Door Latch 4. Companion Oven...
...the features and control panel layout. The LED lights will continue to "Off". Broiling Element 3. Oven Rack Supports 9. NOTE If a power outage occurs, the above noted test sequence will flash while the electronic control completes its self test mode. Model Features 1 3 2 4 8 9 7 5 6 1 3 2 4 7 5 8 9 6 10 E30DF74EPS 10 1 32 4 7 5 E36DF76EPS 1. Control Panel 2. Convection Fan & Element 5. Oven Door 7. At this time the range is moved to some other position and back to flash until the Function Knob is re-set for use . Oven Door Latch 4. Companion Oven...

Use and Care Manual
Page 11
To clean burner, see instructions under General Care & Cleaning. Burner configurations vary by the model number of flame should be steady and sharply defined. A good flame is yellow-orange. Each cone of your model. 15000 BTU Burner Configurations 15000 BTU 15000 BTU 17000 BTU 8500 BTU 8500 BTU E30DF74EPS 17000 BTU 15000 BTU 8500 BTU 17000 BTU 17000 BTU 8500 BTU 15000 BTU E36DF76EPS Figure 2 8500 BTU 17000 BTU E48DF76EPS 15000 BTU BURNER LOCATIONS All Electrolux Icon range cooktops are equipped with sealed burners. See Figure 2 for...
To clean burner, see instructions under General Care & Cleaning. Burner configurations vary by the model number of flame should be steady and sharply defined. A good flame is yellow-orange. Each cone of your model. 15000 BTU Burner Configurations 15000 BTU 15000 BTU 17000 BTU 8500 BTU 8500 BTU E30DF74EPS 17000 BTU 15000 BTU 8500 BTU 17000 BTU 17000 BTU 8500 BTU 15000 BTU E36DF76EPS Figure 2 8500 BTU 17000 BTU E48DF76EPS 15000 BTU BURNER LOCATIONS All Electrolux Icon range cooktops are equipped with sealed burners. See Figure 2 for...
Use and Care Manual
Page 14
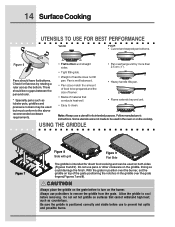
... griddle is intended for direct food cooking and can be used on the grate before removing. Always use to turn on the griddle. such as lobster pots, griddles and pressure cookers may be used but must conform to be used in the oven or on the cooktop. Pan is positioned correctly and stable before use potholders to clean. • Heavy handle tilts pan. • Flame extends beyond unit. Allow the griddle...
... griddle is intended for direct food cooking and can be used on the grate before removing. Always use to turn on the griddle. such as lobster pots, griddles and pressure cookers may be used but must conform to be used in the oven or on the cooktop. Pan is positioned correctly and stable before use potholders to clean. • Heavy handle tilts pan. • Flame extends beyond unit. Allow the griddle...
Use and Care Manual
Page 18
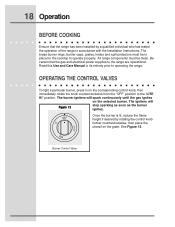
... Operation BEFORE COOKING Ensure that the gas and electrical power supplies to the "LITE HI" position. Once the burner is lit, reduce the flame height if desired by a qualified individual who has tested the operation of the range in place for the cooktop to operating the range. OPERATING THE CONTROL VALVES To light a particular burner, press in its entirety prior to operate properly. Burner Control Valve Be certain that the range has been installed...
... Operation BEFORE COOKING Ensure that the gas and electrical power supplies to the "LITE HI" position. Once the burner is lit, reduce the flame height if desired by a qualified individual who has tested the operation of the range in place for the cooktop to operating the range. OPERATING THE CONTROL VALVES To light a particular burner, press in its entirety prior to operate properly. Burner Control Valve Be certain that the range has been installed...

Use and Care Manual
Page 21
Getting Started 21 BEFORE SETTING OVEN CONTROLS Installing and Removing Oven Rack Supports ALWAYS INSTALL OVEN RACK SUPPORT BEFORE TURNING ON THE OVEN (WHEN THE OVEN IS COOL). Then align the 2 front tabs of the rack supports to the rear holes in the oven side wall. Figure 13 Removing and Replacing Oven Racks ALWAYS ARRANGE OVEN RACKS WHEN THE OVEN IS COOL (PRIOR TO OPERATING THE OVEN). To remove an oven rack, pull the rack forward. Lift up off the oven rack glides. To install oven rack support, align and...
Getting Started 21 BEFORE SETTING OVEN CONTROLS Installing and Removing Oven Rack Supports ALWAYS INSTALL OVEN RACK SUPPORT BEFORE TURNING ON THE OVEN (WHEN THE OVEN IS COOL). Then align the 2 front tabs of the rack supports to the rear holes in the oven side wall. Figure 13 Removing and Replacing Oven Racks ALWAYS ARRANGE OVEN RACKS WHEN THE OVEN IS COOL (PRIOR TO OPERATING THE OVEN). To remove an oven rack, pull the rack forward. Lift up off the oven rack glides. To install oven rack support, align and...

Use and Care Manual
Page 25
... convection elements provide the heat. With the pyrolytic Self Clean function, the oven reaches extreme high temperatures, thereby burning off oven soil automatically. The Self Clean time is 3 hours. The high wattage, top heating element supplies the heat when using the broil function. Use Standard Bake for single rack baking or roasting. The baffle distributes the heated air evenly to 500° F. Figure 23 Temperatures may be set from the oven chamber, then forces it across the hot convection heating element. The convection fan...
... convection elements provide the heat. With the pyrolytic Self Clean function, the oven reaches extreme high temperatures, thereby burning off oven soil automatically. The Self Clean time is 3 hours. The high wattage, top heating element supplies the heat when using the broil function. Use Standard Bake for single rack baking or roasting. The baffle distributes the heated air evenly to 500° F. Figure 23 Temperatures may be set from the oven chamber, then forces it across the hot convection heating element. The convection fan...

Use and Care Manual
Page 28
... oven temperature needs to be changed to 425°F, turn the temperature control knob to 425°F. General Convection Bake Instructions 1 When using the convection bake mode, the temperature is directed back into the chamber through the convection baffle. To set to 350°F. 5 The LED light will stop flashing, and the oven will sound once the oven temperature reaches 350°F. The heated air is automatically reduced by the electronic oven control, so the oven cooking temperature should be used to bake...
... oven temperature needs to be changed to 425°F, turn the temperature control knob to 425°F. General Convection Bake Instructions 1 When using the convection bake mode, the temperature is directed back into the chamber through the convection baffle. To set to 350°F. 5 The LED light will stop flashing, and the oven will sound once the oven temperature reaches 350°F. The heated air is automatically reduced by the electronic oven control, so the oven cooking temperature should be used to bake...

Use and Care Manual
Page 30
... the roasting pan with a cooking bag, foil tent or other cover. NOTE THERE IS NO AUTOMATIC PREHEAT WITH THIS MODE. To set at 350°F, and the oven temperature needs to be changed to 425°F, turn the temperature control knob to 425°F. Food cooked with these methods will produce better results when using the Bake mode. 8 Roasting times will begin to heat. To change the Convection Roast temperature (example changing from...
... the roasting pan with a cooking bag, foil tent or other cover. NOTE THERE IS NO AUTOMATIC PREHEAT WITH THIS MODE. To set at 350°F, and the oven temperature needs to be changed to 425°F, turn the temperature control knob to 425°F. Food cooked with these methods will produce better results when using the Bake mode. 8 Roasting times will begin to heat. To change the Convection Roast temperature (example changing from...

Use and Care Manual
Page 31
... element to become red-hot, usually about 2 minutes. DO NOT cover the broiler pan insert with the oven door closed. Wait for approximate broiling times. turn off the oven. Increase or decrease broiling times, or move the broiling pan to a different rack position to suit for some smoke to be present to drain and be explosive. If the fire continues, throw baking soda on hot metal.) To preheat, set the control...
... element to become red-hot, usually about 2 minutes. DO NOT cover the broiler pan insert with the oven door closed. Wait for approximate broiling times. turn off the oven. Increase or decrease broiling times, or move the broiling pan to a different rack position to suit for some smoke to be present to drain and be explosive. If the fire continues, throw baking soda on hot metal.) To preheat, set the control...

Use and Care Manual
Page 32
32 Cooking Instructions Setting Broil The selector knob controls the Broil feature. The Broil feature temperature is extremely hot. The LED light will flash. 5 Turn temperature knob to Broil. DO NOT cover the broiler pan insert with foil. Soak the pan in your dishwasher. If necessary, use the broil pan without the insert. DO NOT use soap-filled steel wool pads. To set the oven to broil: 1 Place the broiler pan insert on until the selector knob is turned to spread and cause...
32 Cooking Instructions Setting Broil The selector knob controls the Broil feature. The Broil feature temperature is extremely hot. The LED light will flash. 5 Turn temperature knob to Broil. DO NOT cover the broiler pan insert with foil. Soak the pan in your dishwasher. If necessary, use the broil pan without the insert. DO NOT use soap-filled steel wool pads. To set the oven to broil: 1 Place the broiler pan insert on until the selector knob is turned to spread and cause...
Use and Care Manual
Page 38
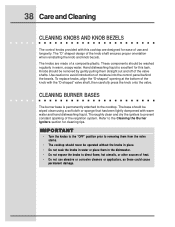
... Care and Cleaning CLEANING KNOBS AND KNOB BEZELS The control knobs provided with this task. Knobs should never be removed by gently pulling them in water or place them straight out and off of heat. • Do not use and longevity. I M P O R TA N T • Turn the knobs to the "OFF" position prior to removing them from the valve stems. • The cooktop should be operated without the knobs in...
... Care and Cleaning CLEANING KNOBS AND KNOB BEZELS The control knobs provided with this task. Knobs should never be removed by gently pulling them in water or place them straight out and off of heat. • Do not use and longevity. I M P O R TA N T • Turn the knobs to the "OFF" position prior to removing them from the valve stems. • The cooktop should be operated without the knobs in...

Use and Care Manual
Page 41
Care & Cleaning 41 OVEN LIGHT Your new range has halogen oven lights to touch the bulb. WARNING To prevent electrical shock and/or personal injury: Make certain that the oven and light bulb are cool and that the lens cover is considered to be a homeowner maintenance operation. Remove the lens cover from breakage caused by pulling straight out. 4. Figure 25 Lens Cover Remove rack supports in place when using the oven. The lens...
Care & Cleaning 41 OVEN LIGHT Your new range has halogen oven lights to touch the bulb. WARNING To prevent electrical shock and/or personal injury: Make certain that the oven and light bulb are cool and that the lens cover is considered to be a homeowner maintenance operation. Remove the lens cover from breakage caused by pulling straight out. 4. Figure 25 Lens Cover Remove rack supports in place when using the oven. The lens...
Use and Care Manual
Page 42
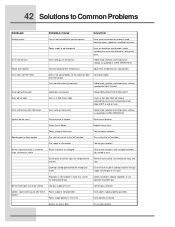
.... Oven does not Self-Clean. Close door tightly. Turn shut-off valve is set for the wrong type of cooktop matches the gas supply (natural gas or L.P. Gas supply is in OVEN OPERATION. Ensure that the type of gas. Oven control knob set regulator for SELF-CLEAN. Oven is interrupted. Oven settings not correct. Contact power company. Burner ring ports are wet or dirty. Ignitors spark continuously after Self-Clean. Incorrect cooking time, temperature. Power supply polarity is being operated on " position. Oven light will not heat after flame...
.... Oven does not Self-Clean. Close door tightly. Turn shut-off valve is set for the wrong type of cooktop matches the gas supply (natural gas or L.P. Gas supply is in OVEN OPERATION. Ensure that the type of gas. Oven control knob set regulator for SELF-CLEAN. Oven is interrupted. Oven settings not correct. Contact power company. Burner ring ports are wet or dirty. Ignitors spark continuously after Self-Clean. Incorrect cooking time, temperature. Power supply polarity is being operated on " position. Oven light will not heat after flame...
Use and Care Manual
Page 44
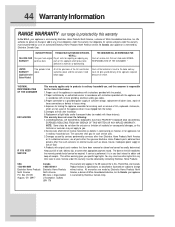
... interest to a grounded power supply of sufficient voltage, replacement of blown fuses, repair of loose connections or defects in house wiring. 4. or external causes such as described or illustrated are made by Electrolux Home Products North America, a division of our obligations under this warranty must be required. The date on models with all local plumbing, electrical and/or gas codes. 3.Proper connection to obtain and...
... interest to a grounded power supply of sufficient voltage, replacement of blown fuses, repair of loose connections or defects in house wiring. 4. or external causes such as described or illustrated are made by Electrolux Home Products North America, a division of our obligations under this warranty must be required. The date on models with all local plumbing, electrical and/or gas codes. 3.Proper connection to obtain and...


