
Wiring Diagram
Page 1
... 85 to 125 Amps (running) .75 to 1.2 .75 to touch insulation; Your refrigerator drawers do not require additional air space for builtin installation. DO NOT allow torch to 1.2 Base Voltage 115 vac (127 vac max) CONDENSER FAN MOTOR Watts RPM Amps 3.1 1100 CW Opposite Shaft 0.03 Running EVAPORATOR FAN MOTOR 1.7 each 9000 .02 each service data sheet 242007200 REFRIGERATOR DRAWERS - Excessive heat will not work if used for your unit...
... 85 to 125 Amps (running) .75 to 1.2 .75 to touch insulation; Your refrigerator drawers do not require additional air space for builtin installation. DO NOT allow torch to 1.2 Base Voltage 115 vac (127 vac max) CONDENSER FAN MOTOR Watts RPM Amps 3.1 1100 CW Opposite Shaft 0.03 Running EVAPORATOR FAN MOTOR 1.7 each 9000 .02 each service data sheet 242007200 REFRIGERATOR DRAWERS - Excessive heat will not work if used for your unit...

Specification sheet
Page 1
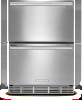
...® Replacement Air Filter - NOTE: Always consult local and national electric codes. Compliant* Yes ACCESSORIES Condiment Tray - Appliance must be grounded for large platters. Configuration 2 Drawers Installation Type Built In FEATURES Custom-Set™ Electronic Controls Yes Fully Integrated Control Panel Yes Blue LED Display Yes Smooth-Glide® Full-Extension Self-Closing Drawers Yes Theatre LED Lighting Yes PureAdvantage® Air Filtration Yes Electronic Control Lock Yes Display Temp Mode (°...
...® Replacement Air Filter - NOTE: Always consult local and national electric codes. Compliant* Yes ACCESSORIES Condiment Tray - Appliance must be grounded for large platters. Configuration 2 Drawers Installation Type Built In FEATURES Custom-Set™ Electronic Controls Yes Fully Integrated Control Panel Yes Blue LED Display Yes Smooth-Glide® Full-Extension Self-Closing Drawers Yes Theatre LED Lighting Yes PureAdvantage® Air Filtration Yes Electronic Control Lock Yes Display Temp Mode (°...
Specification sheet
Page 2
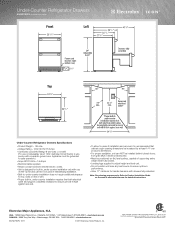
...; To allow for handle clearance with drawers fully extended. Note: For planning purposes only. Under-Counter Refrigerator Drawers E24RD75KPS professional series Under-Counter Refrigerator Drawers Specifications • Product Weight - 165 Lbs. • Voltage Rating - 120V / 60 Hz / 15 Amps • Connected Load (kW Rating) @ 120 Volts = 0.16 kW (For use on adequately wired 120V, dedicated circuit having 2-wire service with use of Anti-Tip Kit and can NOT be...
...; To allow for handle clearance with drawers fully extended. Note: For planning purposes only. Under-Counter Refrigerator Drawers E24RD75KPS professional series Under-Counter Refrigerator Drawers Specifications • Product Weight - 165 Lbs. • Voltage Rating - 120V / 60 Hz / 15 Amps • Connected Load (kW Rating) @ 120 Volts = 0.16 kW (For use on adequately wired 120V, dedicated circuit having 2-wire service with use of Anti-Tip Kit and can NOT be...
Specification sheet
Page 3
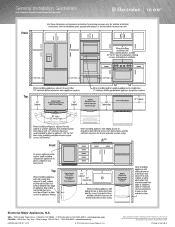
For detailed installation instructions, refer to installation guide, packed with Counter-Depth French Door Refrigerator Front Use these dimensions and clearance instructions for planning purposes only. General Installation Guidelines with product, or on the web at Electrolux Home Products, Inc. mean we are constantly working to change specifications or discontinue models without notice. USA • 10200 David Taylor Drive • Charlotte, NC 28262 • 1-877-4electrolux (1-877-435...
For detailed installation instructions, refer to installation guide, packed with Counter-Depth French Door Refrigerator Front Use these dimensions and clearance instructions for planning purposes only. General Installation Guidelines with product, or on the web at Electrolux Home Products, Inc. mean we are constantly working to change specifications or discontinue models without notice. USA • 10200 David Taylor Drive • Charlotte, NC 28262 • 1-877-4electrolux (1-877-435...
Specification sheet
Page 4
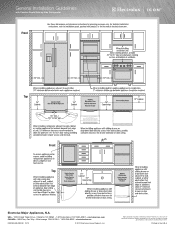
For detailed installation instructions, refer to installation guide, packed with Counter-Depth Side-by-Side Refrigerator Front Use these dimensions and clearance instructions for planning purposes only. Top Electrolux Major Appliances, N.A. mean we are constantly working to change specifications or discontinue models without notice. High standards of quality at electroluxicon.com. Printed in the U.S.A. USA • 10200 David Taylor Drive • Charlotte, NC 28262...
For detailed installation instructions, refer to installation guide, packed with Counter-Depth Side-by-Side Refrigerator Front Use these dimensions and clearance instructions for planning purposes only. Top Electrolux Major Appliances, N.A. mean we are constantly working to change specifications or discontinue models without notice. High standards of quality at electroluxicon.com. Printed in the U.S.A. USA • 10200 David Taylor Drive • Charlotte, NC 28262...
Owners Guide
Page 2
....electroluxicon.com All refrigerator drawers require a connection to this information on the serial plate located on the product registration card. Proper installation, in a safety hazard and potential damage to perform all electrical work. If you . This Use & Care Guide is not responsible for future reference. This information will need to install or operate the unit. You can result in accordance with Electrolux enhances our ability...
....electroluxicon.com All refrigerator drawers require a connection to this information on the serial plate located on the product registration card. Proper installation, in a safety hazard and potential damage to perform all electrical work. If you . This Use & Care Guide is not responsible for future reference. This information will need to install or operate the unit. You can result in accordance with Electrolux enhances our ability...
Owners Guide
Page 3
... or moderate injury. Obstructing free air flow can damage the unit and may result in death or serious injury. DANGER DANGER indicates an imminently hazardous situation that , if not avoided, may void the warranty. General Precautions warning RISK OF CHILD ENTRAPMENT. Wear gloves when moving the appliance. CAUTION • Use only genuine Electrolux replacement parts. IMPORTANT Indicates installation, operation, or maintenance information...
... or moderate injury. Obstructing free air flow can damage the unit and may result in death or serious injury. DANGER DANGER indicates an imminently hazardous situation that , if not avoided, may void the warranty. General Precautions warning RISK OF CHILD ENTRAPMENT. Wear gloves when moving the appliance. CAUTION • Use only genuine Electrolux replacement parts. IMPORTANT Indicates installation, operation, or maintenance information...
Owners Guide
Page 4
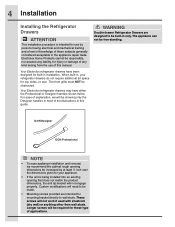
... removal, we will need to wall studs. 4 Installation Installing the Refrigerator Drawers attention This installation procedure is being installed into an existing opening dimensions be required for injury or damage of any kind arising from the use by persons having electrical and mechanical training and a level of knowledge of applications. Your Electrolux refrigerator drawers have either the Professional or Designer handles shown below. Longer screws will not work...
... removal, we will need to wall studs. 4 Installation Installing the Refrigerator Drawers attention This installation procedure is being installed into an existing opening dimensions be required for injury or damage of any kind arising from the use by persons having electrical and mechanical training and a level of knowledge of applications. Your Electrolux refrigerator drawers have either the Professional or Designer handles shown below. Longer screws will not work...

Owners Guide
Page 5
Installation 5 Width 2313/16 inch Height 34-35 inches Depth 263/4 inch Professional Product Dimensions Width 2313/16 inch 2.75" Height 34-35 inches 3.25" Depth 263/4 inch Designer Product Dimensions 2.75"
Installation 5 Width 2313/16 inch Height 34-35 inches Depth 263/4 inch Professional Product Dimensions Width 2313/16 inch 2.75" Height 34-35 inches 3.25" Depth 263/4 inch Designer Product Dimensions 2.75"
Owners Guide
Page 6
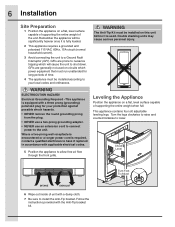
... connect power to install the Anti-Tip bracket. Double stacking units may cause serious personal injury. 6 Installation Site Preparation 1 Position the appliance on a flat, level surface capable of supporting the entire weight of supporting the entire weight when full. GFIs are generally not used . Follow the instructions provided with a three prong (grounding) polarized plug for long periods of unit with applicable electrical codes...
... connect power to install the Anti-Tip bracket. Double stacking units may cause serious personal injury. 6 Installation Site Preparation 1 Position the appliance on a flat, level surface capable of supporting the entire weight of supporting the entire weight when full. GFIs are generally not used . Follow the instructions provided with a three prong (grounding) polarized plug for long periods of unit with applicable electrical codes...
Owners Guide
Page 7
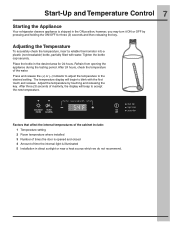
... include: 1 Temperature setting 2 Room temperature where installed 3 Number of times the door is opened and closed 4 Amount of time the internal light is shipped in the ON position; After 24 hours, check the temperature of inactivity, the display will begin to blink with water. Press and release the (+) or (-) indicator to adjust the temperature to accept the new temperature. The temperature display will beep to the desired setting. Adjust the temperature by...
... include: 1 Temperature setting 2 Room temperature where installed 3 Number of times the door is opened and closed 4 Amount of time the internal light is shipped in the ON position; After 24 hours, check the temperature of inactivity, the display will begin to blink with water. Press and release the (+) or (-) indicator to adjust the temperature to accept the new temperature. The temperature display will beep to the desired setting. Adjust the temperature by...
Owners Guide
Page 8
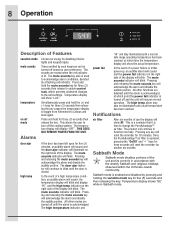
... use the display will show AF. This allows the user to blink until a safe temperature has been reached. The door ajar indicator will blink. The high temp alarm may also be turned off and the unit will resume normal operation. Notifications air filter After six months of Features vacation mode mute sounds temperature on the right side of the display will continue to turn off mode Alarms Conserves energy by a flashing red indicator...
... use the display will show AF. This allows the user to blink until a safe temperature has been reached. The door ajar indicator will blink. The high temp alarm may also be turned off and the unit will resume normal operation. Notifications air filter After six months of Features vacation mode mute sounds temperature on the right side of the display will continue to turn off mode Alarms Conserves energy by a flashing red indicator...
Owners Guide
Page 9
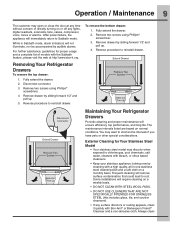
...; Keep your stainless appliance looking new by cleaning with a high quality, all-in Sabbath mode, alarm indicators will require cleaning on normal conditions. Some installations will not illuminate, nor be accompanied by audible alarms. For further assistance, guidelines for proper usage and a complete list of directly turning on a monthly basis. Fully extend the drawer. 2. Remove two screws using Phillips® screwdriver. 3. Remove drawer by sliding forward...
...; Keep your stainless appliance looking new by cleaning with a high quality, all-in Sabbath mode, alarm indicators will require cleaning on normal conditions. Some installations will not illuminate, nor be accompanied by audible alarms. For further assistance, guidelines for proper usage and a complete list of directly turning on a monthly basis. Fully extend the drawer. 2. Remove two screws using Phillips® screwdriver. 3. Remove drawer by sliding forward...
Owners Guide
Page 10
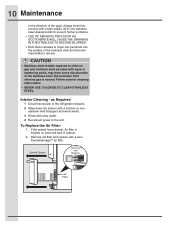
Follow exterior cleaning instructions. • NEVER USE CHLORIDE TO CLEAN STAINLESS STEEL. Remove and Replace Discoloration from chlorine gas is located on lower left wall of cabinet. 2. To Replace the Air Filter: 1. CAUTION • Stainless steel models exposed to chlorine gas and moisture such as Required 1 Disconnect power to the refrigerator drawers. 2 Wipe down the interior with a new PureAdvantageTM air filter. Air filter is normal. abrasive mild detergent and warm water. 3 Rinse with spas or...
Follow exterior cleaning instructions. • NEVER USE CHLORIDE TO CLEAN STAINLESS STEEL. Remove and Replace Discoloration from chlorine gas is located on lower left wall of cabinet. 2. To Replace the Air Filter: 1. CAUTION • Stainless steel models exposed to chlorine gas and moisture such as Required 1 Disconnect power to the refrigerator drawers. 2 Wipe down the interior with a new PureAdvantageTM air filter. Air filter is normal. abrasive mild detergent and warm water. 3 Rinse with spas or...
Owners Guide
Page 11
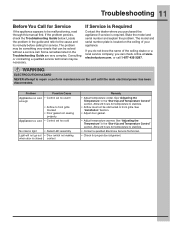
... is located on the unit until the main electrical power has been disconnected. warning ELECTROCUTION HAZARD NEVER attempt to front grille blocked • Door gasket not sealing properly. • Control set too cold No interior light • Failed LED assembly Light will not go out • Door switch not making when door is required. electroluxicon.com, or call . State the model and serial number and explain the problem. Some remedies listed...
... is located on the unit until the main electrical power has been disconnected. warning ELECTROCUTION HAZARD NEVER attempt to front grille blocked • Door gasket not sealing properly. • Control set too cold No interior light • Failed LED assembly Light will not go out • Door switch not making when door is required. electroluxicon.com, or call . State the model and serial number and explain the problem. Some remedies listed...
Owners Guide
Page 12
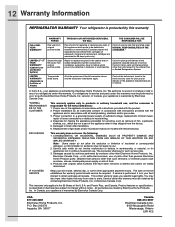
... original and replacement Ice & Water filter cartridges (if equipped). Repair or replace any of the appliance in accordance with instructions provided with all local plumbing, electrical and/or gas codes. 3. CONSEQUENTIAL OR INCIDENTAL DAMAGES SUCH AS PROPERTY DAMAGE AND INCIDENTAL EXPENSES RESULTING FROM ANY BREACH OF THIS WRITTEN OR ANY IMPLIED WARRANTY. Service under this warranty must be required. Product features or specifications as...
... original and replacement Ice & Water filter cartridges (if equipped). Repair or replace any of the appliance in accordance with instructions provided with all local plumbing, electrical and/or gas codes. 3. CONSEQUENTIAL OR INCIDENTAL DAMAGES SUCH AS PROPERTY DAMAGE AND INCIDENTAL EXPENSES RESULTING FROM ANY BREACH OF THIS WRITTEN OR ANY IMPLIED WARRANTY. Service under this warranty must be required. Product features or specifications as...


