Specification sheet
Page 1
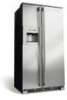
... INSTALLATION Adjustable Rollers Yes Door Stops Yes ACCESSORIES Collar Kit - Theatre Lighting Transition lighting that it gradually illuminates the interior of the refrigerator with a separate ground wire. Ft. 23.7 Sq. Appliance must be replaced, then with optional coordinated Louvered Trim Kit (PN ...174; Filtration Systems The most advanced filtration systems available offer fresher, cleaner air, ice and water. Counter-Depth Refrigerator E23CS78HPS professional series Shown with one touch, the filter exchange is so thoughtfully designed that is made simple and easy. Ft...
... INSTALLATION Adjustable Rollers Yes Door Stops Yes ACCESSORIES Collar Kit - Theatre Lighting Transition lighting that it gradually illuminates the interior of the refrigerator with a separate ground wire. Ft. 23.7 Sq. Appliance must be replaced, then with optional coordinated Louvered Trim Kit (PN ...174; Filtration Systems The most advanced filtration systems available offer fresher, cleaner air, ice and water. Counter-Depth Refrigerator E23CS78HPS professional series Shown with one touch, the filter exchange is so thoughtfully designed that is made simple and easy. Ft...

Specification sheet
Page 2
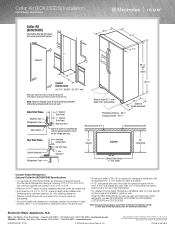
...Terry Fox Way • Mississauga, ON L5V 3E4 • 1-800-265-8352 • electroluxicon.ca E23CS78HPS 09/09 © 2009 Electrolux Home Products, Inc. Counter-Depth Refrigerator Specifications • Product Weight - 300 Lbs. • Voltage Rating - 120V / 60 Hz /...discontinue models without notice. mean we are required. (Refer to Louvered Trim Kit 4480 Installation Specifications page on web. Counter-Depth Refrigerator E23CS78HPS professional series Standard Refrigerator Depth vs. Counter Depth Counter Depth 235/8" 26 7/8" 35 5/8" 7 5/8" 69 5/16" A C B "Built-In ...
...Terry Fox Way • Mississauga, ON L5V 3E4 • 1-800-265-8352 • electroluxicon.ca E23CS78HPS 09/09 © 2009 Electrolux Home Products, Inc. Counter-Depth Refrigerator Specifications • Product Weight - 300 Lbs. • Voltage Rating - 120V / 60 Hz /...discontinue models without notice. mean we are required. (Refer to Louvered Trim Kit 4480 Installation Specifications page on web. Counter-Depth Refrigerator E23CS78HPS professional series Standard Refrigerator Depth vs. Counter Depth Counter Depth 235/8" 26 7/8" 35 5/8" 7 5/8" 69 5/16" A C B "Built-In ...
Specification sheet
Page 3
...panels and requires recessed electrical outlet and water line. High standards of cabinet to improve our products. Collar Kit (ECK23CDS) Installation E23CS78HPS, E23CS78HSS Collar Kit (ECK23CDS) Kit includes: Side/top trim pieces and corner gussets with screws. 26 7/8" 35 5/8" 7... collar trim and must be finished. • For detailed Counter-Depth Refrigerator installation, refer to detailed Collar Kit (ECK23CDS) Installation instructions included with Electrolux ICON® refrigerator models E23CS75DSS, E23CS78EPS, E23CS78ESS, E23CS78GPS and E23CS78GSS. Note: For planning purposes...
...panels and requires recessed electrical outlet and water line. High standards of cabinet to improve our products. Collar Kit (ECK23CDS) Installation E23CS78HPS, E23CS78HSS Collar Kit (ECK23CDS) Kit includes: Side/top trim pieces and corner gussets with screws. 26 7/8" 35 5/8" 7... collar trim and must be finished. • For detailed Counter-Depth Refrigerator installation, refer to detailed Collar Kit (ECK23CDS) Installation instructions included with Electrolux ICON® refrigerator models E23CS75DSS, E23CS78EPS, E23CS78ESS, E23CS78GPS and E23CS78GSS. Note: For planning purposes...

Specification sheet
Page 4
...E23CS78HPS, E23CS78HSS 26 7/8" Recessed water line Recessed electrical outlet 24" Cabinet Top View 25" Countertop Cabinet Side Panels 3/4" min. Counter-Depth Refrigerator Optional Louvered Trim Kit (4480) Specifications • To use Louvered Trim Kit (PN # 4480), an enclosure is required around Counter-Depth Refrigerator having an opening of 80-3/4" H x 37-1/4" W with Electrolux ICON® refrigerator...electroluxicon.com for Trim Kit assembly. • For detailed Counter-Depth Refrigerator installation, refer to detailed Louvered Trim Kit (4480) Installation instructions included ...
...E23CS78HPS, E23CS78HSS 26 7/8" Recessed water line Recessed electrical outlet 24" Cabinet Top View 25" Countertop Cabinet Side Panels 3/4" min. Counter-Depth Refrigerator Optional Louvered Trim Kit (4480) Specifications • To use Louvered Trim Kit (PN # 4480), an enclosure is required around Counter-Depth Refrigerator having an opening of 80-3/4" H x 37-1/4" W with Electrolux ICON® refrigerator...electroluxicon.com for Trim Kit assembly. • For detailed Counter-Depth Refrigerator installation, refer to detailed Louvered Trim Kit (4480) Installation instructions included ...
Owners Guide
Page 2
.... QUESTIONS? Printed in the U.S. We view your sales receipt to this page to serve you , please use this page for choosing Electrolux, the new premium brand in home appliances. To ensure our ability to customer satisfaction and product quality throughout the service life of a ... (1-877-435-3287) For online support and Internet product information: www.electroluxusa.com ©2006 Electrolux Home Products, Inc. You can register online (at the Internet address below) or by dropping your new refrigerator. This Use & Care Guide is part of our commitment to continue serving you .
.... QUESTIONS? Printed in the U.S. We view your sales receipt to this page to serve you , please use this page for choosing Electrolux, the new premium brand in home appliances. To ensure our ability to customer satisfaction and product quality throughout the service life of a ... (1-877-435-3287) For online support and Internet product information: www.electroluxusa.com ©2006 Electrolux Home Products, Inc. You can register online (at the Internet address below) or by dropping your new refrigerator. This Use & Care Guide is part of our commitment to continue serving you .
Owners Guide
Page 3
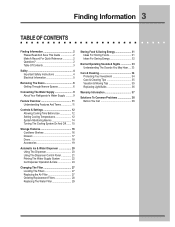
... Quick Reference 2 Questions 2 Table Of Contents 3 Safety 4 Important Safety Instructions 4 Electrical Information 5 Removing The Doors 6 Getting Through Narrow Spaces 6 Connecting The Water Supply 9 About Your Refrigerator's Water Supply .......... 9 Feature Overview 11 Understanding Features And Terms 11 Controls & Settings 12 Allowing Cooling Time Before Use 12 Setting Cooling Temperatures 12 System-Monitoring...
... Quick Reference 2 Questions 2 Table Of Contents 3 Safety 4 Important Safety Instructions 4 Electrical Information 5 Removing The Doors 6 Getting Through Narrow Spaces 6 Connecting The Water Supply 9 About Your Refrigerator's Water Supply .......... 9 Feature Overview 11 Understanding Features And Terms 11 Controls & Settings 12 Allowing Cooling Time Before Use 12 Setting Cooling Temperatures 12 System-Monitoring...
Owners Guide
Page 4
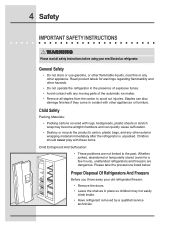
...below. Whether junked, abandoned or temporarily stored (even for warnings regarding flammability and other appliance. Proper Disposal Of Refrigerators And Freezers Before you throw away your new Electrolux refrigerator. General Safety • Do not store or use gasoline, or other flammable liquids, near this or any... other hazards. • Do not operate the refrigerator in place so children may become airtight chambers and can...
...below. Whether junked, abandoned or temporarily stored (even for warnings regarding flammability and other appliance. Proper Disposal Of Refrigerators And Freezers Before you throw away your new Electrolux refrigerator. General Safety • Do not store or use gasoline, or other flammable liquids, near this or any... other hazards. • Do not operate the refrigerator in place so children may become airtight chambers and can...

Owners Guide
Page 5
...person to prevent any risk. • Never unplug the refrigerator by pulling on the power cord. Operating the refrigerator with a three-prong grounding plug for your refrigerator's safety mechanisms are operating correctly. • The refrigerator must follow these guidelines to avoid electrical shock. •...affected if the voltage varies by a wall switch or pull cord to prevent the refrigerator from the receptacle to prevent damaging the power cord. • Unplug the refrigerator before cleaning and before replacing a light bulb to ensure that your protection against electrical...
...person to prevent any risk. • Never unplug the refrigerator by pulling on the power cord. Operating the refrigerator with a three-prong grounding plug for your refrigerator's safety mechanisms are operating correctly. • The refrigerator must follow these guidelines to avoid electrical shock. •...affected if the voltage varies by a wall switch or pull cord to prevent the refrigerator from the receptacle to prevent damaging the power cord. • Unplug the refrigerator before cleaning and before replacing a light bulb to ensure that your protection against electrical...

Owners Guide
Page 6
NOTE For more information on removing the toe grille, please refer to the Installation Instructions. 6 Removing The Doors GETTING THROUGH NARROW SPACES If your refrigerator will need the following tools: Tools Necessary: AND Phillips™ Head OR Socket Wrench Set OR Adjustable Wrench 3/8" Fixed Wrench To prepare for removing the ...
NOTE For more information on removing the toe grille, please refer to the Installation Instructions. 6 Removing The Doors GETTING THROUGH NARROW SPACES If your refrigerator will need the following tools: Tools Necessary: AND Phillips™ Head OR Socket Wrench Set OR Adjustable Wrench 3/8" Fixed Wrench To prepare for removing the ...

Owners Guide
Page 7
...about a half-inch and lift it aside. 3 Remove the three bottom hinge screws and hinge if necessary. ! Lift the door off . To remove the refrigerator door: 1 Trace lightly around the door's top hinge with a pencil. CAUTION Be sure doors are in a secure position where they cannot fall and cause... personal injury. To reinstall the refrigerator door, reverse the above steps. Removing The Doors 7 To remove the top hinge cover: 1 Remove the three screws from the top hinge. Once both...
...about a half-inch and lift it aside. 3 Remove the three bottom hinge screws and hinge if necessary. ! Lift the door off . To remove the refrigerator door: 1 Trace lightly around the door's top hinge with a pencil. CAUTION Be sure doors are in a secure position where they cannot fall and cause... personal injury. To reinstall the refrigerator door, reverse the above steps. Removing The Doors 7 To remove the top hinge cover: 1 Remove the three screws from the top hinge. Once both...
Owners Guide
Page 9
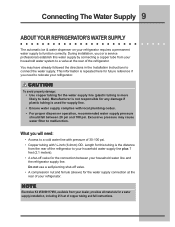
... pressure may have already followed the directions in the Installation Instructions to malfunction. NOTE Electrolux Kit #53039117950, available from your household water system to relocate your refrigerator. ! What you will need to a valve at the rear of copper tubing ... For proper dispenser operation, recommended water supply pressure should fall between your refrigerator. Connecting The Water Supply 9 ABOUT YOUR REFRIGERATOR'S WATER SUPPLY The automatic ice & water dispenser on your refrigerator requires a permanent water supply to leak). This information is the distance ...
... pressure may have already followed the directions in the Installation Instructions to malfunction. NOTE Electrolux Kit #53039117950, available from your household water system to relocate your refrigerator. ! What you will need to a valve at the rear of copper tubing ... For proper dispenser operation, recommended water supply pressure should fall between your refrigerator. Connecting The Water Supply 9 ABOUT YOUR REFRIGERATOR'S WATER SUPPLY The automatic ice & water dispenser on your refrigerator requires a permanent water supply to leak). This information is the distance ...
Owners Guide
Page 10
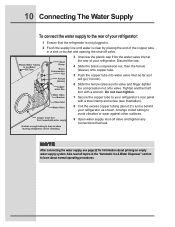
...) into valve and finger-tighten the compression nut onto valve. 10 Connecting The Water Supply To connect the water supply to the rear of your refrigerator: 1 Ensure that leak. Do not over-tighten. 7 Secure the copper tube to learn about priming an empty water supply system. Also read all .... 2 Flush the supply line until water is clear by placing the end of the copper tube in the "Automatic Ice & Water Dispenser" section to your refrigerator. Discard the cap. 4 Slide the brass compression nut, then the ferrule (sleeve) onto copper tube. 5 Push the copper tube into water valve inlet as...
...) into valve and finger-tighten the compression nut onto valve. 10 Connecting The Water Supply To connect the water supply to the rear of your refrigerator: 1 Ensure that leak. Do not over-tighten. 7 Secure the copper tube to learn about priming an empty water supply system. Also read all .... 2 Flush the supply line until water is clear by placing the end of the copper tube in the "Automatic Ice & Water Dispenser" section to your refrigerator. Discard the cap. 4 Slide the brass compression nut, then the ferrule (sleeve) onto copper tube. 5 Push the copper tube into water valve inlet as...
Owners Guide
Page 11
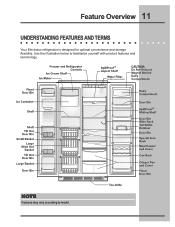
Use the illustration below to model. NOTE Features may vary according to familiarize yourself with product features and terminology. Feature Overview 11 UNDERSTANDING FEATURES AND TERMS Your Electrolux refrigerator is designed for optimal convenience and storage flexibility.
Use the illustration below to model. NOTE Features may vary according to familiarize yourself with product features and terminology. Feature Overview 11 UNDERSTANDING FEATURES AND TERMS Your Electrolux refrigerator is designed for optimal convenience and storage flexibility.
Owners Guide
Page 12
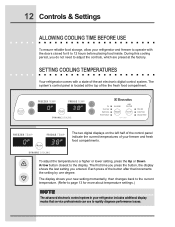
... with the doors closed for more about temperature settings.) NOTE The advanced electronic control system in your refrigerator includes additional display modes that increments the setting by one degree. To adjust the temperature to a higher or lower setting, press ...service professionals can use to rapidly diagnose performance issues. 12 Controls & Settings ALLOWING COOLING TIME BEFORE USE To ensure reliable food storage, allow your refrigerator and freezer to operate with a state-of-the-art electronic digital control system. The system's control panel is located at the factory. The...
... with the doors closed for more about temperature settings.) NOTE The advanced electronic control system in your refrigerator includes additional display modes that increments the setting by one degree. To adjust the temperature to a higher or lower setting, press ...service professionals can use to rapidly diagnose performance issues. 12 Controls & Settings ALLOWING COOLING TIME BEFORE USE To ensure reliable food storage, allow your refrigerator and freezer to operate with a state-of-the-art electronic digital control system. The system's control panel is located at the factory. The...
Owners Guide
Page 13
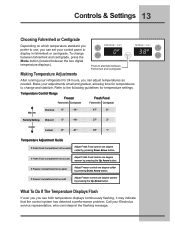
If Fresh Food compartment is too warm Adjust Fresh Food control one degree warmer by pressing Down Arrow button. Call your Electrolux service representative, who can adjust temperatures as needed. To change and stabilize. Temperature Control Range Freezer Fresh Food Fahrenheit Centigrade ... colder by pressing the Up Arrow button. What To Do If The Temperature Displays Flash If ever you you can set your refrigerator for temperature settings. If Freezer compartment is too warm Adjust Freezer control one degree warmer by pressing Down Arrow button. Making Temperature...
If Fresh Food compartment is too warm Adjust Fresh Food control one degree warmer by pressing Down Arrow button. Call your Electrolux service representative, who can adjust temperatures as needed. To change and stabilize. Temperature Control Range Freezer Fresh Food Fahrenheit Centigrade ... colder by pressing the Up Arrow button. What To Do If The Temperature Displays Flash If ever you you can set your refrigerator for temperature settings. If Freezer compartment is too warm Adjust Freezer control one degree warmer by pressing Down Arrow button. Making Temperature...

Owners Guide
Page 14
14 Controls & Settings SYSTEM-MONITORING ALARMS Indicator Lights Alarm Reset Button The electronic control system continuously monitors your refrigerator/freezer for assistance. Alarm Indicator Audible Name Light Tones Condition How To Respond On (light is off) Alarm... settings. High Temp Flashing Amber 9 Freezer or Fresh Food Press Alarm Reset button to Alarms (Audible Tones & Indicator Lights) Your refrigerator's control system can convey the following information through audible tones and the alarm indicator lights. Close door to signal other conditions. Variances ...
14 Controls & Settings SYSTEM-MONITORING ALARMS Indicator Lights Alarm Reset Button The electronic control system continuously monitors your refrigerator/freezer for assistance. Alarm Indicator Audible Name Light Tones Condition How To Respond On (light is off) Alarm... settings. High Temp Flashing Amber 9 Freezer or Fresh Food Press Alarm Reset button to Alarms (Audible Tones & Indicator Lights) Your refrigerator's control system can convey the following information through audible tones and the alarm indicator lights. Close door to signal other conditions. Variances ...

Owners Guide
Page 15
...can monitor the need changing. It can only be replaced from time to reset (activate) the alarm system. Checking the Air Filter Status Your refrigerator's fresh food air filter needs to be reactivated by pressing the Alarm Reset button. Order Filter Air filter is 100 percent used . The On ...system by pressing and holding the Air Filter On/Off button for three seconds. Once you disable the alarm system, you disconnect and reconnect your refrigerator's power cord. This activates a test cycle, and one of the following: Air Filter On/Off Button Indicator Lights Filter OK Air filter ...
...can monitor the need changing. It can only be replaced from time to reset (activate) the alarm system. Checking the Air Filter Status Your refrigerator's fresh food air filter needs to be reactivated by pressing the Alarm Reset button. Order Filter Air filter is 100 percent used . The On ...system by pressing and holding the Air Filter On/Off button for three seconds. Once you disable the alarm system, you disconnect and reconnect your refrigerator's power cord. This activates a test cycle, and one of the following: Air Filter On/Off Button Indicator Lights Filter OK Air filter ...
Owners Guide
Page 16
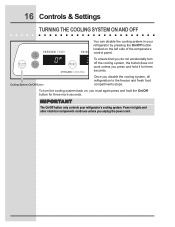
Power to lights and other electrical components continues unless you disable the cooling system, all refrigeration to the freezer and fresh food compartments stops. IMPORTANT The On/Off button only controls your refrigerator by pressing the On/Off button located on , you must again press and hold it for... you unplug the power cord. 16 Controls & Settings TURNING THE COOLING SYSTEM ON AND OFF You can disable the cooling system in your refrigerator's cooling system. To ensure that you do not accidentally turn the cooling system back on the left side of the temperature control panel....
Power to lights and other electrical components continues unless you disable the cooling system, all refrigeration to the freezer and fresh food compartments stops. IMPORTANT The On/Off button only controls your refrigerator by pressing the On/Off button located on , you must again press and hold it for... you unplug the power cord. 16 Controls & Settings TURNING THE COOLING SYSTEM ON AND OFF You can disable the cooling system in your refrigerator's cooling system. To ensure that you do not accidentally turn the cooling system back on the left side of the temperature control panel....

Owners Guide
Page 17
... inserting the mounting bracket hooks into the desired support slots. 5 Lower the shelf and lock into position. Tighten spacers to remove shelf. 1 2 3 1 Shelf Features Your refrigerator includes SpillSafeTM glass shelves, which attach to suit your needs. Sliding shelves can easily adjust shelf positions in a new location, remember to food and faster...
... inserting the mounting bracket hooks into the desired support slots. 5 Lower the shelf and lock into position. Tighten spacers to remove shelf. 1 2 3 1 Shelf Features Your refrigerator includes SpillSafeTM glass shelves, which attach to suit your needs. Sliding shelves can easily adjust shelf positions in a new location, remember to food and faster...
Owners Guide
Page 18
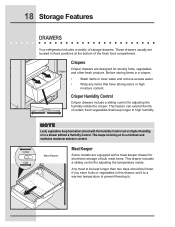
... Control Crisper drawers include a sliding control for adjusting the humidity inside . This feature can extend the life of storage drawers. 18 Storage Features DRAWERS Your refrigerator includes a variety of certain fresh vegetables that have strong odors or high moisture content. This keeps incoming air to be kept longer than two days...
... Control Crisper drawers include a sliding control for adjusting the humidity inside . This feature can extend the life of storage drawers. 18 Storage Features DRAWERS Your refrigerator includes a variety of certain fresh vegetables that have strong odors or high moisture content. This keeps incoming air to be kept longer than two days...


