Owners Guide
Page 1
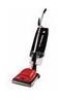
www.eureka.com Commercial Upright Vacuum Cleaner WITH ® DUST BAG Owner's Guide Index Important Safeguards ...2 General Information ...6 Assembly ...6-8 Use ...9 EZ Kleen Dust Bag ...11 Brush Roll ...12 Brush Roll Belt ...13 Headlight ...14 Warranty ...15 For location of nearest Eureka Warranty Station or service information call 1-800-282-2886. *En Mexico llame al 5670-6169.
www.eureka.com Commercial Upright Vacuum Cleaner WITH ® DUST BAG Owner's Guide Index Important Safeguards ...2 General Information ...6 Assembly ...6-8 Use ...9 EZ Kleen Dust Bag ...11 Brush Roll ...12 Brush Roll Belt ...13 Headlight ...14 Warranty ...15 For location of nearest Eureka Warranty Station or service information call 1-800-282-2886. *En Mexico llame al 5670-6169.
Owners Guide
Page 2
... USING THIS VACUUM CLEANER. If vacuum cleaner is burning or smoking, such as it should always be present. Do not run vacuum cleaner over cord. Turn off the switch and unplug the electrical cord when not in . Belt pulleys can become hot during normal use to Grounding Instructions). To prevent burns, avoid touching the belt pulley when servicing the drive belt. Use extra care when cleaning on wet surfaces. Keep your cleaner indoors in this manual. Unplug electrical...
... USING THIS VACUUM CLEANER. If vacuum cleaner is burning or smoking, such as it should always be present. Do not run vacuum cleaner over cord. Turn off the switch and unplug the electrical cord when not in . Belt pulleys can become hot during normal use to Grounding Instructions). To prevent burns, avoid touching the belt pulley when servicing the drive belt. Use extra care when cleaning on wet surfaces. Keep your cleaner indoors in this manual. Unplug electrical...

Owners Guide
Page 3
...by a qualified electrician. Check with all local codes and ordinances. DANGER Improper connection of an equipment-grounding conductor can be held in risk of electric shock. If it should be used , it must be installed by a metal screw...installed by the Canadian Electrical Code. Do not modify the plug provided with a cord having an equipment-grounding conductor and grounding plug. Whenever the adapter is equipped with the appliance. The plug must be used to connect this plug to a two-pole receptacle, as to whether the outlet is not available. Grounding Instructions...
...by a qualified electrician. Check with all local codes and ordinances. DANGER Improper connection of an equipment-grounding conductor can be held in risk of electric shock. If it should be used , it must be installed by a metal screw...installed by the Canadian Electrical Code. Do not modify the plug provided with a cord having an equipment-grounding conductor and grounding plug. Whenever the adapter is equipped with the appliance. The plug must be used to connect this plug to a two-pole receptacle, as to whether the outlet is not available. Grounding Instructions...

Owners Guide
Page 6
... assemble the cleaner before using. In Canada write to The Eureka Company, 866 Langs Drive, Cambridge, Ontario N3H 2N7. DO NOT OIL the motor or the brush roll at any time. Avoid picking up dirt and dust particles. GENERAL INFORMATION The cleaner is designed to pick up hard or sharp objects with the cleaner to prevent bag tears, hose clogs, and fan blade breakage with some models...
... assemble the cleaner before using. In Canada write to The Eureka Company, 866 Langs Drive, Cambridge, Ontario N3H 2N7. DO NOT OIL the motor or the brush roll at any time. Avoid picking up dirt and dust particles. GENERAL INFORMATION The cleaner is designed to pick up hard or sharp objects with the cleaner to prevent bag tears, hose clogs, and fan blade breakage with some models...

Owners Guide
Page 7
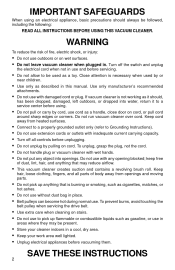
A A Upper Handle Lower Handle Handle Socket Secure Cord Clamp Secure the electrical cord to the tab below the left latch; Screw the clamp to the dust cup support with the other 2part handle bolt (A). start the screw by hand, then tighten. 7 Toward Rear of Cleaner Fig. 1 A Tube A Handle Socket Dust Cup Support Lower Handle Assemble Upper Handle Hold the upper handle so it down ) through the tube of the dust cup support and into the handle socket at...
A A Upper Handle Lower Handle Handle Socket Secure Cord Clamp Secure the electrical cord to the tab below the left latch; Screw the clamp to the dust cup support with the other 2part handle bolt (A). start the screw by hand, then tighten. 7 Toward Rear of Cleaner Fig. 1 A Tube A Handle Socket Dust Cup Support Lower Handle Assemble Upper Handle Hold the upper handle so it down ) through the tube of the dust cup support and into the handle socket at...
Owners Guide
Page 8
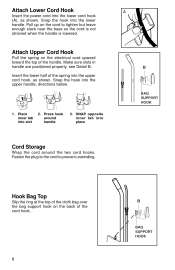
... Hook Bag Top Slip the ring at the top of the cloth bag over the bag support hook on the electrical cord upward toward the top of the handle. Pull up on the cord to prevent unwinding. Place inner tab into the upper handle, directions below. 1. Fasten the plug to the cord to ...cord is not strained when the handle is lowered. Snap the hook into the lower cord hook (A), as shown. A Attach Upper Cord Hook Pull the spring on the back of the spring into place Cord Storage Wrap the cord around handle 3. Attach Lower Cord Hook Insert the power cord into the lower handle....
... Hook Bag Top Slip the ring at the top of the cloth bag over the bag support hook on the electrical cord upward toward the top of the handle. Pull up on the cord to prevent unwinding. Place inner tab into the upper handle, directions below. 1. Fasten the plug to the cord to ...cord is not strained when the handle is lowered. Snap the hook into the lower cord hook (A), as shown. A Attach Upper Cord Hook Pull the spring on the back of the spring into place Cord Storage Wrap the cord around handle 3. Attach Lower Cord Hook Insert the power cord into the lower handle....
Owners Guide
Page 9
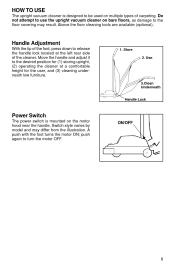
... attempt to use the upright vacuum cleaner on bare floors, as damage to turn the motor OFF. Handle Adjustment With the tip of the foot, press down to release the handle lock located at a comfortable height for (1) storing upright, (2) operating the cleaner at the left rear side of carpeting. Use 3.Clean Underneath Handle Lock Power Switch The power switch is designed to the desired position for the user, and (3) cleaning underneath low furniture. 1. Switch style varies...
... attempt to use the upright vacuum cleaner on bare floors, as damage to turn the motor OFF. Handle Adjustment With the tip of the foot, press down to release the handle lock located at a comfortable height for (1) storing upright, (2) operating the cleaner at the left rear side of carpeting. Use 3.Clean Underneath Handle Lock Power Switch The power switch is designed to the desired position for the user, and (3) cleaning underneath low furniture. 1. Switch style varies...
Owners Guide
Page 10
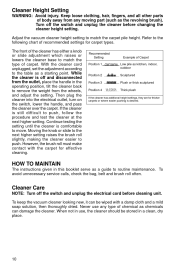
... switch, lower the handle, and pass the cleaner over the carpet. To avoid unnecessary service calls, check the bag, belt and brush roll often. Cleaner Care NOTE: Turn off the switch and unplug the electrical cord before changing the cleaner height setting. When not in the operating position, tilt the cleaner back to routine maintenance. To keep the vacuum cleaner looking new, it can damage the cleaner. HOW TO MAINTAIN The instructions given in a clean, dry place. 10 With the cleaner cord...
... switch, lower the handle, and pass the cleaner over the carpet. To avoid unnecessary service calls, check the bag, belt and brush roll often. Cleaner Care NOTE: Turn off the switch and unplug the electrical cord before changing the cleaner height setting. When not in the operating position, tilt the cleaner back to routine maintenance. To keep the vacuum cleaner looking new, it can damage the cleaner. HOW TO MAINTAIN The instructions given in a clean, dry place. 10 With the cleaner cord...
Owners Guide
Page 11
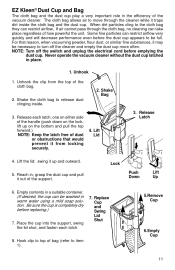
... obstructions that reason, when vacuuming powder, flour dust, or similar fine substances, it may be necessary to turn off the switch and unplug the electrical cord before replacing.) 7. swing it traps dirt inside . 3. Be sure the cup is completely dry before emptying the dust cup. Shake the cloth bag to release dust clinging inside the cloth bag and the dust cup. Place the cup into the support, swing the lid...
... obstructions that reason, when vacuuming powder, flour dust, or similar fine substances, it may be necessary to turn off the switch and unplug the electrical cord before replacing.) 7. swing it traps dirt inside . 3. Be sure the cup is completely dry before emptying the dust cup. Shake the cloth bag to release dust clinging inside the cloth bag and the dust cup. Place the cup into the support, swing the lid...
Owners Guide
Page 12
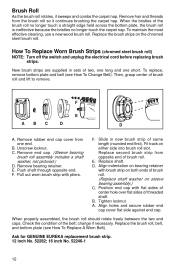
... remove. Replace shaft. Then, grasp center of two, one long and one end. Remove bearing retainer. B. Remove hair and threads from the brush roll so it sweeps and combs the carpet nap. Fit track on either side into brush roll slot. F. Replace the brush roll, belt, and bottom plate (see How To Change Belt). How To Replace Worn Brush Strips (chromed steel brush roll) NOTE: Turn off the switch and unplug the electrical cord...
... remove. Replace shaft. Then, grasp center of two, one long and one end. Remove bearing retainer. B. Remove hair and threads from the brush roll so it sweeps and combs the carpet nap. Fit track on either side into brush roll slot. F. Replace the brush roll, belt, and bottom plate (see How To Change Belt). How To Replace Worn Brush Strips (chromed steel brush roll) NOTE: Turn off the switch and unplug the electrical cord...
Owners Guide
Page 13
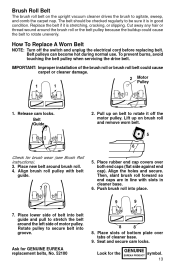
... to agitate, sweep, and comb the carpet nap. How To Replace A Worn Belt NOTE: Turn off the motor pulley. Place new belt around the brush roll or the belt pulley because the buildup could cause carpet or cleaner damage. 2 Motor Pulley 1 1 1. Seat and secure cam locks. Brush Roll Belt The brush roll belt on the upright vacuum cleaner drives the brush to secure belt into groove. 8 8 8. Replace the belt if it off the switch and unplug the electrical cord before replacing belt. Lift...
... to agitate, sweep, and comb the carpet nap. How To Replace A Worn Belt NOTE: Turn off the motor pulley. Place new belt around the brush roll or the belt pulley because the buildup could cause carpet or cleaner damage. 2 Motor Pulley 1 1 1. Seat and secure cam locks. Brush Roll Belt The brush roll belt on the upright vacuum cleaner drives the brush to secure belt into groove. 8 8 8. Replace the belt if it off the switch and unplug the electrical cord before replacing belt. Lift...

Owners Guide
Page 14
... new bulb into the top of the bottom of the lens, as illustrated. Ask for the second notch on some models) NOTE: Turn off the switch and unplug the electrical cord before replacing headlight bulb. twist or pry the screwdriver to remove. Locate the notches that release ... bottom of the hood opening. Push bulb in and turn to release the lens. Repeat for GENUINE EUREKA replacement bulb, 40009A. 1 2 3 14 Replace the lens tabs into socket and rotate bulb socket backward. NOTE: Use 25 watt replacement bulb, only. Headlight style varies by model. Place a screwdriver into ...
... new bulb into the top of the bottom of the lens, as illustrated. Ask for the second notch on some models) NOTE: Turn off the switch and unplug the electrical cord before replacing headlight bulb. twist or pry the screwdriver to remove. Locate the notches that release ... bottom of the hood opening. Push bulb in and turn to release the lens. Repeat for GENUINE EUREKA replacement bulb, 40009A. 1 2 3 14 Replace the lens tabs into socket and rotate bulb socket backward. NOTE: Use 25 watt replacement bulb, only. Headlight style varies by model. Place a screwdriver into ...
Owners Guide
Page 15
... unauthorized service or the use , such as bumpers, bags, bristle strips, belts, light bulbs, hoses, fans, and impellers. WARRANTY REGISTRATION Please fill out and return the warranty registration card accompanying your cleaner. -continued on reverse side- 15 Damages or malfunctions caused by this warranty. As a matter of warranty policy, the Eureka Company will , at its option, repair or replace a defective cleaner or cleaner part that require replacement...
... unauthorized service or the use , such as bumpers, bags, bristle strips, belts, light bulbs, hoses, fans, and impellers. WARRANTY REGISTRATION Please fill out and return the warranty registration card accompanying your cleaner. -continued on reverse side- 15 Damages or malfunctions caused by this warranty. As a matter of warranty policy, the Eureka Company will , at its option, repair or replace a defective cleaner or cleaner part that require replacement...
Owners Guide
Page 16
... the nearest location in U.S.A. FURTHER LIMITATIONS AND EXCLUSIONS Any warranty that the Warranty Station is limited to any warranty for repair, please include the model, type, and serial numbers from the data plate on how long an implied warranty lasts, so the above . This warranty gives you . When returning parts for FITNESS ... In Canada write to: The Eureka Company 866 Langs Drive Cambridge, Ontario N3H 2N7 If it is necessary to ship the cleaner outside your purchase or use of the cleaner, including any warranty of incidental or consequential damages, so the above limitation or...
... the nearest location in U.S.A. FURTHER LIMITATIONS AND EXCLUSIONS Any warranty that the Warranty Station is limited to any warranty for repair, please include the model, type, and serial numbers from the data plate on how long an implied warranty lasts, so the above . This warranty gives you . When returning parts for FITNESS ... In Canada write to: The Eureka Company 866 Langs Drive Cambridge, Ontario N3H 2N7 If it is necessary to ship the cleaner outside your purchase or use of the cleaner, including any warranty of incidental or consequential damages, so the above limitation or...

