Electrolux 169B - Home Care Superbroom Power Vacuum Support and Manuals
Get Help and Manuals for this Electrolux item

View All Support Options Below
Free Electrolux 169B manuals!
Problems with Electrolux 169B?
Ask a Question
Free Electrolux 169B manuals!
Problems with Electrolux 169B?
Ask a Question
Popular Electrolux 169B Manual Pages
Use and Care Guide - Page 2
...
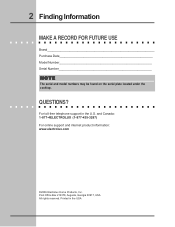
MAKE A RECORD FOR FUTURE USE
Brand Purchase Date Model Number Serial Number
NOTE
The serial and model numbers may be found on the serial plate located under the cooktop. and Canada: 1-877-4ELECTROLUX (1-877-435-3287) For online support and internet product information: www.electrolux.com
©2006 Electrolux Home Products, Inc. Post Office Box 212378, Augusta, Georgia...
Use and Care Guide - Page 3
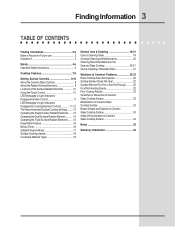
...2-3 Make a Record for Future use 2 Questions 2
Safety 4-6 Important Safety Instructions 4
Cooktop Features 7-8
Setting Surface Controls 9-18 About the Ceramic Glass Cooktop 9 About the Radiant Surface Elements... Ceramic Glass Cooktop 20-21 Care & Cleaning of Stainless Steel 21
Solutions to Common Problems 22-23 Entire Cooktop Does Not Operate 22 Surface Element Does Not Heat 22 Surface ...
Use and Care Guide - Page 4
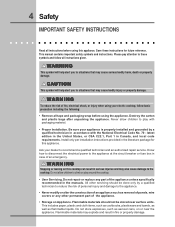
... manual contains important safety symbols and instructions. CAUTION
This symbol will help alert you to the appliance at the circuit breaker or fuse box in accordance with packaging material.
• Proper Installation. Destroy the carton and plastic bags after unpacking the appliance. Do not repair or replace any other permanent part of the appliance unless specifically recommended...
Use and Care Guide - Page 5
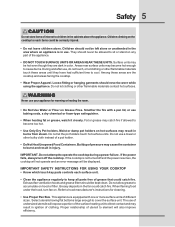
..., always turn fan on the cooktop to reach items could catch fire. IMPORTANT SAFETY INSTRUCTIONS FOR USING YOUR COOKTOP • Know which touch key pads controls each surface unit.
• Clean the appliance regularly to keep all parts free of grease that could be left alone or unattended in the area where an...
Use and Care Guide - Page 6
... will occur if the hot covers are suitable for range top service without breaking due to line any part of the appliance. Only use aluminum foil to the sudden change in temperature. ... to the appliance.
• Ventilating hood. 6 Safety
• Utensil Handles Should Be Turned Inward and Not Extend Over Adjacent Surface Units. NOTE
Save these important safety instructions for cooktop ...
Use and Care Guide - Page 8
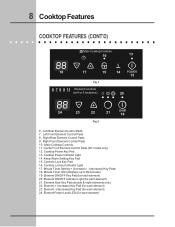
Cooktop Power Key Pad 13. Controls Lockout Indicator Light 17. Minute Timer Setting + (increase) / - (decrease) Key Pads 18. Element - (decrease) Key Pad (for each ...
21
On/Off
19
Fig. 2
6. Right Front Element Control Pads 10. Center Front Element Control Pads (36" model only) 12. Minute Timer LED (displays up to 99 minutes) 19. Cooktop Power Indicator Light 14. Controls Lock ...
Use and Care Guide - Page 9
...at the HI setting. The type and size of cookware, the number of surface elements in the General Care & Cleaning section and Solutions to Common Problems section of heat... Care Guide.
Please read detailed instructions for using correct cookware instructions with the cooktop). Only flat-bottom cookware should be used. Cooktop Appearance
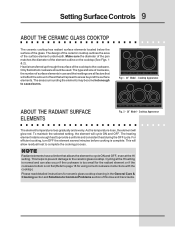
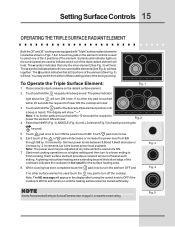
ABOUT THE RADIANT SURFACE ELEMENTS
Fig. 2 - 36" Model -...
Use and Care Guide - Page 10
... located on the center of a pad, the cooktop may not respond to the selection made. 10 Setting Surface Controls
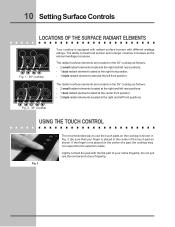
LOCATIONS OF THE SURFACE RADIANT ELEMENTS
On/Off
On/Off
On/Off
On/Off
POWER
Fig...
Fig. 2 - 36" cooktop
Your cooktop is equipped with radiant surface burners with the flat part of your entire fingertip. USING THE TOUCH CONTROL
Fig. 3
The recommended way to heat food ...
Use and Care Guide - Page 15
... then turn the element OFF and On/Of f
if no further pads are used to select one of the 3 positions of these settings at any time while the element is ON.
7. Select the INNER (Fig. 3), MIDDLE (Fig. 4) or ALL 3element (Fig. 5) to heat by .2 increments. The symbol indicates ...
Use and Care Guide - Page 17

...and hold for few seconds the pad of the left rear element (for 30"model) or of the left front element (for 36" model) and the of the right front element at the same time. To turn ...any of the other Cooktop functions may be locked in all electronic surface element control displays show the setting because "Sb" is possible to adjust the power of the right front element at any Cooking ...
Use and Care Guide - Page 18

...griddles and pressure cookers may leave metal marks which will influence the setting needed for flatness by more than element. COOKWARE MATERIAL TYPES
The cookware... Always use on ceramic glass (see Aluminum above
recommended cookware requirements. Follow manufacturer's instructions. Some utensils were
not made to avoid scratching ceramic cooktops.
Remove these marks immediately...
Use and Care Guide - Page 21
...must be taken when aluminum pots or pans are required for maintaining the appearance of stainless parts. The melting point of aluminum is much lower than that of the cooktop surface) may...Do not use scrub pad. Use of the General Care & Cleaning section in this Use & Care Manual. After turning the surface elements OFF, use the same method for Aluminum Foil and Aluminum Cooking Utensils...
Use and Care Guide - Page 22
... HOT ENOUGH
• Incorrect control setting. Be sure to use correct control for service, review the following problems first. Dial markings are not the result of relative heat settings and will vary slightly.
• Lightweight or warped pans being used. Check/reset breaker or replace fuse. 22 Solutions to Common Problems
I M P O R TA N T
Before calling for the...
Use and Care Guide - Page 23
...Guide. Select flat-bottomed cookware of utensils are between cooktop and utensil. Use heavier quality cookware so foods being prepared may cook more evenly.
Be sure cooktop surface and bottom of a proper size to fit element. • Incorrect control setting. Use flat-bottomed, smooth utensils. Use a mildly abrasive cleanser to Common Problems...Raise or lower setting until proper amount ...
Use and Care Guide - Page 26
...'s travel to the home and any costs for servicing, such as removal of trim, cupboards, shelves,etc.,
which prove to any
purchase date
parts of this appliance which are not a part of the U.S.A., Puerto Rico, and Canada. Proper installation by Electrolux Home Products North America, a division of
loose connections or defects in accordance with instructions provided with original serial...
Electrolux 169B Reviews
We have not received any reviews for Electrolux yet.