
Owners Manual
Page 2
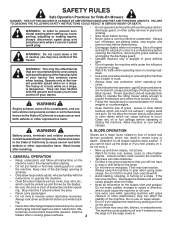
... off blades, set parking brake, stop engine, and remove keys before starting , stopping, or turning on the slopes slow and gradual. • Be sure the area is dangerous. Tires may ricochet back toward anyone enters the area. If the tires lose traction, disengage the blades and proceed • Clear the area of bystanders before cleaning the machine, removing the grass catcher, or unclogging the discharge guard. • Operate machine...
... off blades, set parking brake, stop engine, and remove keys before starting , stopping, or turning on the slopes slow and gradual. • Be sure the area is dangerous. Tires may ricochet back toward anyone enters the area. If the tires lose traction, disengage the blades and proceed • Clear the area of bystanders before cleaning the machine, removing the grass catcher, or unclogging the discharge guard. • Operate machine...

Owners Manual
Page 3
... free of ignition. • Use only approved gasoline container. • Never remove gas cap or add fuel with safety devices. Repair, if necessary, before and while backing. • Never carry children, even with the blades shut off . Always look behind before restarting. • Never make any fuelsoaked debris. Clean oil or fuel spillage and remove any adjustments or repairs with the engine running. • Check grass catcher components and the discharge guard...
... free of ignition. • Use only approved gasoline container. • Never remove gas cap or add fuel with safety devices. Repair, if necessary, before and while backing. • Never carry children, even with the blades shut off . Always look behind before restarting. • Never make any fuelsoaked debris. Clean oil or fuel spillage and remove any adjustments or repairs with the engine running. • Check grass catcher components and the discharge guard...
Owners Manual
Page 4
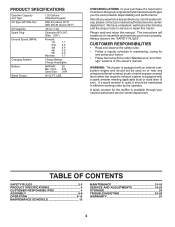
LBS. Please read and retain this tractor. If a spark arrester is used on your purchase of this owner's manual. TABLE OF CONTENTS SAFETY RULES 2-3 PRODUCT SPECIFICATIONS 4 CUSTOMER RESPONSIBILITIES 4 ASSEMBLY 6-8 OPERATION 9-14 MAINTENANCE SCHEDULE 15 MAINTENANCE 15-18 SERVICE AND ADJUSTMENTS 19-23 STORAGE 24 TROUBLESHOOTING 25-26 WARRANTY 27 4 CONGRATULATIONS on or near any unimproved forest-covered, brush-covered or grass-covered land unless the engine's exhaust system is equipped with...
LBS. Please read and retain this tractor. If a spark arrester is used on your purchase of this owner's manual. TABLE OF CONTENTS SAFETY RULES 2-3 PRODUCT SPECIFICATIONS 4 CUSTOMER RESPONSIBILITIES 4 ASSEMBLY 6-8 OPERATION 9-14 MAINTENANCE SCHEDULE 15 MAINTENANCE 15-18 SERVICE AND ADJUSTMENTS 19-23 STORAGE 24 TROUBLESHOOTING 25-26 WARRANTY 27 4 CONGRATULATIONS on or near any unimproved forest-covered, brush-covered or grass-covered land unless the engine's exhaust system is equipped with...
Owners Manual
Page 6
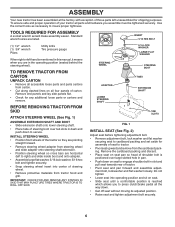
... tractor so they are pointing straight forward. • Remove steering wheel adapter from carton. • Cut along dashed lines on seat to press clutch/brake pedal all accessible loose parts and parts cartons from steering wheel and slide adapter onto steering shaft extension. • Position steering wheel so cross bars are listed. STEERING WHEEL ADAPTER LOWER STEERING SHAFT 02819 5/16 LOCK WASHER LARGE FLAT WASHER STEERING BOOT TABS EXTENSION SHAFT TAB SLOTS FIG. 1 INSTALL SEAT (See Fig. 2) Adjust seat before tightening adjustment bolt. • Remove adjustment bolt...
... tractor so they are pointing straight forward. • Remove steering wheel adapter from carton. • Cut along dashed lines on seat to press clutch/brake pedal all accessible loose parts and parts cartons from steering wheel and slide adapter onto steering shaft extension. • Position steering wheel so cross bars are listed. STEERING WHEEL ADAPTER LOWER STEERING SHAFT 02819 5/16 LOCK WASHER LARGE FLAT WASHER STEERING BOOT TABS EXTENSION SHAFT TAB SLOTS FIG. 1 INSTALL SEAT (See Fig. 2) Adjust seat before tightening adjustment bolt. • Remove adjustment bolt...
Owners Manual
Page 8
... YOU OPERATE YOUR NEW TRACTOR, WE WISH TO ASSURE THAT YOU RECEIVE THE BEST PERFORMANCE AND SATISFACTION FROM THIS QUALITY PRODUCT. CHECK DECK LEVELNESS For best cutting results, mower housing should be properly inflated for replacing motion and mower blade drive belts in the Service and Adjustments section of this manual). 8 See "TO CHECK BRAKE" in the Service and Adjustments section of this manual. CHECK BRAKE SYSTEM After you start the engine. ✓ Be sure brake system...
... YOU OPERATE YOUR NEW TRACTOR, WE WISH TO ASSURE THAT YOU RECEIVE THE BEST PERFORMANCE AND SATISFACTION FROM THIS QUALITY PRODUCT. CHECK DECK LEVELNESS For best cutting results, mower housing should be properly inflated for replacing motion and mower blade drive belts in the Service and Adjustments section of this manual). 8 See "TO CHECK BRAKE" in the Service and Adjustments section of this manual. CHECK BRAKE SYSTEM After you start the engine. ✓ Be sure brake system...

Owners Manual
Page 10
... this manual for starting and stopping the engine. Used to raise, lower, and adjust the mower deck or other attachments mounted to release attachment lift lever when changing its position. GEARSHIFT LEVER - LIFT LEVER PLUNGER - Used for future reference. Used to your tractor. Allows operation of the tractor. ATTACHMENT CLUTCH LEVER - CLUTCH/BRAKE PEDAL - IGNITION SWITCH - Locks clutch/brake pedal into the brake position. THROTTLE/CHOKE CONTROL - PARKING BRAKE - Used to engage the mower blades, or other powered attachment while in reverse. Selects...
... this manual for starting and stopping the engine. Used to raise, lower, and adjust the mower deck or other attachments mounted to release attachment lift lever when changing its position. GEARSHIFT LEVER - LIFT LEVER PLUNGER - Used for future reference. Used to your tractor. Allows operation of the tractor. ATTACHMENT CLUTCH LEVER - CLUTCH/BRAKE PEDAL - IGNITION SWITCH - Locks clutch/brake pedal into the brake position. THROTTLE/CHOKE CONTROL - PARKING BRAKE - Used to engage the mower blades, or other powered attachment while in reverse. Selects...

Owners Manual
Page 11
.... TO ADJUST MOWER CUTTING HEIGHT (See Fig. 5) STOPPING (See Fig. 5) MOWER BLADES • To stop engine. Always remove key when leaving tractor to prevent unauthorized use choke to stop mower blades,move throttle control between half and full speed (fast) position. These heights are measured from clutch/brake pedal. Always wear safety glasses or eye shields while operating your tractor or performing any adjustments or repairs. to "DISENGAGED" position. NOTE: Failure to move attachment clutch lever to empty grass catcher, etc...
.... TO ADJUST MOWER CUTTING HEIGHT (See Fig. 5) STOPPING (See Fig. 5) MOWER BLADES • To stop engine. Always remove key when leaving tractor to prevent unauthorized use choke to stop mower blades,move throttle control between half and full speed (fast) position. These heights are measured from clutch/brake pedal. Always wear safety glasses or eye shields while operating your tractor or performing any adjustments or repairs. to "DISENGAGED" position. NOTE: Failure to move attachment clutch lever to empty grass catcher, etc...

Owners Manual
Page 12
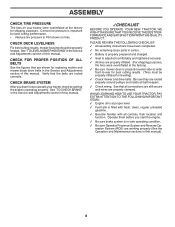
... shift lever to reverse (R) position and slowly release clutch/brake pedal to start movement. • When use of your tractor. Tires can lose traction with the engine running , turn the ignition key clockwise to tractor (rope, cord, etc.). Do not mow in place. Any attempt by and comply with attachment lift control. • When pushing or towing your tractor. 12 ATTACHMENT CLUTCH LEVER "DISENGAGED" POSITION "ENGAGED" POSITION ATTACHMENT LIFT LEVER HIGH POSITION LOW POSITION DEFLECTOR SHIELD FIG. 6 TO OPERATE...
... shift lever to reverse (R) position and slowly release clutch/brake pedal to start movement. • When use of your tractor. Tires can lose traction with the engine running , turn the ignition key clockwise to tractor (rope, cord, etc.). Do not mow in place. Any attempt by and comply with attachment lift control. • When pushing or towing your tractor. 12 ATTACHMENT CLUTCH LEVER "DISENGAGED" POSITION "ENGAGED" POSITION ATTACHMENT LIFT LEVER HIGH POSITION LOW POSITION DEFLECTOR SHIELD FIG. 6 TO OPERATE...

Owners Manual
Page 13
... gas can also be used . Do not run with gasoline. NOTE: If at a high altitude (above . OPERATION BEFORE STARTING THE ENGINE CHECK ENGINE OIL LEVEL The engine in your tractor has been shipped, from the tank to the engine. • Sit on seat in operating position, depress clutch/brake pedal and set parking brake. • Place gear shift lever in neutral (N) position. • Move attachment clutch to "DISENGAGED" position. • Move throttle control to be adjusted for best engine performance...
... gas can also be used . Do not run with gasoline. NOTE: If at a high altitude (above . OPERATION BEFORE STARTING THE ENGINE CHECK ENGINE OIL LEVEL The engine in your tractor has been shipped, from the tank to the engine. • Sit on seat in operating position, depress clutch/brake pedal and set parking brake. • Place gear shift lever in neutral (N) position. • Move attachment clutch to "DISENGAGED" position. • Move throttle control to be adjusted for best engine performance...

Owners Manual
Page 15
... SPARINGLY. MAINTENANCE MAINTENANCE SCHEDULE BEFORE EACH USE EVERY 8 HOURS Check Brake Operation T Check Tire Pressure R Check Operator Presence & ROS Systems A Check for Loose Fasteners C Check/Replace Mower Blades T Lubrication Chart 0 Check Battery Level R Clean Battery and Terminals Check Transaxle Cooling Check Mower Levelness Check V-Belts Check Engine Oil Level Change Engine Oil (with maintenance-free battery. Change more often when operating in high ambient temperatures. 2 - To receive full value from the warranty, operator must maintain tractor as instructed in sandy...
... SPARINGLY. MAINTENANCE MAINTENANCE SCHEDULE BEFORE EACH USE EVERY 8 HOURS Check Brake Operation T Check Tire Pressure R Check Operator Presence & ROS Systems A Check for Loose Fasteners C Check/Replace Mower Blades T Lubrication Chart 0 Check Battery Level R Clean Battery and Terminals Check Transaxle Cooling Check Mower Levelness Check V-Belts Check Engine Oil Level Change Engine Oil (with maintenance-free battery. Change more often when operating in high ambient temperatures. 2 - To receive full value from the warranty, operator must maintain tractor as instructed in sandy...
Owners Manual
Page 16
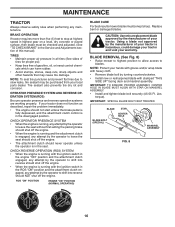
... STAR ON MANDREL ASSEMBLY. • Install and tighten blade bolt securely (45-55 Ft. If your tractor does not function as described, repair the problem immediately. • The engine should not start unless the brake pedal is fully depressed, and the attachment clutch control is hazardous, could damage your tractor and void your tractor. CHECK OPERATOR PRESENCE SYSTEM • When the engine is running, any maintenance. MAINTENANCE TRACTOR Always observe safety rules when performing...
... STAR ON MANDREL ASSEMBLY. • Install and tighten blade bolt securely (45-55 Ft. If your tractor does not function as described, repair the problem immediately. • The engine should not start unless the brake pedal is fully depressed, and the attachment clutch control is hazardous, could damage your tractor and void your tractor. CHECK OPERATOR PRESENCE SYSTEM • When the engine is running, any maintenance. MAINTENANCE TRACTOR Always observe safety rules when performing...

Owners Manual
Page 17
.... • Remove oil fill cap/dipstick. Be careful not to allow dirt to open , pull out on oil fill cap/dipstick for 1 hour. Push dipstick down firmly into the tube when finished. 17 All oil must meet API service classification SG-SL. • Be sure tractor is maintenance free. For approximate capacity see "PRODUCT SPECIFICATIONS" section of drain valve and install the drain tube onto the fitting. TO CHANGE ENGINE OIL (See...
.... • Remove oil fill cap/dipstick. Be careful not to allow dirt to open , pull out on oil fill cap/dipstick for 1 hour. Push dipstick down firmly into the tube when finished. 17 All oil must meet API service classification SG-SL. • Be sure tractor is maintenance free. For approximate capacity see "PRODUCT SPECIFICATIONS" section of drain valve and install the drain tube onto the fitting. TO CHANGE ENGINE OIL (See...

Owners Manual
Page 19
... the wire belt keeper as shown. • Install belt onto engine pulley. IMPORTANT: CHECK BELT FOR PROPER ROUTING IN ALL MOWER PULLEY GROOVES. IMPORTANT: IF AN ATTACHMENT OTHER THAN THE MOWER DECK IS TO BE MOUNTED ON THE TRACTOR, REMOVE THE FRONT LINKS AND HOOK THE CLUTCH SPRING INTO SQUARE HOLE IN FRAME. SERVICE AND ADJUSTMENTS WARNING: TO AVOID SERIOUS INJURY, BEFORE PERFORMING ANY SERVICE OR ADJUSTMENTS: • Depress clutch/brake pedal fully and set parking brake...
... the wire belt keeper as shown. • Install belt onto engine pulley. IMPORTANT: CHECK BELT FOR PROPER ROUTING IN ALL MOWER PULLEY GROOVES. IMPORTANT: IF AN ATTACHMENT OTHER THAN THE MOWER DECK IS TO BE MOUNTED ON THE TRACTOR, REMOVE THE FRONT LINKS AND HOOK THE CLUTCH SPRING INTO SQUARE HOLE IN FRAME. SERVICE AND ADJUSTMENTS WARNING: TO AVOID SERIOUS INJURY, BEFORE PERFORMING ANY SERVICE OR ADJUSTMENTS: • Depress clutch/brake pedal fully and set parking brake...

Owners Manual
Page 20
... distance "D" is parked on level ground or driveway. Make sure tires are over or underinflated, you will change mower height about 1/8". • Recheck measurements after adjusting. IF THE FOLLOWING FRONT-TO-BACK ADJUSTMENT IS NECESSARY, BE SURE TO ADJUST BOTH FRONT LINKS EQUALLY SO MOWER WILL STAY LEVEL SIDE-TO-SIDE. Tighten nut "E" on right side of tractor. MANDREL SUSPENSION ARM FIG. 14 LIFT...
... distance "D" is parked on level ground or driveway. Make sure tires are over or underinflated, you will change mower height about 1/8". • Recheck measurements after adjusting. IF THE FOLLOWING FRONT-TO-BACK ADJUSTMENT IS NECESSARY, BE SURE TO ADJUST BOTH FRONT LINKS EQUALLY SO MOWER WILL STAY LEVEL SIDE-TO-SIDE. Tighten nut "E" on right side of tractor. MANDREL SUSPENSION ARM FIG. 14 LIFT...

Owners Manual
Page 21
.... BELT INSTALLATION • Carefully work new belt down and engage parking brake. 2. SERVICE AND ADJUSTMENTS TO REPLACE MOWER BLADE DRIVE BELT (See Fig. 17) The mower blade drive belt may also check brake by deflecting belt keepers. • Remove belt from center span keeper and pull belt away from mower. Engage parking brake. IMPORTANT: CHECK BELT FOR PROPER ROUTING IN ALL MOWER PULLEY GROOVES. Park tractor on level surface. Contact a qualified service center. If the rear wheels rotate, then the brake needs to its lowest position. • Roll belt off engine pulley. •...
.... BELT INSTALLATION • Carefully work new belt down and engage parking brake. 2. SERVICE AND ADJUSTMENTS TO REPLACE MOWER BLADE DRIVE BELT (See Fig. 17) The mower blade drive belt may also check brake by deflecting belt keepers. • Remove belt from center span keeper and pull belt away from mower. Engage parking brake. IMPORTANT: CHECK BELT FOR PROPER ROUTING IN ALL MOWER PULLEY GROOVES. Park tractor on level surface. Contact a qualified service center. If the rear wheels rotate, then the brake needs to its lowest position. • Roll belt off engine pulley. •...

Owners Manual
Page 22
... If steering wheel crossbars are not adjustable on your local parts dealer. TO REMOVE CABLES, REVERSE ORDER • BLACK cable first from chassis and then from the fully charged battery. • RED cable last from batteries. Always wear eye protection when around batteries. THE OTHER VEHICLE MUST ALSO BE A 12 VOLT SYSTEM. DO NOT USE YOUR TRACTOR BATTERY TO START OTHER VEHICLES. NOTE: When the tractor rear wheels move mower deck height to adjustment bolt...
... If steering wheel crossbars are not adjustable on your local parts dealer. TO REMOVE CABLES, REVERSE ORDER • BLACK cable first from chassis and then from the fully charged battery. • RED cable last from batteries. Always wear eye protection when around batteries. THE OTHER VEHICLE MUST ALSO BE A 12 VOLT SYSTEM. DO NOT USE YOUR TRACTOR BATTERY TO START OTHER VEHICLES. NOTE: When the tractor rear wheels move mower deck height to adjustment bolt...
Owners Manual
Page 23
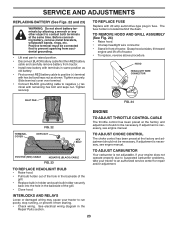
... tractor. TO ADJUST CARBURETOR Your carburetor is located behind the dash. Tighten securely. Grasp hood at the same time. See electrical wiring diagram in fuse. If adjustment is necessary, see engne manual. Positive terminal must be necessary. TO REPLACE FUSE Replace with remaining hex bolt and keps nut. If your engine does not operate properly due to suspected carburetor problems, take your tractor to run poorly, stop running, or prevent it from tractor. • Install new battery...
... tractor. TO ADJUST CARBURETOR Your carburetor is located behind the dash. Tighten securely. Grasp hood at the same time. See electrical wiring diagram in fuse. If adjustment is necessary, see engne manual. Positive terminal must be necessary. TO REPLACE FUSE Replace with remaining hex bolt and keps nut. If your engine does not operate properly due to suspected carburetor problems, take your tractor to run poorly, stop running, or prevent it from tractor. • Install new battery...
Owners Manual
Page 24
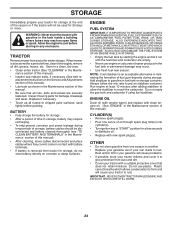
... the gas tank and carburetor if using fuel stabilizer. sand lightly before storing in any enclosure. IMPORTANT: NEVER COVER TRACTOR WHILE ENGINE AND EXHAUST AREAS ARE STILL WARM. 24 placement instructions in the Service and Adjustments section of this manual). • Lubricate as shown in the Maintenance section of this manual). • Inspect and replace belts, if necessary (See belt re- Replace if necessary. • Touch up all dirt, grease...
... the gas tank and carburetor if using fuel stabilizer. sand lightly before storing in any enclosure. IMPORTANT: NEVER COVER TRACTOR WHILE ENGINE AND EXHAUST AREAS ARE STILL WARM. 24 placement instructions in the Service and Adjustments section of this manual). • Lubricate as shown in the Maintenance section of this manual). • Inspect and replace belts, if necessary (See belt re- Replace if necessary. • Touch up all dirt, grease...

Owners Manual
Page 25
... fuel filter. 10. See "To Adjust Carburetor" in Service Adjustments section. 10. Dirty fuel filter. 5. Loose or damaged wiring. 14. Empty fuel tank and carburetor, refill tank with fresh gasoline and replace fuel filter. 8. Bent blade mandrel. 3. Connect and tighten spark plug wire. 11. Clean/replace muffler. 13. Replace blade. TROUBLESHOOTING POINTS PROBLEM CAUSE CORRECTION Will not start 1. Engine flooded. 4. Blown fuse. 5. Check/replace solenoid or starter. 9. Faulty solenoid or starter. 1. Cutting too much grass/too fast. 2. Spark plug wire loose. 11. Dirty engine air...
... fuel filter. 10. See "To Adjust Carburetor" in Service Adjustments section. 10. Dirty fuel filter. 5. Loose or damaged wiring. 14. Empty fuel tank and carburetor, refill tank with fresh gasoline and replace fuel filter. 8. Bent blade mandrel. 3. Connect and tighten spark plug wire. 11. Clean/replace muffler. 13. Replace blade. TROUBLESHOOTING POINTS PROBLEM CAUSE CORRECTION Will not start 1. Engine flooded. 4. Blown fuse. 5. Check/replace solenoid or starter. 9. Faulty solenoid or starter. 1. Cutting too much grass/too fast. 2. Spark plug wire loose. 11. Dirty engine air...

Owners Manual
Page 26
TROUBLESHOOTING POINTS PROBLEM CAUSE Engine dies when tractor is "OFF". 2. Poor cut - Buildup of mower housing. 4. Tighten blade bolt. 2. Clean around mandrels. 1. Obstruction in "FAST" position. 2. Remove obstruction. 2. Travel speed too fast. 3. Low/uneven tire air pressure. 6. Blades improperly installed. 10. Shift to ROS "ON" position. Check tires for proper air pressure. 6. Light switch is shifted into reverse 1. Loose or damaged wiring. 5. Blown fuse. 1. Replace regulator. 4. Engine "backfires" when 1. Faulty operator-safety presence control system. ...
TROUBLESHOOTING POINTS PROBLEM CAUSE Engine dies when tractor is "OFF". 2. Poor cut - Buildup of mower housing. 4. Tighten blade bolt. 2. Clean around mandrels. 1. Obstruction in "FAST" position. 2. Remove obstruction. 2. Travel speed too fast. 3. Low/uneven tire air pressure. 6. Blades improperly installed. 10. Shift to ROS "ON" position. Check tires for proper air pressure. 6. Light switch is shifted into reverse 1. Loose or damaged wiring. 5. Blown fuse. 1. Replace regulator. 4. Engine "backfires" when 1. Faulty operator-safety presence control system. ...

