Datasheet
Page 2
... 1.3M Pixels CMOS Sensor 5 mm, Manual Focus, F=2.8 4MB Flash 64MB SDRAM DIMENSION CERTIFICATIONS 108mm x 112mm x 108mm FCC Class B, CE Mark SYSTEM REQUIREMENTS RF OUTPUT POWER Power Adapter DC 12V, 1A LED LAN Wireless (IC-7010PT & IC-7010PTn only) ACT (IC-7010PoE) Power Operating Conditions 0~40oC 10~90%... & Post-recording of the triggered event • Includes 16-channel view and record utility to view up to 16 cameras simultaneously* • Manual/Schedule/Cycle recording and Playback/Forward/Pause/Stop video with IEEE802.3af PoE standard (IC7010PoE only) 1 x Ethernet (RJ-45) Port 1 ...
... 1.3M Pixels CMOS Sensor 5 mm, Manual Focus, F=2.8 4MB Flash 64MB SDRAM DIMENSION CERTIFICATIONS 108mm x 112mm x 108mm FCC Class B, CE Mark SYSTEM REQUIREMENTS RF OUTPUT POWER Power Adapter DC 12V, 1A LED LAN Wireless (IC-7010PT & IC-7010PTn only) ACT (IC-7010PoE) Power Operating Conditions 0~40oC 10~90%... & Post-recording of the triggered event • Includes 16-channel view and record utility to view up to 16 cameras simultaneously* • Manual/Schedule/Cycle recording and Playback/Forward/Pause/Stop video with IEEE802.3af PoE standard (IC7010PoE only) 1 x Ethernet (RJ-45) Port 1 ...
Quick Install Guide
Page 3
...written permission of this publication and to make changes from time to time in Edimax products are distributed without any particular purpose. all brand and product names mentioned in this manual are subject to the contents hereof and specifically disclaims any warranties, merchantability or ... those shown in this QIG. Linux Open Source Code Certain Edimax products include software code developed by Edimax Technology Co, LTD. Should the programs prove defective following their purchase, the buyer (and not this manual is sold or licensed "as is". Copyright by ...
...written permission of this publication and to make changes from time to time in Edimax products are distributed without any particular purpose. all brand and product names mentioned in this manual are subject to the contents hereof and specifically disclaims any warranties, merchantability or ... those shown in this QIG. Linux Open Source Code Certain Edimax products include software code developed by Edimax Technology Co, LTD. Should the programs prove defective following their purchase, the buyer (and not this manual is sold or licensed "as is". Copyright by ...
Quick Install Guide
Page 5
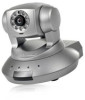
... suitable for almost all security and surveillance applications. Check your new IP camera, please check the package contents. The Edimax IC-7010 series features extremely high picture quality matched by a high frame rate video streaming because of 5 Before enjoying your...; 1 x IP Camera 1 x Power Adapter 2 x Detachable Antenna (IC-7010PTn only) 1 x Mounting Kit 1 x Category 5 Ethernet Cable 1 x Quick Installation Guide 1 x CD (Including Manual/Utility/Multi-Language QIG) 1 x Accessory Kit 3. 1. Better yet, you can ...
... suitable for almost all security and surveillance applications. Check your new IP camera, please check the package contents. The Edimax IC-7010 series features extremely high picture quality matched by a high frame rate video streaming because of 5 Before enjoying your...; 1 x IP Camera 1 x Power Adapter 2 x Detachable Antenna (IC-7010PTn only) 1 x Mounting Kit 1 x Category 5 Ethernet Cable 1 x Quick Installation Guide 1 x CD (Including Manual/Utility/Multi-Language QIG) 1 x Accessory Kit 3. 1. Better yet, you can ...
Quick Install Guide
Page 24
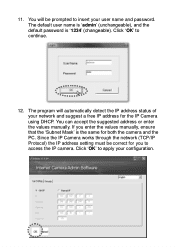
... „admin‟ (unchangeable), and the default password is the same for you to insert your user name and password. If you enter the values manually, ensure that the „Subnet Mask‟ is „1234‟ (changeable). Since the IP Camera works through the network (TCP/IP Protocol) the IP...; to continue. 12. The program will be correct for both the camera and the PC. You can accept the suggested address or enter the values manually. 11.
... „admin‟ (unchangeable), and the default password is the same for you to insert your user name and password. If you enter the values manually, ensure that the „Subnet Mask‟ is „1234‟ (changeable). Since the IP Camera works through the network (TCP/IP Protocol) the IP...; to continue. 12. The program will be correct for both the camera and the PC. You can accept the suggested address or enter the values manually. 11.
Quick Install Guide
Page 26
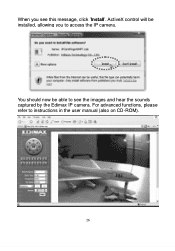
You should now be installed, allowing you see the images and hear the sounds captured by the Edimax IP camera. For advanced functions, please refer to instructions in the user manual (also on CD-ROM). 26 When you to access the IP camera. ActiveX control will be able to see this message, click ‟Install‟.
You should now be installed, allowing you see the images and hear the sounds captured by the Edimax IP camera. For advanced functions, please refer to instructions in the user manual (also on CD-ROM). 26 When you to access the IP camera. ActiveX control will be able to see this message, click ‟Install‟.
Manual
Page 3
...the license on the CD-ROM. Please visit our web site www.edimax.com for any means, electronic, mechanical, magnetic, optical, chemical, manual or otherwise, without obligation to time in any form or by Edimax Technology Co, LTD. For more than the costs of physically performing ...source distribution, a complete machine-readable copy of this manual is sold or licensed "as is free software and distributed without notice. Please contact Edimax at least three years, to the GNU/GPL-Version 2. All rights reserved including all rights...
...the license on the CD-ROM. Please visit our web site www.edimax.com for any means, electronic, mechanical, magnetic, optical, chemical, manual or otherwise, without obligation to time in any form or by Edimax Technology Co, LTD. For more than the costs of physically performing ...source distribution, a complete machine-readable copy of this manual is sold or licensed "as is free software and distributed without notice. Please contact Edimax at least three years, to the GNU/GPL-Version 2. All rights reserved including all rights...
Manual
Page 6
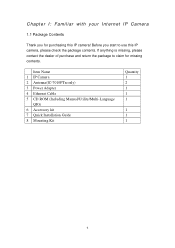
Before you for missing contents. Item Name 1 IP Camera 2 Antenna(IC-7010PTn only) 3 Power Adapter 4 Ethernet Cable 5 CD ROM (Including Manual/Utility/Multi-Language QIG) 6 Accessory kit 7 Quick Installation Guide 8 Mounting Kit Quantity 1 2 1 1 1 1 1 1 6 If anything is missing, please contact the dealer of purchase and return the package to use this IP camera! Chapter I: Familiar with your Internet IP Camera 1.1 Package Contents Thank you start to claim for purchasing this IP camera, please check the package contents.
Before you for missing contents. Item Name 1 IP Camera 2 Antenna(IC-7010PTn only) 3 Power Adapter 4 Ethernet Cable 5 CD ROM (Including Manual/Utility/Multi-Language QIG) 6 Accessory kit 7 Quick Installation Guide 8 Mounting Kit Quantity 1 2 1 1 1 1 1 1 6 If anything is missing, please contact the dealer of purchase and return the package to use this IP camera! Chapter I: Familiar with your Internet IP Camera 1.1 Package Contents Thank you start to claim for purchasing this IP camera, please check the package contents.

Manual
Page 24
The admin software is connected to locate multiple cameras on your local area network. Please insert the user manual CD-ROM supplied in last chapter, you can use camera admin software: 24 1.7 Using Camera Admin Software to Locate Camera If you can ‟t connect ...
The admin software is connected to locate multiple cameras on your local area network. Please insert the user manual CD-ROM supplied in last chapter, you can use camera admin software: 24 1.7 Using Camera Admin Software to Locate Camera If you can ‟t connect ...
Manual
Page 29
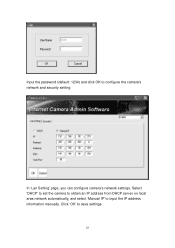
Input the password (default: 1234) and click OK to input the IP address information manually. Select „DHCP‟ to set the camera to obtain an IP address from DHCP server on local area network automatically, and select „Manual IP‟ to configure the camera‟s network and security setting: In „Lan Setting‟ page, you can configure camera‟s network settings. Click „OK‟ to save settings. 29
Input the password (default: 1234) and click OK to input the IP address information manually. Select „DHCP‟ to set the camera to obtain an IP address from DHCP server on local area network automatically, and select „Manual IP‟ to configure the camera‟s network and security setting: In „Lan Setting‟ page, you can configure camera‟s network settings. Click „OK‟ to save settings. 29

Manual
Page 75
... the date and time you select „NTP Server‟, the camera will be given below: Item Set Date/Time manually / NTP Server Description If you select „Set Date/Time manually‟, you can set the date and time of the computer you‟re using. Example: 24th August 2007 = 2007... set here. The descriptions of every setting in this menu will get the date and time from dropdown menu here. You can set the time manually, or use the time of this IP camera. Please select the time zone of the country / city of NTP server here. Date / time format is...
... the date and time you select „NTP Server‟, the camera will be given below: Item Set Date/Time manually / NTP Server Description If you select „Set Date/Time manually‟, you can set the date and time of the computer you‟re using. Example: 24th August 2007 = 2007... set here. The descriptions of every setting in this menu will get the date and time from dropdown menu here. You can set the time manually, or use the time of this IP camera. Please select the time zone of the country / city of NTP server here. Date / time format is...
Manual
Page 76
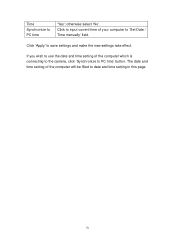
Time Synchronize to save settings and make the new settings take effect. If you wish to use the date and time setting of the computer will be filled to date and time setting in this page. 76 The date and time setting of the computer which is connecting to the camera, click „Synchronize to „Set Date / Time manually‟ field. Click „Apply‟ to PC time „Yes‟; otherwise select „No‟. Click to input current time of your computer to PC time‟ button.
Time Synchronize to save settings and make the new settings take effect. If you wish to use the date and time setting of the computer will be filled to date and time setting in this page. 76 The date and time setting of the computer which is connecting to the camera, click „Synchronize to „Set Date / Time manually‟ field. Click „Apply‟ to PC time „Yes‟; otherwise select „No‟. Click to input current time of your computer to PC time‟ button.
Manual
Page 120
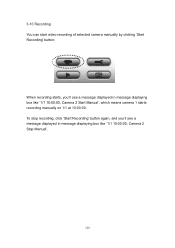
To stop recording, click „Start Recording‟ button again, and you ‟ll see a message displayed in message displaying box like „1/1 10:00:00, Camera 2 Stop Manual‟. 120 3-10 Recording You can start video recording of selected camera manually by clicking „Start Recording‟ button: When recording starts, you ‟ll see a message displayed in message displaying box like „1/1 10:00:00, Camera 2 Start Manual‟, which means camera 1 starts recording manually on 1/1 at 10:00:00.
To stop recording, click „Start Recording‟ button again, and you ‟ll see a message displayed in message displaying box like „1/1 10:00:00, Camera 2 Stop Manual‟. 120 3-10 Recording You can start video recording of selected camera manually by clicking „Start Recording‟ button: When recording starts, you ‟ll see a message displayed in message displaying box like „1/1 10:00:00, Camera 2 Start Manual‟, which means camera 1 starts recording manually on 1/1 at 10:00:00.