
Datasheet
Page 1
... you . There is a 500Mbps Powerline adapter and a 300Mbps 802.11n wireless. HP-5101Wn expands your internet access anytime anywhere in the house without notice. The HP-5101Wn offers easy, plug-and-play setup and provides super-fast Wi-Fi coverage - Copyright © 2013 Edimax Technology Co. Powerline Wireless Extender is perfect for you an expandable...
... you . There is a 500Mbps Powerline adapter and a 300Mbps 802.11n wireless. HP-5101Wn expands your internet access anytime anywhere in the house without notice. The HP-5101Wn offers easy, plug-and-play setup and provides super-fast Wi-Fi coverage - Copyright © 2013 Edimax Technology Co. Powerline Wireless Extender is perfect for you an expandable...
Datasheet
Page 2
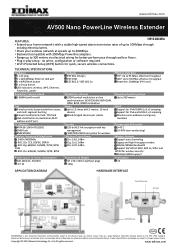
www.edimax.com AV500 Nano PowerLine Wireless Extender FEATURES: HP-5101Wn • Extend your wireless network at the physical layer via electrical wiring for quick, secure wireless connections. Product specifications and design are subject to change ... with 1 master, 16 total devices Max 8 bridged devices per station Powerline Operating Range Up to 500Mbps through walls or floors. • Plug-n-play setup - www.edimax.com Maximum performance, actual data rates, and coverage will vary depending on the IEEE 1901 standard. Ltd. All rights reserved. Copyright © 2013...
www.edimax.com AV500 Nano PowerLine Wireless Extender FEATURES: HP-5101Wn • Extend your wireless network at the physical layer via electrical wiring for quick, secure wireless connections. Product specifications and design are subject to change ... with 1 master, 16 total devices Max 8 bridged devices per station Powerline Operating Range Up to 500Mbps through walls or floors. • Plug-n-play setup - www.edimax.com Maximum performance, actual data rates, and coverage will vary depending on the IEEE 1901 standard. Ltd. All rights reserved. Copyright © 2013...
User Manual
Page 3
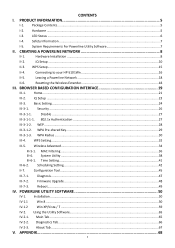
PRODUCT INFORMATION 5 I -4. System Requirements For Powerline Utility Software 7 II. Hardware Installation ...8 II-2. Connecting to your HP-5101Wn 16 II-5. WEP...28 III-3-1-2. About Tab ...67 V. Home...21 III-2. Wireless Advanced...34 III-5-1. MAC Filtering ...36 III-6. Installation ...50 IV-1.1 Win 8 ...50 IV-1.2 ...
PRODUCT INFORMATION 5 I -4. System Requirements For Powerline Utility Software 7 II. Hardware Installation ...8 II-2. Connecting to your HP-5101Wn 16 II-5. WEP...28 III-3-1-2. About Tab ...67 V. Home...21 III-2. Wireless Advanced...34 III-5-1. MAC Filtering ...36 III-6. Installation ...50 IV-1.1 Win 8 ...50 IV-1.2 ...

User Manual
Page 5
...Button Ethernet Port Group Button Item Ethernet Port WPS/Reset Button Description Connects HP-5101Wn to factory default settings or starts the WPS function. WPS: Press for over 10 seconds. Package Contents HP-5101Wn I -1. PRODUCT INFORMATION Before you start using this product, please check ...if there is anything missing in the package, and contact your dealer to claim the missing items(s): I -2. Resets the HP-5101Wn to a computer or other network device...
...Button Ethernet Port Group Button Item Ethernet Port WPS/Reset Button Description Connects HP-5101Wn to factory default settings or starts the WPS function. WPS: Press for over 10 seconds. Package Contents HP-5101Wn I -1. PRODUCT INFORMATION Before you start using this product, please check ...if there is anything missing in the package, and contact your dealer to claim the missing items(s): I -2. Resets the HP-5101Wn to a computer or other network device...
User Manual
Page 6
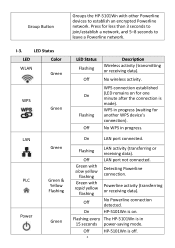
...Status Flashing Off On Flashing Off Description Wireless activity (transmitting or receiving data). Detecting Powerline connection. Group Button Groups the HP-5101Wn with rapid yellow flashing Off LAN activity (transferring or receiving data). WPS in progress (waiting for one minute after the...is in progress. WPS connection established (LED remains on . No WPS in 15 seconds power-saving mode. On HP-5101Wn is off. 6 Off HP-5101Wn is on for another WPS device's connection). On LAN port connected. Powerline activity (transferring or receiving data). No ...
...Status Flashing Off On Flashing Off Description Wireless activity (transmitting or receiving data). Detecting Powerline connection. Group Button Groups the HP-5101Wn with rapid yellow flashing Off LAN activity (transferring or receiving data). WPS in progress (waiting for one minute after the...is in progress. WPS connection established (LED remains on . No WPS in 15 seconds power-saving mode. On HP-5101Wn is off. 6 Off HP-5101Wn is on for another WPS device's connection). On LAN port connected. Powerline activity (transferring or receiving data). No ...

User Manual
Page 8
...a Powerline connection, and then that they are required to your Powerline adapters in the same room, and then relocate the HP-5101Wn to its preferred location after setup is on. 3. It may be convenient to install and configure your router via Ethernet .... Hardware Installation 1. II-1. II. Connect one Powerline adapter to establish a Powerline network. Plug another Powerline adapter (HP-5101Wn) into standard wall sockets. See LED Status for HP-5101Wn LEDs. 8 Avoid using multi-socket adapters. For best performance, plug Powerline adapters directly into a power socket, and...
...a Powerline connection, and then that they are required to your Powerline adapters in the same room, and then relocate the HP-5101Wn to its preferred location after setup is on. 3. It may be convenient to install and configure your router via Ethernet .... Hardware Installation 1. II-1. II. Connect one Powerline adapter to establish a Powerline network. Plug another Powerline adapter (HP-5101Wn) into standard wall sockets. See LED Status for HP-5101Wn LEDs. 8 Avoid using multi-socket adapters. For best performance, plug Powerline adapters directly into a power socket, and...
User Manual
Page 9
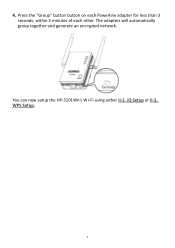
The adapters will automatically group together and generate an encrypted network. iQ Setup or II-3. 4. You can now setup the HP-5101Wn's Wi-Fi using either II-2. WPS Setup. 9 Press the "Group" button button on each Powerline adapter for less than 3 seconds, within 2 minutes of each other.
The adapters will automatically group together and generate an encrypted network. iQ Setup or II-3. 4. You can now setup the HP-5101Wn's Wi-Fi using either II-2. WPS Setup. 9 Press the "Group" button button on each Powerline adapter for less than 3 seconds, within 2 minutes of each other.

User Manual
Page 11
Advanced users who need to specify an IP address for the HP-5101Wn, select "Use the following IP address". 4. Please wait a moment. 11 3. Select "Obtain an IP address automatically" and then click "NEXT".
Advanced users who need to specify an IP address for the HP-5101Wn, select "Use the following IP address". 4. Please wait a moment. 11 3. Select "Obtain an IP address automatically" and then click "NEXT".
User Manual
Page 12
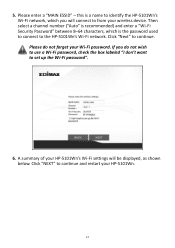
..."Wi-Fi Security Password" between 8-64 characters, which you do not forget your wireless device. A summary of your HP-5101Wn. 12 Then select a channel number ("Auto" is the password used to connect to the HP-5101Wn's Wi-Fi network. 5. Click "NEXT" to from your Wi-Fi password. Click "Next" to set up the... Wi-Fi password". 6. If you will connect to continue and restart your HP-5101Wn's Wi-Fi settings will be displayed, as shown below. Please do not wish to use a Wi-Fi password, check the box labeled "I don't want...
..."Wi-Fi Security Password" between 8-64 characters, which you do not forget your wireless device. A summary of your HP-5101Wn. 12 Then select a channel number ("Auto" is the password used to connect to the HP-5101Wn's Wi-Fi network. 5. Click "NEXT" to from your Wi-Fi password. Click "Next" to set up the... Wi-Fi password". 6. If you will connect to continue and restart your HP-5101Wn's Wi-Fi settings will be displayed, as shown below. Please do not wish to use a Wi-Fi password, check the box labeled "I don't want...
User Manual
Page 13
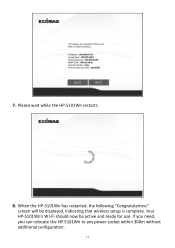
Your HP-5101Wn's Wi-Fi should now be displayed, indicating that wireless setup is complete. Please wait while the HP-5101Wn restarts. 8. When the HP-5101Wn has restarted, the following "Congratulations" screen will be active and ready for use. If you need, you can relocate the HP-5101Wn to any power socket within 300m without additional configuration. 13 7.
Your HP-5101Wn's Wi-Fi should now be displayed, indicating that wireless setup is complete. Please wait while the HP-5101Wn restarts. 8. When the HP-5101Wn has restarted, the following "Congratulations" screen will be active and ready for use. If you need, you can relocate the HP-5101Wn to any power socket within 300m without additional configuration. 13 7.
User Manual
Page 14
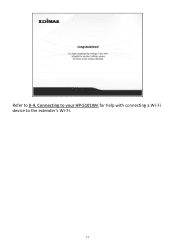
Connecting to your HP-5101Wn for help with connecting a Wi-Fi device to II-4. Refer to the extender's Wi-Fi. 14
Connecting to your HP-5101Wn for help with connecting a Wi-Fi device to II-4. Refer to the extender's Wi-Fi. 14
User Manual
Page 15
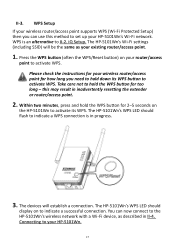
...the WPS button for too long - Connecting to II-2. Please check the instructions for your wireless router/access point for 2-5 seconds on your HP-5101Wn's Wi-Fi network. Within two minutes, press and hold the WPS button for how long you can now connect to activate WPS. WPS ... settings (including SSID) will establish a connection. II-3. Press the WPS button (often the WPS/Reset button) on the HP-5101Wn to set up your router/access point to the HP-5101Wn's wireless network with a Wi-Fi device, as your wireless router/access point supports WPS (Wi-Fi Protected Setup) then...
...the WPS button for too long - Connecting to II-2. Please check the instructions for your wireless router/access point for 2-5 seconds on your HP-5101Wn's Wi-Fi network. Within two minutes, press and hold the WPS button for how long you can now connect to activate WPS. WPS ... settings (including SSID) will establish a connection. II-3. Press the WPS button (often the WPS/Reset button) on the HP-5101Wn to set up your router/access point to the HP-5101Wn's wireless network with a Wi-Fi device, as your wireless router/access point supports WPS (Wi-Fi Protected Setup) then...
User Manual
Page 16
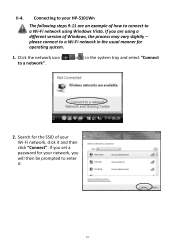
Click the network icon ( , or ) in the system tray and select "Connect to a Wi-Fi network in the usual manner for operating system. 1. please connect to a network". 2. If you are an example of how to connect to enter it and then click "Connect". Connecting to your HP-5101Wn The following steps 9-11 are using a different version of your network, you set a password for the SSID of Windows, the process may vary slightly - Search for your Wi-Fi network, click it . 16 II-4. If you will then be prompted to a Wi-Fi network using Windows Vista.
Click the network icon ( , or ) in the system tray and select "Connect to a Wi-Fi network in the usual manner for operating system. 1. please connect to a network". 2. If you are an example of how to connect to enter it and then click "Connect". Connecting to your HP-5101Wn The following steps 9-11 are using a different version of your network, you set a password for the SSID of Windows, the process may vary slightly - Search for your Wi-Fi network, click it . 16 II-4. If you will then be prompted to a Wi-Fi network using Windows Vista.

User Manual
Page 17
After correctly entering your Wi-Fi network. 4. 3. You can also use the Ethernet port on the underside of the HP-5101Wn to your password, you will be successfully connected to connect a computer or other device via Ethernet cable. 17
After correctly entering your Wi-Fi network. 4. 3. You can also use the Ethernet port on the underside of the HP-5101Wn to your password, you will be successfully connected to connect a computer or other device via Ethernet cable. 17
User Manual
Page 18
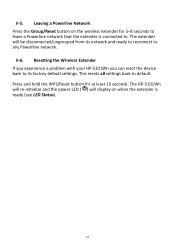
... the WPS/Reset button for 5-8 seconds to . Resetting the Wireless Extender If you experience a problem with your HP-5101Wn you can reset the device back to its network and ready to reconnect to default. The HP-5101Wn will re-initialize and the power LED ( ) will be disconnected/ungrouped from its factory default settings. II-5.
... the WPS/Reset button for 5-8 seconds to . Resetting the Wireless Extender If you experience a problem with your HP-5101Wn you can reset the device back to its network and ready to reconnect to default. The HP-5101Wn will re-initialize and the power LED ( ) will be disconnected/ungrouped from its factory default settings. II-5.

