
Datasheet
Page 3
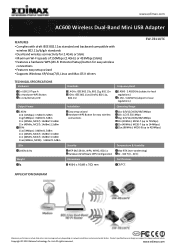
...APPLICATION DIAGRAM Maximum performance, actual data rates, and coverage will vary depending on network conditions and environmental factors. www.edimax.com AC600 Wireless Dual-Band Mini USB Adapter FEATURES • Complies with draft IEEE 802.11ac standard and backward compatible... a hardware WPS (Wi-Fi Protected Setup) button for easy wireless connections • Features easy setup wizard • Supports Windows XP/Vista/7/8, Linux and Mac OS X drivers EW-7811UTC TECHNICAL SPECIFICATIONS Hardware 1 x USB 2.0 Type A 1 x Hardware WPS Button 1 x Link/Activity LED Output Power 2.4GHz...
...APPLICATION DIAGRAM Maximum performance, actual data rates, and coverage will vary depending on network conditions and environmental factors. www.edimax.com AC600 Wireless Dual-Band Mini USB Adapter FEATURES • Complies with draft IEEE 802.11ac standard and backward compatible... a hardware WPS (Wi-Fi Protected Setup) button for easy wireless connections • Features easy setup wizard • Supports Windows XP/Vista/7/8, Linux and Mac OS X drivers EW-7811UTC TECHNICAL SPECIFICATIONS Hardware 1 x USB 2.0 Type A 1 x Hardware WPS Button 1 x Link/Activity LED Output Power 2.4GHz...

Quick Install Guide
Page 2
... VII-3-3. WPS Setup...32 2 LED Status ...4 I -2. Driver Uninstallation...17 V. Using The Adapter 25 VII-1. Mac OS 12 IV-1. Windows 7 ...23 VI-4. WPS ...30 VII-3-5. III-2-2. Driver Installation ...8 Driver Uninstallation...11 Windows XP/Vista/7 ...11 Windows 8 ...11 IV. Mac: Wireless Utility...28 VII-3-1. Product Information 4 I -4. System Requirements...4 I -1. Mac: Connect to a Wi-Fi network 26...
... VII-3-3. WPS Setup...32 2 LED Status ...4 I -2. Driver Uninstallation...17 V. Using The Adapter 25 VII-1. Mac OS 12 IV-1. Windows 7 ...23 VI-4. WPS ...30 VII-3-5. III-2-2. Driver Installation ...8 Driver Uninstallation...11 Windows XP/Vista/7 ...11 Windows 8 ...11 IV. Mac: Wireless Utility...28 VII-3-1. Product Information 4 I -4. System Requirements...4 I -1. Mac: Connect to a Wi-Fi network 26...
Quick Install Guide
Page 4
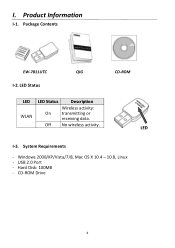
LED Status LED WLAN LED Status Description Wireless activity: On transmitting or receiving data. Windows 2000/XP/Vista/7/8, Mac OS X 10.4 - 10.8, Linux - CD-ROM LED I -2. Package Contents EW-7811UTC QIG I -3. Off No wireless activity. USB 2.0 Port - Product Information I . Hard Disk: 100MB - I -1. CD-ROM Drive 4 System Requirements -
LED Status LED WLAN LED Status Description Wireless activity: On transmitting or receiving data. Windows 2000/XP/Vista/7/8, Mac OS X 10.4 - 10.8, Linux - CD-ROM LED I -2. Package Contents EW-7811UTC QIG I -3. Off No wireless activity. USB 2.0 Port - Product Information I . Hard Disk: 100MB - I -1. CD-ROM Drive 4 System Requirements -
Quick Install Guide
Page 6
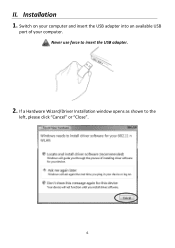
If a Hardware Wizard/Driver Installation window opens as shown to insert the USB adapter. 2. Switch on your computer and insert the USB adapter into an available USB port of your computer. Never use force to the left, please click "Cancel" or "Close". 6 Installation 1. II.
If a Hardware Wizard/Driver Installation window opens as shown to insert the USB adapter. 2. Switch on your computer and insert the USB adapter into an available USB port of your computer. Never use force to the left, please click "Cancel" or "Close". 6 Installation 1. II.
Quick Install Guide
Page 7
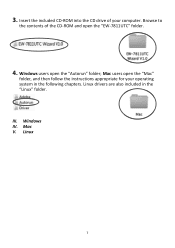
Mac V. Linux 7 Browse to the contents of your operating system in the "Linux" folder. Windows users open the "EW-7811UTC" folder. 4. Mac users open the "Mac" folder, and then follow the instructions appropriate for your computer. 3. Windows IV. III. Insert the included CD-ROM into the CD drive of the CD-ROM and open the "Autorun" folder; Linux drivers are also included in the following chapters.
Mac V. Linux 7 Browse to the contents of your operating system in the "Linux" folder. Windows users open the "EW-7811UTC" folder. 4. Mac users open the "Mac" folder, and then follow the instructions appropriate for your computer. 3. Windows IV. III. Insert the included CD-ROM into the CD drive of the CD-ROM and open the "Autorun" folder; Linux drivers are also included in the following chapters.
Quick Install Guide
Page 8
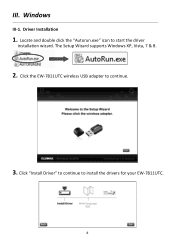
III. Windows III-1. The Setup Wizard supports Windows XP, Vista, 7 & 8. 2. Locate and double click the "Autorun.exe" icon to continue. 3. Click the EW-7811UTC wireless USB adapter to start the driver installation wizard. Driver Installation 1. Click "Install Driver" to continue to install the drivers for your EW-7811UTC. 8
III. Windows III-1. The Setup Wizard supports Windows XP, Vista, 7 & 8. 2. Locate and double click the "Autorun.exe" icon to continue. 3. Click the EW-7811UTC wireless USB adapter to start the driver installation wizard. Driver Installation 1. Click "Install Driver" to continue to install the drivers for your EW-7811UTC. 8

Quick Install Guide
Page 9
Please wait until the installation wizard is ready and then click "Next" to your computer. 5. For Windows 7 & 8 users, if a "User Account Control" window opens, please select "Yes" to allow the wizard to make changes to continue. 6. The installation wizard will install the necessary drivers, please wait. 9 4.
Please wait until the installation wizard is ready and then click "Next" to your computer. 5. For Windows 7 & 8 users, if a "User Account Control" window opens, please select "Yes" to allow the wizard to make changes to continue. 6. The installation wizard will install the necessary drivers, please wait. 9 4.
Quick Install Guide
Page 10
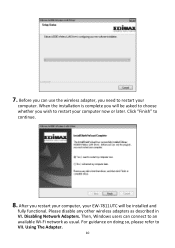
For guidance on doing so, please refer to continue. 8. Click "Finish" to VII. Before you can connect to restart your EW-7811UTC will be installed and fully functional. Then, Windows users can use the wireless adapter, you wish to restart your computer now or later. Please disable any other wireless adapters as usual. Disabling Network Adapters. Using The Adapter. 10 7. When the installation is complete you will be asked to choose whether you need to an available Wi-Fi network as described in VI. After you restart your computer, your computer.
For guidance on doing so, please refer to continue. 8. Click "Finish" to VII. Before you can connect to restart your EW-7811UTC will be installed and fully functional. Then, Windows users can use the wireless adapter, you wish to restart your computer now or later. Please disable any other wireless adapters as usual. Disabling Network Adapters. Using The Adapter. 10 7. When the installation is complete you will be asked to choose whether you need to an available Wi-Fi network as described in VI. After you restart your computer, your computer.

Quick Install Guide
Page 11
Go to Start > Programs > Edimax Wireless LAN > Uninstall 2. Windows 8 1. Locate the Edimax Wireless LAN category, select "Uninstall" and follow the on screen instructions. III-2-2. screen instructions. 11 Windows XP/Vista/7 1. Driver Uninstallation III-2-1. Follow the on - An uninstall wizard will guide you through the process. III-2. Right click anywhere on the "Start" screen and then click the "All apps" icon in the bottom right corner. 2.
Go to Start > Programs > Edimax Wireless LAN > Uninstall 2. Windows 8 1. Locate the Edimax Wireless LAN category, select "Uninstall" and follow the on screen instructions. III-2-2. screen instructions. 11 Windows XP/Vista/7 1. Driver Uninstallation III-2-1. Follow the on - An uninstall wizard will guide you through the process. III-2. Right click anywhere on the "Start" screen and then click the "All apps" icon in the bottom right corner. 2.

Quick Install Guide
Page 16
... Installation Step 3. However if you see the following screen informing you can open , you that a new interface has been detected. Click "Restart" to close the window and then click "Apply" in the bottom right corner of the "Network" panel. 16 If the utility doesn't open it from the "Applications" menu in...
... Installation Step 3. However if you see the following screen informing you can open , you that a new interface has been detected. Click "Restart" to close the window and then click "Apply" in the bottom right corner of the "Network" panel. 16 If the utility doesn't open it from the "Applications" menu in...
Quick Install Guide
Page 22
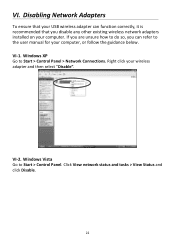
Windows XP Go to Start > Control Panel. Right click your computer. Click View network status and tasks > View Status and click Disable. 22 VI-2. If you are unsure how to the user manual for your computer, or follow the guidance below. VI-1. Disabling Network Adapters To ensure that your USB wireless adapter can function correctly, it is recommended that you can refer to do so, you disable any other existing wireless network adapters installed on your wireless adapter and then select "Disable". Windows Vista Go to Start > Control Panel > Network Connections. VI.
Windows XP Go to Start > Control Panel. Right click your computer. Click View network status and tasks > View Status and click Disable. 22 VI-2. If you are unsure how to the user manual for your computer, or follow the guidance below. VI-1. Disabling Network Adapters To ensure that your USB wireless adapter can function correctly, it is recommended that you can refer to do so, you disable any other existing wireless network adapters installed on your wireless adapter and then select "Disable". Windows Vista Go to Start > Control Panel > Network Connections. VI.

Quick Install Guide
Page 23
Windows 8 1. Switch to File Explorer > (right click) Network > Properties > Change adapter settings. 23 Click View network status and tasks > Wireless Network Connection and click Disable. VI-4. Then go to desktop mode by clicking your cursor in the bottom left of the Windows 8 Start screen. VI-3. Windows 7 Go to Start > Control Panel.
Windows 8 1. Switch to File Explorer > (right click) Network > Properties > Change adapter settings. 23 Click View network status and tasks > Wireless Network Connection and click Disable. VI-4. Then go to desktop mode by clicking your cursor in the bottom left of the Windows 8 Start screen. VI-3. Windows 7 Go to Start > Control Panel.

Quick Install Guide
Page 25
... for the SSID of your password, you have installed the driver and if necessary disabled other versions of how to a Wi-Fi network using Windows Vista - Using The Adapter After you will be prompted to your network, you will then be successfully connected to enter it. 3. Click the... network icon (examples below) in the system tray and select "Connect to a Wi-Fi network as described in VI-5. Mac. Windows Below is an example of Windows. 1. Mac users need to connect to connect using the included utility software, as usual (see VI. the process may vary slightly ...
... for the SSID of your password, you have installed the driver and if necessary disabled other versions of how to a Wi-Fi network using Windows Vista - Using The Adapter After you will be prompted to your network, you will then be successfully connected to enter it. 3. Click the... network icon (examples below) in the system tray and select "Connect to a Wi-Fi network as described in VI-5. Mac. Windows Below is an example of Windows. 1. Mac users need to connect to connect using the included utility software, as usual (see VI. the process may vary slightly ...

Quick Install Guide
Page 28
Navigate the wireless utility using the menu across the top of the window. VII-3-1. VII-3.Mac: Wireless Utility The wireless utility offers features to save different Wi-Fi connection settings as "Profiles". Existing profiles are listed in the "Profile List". 28 Turn Radio OFF VII-3-2. Link Status The "Link Status" page displays information about the current wireless connection. Profiles Switch off the adapter's wireless radio. The "Profile" screen allows you to monitor and configure your connection.
Navigate the wireless utility using the menu across the top of the window. VII-3-1. VII-3.Mac: Wireless Utility The wireless utility offers features to save different Wi-Fi connection settings as "Profiles". Existing profiles are listed in the "Profile List". 28 Turn Radio OFF VII-3-2. Link Status The "Link Status" page displays information about the current wireless connection. Profiles Switch off the adapter's wireless radio. The "Profile" screen allows you to monitor and configure your connection.

Quick Install Guide
Page 29
Save any changes. You can also add a new profile from the "Available Network" screen. Add Edit Remove Duplicate Apply Opens a new window to ) an existing profile. ADD When you select "ADD", a new window will open. VII-3-3. Activate (connect to manually add a new profile. Remove an existing (selected) profile. Available Network The "Available Network...
Save any changes. You can also add a new profile from the "Available Network" screen. Add Edit Remove Duplicate Apply Opens a new window to ) an existing profile. ADD When you select "ADD", a new window will open. VII-3-3. Activate (connect to manually add a new profile. Remove an existing (selected) profile. Available Network The "Available Network...
