Datasheet
Page 2
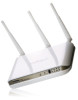
... and DMZ LNK/ACT for LAN MAC/IP filter and URL blocking 3 x 3dBi PR-SMA Detachable Antenna Static routing WPS / Reset button UPnP architecture VPN Pass-Through (IPSec/PPTP) Supports Remote Management Support EZview Management System Status and Security Log (Web Interface) ...WiFi NETWORK SETUP DIAGRAM AND RELATED PRODUCTS An example of how the BR-6524n can be setup: • Connect the BR-6524n router to your printer using an Edimax print server. All rights reserved. Copyright © 2012 Edimax Technology Co. Stated ranges are based on network conditions and environmental ...
... and DMZ LNK/ACT for LAN MAC/IP filter and URL blocking 3 x 3dBi PR-SMA Detachable Antenna Static routing WPS / Reset button UPnP architecture VPN Pass-Through (IPSec/PPTP) Supports Remote Management Support EZview Management System Status and Security Log (Web Interface) ...WiFi NETWORK SETUP DIAGRAM AND RELATED PRODUCTS An example of how the BR-6524n can be setup: • Connect the BR-6524n router to your printer using an Edimax print server. All rights reserved. Copyright © 2012 Edimax Technology Co. Stated ranges are based on network conditions and environmental ...
Quick Install Guide
Page 3
Contents 1 Product Introduction 4 1-1 Package Contents 5 1-2 Front Panel 5 1-3 Back Panel 6 2 Network Setup 7 Step 1:Getting Started 7 Step2 : PC LAN IP Configuration 8 2.1 Router Configuration - PPPoE 11 2.2 Router Configuration - Cable Modem 14 3 Advanced Setup 16 3-1 Change management password 16 3-2 Firmware Upgrade 17 3-3 System Restart and Reset to Default 19 3-4 Wireless Setup 19 2
Contents 1 Product Introduction 4 1-1 Package Contents 5 1-2 Front Panel 5 1-3 Back Panel 6 2 Network Setup 7 Step 1:Getting Started 7 Step2 : PC LAN IP Configuration 8 2.1 Router Configuration - PPPoE 11 2.2 Router Configuration - Cable Modem 14 3 Advanced Setup 16 3-1 Change management password 16 3-2 Firmware Upgrade 17 3-3 System Restart and Reset to Default 19 3-4 Wireless Setup 19 2

Quick Install Guide
Page 7
... or vertical installation), and place the wireless access point in the following picture is 3-antenna model. 1-3 Back Panel (BR-6574n) Item Name Power Reset / WPS 1 - 4 WAN Description Power connector, connects to 12V power adapter Reset the router to factory default settings (clear all settings) or start WPS function. (a) Press this button and hold...
... or vertical installation), and place the wireless access point in the following picture is 3-antenna model. 1-3 Back Panel (BR-6574n) Item Name Power Reset / WPS 1 - 4 WAN Description Power connector, connects to 12V power adapter Reset the router to factory default settings (clear all settings) or start WPS function. (a) Press this button and hold...

Quick Install Guide
Page 20
... 'General Setup' \ 'Wireless' 19 If you can use the Reset button at the Real Panel of the router. Please click 'Apply' to reset your current settings or restore to factory defaults. Alternatively, you wish to reset the router to the factory default settings, select "Factory Default Settings"... then click "Restart". 3-3 Restart and Reset to Default Setting If you found the router ...
... 'General Setup' \ 'Wireless' 19 If you can use the Reset button at the Real Panel of the router. Please click 'Apply' to reset your current settings or restore to factory defaults. Alternatively, you wish to reset the router to the factory default settings, select "Factory Default Settings"... then click "Restart". 3-3 Restart and Reset to Default Setting If you found the router ...
Manual
Page 12
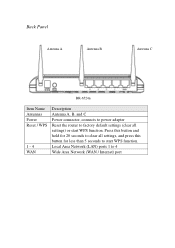
Back Panel Antenna A Antenna B Antenna C BR-6524n Item Name Antennas Power Reset / WPS 1 - 4 WAN Description Antenna A, B, and C Power connector, connects to power adapter Reset the router to factory default settings (clear all settings, and press this button for 20 seconds to clear all settings) or start WPS function. Press this button and hold for less than 5 seconds to 4 Wide Area Network (WAN / Internet) port Local Area Network (LAN) ports 1 to start WPS function.
Back Panel Antenna A Antenna B Antenna C BR-6524n Item Name Antennas Power Reset / WPS 1 - 4 WAN Description Antenna A, B, and C Power connector, connects to power adapter Reset the router to factory default settings (clear all settings, and press this button for 20 seconds to clear all settings) or start WPS function. Press this button and hold for less than 5 seconds to 4 Wide Area Network (WAN / Internet) port Local Area Network (LAN) ports 1 to start WPS function.

Manual
Page 27
... the IP address of network setup procedure. Input 'ipconfig', then press 'Enter' key. If you forget the password, please jump to chapter xx-xx to reset the broadband router.
... the IP address of network setup procedure. Input 'ipconfig', then press 'Enter' key. If you forget the password, please jump to chapter xx-xx to reset the broadband router.

Manual
Page 73
... on other settings later. If you wish to save changes you 'll see the following messages: Please click 'Apply' to delete all checked boxes, click 'Reset' button.
... on other settings later. If you wish to save changes you 'll see the following messages: Please click 'Apply' to delete all checked boxes, click 'Reset' button.

Manual
Page 96
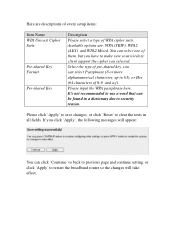
... and continue setting, or click 'Apply' to restart the broadband router so the changes will take effect. Please click 'Apply' to save changes, or click 'Reset' to protect your data security. It's recommended to use WPA instead of WEP when you need to use characters 0-9, a-f, and A-F. WPA pre-shared key WPA...
... and continue setting, or click 'Apply' to restart the broadband router so the changes will take effect. Please click 'Apply' to save changes, or click 'Reset' to protect your data security. It's recommended to use WPA instead of WEP when you need to use characters 0-9, a-f, and A-F. WPA pre-shared key WPA...
Manual
Page 97
... page and continue setting, or click 'Apply' to 63), or Hex (64 characters of WPA cipher suite. Please click 'Apply' to save changes, or click 'Reset' to security reason. You can select one of them, but you have to make sure your wireless client support the cipher you click 'Apply', the...
... page and continue setting, or click 'Apply' to 63), or Hex (64 characters of WPA cipher suite. Please click 'Apply' to save changes, or click 'Reset' to security reason. You can select one of them, but you have to make sure your wireless client support the cipher you click 'Apply', the...
Manual
Page 100
If you click 'Apply', the following messages will appear: You can use encryption to use characters 0-9, a-f, and A-F. Please click 'Apply' to save changes, or click 'Reset' to restart the broadband router so the changes will take effect. It's recommended to use WPA instead of WEP when you need to protect your ...
If you click 'Apply', the following messages will appear: You can use encryption to use characters 0-9, a-f, and A-F. Please click 'Apply' to save changes, or click 'Reset' to restart the broadband router so the changes will take effect. It's recommended to use WPA instead of WEP when you need to protect your ...
Manual
Page 101
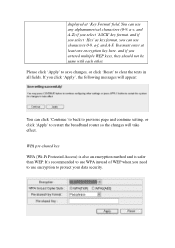
... click 'Apply', the following messages will take effect. Here are : WPA (TKIP), WPA2 (AES), and WPA2 Mixed. Please click 'Apply' to save changes, or click 'Reset' to restart the broadband router so the changes will appear: You can select Passphrase (8 or more alphanumerical characters, up to security reason. Available options are...
... click 'Apply', the following messages will take effect. Here are : WPA (TKIP), WPA2 (AES), and WPA2 Mixed. Please click 'Apply' to save changes, or click 'Reset' to restart the broadband router so the changes will appear: You can select Passphrase (8 or more alphanumerical characters, up to security reason. Available options are...

Manual
Page 102
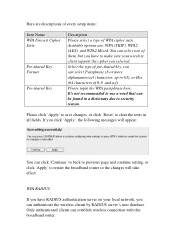
You can select one of WPA cipher suite. Input the port number of RADIUS authentication server here. Please click 'Apply' to save changes, or click 'Reset' to restart the broadband router so the changes will use port number 1812 and you selected. Available options are descriptions of every setup items: Item ...
You can select one of WPA cipher suite. Input the port number of RADIUS authentication server here. Please click 'Apply' to save changes, or click 'Reset' to restart the broadband router so the changes will use port number 1812 and you selected. Available options are descriptions of every setup items: Item ...
Manual
Page 104
... you can click 'Cancel' to discard changes. When you finished with the settings in this page, you can reconnect to delete all checked boxes, click 'Reset' button.
... you can click 'Cancel' to discard changes. When you finished with the settings in this page, you can reconnect to delete all checked boxes, click 'Reset' button.
Manual
Page 106
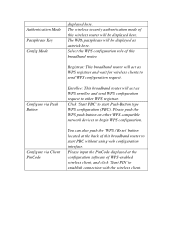
... Mode Passphrase Key Config Mode displayed here. The WPA passphrase will act as asterisk here. Configure via Client PinCode You can also push the 'WPS / Reset' button located at the configuration software of this broadband router to start Push-Button type WPS configuration (PBC). Please push the WPS push-button on...
... Mode Passphrase Key Config Mode displayed here. The WPA passphrase will act as asterisk here. Configure via Client PinCode You can also push the 'WPS / Reset' button located at the configuration software of this broadband router to start Push-Button type WPS configuration (PBC). Please push the WPS push-button on...

Manual
Page 109
... table. If you want to erase all rules currently listed in this broadband router and continue on other settings later. Move selected item up. Click 'Reset' When you finished with the settings in this page, you can click 'Cancel' to discard changes. If the QoS table is empty, this is normal... rule you just entered. If the QoS table is not malfunction). You can not be clicked. Edit Delete Selected Delete All Move Up Move Down Reset If you want to modify the content of a specific rule, please check the 'select' box of the rule(s) you made and restart the broadband router...
... table. If you want to erase all rules currently listed in this broadband router and continue on other settings later. Move selected item up. Click 'Reset' When you finished with the settings in this page, you can click 'Cancel' to discard changes. If the QoS table is empty, this is normal... rule you just entered. If the QoS table is not malfunction). You can not be clicked. Edit Delete Selected Delete All Move Up Move Down Reset If you want to modify the content of a specific rule, please check the 'select' box of the rule(s) you made and restart the broadband router...
Manual
Page 111
... this rule as a IP address based rule (apply the limitation on a single port, just input the port number, like '80'. If you just entered, click 'Reset'. if you did anything wrong, you'll get an error message when you want to apply this rule on all values you want to apply...
... this rule as a IP address based rule (apply the limitation on a single port, just input the port number, like '80'. If you just entered, click 'Reset'. if you did anything wrong, you'll get an error message when you want to apply this rule on all values you want to apply...
Manual
Page 113
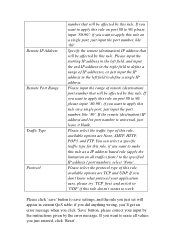
You can select the computer name and click ' All computer names found by this box to enable virtual server, and uncheck this broadband router on local network will be listed here. Here are descriptions of the computer which provides Internet service. Input the IP address of every setup items: Item Name Enable Virtual Server Private IP Computer name Description Check this box to disable virtual server.
You can select the computer name and click ' All computer names found by this box to enable virtual server, and uncheck this broadband router on local network will be listed here. Here are descriptions of the computer which provides Internet service. Input the IP address of every setup items: Item Name Enable Virtual Server Private IP Computer name Description Check this box to disable virtual server.

Manual
Page 116
...more than one or more than one port number and they 're not contiguous, list all port numbers here and separate them by comma ( , ). Add Reset After a game is optional. This is selected, click 'Add' (the one next to 'Select Game' dropdown list) to add the connection parameters to input... here to help you remember the purpose of network games. If you need to special applications table. If you want to remove all boxes, click 'Reset'. UDP Port to remove the mapping. Click this page. All existing special application mappings will be a single value, or a range (like 20-50). ...
...more than one or more than one port number and they 're not contiguous, list all port numbers here and separate them by comma ( , ). Add Reset After a game is optional. This is selected, click 'Add' (the one next to 'Select Game' dropdown list) to add the connection parameters to input... here to help you remember the purpose of network games. If you need to special applications table. If you want to remove all boxes, click 'Reset'. UDP Port to remove the mapping. Click this page. All existing special application mappings will be a single value, or a range (like 20-50). ...
Manual
Page 119
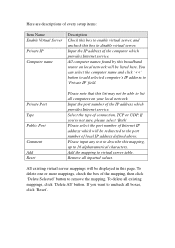
You can select the computer name and click ' Please input the MAC address of your wireless device indicates 'aa-bb-cc-dd-ee-ff' or 'aa:bb:cc:dd:ee:ff', just input 'aabbccddeeff' All computer names found by this broadband router on local network will be listed here. Client PC MAC address Computer Name Comment Add Reset network devices. If the MAC address label of computer or network device here, dash ( - ) or colon ( : ) are not required. (i.e.
You can select the computer name and click ' Please input the MAC address of your wireless device indicates 'aa-bb-cc-dd-ee-ff' or 'aa:bb:cc:dd:ee:ff', just input 'aabbccddeeff' All computer names found by this broadband router on local network will be listed here. Client PC MAC address Computer Name Comment Add Reset network devices. If the MAC address label of computer or network device here, dash ( - ) or colon ( : ) are not required. (i.e.
Manual
Page 120
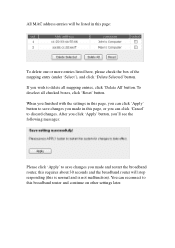
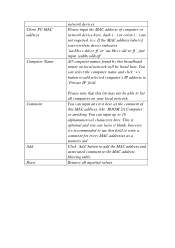
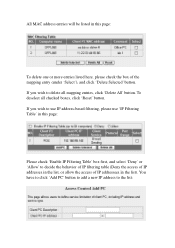
You have to click 'Add PC' button to add a new IP address to delete all checked boxes, click 'Reset' button. All MAC address entries will be listed in this page: Please check 'Enable IP Filtering Table' box first, and select 'Deny' or 'Allow' to ...
You have to click 'Add PC' button to add a new IP address to delete all checked boxes, click 'Reset' button. All MAC address entries will be listed in this page: Please check 'Enable IP Filtering Table' box first, and select 'Deny' or 'Allow' to ...


