Quick Install Guide
Page 10
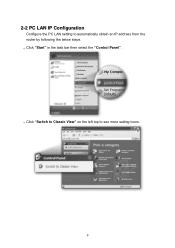
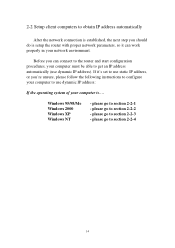
z Click "Start" in the task bar then select the "Control Panel" . z Click "Switch to Classic View" on the left top to automatically obtain an IP address from the router by following the below steps. 2-2 PC LAN IP Configuration Configure the PC LAN setting to see more setting icons. 9
z Click "Start" in the task bar then select the "Control Panel" . z Click "Switch to Classic View" on the left top to automatically obtain an IP address from the router by following the below steps. 2-2 PC LAN IP Configuration Configure the PC LAN setting to see more setting icons. 9
Quick Install Guide
Page 12
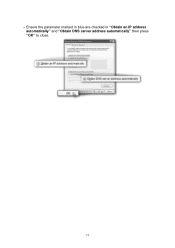
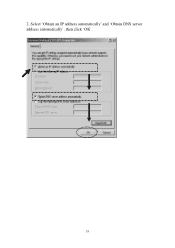
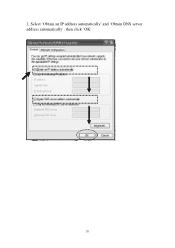
z Ensure the parameter marked in blue are checked in "Obtain an IP address automatically" and "Obtain DNS server address automatically" then press "OK" to close. 11
z Ensure the parameter marked in blue are checked in "Obtain an IP address automatically" and "Obtain DNS server address automatically" then press "OK" to close. 11
Quick Install Guide
Page 14
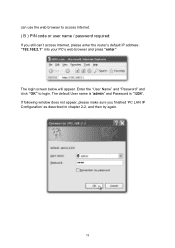
can use the web browser to login. The default User name is "admin" and Password is "1234", If following window does not appear, please make sure you still can't access Internet, please enter the router's default IP address: "192.168.2.1" into your PC's web browser and press "enter" The login screen below will appear. Enter the "User Name" and "Password" and click "OK" to access Internet. ( B ) PIN code or user name / password required: If you finished 'PC LAN IP Configuration' as described in chapter 2-2, and then try again. 13
can use the web browser to login. The default User name is "admin" and Password is "1234", If following window does not appear, please make sure you still can't access Internet, please enter the router's default IP address: "192.168.2.1" into your PC's web browser and press "enter" The login screen below will appear. Enter the "User Name" and "Password" and click "OK" to access Internet. ( B ) PIN code or user name / password required: If you finished 'PC LAN IP Configuration' as described in chapter 2-2, and then try again. 13
Quick Install Guide
Page 23
15. Now you are able to connect to Internet successfully. 22 You can check the Status of the 3G router. 16. Plug in the C100S into the USB port of the 3G-6200n / 3G-6400n on the Web site (ex: 192.168.2.1). 17. The USB adapter will get the IP address from ISP automatically.
15. Now you are able to connect to Internet successfully. 22 You can check the Status of the 3G router. 16. Plug in the C100S into the USB port of the 3G-6200n / 3G-6400n on the Web site (ex: 192.168.2.1). 17. The USB adapter will get the IP address from ISP automatically.
Quick Install Guide
Page 25
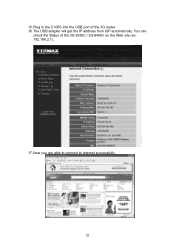
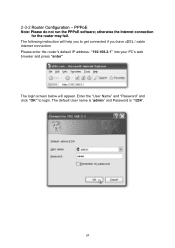
The default User name is "admin" and Password is "1234", 24 Enter the "User Name" and "Password" and click "OK" to get connected if you have xDSL / cable Internet connection Please enter the router's default IP address: "192.168.2.1" into your PC's web browser and press "enter" The login screen below will appear. otherwise the Internet connection for the router may fail. 2-3-2 Router Configuration - PPPoE Note: Please do not run the PPPoE software; The following instruction will help you to login.
The default User name is "admin" and Password is "1234", 24 Enter the "User Name" and "Password" and click "OK" to get connected if you have xDSL / cable Internet connection Please enter the router's default IP address: "192.168.2.1" into your PC's web browser and press "enter" The login screen below will appear. otherwise the Internet connection for the router may fail. 2-3-2 Router Configuration - PPPoE Note: Please do not run the PPPoE software; The following instruction will help you to login.
Quick Install Guide
Page 27
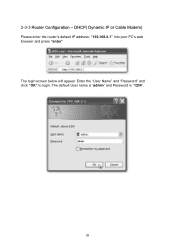
2-3-3 Router Configuration - DHCP( Dynamic IP or Cable Modem) Please enter the router's default IP address: "192.168.2.1" into your PC's web browser and press "enter" The login screen below will appear. Enter the "User Name" and "Password" and click "OK" to login. The default User name is "admin" and Password is "1234", 26
2-3-3 Router Configuration - DHCP( Dynamic IP or Cable Modem) Please enter the router's default IP address: "192.168.2.1" into your PC's web browser and press "enter" The login screen below will appear. Enter the "User Name" and "Password" and click "OK" to login. The default User name is "admin" and Password is "1234", 26
Manual
Page 3
... connection 11 2-2 Setup client computers to obtain IP address automatically 14 2-2-1 Windows 95/98/Me IP address setup 15 2-2-2 Windows 2000 IP address setup 17 2-2-3 Windows XP IP address setup 19 2-2-4 Windows Vista IP address setup 21 2-3 Connect to broadband router by web browser 23 2-4 Using 'Quick Setup 27 2-4-1 3G/3.5G 31 2-4-2 Using 'Dynamic IP' as broadband connection type 40 2-4-3 Using 'Fixed...
... connection 11 2-2 Setup client computers to obtain IP address automatically 14 2-2-1 Windows 95/98/Me IP address setup 15 2-2-2 Windows 2000 IP address setup 17 2-2-3 Windows XP IP address setup 19 2-2-4 Windows Vista IP address setup 21 2-3 Connect to broadband router by web browser 23 2-4 Using 'Quick Setup 27 2-4-1 3G/3.5G 31 2-4-2 Using 'Dynamic IP' as broadband connection type 40 2-4-3 Using 'Fixed...
Manual
Page 14
...2-2-1 - If it can connect to the router and start configuration procedures, your computer must be able to get an IP address automatically (use dynamic IP address: If the operating system of your computer is setup the router with proper network parameters, so it 's set to use static... IP address, or you're unsure, please follow the following instructions to configure your computer to use dynamic IP address). please go to section 2-2-2 - please go to section 2-2-4 14 please go to section ...
...2-2-1 - If it can connect to the router and start configuration procedures, your computer must be able to get an IP address automatically (use dynamic IP address: If the operating system of your computer is setup the router with proper network parameters, so it 's set to use static... IP address, or you're unsure, please follow the following instructions to configure your computer to use dynamic IP address). please go to section 2-2-2 - please go to section 2-2-4 14 please go to section ...
Manual
Page 15
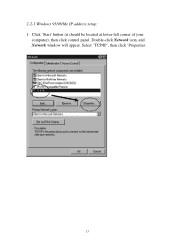
Select 'TCP/IP', then click 'Properties'. 15 Click 'Start' button (it should be located at lower-left corner of your computer), then click control panel. Double-click Network icon, and Network window will appear. 2-2-1 Windows 95/98/Me IP address setup: 1.
Select 'TCP/IP', then click 'Properties'. 15 Click 'Start' button (it should be located at lower-left corner of your computer), then click control panel. Double-click Network icon, and Network window will appear. 2-2-1 Windows 95/98/Me IP address setup: 1.
Manual
Page 16
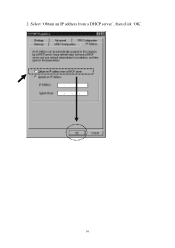
Select 'Obtain an IP address from a DHCP server', then click 'OK'. 16 2.
Select 'Obtain an IP address from a DHCP server', then click 'OK'. 16 2.
Manual
Page 17
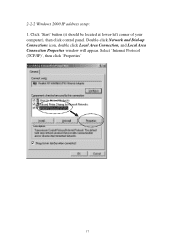
Click 'Start' button (it should be located at lower-left corner of your computer), then click control panel. Double-click Network and Dial-up Connections icon, double click Local Area Connection, and Local Area Connection Properties window will appear. Select 'Internet Protocol (TCP/IP)', then click 'Properties' 17 2-2-2 Windows 2000 IP address setup: 1.
Click 'Start' button (it should be located at lower-left corner of your computer), then click control panel. Double-click Network and Dial-up Connections icon, double click Local Area Connection, and Local Area Connection Properties window will appear. Select 'Internet Protocol (TCP/IP)', then click 'Properties' 17 2-2-2 Windows 2000 IP address setup: 1.
Manual
Page 18
Select 'Obtain an IP address automatically' and 'Obtain DNS server address automatically', then click 'OK'. 18 2.
Select 'Obtain an IP address automatically' and 'Obtain DNS server address automatically', then click 'OK'. 18 2.
Manual
Page 19
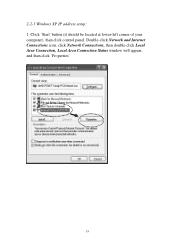
Click 'Start' button (it should be located at lower-left corner of your computer), then click control panel. 2-2-3 Windows XP IP address setup: 1. Double-click Network and Internet Connections icon, click Network Connections, then double-click Local Area Connection, Local Area Connection Status window will appear, and then click 'Properties' 19
Click 'Start' button (it should be located at lower-left corner of your computer), then click control panel. 2-2-3 Windows XP IP address setup: 1. Double-click Network and Internet Connections icon, click Network Connections, then double-click Local Area Connection, Local Area Connection Status window will appear, and then click 'Properties' 19
Manual
Page 20
2. Select 'Obtain an IP address automatically' and 'Obtain DNS server address automatically', then click 'OK'. 20
2. Select 'Obtain an IP address automatically' and 'Obtain DNS server address automatically', then click 'OK'. 20
Manual
Page 21
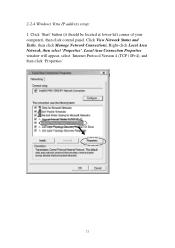
2-2-4 Windows Vista IP address setup: 1. Click View Network Status and Tasks, then click Manage Network Connections..Right-click Local Area Netwrok, then select 'Properties'. Local Area Connection Properties window will appear, select 'Internet Protocol Version 4 (TCP / IPv4), and then click 'Properties' 21 Click 'Start' button (it should be located at lower-left corner of your computer), then click control panel.
2-2-4 Windows Vista IP address setup: 1. Click View Network Status and Tasks, then click Manage Network Connections..Right-click Local Area Netwrok, then select 'Properties'. Local Area Connection Properties window will appear, select 'Internet Protocol Version 4 (TCP / IPv4), and then click 'Properties' 21 Click 'Start' button (it should be located at lower-left corner of your computer), then click control panel.

Manual
Page 22
2. Select 'Obtain an IP address automatically' and 'Obtain DNS server address automatically', then click 'OK'. 22
2. Select 'Obtain an IP address automatically' and 'Obtain DNS server address automatically', then click 'OK'. 22

Manual
Page 23
Please input '192.168.2.1' in web browser's address bar and press 'Enter' key to broadband router's web-based configuration interface by any connected computer with web browser (Internet Explorer 5.x or above, Firefox, or Netscape). 2-3 Connect to broadband router by web browser Default IP address of this broadband router is '192.168.2.1', and you can connect to establish connection: You should see the following authentication window: 23
Please input '192.168.2.1' in web browser's address bar and press 'Enter' key to broadband router's web-based configuration interface by any connected computer with web browser (Internet Explorer 5.x or above, Firefox, or Netscape). 2-3 Connect to broadband router by web browser Default IP address of this broadband router is '192.168.2.1', and you can connect to establish connection: You should see the following authentication window: 23
Manual
Page 24
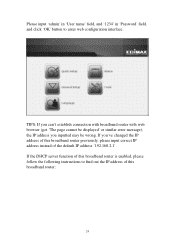
... 'User name' field, and '1234' in 'Password' field, and click 'OK' button to find out the IP address of this broadband router: 24 If the DHCP server function of this broadband router previously, please input correct IP address instead of this broadband router is enabled, please follow the following instructions to enter web configuration... be wrong. TIPS: If you can't establish connection with broadband router with web browser (got 'The page cannot be displayed' or similar error message), the IP address you 've changed the IP address of the default IP address '192.168.2.1'.
... 'User name' field, and '1234' in 'Password' field, and click 'OK' button to find out the IP address of this broadband router: 24 If the DHCP server function of this broadband router previously, please input correct IP address instead of this broadband router is enabled, please follow the following instructions to enter web configuration... be wrong. TIPS: If you can't establish connection with broadband router with web browser (got 'The page cannot be displayed' or similar error message), the IP address you 've changed the IP address of the default IP address '192.168.2.1'.
Manual
Page 26
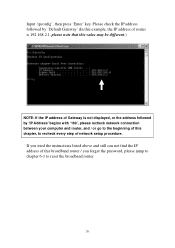
... press 'Enter' key. Please check the IP address followed by 'Default Gateway' (In this example, the IP address of router is 192.168.2.1, please note that this value may be different.) NOTE: If the IP address of Gateway is not displayed, or the address followed by 'IP Address' begins with '169', please recheck network ...router, and / or go to reset the broadband router. 26 If you tried the instructions listed above and still can not find the IP address of this chapter, to recheck every step of this broadband router / you forget the password, please jump to chapter 6-1 to the beginning...
... press 'Enter' key. Please check the IP address followed by 'Default Gateway' (In this example, the IP address of router is 192.168.2.1, please note that this value may be different.) NOTE: If the IP address of Gateway is not displayed, or the address followed by 'IP Address' begins with '169', please recheck network ...router, and / or go to reset the broadband router. 26 If you tried the instructions listed above and still can not find the IP address of this chapter, to recheck every step of this broadband router / you forget the password, please jump to chapter 6-1 to the beginning...
Manual
Page 28
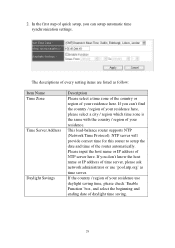
... the country / region of your residence here. This load-balance router supports NTP (Network Time Protocol). Please input the host name or IP address of time server, please ask network administrator or use daylight saving time, please check 'Enable Function' box, and select the beginning and ...the router automatically. If the country / region of your residence use 'pool.ntp.org' as follow: Item Name Time Zone Time Server Address Daylight Savings Description Please select a time zone of the country or region of daylight time saving. 28 The descriptions of every setting items...
... the country / region of your residence here. This load-balance router supports NTP (Network Time Protocol). Please input the host name or IP address of time server, please ask network administrator or use daylight saving time, please check 'Enable Function' box, and select the beginning and ...the router automatically. If the country / region of your residence use 'pool.ntp.org' as follow: Item Name Time Zone Time Server Address Daylight Savings Description Please select a time zone of the country or region of daylight time saving. 28 The descriptions of every setting items...