
User Manual
Page 2
User's Guide EVGA X58 SLI Motherboard EVGA | 1
User's Guide EVGA X58 SLI Motherboard EVGA | 1

User Manual
Page 4
EVGA X58 SLI Motherboard Table of Contents User's Guide...1 EVGA X58 SLI Motherboard 1 Before You Begin...8 Parts NOT in the Kit 8 Intentions of the Kit 8 EVGA X58 SLI Motherboard 9 Motherboard Specifications 9 Unpacking and Parts Descriptions 11 Unpacking ...11 Equipment ...11 EVGA X58 SLI Motherboard 13 Hardware Installation 16 Safety Instructions 16 Preparing the Motherboard 17 Installing the CPU 17 Installing the CPU Fan 18 Installing System Memory (DIMMs 19...
EVGA X58 SLI Motherboard Table of Contents User's Guide...1 EVGA X58 SLI Motherboard 1 Before You Begin...8 Parts NOT in the Kit 8 Intentions of the Kit 8 EVGA X58 SLI Motherboard 9 Motherboard Specifications 9 Unpacking and Parts Descriptions 11 Unpacking ...11 Equipment ...11 EVGA X58 SLI Motherboard 13 Hardware Installation 16 Safety Instructions 16 Preparing the Motherboard 17 Installing the CPU 17 Installing the CPU Fan 18 Installing System Memory (DIMMs 19...
User Manual
Page 6
EVGA X58 SLI Motherboard Hard Disk Boot Priority 43 CD-ROM Device Priority 43 First/Second/Third Boot Device 43 Boot Other Device 44 Boot Up NumLock Status 44 ... 51 PnP/PCI Configuration Menu 52 Init Display First 52 Reset Configuration 53 Resources Controlled By 53 IRQ Resources 53 PCI/VGA Palette Snoop 54 EVGA | 5
EVGA X58 SLI Motherboard Hard Disk Boot Priority 43 CD-ROM Device Priority 43 First/Second/Third Boot Device 43 Boot Other Device 44 Boot Up NumLock Status 44 ... 51 PnP/PCI Configuration Menu 52 Init Display First 52 Reset Configuration 53 Resources Controlled By 53 IRQ Resources 53 PCI/VGA Palette Snoop 54 EVGA | 5

User Manual
Page 7
... Function 56 Frequency/Voltage Control Menu 57 Memory Feature 58 CPU Feature...59 CPU Clock Ratio 61 CPU Host Frequency (Mhz 62 Spread Spectrum 62 EVGA VDroop control 62 CPU VCore...62 CPU VTT Voltage 62 CPU PLL Vcore 62 DIMM Voltage ...62 DIMM DQ Vref...63 QPI PLL Vcore...63... Vcore...63 CPU Thermal Trip 63 PWM Frequency 64 Installing Drivers and Software 65 Windows XP/Vista Driver Installation 65 Appendix A. POST Codes for the EVGA X58 SLI Motherboard 66 EVGA Glossary of Terms 74...
... Function 56 Frequency/Voltage Control Menu 57 Memory Feature 58 CPU Feature...59 CPU Clock Ratio 61 CPU Host Frequency (Mhz 62 Spread Spectrum 62 EVGA VDroop control 62 CPU VCore...62 CPU VTT Voltage 62 CPU PLL Vcore 62 DIMM Voltage ...62 DIMM DQ Vref...63 QPI PLL Vcore...63... Vcore...63 CPU Thermal Trip 63 PWM Frequency 64 Installing Drivers and Software 65 Windows XP/Vista Driver Installation 65 Appendix A. POST Codes for the EVGA X58 SLI Motherboard 66 EVGA Glossary of Terms 74...

User Manual
Page 8
... of Figures Figure 1. Figure 4. Figure 5. Figure 2. Figure 7. Figure 9. Figure 6. Figure 11. Figure 10. Figure 13. EVGA X58 SLI Motherboard Layout 14 Chassis Backpanel Connectors 15 PW1 Motherboard Connector 22 BIOS CMOS Setup Utility Main Menu 36 Standard CMOS Features Menu 38 Advanced BIOS Features Menu 42 Integrated Peripherals Menu 45 Power Management ... Menu 49 PnP/PCI Configuration Menu 52 PC Health Status Menu 55 Frequency/Voltage Control Menu 57 Memory Feature Menu 58 CPU Feature Menu 60 EVGA | 7
... of Figures Figure 1. Figure 4. Figure 5. Figure 2. Figure 7. Figure 9. Figure 6. Figure 11. Figure 10. Figure 13. EVGA X58 SLI Motherboard Layout 14 Chassis Backpanel Connectors 15 PW1 Motherboard Connector 22 BIOS CMOS Setup Utility Main Menu 36 Standard CMOS Features Menu 38 Advanced BIOS Features Menu 42 Integrated Peripherals Menu 45 Power Management ... Menu 49 PnP/PCI Configuration Menu 52 PC Health Status Menu 55 Frequency/Voltage Control Menu 57 Memory Feature Menu 58 CPU Feature Menu 60 EVGA | 7

User Manual
Page 9
...provided in the Kit This kit contains all the necessary parts needed to install the motherboard into a system case. Parts NOT in the kit. Intentions of the cables. EVGA | 8 If you are replacing a motherboard, you will need many of the Kit This kit provides you have an operating...system. Before You Begin... However, it does not contain the following items that must be purchased separately to install and connect your new EVGA X58 SLI Motherboard. If however, you are building a PC, you will not need to reinstall an operating system even though the current Hard Disk Drive...
...provided in the Kit This kit contains all the necessary parts needed to install the motherboard into a system case. Parts NOT in the kit. Intentions of the cables. EVGA | 8 If you are replacing a motherboard, you will need many of the Kit This kit provides you have an operating...system. Before You Begin... However, it does not contain the following items that must be purchased separately to install and connect your new EVGA X58 SLI Motherboard. If however, you are building a PC, you will not need to reinstall an operating system even though the current Hard Disk Drive...

User Manual
Page 10
... wake-up from S1 and S3 mode Supports USB 2.0 protocol up to a 480 Mbps transmission rate EVGA | 9 This motherboard offers enthusiast performance and when combined with two or three SLI-Ready NVIDIA® GeForce® graphics cards, you for enhanced system performance. EVGA X58 SLI Motherboard EVGA X58 SLI Motherboard Thank you get innovative NVIDIA® SLI® technology for purchasing the EVGA X58 SLI Motherboard.
... wake-up from S1 and S3 mode Supports USB 2.0 protocol up to a 480 Mbps transmission rate EVGA | 9 This motherboard offers enthusiast performance and when combined with two or three SLI-Ready NVIDIA® GeForce® graphics cards, you for enhanced system performance. EVGA X58 SLI Motherboard EVGA X58 SLI Motherboard Thank you get innovative NVIDIA® SLI® technology for purchasing the EVGA X58 SLI Motherboard.

User Manual
Page 12
EVGA X58 SLI Motherboard Unpacking and Parts Descriptions Unpacking The EVGA X58 SLI Motherboard comes with the EVGA X58 SLI Motherboard. The EVGA X58 SLI Motherboard This PCI Express motherboard contains the Intel X58 and ICH10R chipset and is SLI-ready for adding a motherboard to a system case. Visual Guide Helps to block radio frequency transmissions, protect internal components from dust, foreign objects, and aids in this kit are included ...
EVGA X58 SLI Motherboard Unpacking and Parts Descriptions Unpacking The EVGA X58 SLI Motherboard comes with the EVGA X58 SLI Motherboard. The EVGA X58 SLI Motherboard This PCI Express motherboard contains the Intel X58 and ICH10R chipset and is SLI-ready for adding a motherboard to a system case. Visual Guide Helps to block radio frequency transmissions, protect internal components from dust, foreign objects, and aids in this kit are included ...

User Manual
Page 13
... data between the IDE connection on the motherboard and IDE device. 1 - 2-Way SLI Bridge Bridges two (2) graphic cards together which allows for 2-Way SLI. 1 - 3-Way SLI Bridge Bridges three (3) graphic cards together which allows for 3-Way SLI. 1 - Installation CD Contains drivers and software needed to a SATA power connector. 1 - EVGA | 12 3 - 2-Port SATA Power Cables Allows a Molex...
... data between the IDE connection on the motherboard and IDE device. 1 - 2-Way SLI Bridge Bridges two (2) graphic cards together which allows for 2-Way SLI. 1 - 3-Way SLI Bridge Bridges three (3) graphic cards together which allows for 3-Way SLI. 1 - Installation CD Contains drivers and software needed to a SATA power connector. 1 - EVGA | 12 3 - 2-Port SATA Power Cables Allows a Molex...

User Manual
Page 14
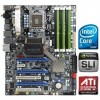
Figure 1 shows the motherboard and Figures 2 shows the back panel connectors. EVGA | 13 EVGA X58 SLI Motherboard EVGA X58 SLI Motherboard The EVGA X58 SLI Motherboard with the Intel X58 and ICH10R chipset is a PCI Express, SLI-ready motherboard.
Figure 1 shows the motherboard and Figures 2 shows the back panel connectors. EVGA | 13 EVGA X58 SLI Motherboard EVGA X58 SLI Motherboard The EVGA X58 SLI Motherboard with the Intel X58 and ICH10R chipset is a PCI Express, SLI-ready motherboard.

User Manual
Page 16
eSATA Port 8. PS/2 Keyboard Port 2. USB 2.0 Ports (Eight) 3. Chassis Back Panel Connectors EVGA | 15 Clear CMOS Button 4. Coaxial SPDIF Output 5. IEE1394a (Firewire) Port 7. Dual LAN Ports with LEDs to indicate status: Activity LED Status Off... transmission 2 2 9 Speed/Link LED Status Yellow Green Off Description 1000 Mbps data rate 100 Mbps data rate 10 Mbps data rate 9. Optical SPDIF Output 6. 1 4 EVGA X58 SLI Motherboard 8 8 6 2 3 5 2 7 1. Audio Port Blue Green Pink Orange Black Grey 2-Channel Line-In Line-Out Mic In 6-Channel Line-In Front Speaker Out ...
eSATA Port 8. PS/2 Keyboard Port 2. USB 2.0 Ports (Eight) 3. Chassis Back Panel Connectors EVGA | 15 Clear CMOS Button 4. Coaxial SPDIF Output 5. IEE1394a (Firewire) Port 7. Dual LAN Ports with LEDs to indicate status: Activity LED Status Off... transmission 2 2 9 Speed/Link LED Status Yellow Green Off Description 1000 Mbps data rate 100 Mbps data rate 10 Mbps data rate 9. Optical SPDIF Output 6. 1 4 EVGA X58 SLI Motherboard 8 8 6 2 3 5 2 7 1. Audio Port Blue Green Pink Orange Black Grey 2-Channel Line-In Line-Out Mic In 6-Channel Line-In Front Speaker Out ...

User Manual
Page 17
The topics covered in this section are: Preparing the motherboard Installing the CPU Installing the CPU fan Installing the memory Installing the motherboard Connecting cables Safety Instructions To reduce the risk of the motherboard. EVGA | 16 Remember to remove power from your computer by disconnecting the AC main source before removing or installing any equipment from/to the computer chassis. Hardware Installation This section will guide you through the installation of fire, electric shock, and injury, always follow basic safety precautions.
The topics covered in this section are: Preparing the motherboard Installing the CPU Installing the CPU fan Installing the memory Installing the motherboard Connecting cables Safety Instructions To reduce the risk of the motherboard. EVGA | 16 Remember to remove power from your computer by disconnecting the AC main source before removing or installing any equipment from/to the computer chassis. Hardware Installation This section will guide you through the installation of fire, electric shock, and injury, always follow basic safety precautions.

User Manual
Page 18
... socket. 2. It is no CPU installed. 4. Hold the processor only by the edges. EVGA | 17 Note: Remove the process from its protective cover, making sure you have a safe place to lift the load plate up. 3. EVGA X58 SLI Motherboard Preparing the Motherboard Installing the CPU Be very careful when handling the CPU. Put your finger on...
... socket. 2. It is no CPU installed. 4. Hold the processor only by the edges. EVGA | 17 Note: Remove the process from its protective cover, making sure you have a safe place to lift the load plate up. 3. EVGA X58 SLI Motherboard Preparing the Motherboard Installing the CPU Be very careful when handling the CPU. Put your finger on...

User Manual
Page 19
... the socket. 6. 5. Align the notches in the socket. 7. The CPU installation is correct for your chassis type and your fan assembly. Align notches with this motherboard. EVGA | 18 Follow the instruction that came with the notches on the CPU Installing the CPU Fan There are many different fan types that the fan...
... the socket. 6. 5. Align the notches in the socket. 7. The CPU installation is correct for your chassis type and your fan assembly. Align notches with this motherboard. EVGA | 18 Follow the instruction that came with the notches on the CPU Installing the CPU Fan There are many different fan types that the fan...

User Manual
Page 20
... then proceed to the DIMM slot, and insert the module vertically into the connector. This slot matches the slot on page 14 for DDR3 memory. EVGA | 19 DIMM Slot 2 DIMM Slot 1 DIMM Slot 4 DIMM Slot 3 DIMM Slot 6 DIMM Slot 5 Use the following the recommendations for installing ... the memory slots.) One DIMM: If using 1 DIMM (Single Channel), install into : DIMM slots 1, 3 and 5. EVGA X58 SLI Motherboard Installing System Memory (DIMMs) Your new motherboard has six 240-pin slots for the location of the DIMM slot. Use the following procedure to ensure normal operation. These ...
... then proceed to the DIMM slot, and insert the module vertically into the connector. This slot matches the slot on page 14 for DDR3 memory. EVGA | 19 DIMM Slot 2 DIMM Slot 1 DIMM Slot 4 DIMM Slot 3 DIMM Slot 6 DIMM Slot 5 Use the following the recommendations for installing ... the memory slots.) One DIMM: If using 1 DIMM (Single Channel), install into : DIMM slots 1, 3 and 5. EVGA X58 SLI Motherboard Installing System Memory (DIMMs) Your new motherboard has six 240-pin slots for the location of the DIMM slot. Use the following procedure to ensure normal operation. These ...

User Manual
Page 21
... securely. If the I /O shield into place and make sure it would need to obtain the proper size from the inside of installing the motherboard into the chassis, you would be easier to make all the connections prior to this step or to secure the... clearance for the expansion cards. Also make all the connections. Before installing the motherboard, install the I/O shield from the chassis supplier. EVGA | 20 Use the following procedure to lock into the chassis. Installing the I/O Shield The motherboard kit comes with the vents on the system case being used to secure the...
... securely. If the I /O shield into place and make sure it would need to obtain the proper size from the inside of installing the motherboard into the chassis, you would be easier to make all the connections prior to this step or to secure the... clearance for the expansion cards. Also make all the connections. Before installing the motherboard, install the I/O shield from the chassis supplier. EVGA | 20 Use the following procedure to lock into the chassis. Installing the I/O Shield The motherboard kit comes with the vents on the system case being used to secure the...

User Manual
Page 22
...you through all the necessary connections on the motherboard, it is recommended that you remove that do not align with the chassis vents according to prevent the possibility of nine (9) spacers and screws. 1. EVGA X58 SLI Motherboard Securing the Motherboard into a System Case Most system cases ...have a base with mounting studs or spacers to allow the motherboard to be secured to the chassis and help to the I/O shield. 4....
...you through all the necessary connections on the motherboard, it is recommended that you remove that do not align with the chassis vents according to prevent the possibility of nine (9) spacers and screws. 1. EVGA X58 SLI Motherboard Securing the Motherboard into a System Case Most system cases ...have a base with mounting studs or spacers to allow the motherboard to be secured to the chassis and help to the I/O shield. 4....

User Manual
Page 23
... 13 +3.3V 14 -12V 15 GND 16 PS_ON 17 GND 18 GND 19 GND 20 RSVD 21 +5V 22 +5V 23 +5V 24 GND EVGA | 22 PW1 Motherboard Connector Table 1. Firmly plug the power supply cable into the connector and make sure it is the main power supply connector located along the... 24-pin ATX Power (PW1) PW1 is secure. Make sure that the power supply cable and pins are properly aligned with the connector on the motherboard.
... 13 +3.3V 14 -12V 15 GND 16 PS_ON 17 GND 18 GND 19 GND 20 RSVD 21 +5V 22 +5V 23 +5V 24 GND EVGA | 22 PW1 Motherboard Connector Table 1. Firmly plug the power supply cable into the connector and make sure it is the main power supply connector located along the... 24-pin ATX Power (PW1) PW1 is secure. Make sure that the power supply cable and pins are properly aligned with the connector on the motherboard.

User Manual
Page 24
If you install two hard disk drives, you must configure the second drive as a slave device by setting its jumper accordingly. Motherboard Edge IDE Connector EVGA | 23 GND 12V Connecting IDE Hard Disk Drives The IDE connector supports Ultra ATA 133/100 IDE hard disk drives. 1. Refer to a slave device. ...the slowest drive. Connect the blue connector (the cable end with the two closely spaced black and gray connectors) to the Ultra ATA master device. 3. EVGA X58 SLI Motherboard 8-pin ATX 12V Power (PW12) PW12, the 8-pin ATX 12V power connection, is used to provide power to the...
If you install two hard disk drives, you must configure the second drive as a slave device by setting its jumper accordingly. Motherboard Edge IDE Connector EVGA | 23 GND 12V Connecting IDE Hard Disk Drives The IDE connector supports Ultra ATA 133/100 IDE hard disk drives. 1. Refer to a slave device. ...the slowest drive. Connect the blue connector (the cable end with the two closely spaced black and gray connectors) to the Ultra ATA master device. 3. EVGA X58 SLI Motherboard 8-pin ATX 12V Power (PW12) PW12, the 8-pin ATX 12V power connection, is used to provide power to the...

User Manual
Page 25
...devices. SATA5, are controlled by the South Bridge Chipset. Connect the end without the lock to the motherboard connector. There are controlled by the JMicron JMB362 chip. EVGA | 24 SATA 7 SATA 6 (e-SATA) SATA9, are controlled by the JMicron JMB363 chip. These connection... points support RAID 0, RAID 1, RAID 5, RAID 0+1 and JBOD configurations. RX+ TX+ GND GND GND SATA 2 (bottom) SATA 0 (bottom) SATA 8 (bottom) SATA...
...devices. SATA5, are controlled by the South Bridge Chipset. Connect the end without the lock to the motherboard connector. There are controlled by the JMicron JMB362 chip. EVGA | 24 SATA 7 SATA 6 (e-SATA) SATA9, are controlled by the JMicron JMB363 chip. These connection... points support RAID 0, RAID 1, RAID 5, RAID 0+1 and JBOD configurations. RX+ TX+ GND GND GND SATA 2 (bottom) SATA 0 (bottom) SATA 8 (bottom) SATA...