
User Manual
Page 2
...-19L200A12 19" LCD TV Contents CHILD SAFETY 1 Important safety instructions 2 Warnings 2 Cautions 3 Installing the stand or wall-mount bracket 4 Installing the stand 4 Installing a wall-mount bracket 4 TV components 4 Package contents 4 Front 5 Side 5 Back 5 Remote control 6 Making connections 6 What connection should I use 6 Connecting power 7 Connecting a cable or satellite box 7 Connecting an antenna or cable TV (no box 10 Connecting a DVD or Blu-ray player 10 Connecting a VCR 12 Connecting a camcorder or game console 13 Connecting a computer 13 Connecting a basic home...
...-19L200A12 19" LCD TV Contents CHILD SAFETY 1 Important safety instructions 2 Warnings 2 Cautions 3 Installing the stand or wall-mount bracket 4 Installing the stand 4 Installing a wall-mount bracket 4 TV components 4 Package contents 4 Front 5 Side 5 Back 5 Remote control 6 Making connections 6 What connection should I use 6 Connecting power 7 Connecting a cable or satellite box 7 Connecting an antenna or cable TV (no box 10 Connecting a DVD or Blu-ray player 10 Connecting a VCR 12 Connecting a camcorder or game console 13 Connecting a computer 13 Connecting a basic home...

User Manual
Page 3
... 43 What does the warranty not cover 43 Dynex Televisions 43 Definitions 43 How long does the coverage last 43 What does this warranty cover 43 How to factory default settings 37 Maintaining 37 Cleaning 37 Servicing 37 Troubleshooting 37 Video and audio 37 Remote control 39 General 39 Specifications 40 Programming universal remote controls 41 Programming a different universal remote control 41 For additional help and information 41 Common universal remote control codes 41 Legal notices 42...
... 43 What does the warranty not cover 43 Dynex Televisions 43 Definitions 43 How long does the coverage last 43 What does this warranty cover 43 How to factory default settings 37 Maintaining 37 Cleaning 37 Servicing 37 Troubleshooting 37 Video and audio 37 Remote control 39 General 39 Specifications 40 Programming universal remote controls 41 Programming a different universal remote control 41 For additional help and information 41 Common universal remote control codes 41 Legal notices 42...

User Manual
Page 5
... you enjoy your flat panel display As you are not always supported on the proper stands or installed according to making home entertainment enjoyable and safe. Use only a TV stand rated for safe wall mount installation. However, TVs are unsure, ask a professional installer. • TVs can easily be mounted to wall mount your TV, always remember: • One size of wall mount does not fit all instructions supplied by curious...
... you enjoy your flat panel display As you are not always supported on the proper stands or installed according to making home entertainment enjoyable and safe. Use only a TV stand rated for safe wall mount installation. However, TVs are unsure, ask a professional installer. • TVs can easily be mounted to wall mount your TV, always remember: • One size of wall mount does not fit all instructions supplied by curious...

User Manual
Page 6
... any ventilation openings. No user-serviceable parts are important operating and maintenance instructions in the panel. Also, if the liquid gets in clean water. Power source Operate your doctor after rinsing for long periods of overhead power lines or other apparatus (including amplifiers) that you do not remove any way, such as the original part. If the provided plug does not fit into...
... any ventilation openings. No user-serviceable parts are important operating and maintenance instructions in the panel. Also, if the liquid gets in clean water. Power source Operate your doctor after rinsing for long periods of overhead power lines or other apparatus (including amplifiers) that you do not remove any way, such as the original part. If the provided plug does not fit into...

User Manual
Page 7
.... In such cases, change in performance. Non-active pixels The LCD panel contains almost 3 million thin film transistors, which provide exceptionally sharp video quality. Your TV also contains material that the antenna or cable system is for the grounding electrode. 1 2 Condensation Moisture will often require extensive work by following conditions: • When the power supply cord or plug is damaged or...
.... In such cases, change in performance. Non-active pixels The LCD panel contains almost 3 million thin film transistors, which provide exceptionally sharp video quality. Your TV also contains material that the antenna or cable system is for the grounding electrode. 1 2 Condensation Moisture will often require extensive work by following conditions: • When the power supply cord or plug is damaged or...

User Manual
Page 9
... "Connecting a cable or satellite box" on page 7 or "Connecting a DVD or Blu-ray player" on -screen menu. Press to go to the next or previous channel in standby mode. Press to turn your TV on or off (standby mode). Connect the video for an HDMI device. For more information, see "Connecting a computer" on or off " on page 16. Side # Button 1 VOLUME+/- 2 CHANNEL / 3 MENU 4 INPUT/ENTER 5 POWER Description Press to select the desired setting during menu screen operations. For...
... "Connecting a cable or satellite box" on page 7 or "Connecting a DVD or Blu-ray player" on -screen menu. Press to go to the next or previous channel in standby mode. Press to turn your TV on or off (standby mode). Connect the video for an HDMI device. For more information, see "Connecting a computer" on or off " on page 16. Side # Button 1 VOLUME+/- 2 CHANNEL / 3 MENU 4 INPUT/ENTER 5 POWER Description Press to select the desired setting during menu screen operations. For...

User Manual
Page 10
Connect an antenna or cable TV to this jack. Press to display TV status information, such as the channel number, channel name (if available), or signal source. Press to enter channel numbers and the parental control password. Use the following tables to identify cables: Connection Video type and jack quality Cable connector # Button 1 POWER 2. 3 SLEEP 4 VOL+/VOL-/ 5 MENU 6 RESET 7 INPUT 8 ZOOM Description Press to turn your devices have HDMI) Component video (requires an audio connection) Better than composite, or coaxial Composite video (requires an audio connection) ...
Connect an antenna or cable TV to this jack. Press to display TV status information, such as the channel number, channel name (if available), or signal source. Press to enter channel numbers and the parental control password. Use the following tables to identify cables: Connection Video type and jack quality Cable connector # Button 1 POWER 2. 3 SLEEP 4 VOL+/VOL-/ 5 MENU 6 RESET 7 INPUT 8 ZOOM Description Press to turn your devices have HDMI) Component video (requires an audio connection) Better than composite, or coaxial Composite video (requires an audio connection) ...

User Manual
Page 11
... install a set -top antenna with your TV. For more than one connection type. The picture displayed on your TV is good on some channels and poor on others, the problem may be different from the power source indicated on the label. Notes An HDMI cable carries both audio and video. Contact your TV for an extended period of TV Cable or satellite box HDMI cable 75 ohm cable Cable TV wall outlet 4 Turn...
... install a set -top antenna with your TV. For more than one connection type. The picture displayed on your TV is good on some channels and poor on others, the problem may be different from the power source indicated on the label. Notes An HDMI cable carries both audio and video. Contact your TV for an extended period of TV Cable or satellite box HDMI cable 75 ohm cable Cable TV wall outlet 4 Turn...

User Manual
Page 19
... brightness and energy consumption, change setting to complete memorizing digital cable channels. Auto Setup begins. Notes: • Depending on the batteries with a cloth. symbols on reception, it may not conform to the ENERGY STAR standard after Reset is performed or the Backlight is not going to be exposed to page 10 for details.) • Connected the power cord. (See page 7 for...
... brightness and energy consumption, change setting to complete memorizing digital cable channels. Auto Setup begins. Notes: • Depending on the batteries with a cloth. symbols on reception, it may not conform to the ENERGY STAR standard after Reset is performed or the Backlight is not going to be exposed to page 10 for details.) • Connected the power cord. (See page 7 for...

User Manual
Page 20
... immediately change the channel. . • To select a digital sub-channel, press the number buttons to select the main digital channel, press , then press the number button for the sub-channel. The screens shown in this manual are described in TV mode. Adjusting the volume To adjust the volume: • Press VOL+ or VOL- to go to the last viewed channel. Full 1080i • Analog channel information-Displays channel number, channel label (if preset), signal type, audio information, and resolution. 14 G Analog Cable Sleep Timer...
... immediately change the channel. . • To select a digital sub-channel, press the number buttons to select the main digital channel, press , then press the number button for the sub-channel. The screens shown in this manual are described in TV mode. Adjusting the volume To adjust the volume: • Press VOL+ or VOL- to go to the last viewed channel. Full 1080i • Analog channel information-Displays channel number, channel label (if preset), signal type, audio information, and resolution. 14 G Analog Cable Sleep Timer...
User Manual
Page 26
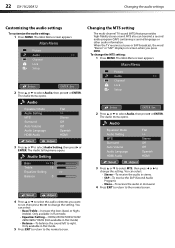
.../4kHz/10kHz (Not available in Flat mode) • Balance-To balance the sound left to select Audio Setting, then press or ENTER. The Main Menu screen appears. The Audio Setting menu opens. Audio Setting Bass >> 15 Treble 15 Equalizer Setting >> Balance 0 Changing the MTS setting The multi-channel TV sound (MTS) feature provides high-fidelity stereo sound. To change the setting. Main Menu Picture Audio >> CH Channel Lock Setup :Select ENTER :Set 2 Press or to the normal...
.../4kHz/10kHz (Not available in Flat mode) • Balance-To balance the sound left to select Audio Setting, then press or ENTER. The Main Menu screen appears. The Audio Setting menu opens. Audio Setting Bass >> 15 Treble 15 Equalizer Setting >> Balance 0 Changing the MTS setting The multi-channel TV sound (MTS) feature provides high-fidelity stereo sound. To change the setting. Main Menu Picture Audio >> CH Channel Lock Setup :Select ENTER :Set 2 Press or to the normal...

User Manual
Page 37
... closed captioning: 1 Press MENU. Main Menu Picture Audio CH Channel Lock Setup >> :Select ENTER :Set 2 Press or to select Closed Caption, then press or ENTER. Note: Depending on the broadcast signal, some analog captions will be delayed approx. 10 seconds. • If no captions will remain in your viewing area, a black rectangle may occasionally appear during live . Notes: • If the program or video you selected is not closed captioned, no captions will display...
... closed captioning: 1 Press MENU. Main Menu Picture Audio CH Channel Lock Setup >> :Select ENTER :Set 2 Press or to select Closed Caption, then press or ENTER. Note: Depending on the broadcast signal, some analog captions will be delayed approx. 10 seconds. • If no captions will remain in your viewing area, a black rectangle may occasionally appear during live . Notes: • If the program or video you selected is not closed captioned, no captions will display...

User Manual
Page 38
... Advanced menu opens. Setup Closed Caption Language Video Label On Timer Auto Shut Off Auto Setup >> English >> Off On >> :Select ENTER :Set 3 Press or to select CC Advanced, then press or ENTER. To change the setting. The Main Menu screen appears. Main Menu Picture Audio CH Channel Lock Setup >> 6 Press or to select Closed Caption, then press or ENTER. Closed Caption CC Setting CC Priority Analog Caption Digital Caption Digital CC Preset CC Advanced Off Digital CC C1 CS1 Default >> :Select :Adjust 4 Press...
... Advanced menu opens. Setup Closed Caption Language Video Label On Timer Auto Shut Off Auto Setup >> English >> Off On >> :Select ENTER :Set 3 Press or to select CC Advanced, then press or ENTER. To change the setting. The Main Menu screen appears. Main Menu Picture Audio CH Channel Lock Setup >> 6 Press or to select Closed Caption, then press or ENTER. Closed Caption CC Setting CC Priority Analog Caption Digital Caption Digital CC Preset CC Advanced Off Digital CC C1 CS1 Default >> :Select :Adjust 4 Press...

User Manual
Page 41
"Picture Size", "MTS", "Audio Language", "HDMI Audio" cannot be experiencing technical issues. • Make sure that the incoming signal is reset to factory default settings. Clean your TV yourself. Before using a chemically treated cloth, read the instructions that the antenna or cable TV is connected correctly and securely. Troubleshooting Warning Do not try to repair your TV to factory default settings: 1 Press MENU. No picture (screen is not lit) and no sound. • Press POWER on the...
"Picture Size", "MTS", "Audio Language", "HDMI Audio" cannot be experiencing technical issues. • Make sure that the incoming signal is reset to factory default settings. Clean your TV yourself. Before using a chemically treated cloth, read the instructions that the antenna or cable TV is connected correctly and securely. Troubleshooting Warning Do not try to repair your TV to factory default settings: 1 Press MENU. No picture (screen is not lit) and no sound. • Press POWER on the...

User Manual
Page 42
... the digital signal strength" on the screen. • Try another channel. Only snow (noise) appears on page 27. • If you have determined which device is lit), but poor color • Adjust the contrast, color, and brightness settings. Turn off one or more devices. Audio noise • Other devices (for example, surround sound receiver, external speakers, fans, or hair dryers) may be bad. See "Connecting a cable...
... the digital signal strength" on the screen. • Try another channel. Only snow (noise) appears on page 27. • If you have determined which device is lit), but poor color • Adjust the contrast, color, and brightness settings. Turn off one or more devices. Audio noise • Other devices (for example, surround sound receiver, external speakers, fans, or hair dryers) may be bad. See "Connecting a cable...

User Manual
Page 43
... using an antenna, the digital channel signal may cause the cabinet to expand or contract which can add the channel back to the channel list. Your original remote control will be accessed. See "Changing the audio settings" on page 21. • Make sure that accompanied your universal remote control and contact the manufacturer if problems persist. See "Installing remote control batteries" on page 15. • See instructions and a table of common codes in and turn...
... using an antenna, the digital channel signal may cause the cabinet to expand or contract which can add the channel back to the channel list. Your original remote control will be accessed. See "Changing the audio settings" on page 21. • Make sure that accompanied your universal remote control and contact the manufacturer if problems persist. See "Installing remote control batteries" on page 15. • See instructions and a table of common codes in and turn...

User Manual
Page 44
... No 1 (back) 1 (back) Yes - See the instructions that came with the wall-mount bracket for firmware upgrade only Audio Video Analog audio Digital audio WiFi Ethernet Headphone No No 1 (back) No No 1 (back) Power Simulated Surround Sound Sound Leveler Watts/channel Number of speakers Yes No 2W x 2 2 Power consumption Power input Miscellaneous On: 29W Standby: 0.3W 120V/60Hz OSD languages INlink Game Mode ENERGY STAR qualified Internet connectable TV base screws V-Chip Sleep timer Channel labeling VESA mount (mm) (horizontal × vertical) English, French...
... No 1 (back) 1 (back) Yes - See the instructions that came with the wall-mount bracket for firmware upgrade only Audio Video Analog audio Digital audio WiFi Ethernet Headphone No No 1 (back) No No 1 (back) Power Simulated Surround Sound Sound Leveler Watts/channel Number of speakers Yes No 2W x 2 2 Power consumption Power input Miscellaneous On: 29W Standby: 0.3W 120V/60Hz OSD languages INlink Game Mode ENERGY STAR qualified Internet connectable TV base screws V-Chip Sleep timer Channel labeling VESA mount (mm) (horizontal × vertical) English, French...

User Manual
Page 45
... your universal remote control's instructions for details. Call the Dynex Customer Care Center 1-800-305-2204. The following is often visible on the back. • If your universal remote control isn't listed on the chart, refer to your universal remote control's instructions and try several codes before finding a match. See your universal remote control's instructions to enter the TV code you are available online at a time. Call technical support for the universal remote control or cable...
... your universal remote control's instructions for details. Call the Dynex Customer Care Center 1-800-305-2204. The following is often visible on the back. • If your universal remote control isn't listed on the chart, refer to your universal remote control's instructions and try several codes before finding a match. See your universal remote control's instructions to enter the TV code you are available online at a time. Call technical support for the universal remote control or cable...

User Manual
Page 47
... Dynex repair center or store personnel, Dynex will have a Dynex-approved repair technician dispatched to your Dynex Product during the Warranty Period. The Warranty Period lasts for lengthy periods (burn-in). • Damage due to incorrect operation or maintenance • Connection to an incorrect voltage or power supply • Attempted repair by any part of the Product, including the antenna • Plasma display panel damaged by Dynex to service...
... Dynex repair center or store personnel, Dynex will have a Dynex-approved repair technician dispatched to your Dynex Product during the Warranty Period. The Warranty Period lasts for lengthy periods (burn-in). • Damage due to incorrect operation or maintenance • Connection to an incorrect voltage or power supply • Attempted repair by any part of the Product, including the antenna • Plasma display panel damaged by Dynex to service...

Brochure
Page 1
... PC audio input RF input Video output Analog audio output Digital audio output (coaxial) Media card slot INlink WiFi 160° 5ms (Tr + TF) NTSC, ATSC, 8-VSB, Clear-QAM 1 (back) No 1 (back) 1 (back) 1 (back) Yes 1 (back) Yes No No 1 (back) No No No Ethernet port USB port Headphone jack Watts/channel # of speakers Simulated surround sound Sound leveler Power consumption Power consumption-in standby Power inputs: AC OSD languages Energy Star qualified Internet connectable V-Chip (version 2.0) Sleep timer Channel labeling VESA mount...
... PC audio input RF input Video output Analog audio output Digital audio output (coaxial) Media card slot INlink WiFi 160° 5ms (Tr + TF) NTSC, ATSC, 8-VSB, Clear-QAM 1 (back) No 1 (back) 1 (back) 1 (back) Yes 1 (back) Yes No No 1 (back) No No No Ethernet port USB port Headphone jack Watts/channel # of speakers Simulated surround sound Sound leveler Power consumption Power consumption-in standby Power inputs: AC OSD languages Energy Star qualified Internet connectable V-Chip (version 2.0) Sleep timer Channel labeling VESA mount...


