
Quick Setup Guide (English)
Page 1
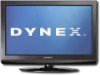
... the batteries align with the + and - Universal remote control TV codes (for all Dynex TVs manufactured after Jan. 1, 2007) Universal remote control makers and models Philips PHDVD5, PH5DSS, PMDVR8, PDVR8 RCA RCU807 One for the latest remote . 26"/32" LCD TV / DVD combo QUICK SETUP GUIDE DX-26LD150A11/DX-32LD150A11 TV DVD INPUT GUIDE 1 23 456 789...
... the batteries align with the + and - Universal remote control TV codes (for all Dynex TVs manufactured after Jan. 1, 2007) Universal remote control makers and models Philips PHDVD5, PH5DSS, PMDVR8, PDVR8 RCA RCU807 One for the latest remote . 26"/32" LCD TV / DVD combo QUICK SETUP GUIDE DX-26LD150A11/DX-32LD150A11 TV DVD INPUT GUIDE 1 23 456 789...

Quick Setup Guide (English)
Page 2
...Navigating menus with your TV for the rst time 1. We're here for details. Turning on your remote control TV MENU Press to open the on-screen menu. The Choose your menu language screen. Selecting.... If you selected Home Mode, the Choose your User Guide! Need additional help? de R.L. DYNEX is not necessary and will not appear. 6 Press EXIT to close the menu. Setup Wizard Choose...1091 09-0xxx 26" • 32" LCD TV / DVD combo I QUICK SETUP GUIDE I DX-26LD150A11/DX-32LD150A11 Connecting power Connect the power cable to the AC INPUT on the back of BBY Solutions, Inc. ...
...Navigating menus with your TV for the rst time 1. We're here for details. Turning on your remote control TV MENU Press to open the on-screen menu. The Choose your menu language screen. Selecting.... If you selected Home Mode, the Choose your User Guide! Need additional help? de R.L. DYNEX is not necessary and will not appear. 6 Press EXIT to close the menu. Setup Wizard Choose...1091 09-0xxx 26" • 32" LCD TV / DVD combo I QUICK SETUP GUIDE I DX-26LD150A11/DX-32LD150A11 Connecting power Connect the power cable to the AC INPUT on the back of BBY Solutions, Inc. ...

User Manual (English)
Page 2
... 4 Installing the stand (DX-26LD150A11 4 Installing the stand (DX-32LD150A11 4 Removing the stand and stand column (DX-26LD150A11 5 Removing the stand and stand column (DX-32LD150A11 5 Installing a wall-mount bracket (DX-26LD150A11 6 Installing a wall-mount bracket (DX-32LD150A11 6 TV/DVD combo components 6 Accessories 6 Front 7 Back 7 Side 8 Remote control 8 Using the remote control 9 Installing remote control batteries 9 Aiming the remote control 10 Programming a universal...
... 4 Installing the stand (DX-26LD150A11 4 Installing the stand (DX-32LD150A11 4 Removing the stand and stand column (DX-26LD150A11 5 Removing the stand and stand column (DX-32LD150A11 5 Installing a wall-mount bracket (DX-26LD150A11 6 Installing a wall-mount bracket (DX-32LD150A11 6 TV/DVD combo components 6 Accessories 6 Front 7 Back 7 Side 8 Remote control 8 Using the remote control 9 Installing remote control batteries 9 Aiming the remote control 10 Programming a universal...

User Manual (English)
Page 3
... parental controls 40 Changing DVD preferences 41 Maintenance 41 Cleaning 41 Care and handling of discs 41 Servicing 41 Troubleshooting 42 Video and audio 42 Remote control 42 General 42 Specifications 43...
... parental controls 40 Changing DVD preferences 41 Maintenance 41 Cleaning 41 Care and handling of discs 41 Servicing 41 Troubleshooting 42 Video and audio 42 Remote control 42 General 42 Specifications 43...

User Manual (English)
Page 6
...as vases, shall be taken to keep from tip-over. A polarized plug has two blades with a protective earthing connection. 17 Remote control batteries should not be careful of broken glass. • If the LCD panel is in the panel. Handling the LCD panel...apparatus (including amplifiers) that you are important operating and maintenance instructions in fire, electric shock, personal injury, or other . 2 DX-26LD150A11/DX-32LD150A11 Important safety instructions Important safety instructions CAUTION RISK OF ELECTRIC SHOCK DO NOT OPEN This symbol indicates that there are not sure of...
...as vases, shall be taken to keep from tip-over. A polarized plug has two blades with a protective earthing connection. 17 Remote control batteries should not be careful of broken glass. • If the LCD panel is in the panel. Handling the LCD panel...apparatus (including amplifiers) that you are important operating and maintenance instructions in fire, electric shock, personal injury, or other . 2 DX-26LD150A11/DX-32LD150A11 Important safety instructions Important safety instructions CAUTION RISK OF ELECTRIC SHOCK DO NOT OPEN This symbol indicates that there are not sure of...

User Manual (English)
Page 10
... provided with the bracket. 3.94" 100mm TV/DVD combo components Accessories • TV/DVD combo • Power cord • Pedestal stand • Stand cover (DX-32LD150A11 only) • Remote control with washers. Stand screws (M4*10) with batteries (2 AAA) • Screws for attaching the stand • Component video cable • Analog audio cable...
... provided with the bracket. 3.94" 100mm TV/DVD combo components Accessories • TV/DVD combo • Power cord • Pedestal stand • Stand cover (DX-32LD150A11 only) • Remote control with washers. Stand screws (M4*10) with batteries (2 AAA) • Screws for attaching the stand • Component video cable • Analog audio cable...

User Manual (English)
Page 11
...on page 13. 5 PC INPUT AUDIO jack 6 COMPONENT1 and and 7 COMPONENT2 INPUT (Y, Pb,Pr, and L/R Audio) jacks Connect the audio signal from the remote control. Press once more information, see "Connecting a computer" on page 11. 4 PC INPUT VGA jack Connect the video signal from the illustrations. # Component... more to resume playback. 6 DISC IN Lights when a DVD or CD is in the channel list. TV/DVD combo components DX-26LD150A11/DX-32LD150A11 7 Front Model DX-26LD150A11 is used as a cable and INPUT jacks box or DVD player, to this slot to change mode and begin playback.
...on page 13. 5 PC INPUT AUDIO jack 6 COMPONENT1 and and 7 COMPONENT2 INPUT (Y, Pb,Pr, and L/R Audio) jacks Connect the audio signal from the remote control. Press once more information, see "Connecting a computer" on page 11. 4 PC INPUT VGA jack Connect the video signal from the illustrations. # Component... more to resume playback. 6 DISC IN Lights when a DVD or CD is in the channel list. TV/DVD combo components DX-26LD150A11/DX-32LD150A11 7 Front Model DX-26LD150A11 is used as a cable and INPUT jacks box or DVD player, to this slot to change mode and begin playback.
User Manual (English)
Page 12
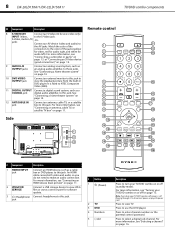
8 DX-26LD150A11/DX-32LD150A11 TV/DVD combo components ## Component Description 8 S-VIDEO/AV Connect an S-Video AV device (video only) INPUT (Video, to the AV jacks. S-Video, Audio L/R) -Orjacks Connect ... page 16. An HDMI cable carries both video and audio, so you do not need to view TV. Press to make an audio connection. Side Remote control TV DVD INPUT GUIDE 1 23 456 789 0 RECALL MTS/SAP CCD PICTURE AUDIO ZOOM TV MENU FAVORITE EXIT OK ENTER INFO TITLE MENU SETUP...
8 DX-26LD150A11/DX-32LD150A11 TV/DVD combo components ## Component Description 8 S-VIDEO/AV Connect an S-Video AV device (video only) INPUT (Video, to the AV jacks. S-Video, Audio L/R) -Orjacks Connect ... page 16. An HDMI cable carries both video and audio, so you do not need to view TV. Press to make an audio connection. Side Remote control TV DVD INPUT GUIDE 1 23 456 789 0 RECALL MTS/SAP CCD PICTURE AUDIO ZOOM TV MENU FAVORITE EXIT OK ENTER INFO TITLE MENU SETUP...
User Manual (English)
Page 13
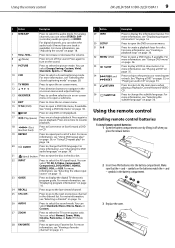
... Press to stop DVD or CD playback. 17 (Play/pause) Press once to display the digital TV electronic program guide. Using the remote control Installing remote control batteries To install remote control batteries: 1 Open the battery compartment cover by lifting it off the sound. See "Using a DVD title menu" on page 15. ...page 16. 24 RECALL 25 CH+/CH- For analog channels, you press the release button. 2 Insert two AAA batteries into the battery compartment. Using the remote control DX-26LD150A11/DX-32LD150A11 9 # Button Description 6 MTS/SAP Press to select the audio mode.
... Press to stop DVD or CD playback. 17 (Play/pause) Press once to display the digital TV electronic program guide. Using the remote control Installing remote control batteries To install remote control batteries: 1 Open the battery compartment cover by lifting it off the sound. See "Using a DVD title menu" on page 15. ...page 16. 24 RECALL 25 CH+/CH- For analog channels, you press the release button. 2 Insert two AAA batteries into the battery compartment. Using the remote control DX-26LD150A11/DX-32LD150A11 9 # Button Description 6 MTS/SAP Press to select the audio mode.

User Manual (English)
Page 14
... may not work with a new or existing universal remote control. See your universal remote control or set-top box manufacturer, or call the Dynex Customer Care Center: US & CA Market- 1-800-305-2204 Mexico Market- 01 800 - 926 - 3020. Loose connections can cause a rash. 10 DX-26LD150A11/DX-32LD150A11 Making connections Notes: • Do not mix...
... may not work with a new or existing universal remote control. See your universal remote control or set-top box manufacturer, or call the Dynex Customer Care Center: US & CA Market- 1-800-305-2204 Mexico Market- 01 800 - 926 - 3020. Loose connections can cause a rash. 10 DX-26LD150A11/DX-32LD150A11 Making connections Notes: • Do not mix...

User Manual (English)
Page 18
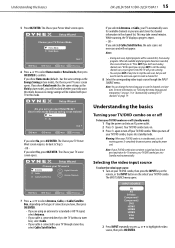
... time settings (hour and minute) are set based on a time signal received from field to field, then press or to change the value in the remote control, connected your devices to the TV, and connected the AC power. 2 Press (Power), then wait several seconds. When using headphones, use the ...hear the sound. If you turn on your TV, the Setup Wizard opens. Press or to move the cursor from a DTV channel. 14 DX-26LD150A11/DX-32LD150A11 Turning on your TV for the first time The first time you through setting up basic settings including the menu language, time mode, picture mode...
... time settings (hour and minute) are set based on a time signal received from field to field, then press or to change the value in the remote control, connected your devices to the TV, and connected the AC power. 2 Press (Power), then wait several seconds. When using headphones, use the ...hear the sound. If you turn on your TV, the Setup Wizard opens. Press or to move the cursor from a DTV channel. 14 DX-26LD150A11/DX-32LD150A11 Turning on your TV for the first time The first time you through setting up basic settings including the menu language, time mode, picture mode...
User Manual (English)
Page 19
...power). Selecting the video input source To select the video input source: 1 Turn on your TV/DVD combo, then press the INPUT key on the remote, or the INPUT button on page 19. since in the channel list. While scanning, the TV displays a progress report. - At this mode. Note...TV in this point you are using an antenna for available channels in standby mode, it goes into Standby mode automatically. Understanding the basics DX-26LD150A11/DX-32LD150A11 15 5 Press OK/ENTER. If you chose Retail mode (has the same settings as the Energy Saving picture mode), the Choose your TV...
...power). Selecting the video input source To select the video input source: 1 Turn on your TV/DVD combo, then press the INPUT key on the remote, or the INPUT button on page 19. since in the channel list. While scanning, the TV displays a progress report. - At this mode. Note...TV in this point you are using an antenna for available channels in standby mode, it goes into Standby mode automatically. Understanding the basics DX-26LD150A11/DX-32LD150A11 15 5 Press OK/ENTER. If you chose Retail mode (has the same settings as the Energy Saving picture mode), the Choose your TV...

User Manual (English)
Page 21
... displayed. When connected to a computer, to adjust the option. Adjusting the picture DX-26LD150A11/DX-32LD150A11 17 Navigating the menus TV MENU Press to adjust the option. OK ENTER Press to select menus, to adjust selected items, or move on the remote control to select the picture mode. • Contrast-Adjusts the white levels...
... displayed. When connected to a computer, to adjust the option. Adjusting the picture DX-26LD150A11/DX-32LD150A11 17 Navigating the menus TV MENU Press to adjust the option. OK ENTER Press to select menus, to adjust selected items, or move on the remote control to select the picture mode. • Contrast-Adjusts the white levels...

User Manual (English)
Page 23
... button. Notes: • After Audio Only is set to cycle through the available modes. For more information, see "Turning on the remote control one or more times to On, the TV picture will disappear 10 seconds after you exit Audio Only mode, the Audio Only option...the TV scan for channels unless the available channels changed after the on -screen menu opens with the Picture menu displayed. Changing channel settings DX-26LD150A11/DX-32LD150A11 19 • Treble-Adjusts the high sounds. • Balance-Adjusts the balance between the left and right audio channels. • Digital...
... button. Notes: • After Audio Only is set to cycle through the available modes. For more information, see "Turning on the remote control one or more times to On, the TV picture will disappear 10 seconds after you exit Audio Only mode, the Audio Only option...the TV scan for channels unless the available channels changed after the on -screen menu opens with the Picture menu displayed. Changing channel settings DX-26LD150A11/DX-32LD150A11 19 • Treble-Adjusts the high sounds. • Balance-Adjusts the balance between the left and right audio channels. • Digital...

User Manual (English)
Page 31
... controls DX-26LD150A11/DX-32LD150A11 27 Downloading rating information To download rating information: 1 Press TV MENU. Parental Controls Time Closed Caption Menu Settings VGA Settings Input Label Restore Default Audio Only Move Picture Audio Setup Channel Off Select MENU Exit 3 Press OK/ENTER or . The rating information is broadcast by using the remote control...
... controls DX-26LD150A11/DX-32LD150A11 27 Downloading rating information To download rating information: 1 Press TV MENU. Parental Controls Time Closed Caption Menu Settings VGA Settings Input Label Restore Default Audio Only Move Picture Audio Setup Channel Off Select MENU Exit 3 Press OK/ENTER or . The rating information is broadcast by using the remote control...

User Manual (English)
Page 32
...then press or to select the CC Mode. The Enter Password menu opens. To turn closed captioning on or off with the on the remote control to highlight Setup, then press . The Closed Caption menu opens. You can select On (turns on closed captioning), CC on Mute... the control buttons on -screen menu opens with Parental Controls highlighted. The Setup menu opens. 28 DX-26LD150A11/DX-32LD150A11 Using closed captioning). The default password is muted), or Off (turns off with the remote control: • Press CCD on -screen menus: 1 Press TV MENU. Parental Controls Time Closed...
...then press or to select the CC Mode. The Enter Password menu opens. To turn closed captioning on or off with the on the remote control to highlight Setup, then press . The Closed Caption menu opens. You can select On (turns on closed captioning), CC on Mute... the control buttons on -screen menu opens with Parental Controls highlighted. The Setup menu opens. 28 DX-26LD150A11/DX-32LD150A11 Using closed captioning). The default password is muted), or Off (turns off with the remote control: • Press CCD on -screen menus: 1 Press TV MENU. Parental Controls Time Closed...

User Manual (English)
Page 37
...; Press or to rotate the picture. • Press TV MENU to exit. A preview of your TV/DVD combo. 2 Press INPUT. Using USB DX-26LD150A11/DX-32LD150A11 33 3 Press or to select USB, then press OK/ENTER. The INPUT SOURCE menu opens. S7304448.JPG S7304449.JPG S7304450.JPG S7304451.JPG S7304452.JPG... screen, you want, press OK/ENTER. Viewing photos To view photos: 1 Connect a USB storage device to the USB port on using the remote control. USB JPEG Playlist Spring Summer Autumn Winter S7304460.JPG S7304461.JPG Picture Setup JPEG Directory 2009/02/10 Move MENU Exit ENTER Enter Return...
...; Press or to rotate the picture. • Press TV MENU to exit. A preview of your TV/DVD combo. 2 Press INPUT. Using USB DX-26LD150A11/DX-32LD150A11 33 3 Press or to select USB, then press OK/ENTER. The INPUT SOURCE menu opens. S7304448.JPG S7304449.JPG S7304450.JPG S7304451.JPG S7304452.JPG... screen, you want, press OK/ENTER. Viewing photos To view photos: 1 Connect a USB storage device to the USB port on using the remote control. USB JPEG Playlist Spring Summer Autumn Winter S7304460.JPG S7304461.JPG Picture Setup JPEG Directory 2009/02/10 Move MENU Exit ENTER Enter Return...
User Manual (English)
Page 39
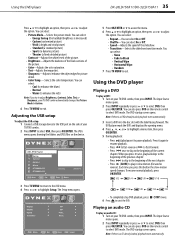
...Press to highlight Setup. You can select: • Repeat-You can select On or Off. • Shuffle-You can also press DVD on the remote control to the USB port on your TV/DVD combo, then press INPUT. The Input Source menu opens. 2 Press INPUT repeatedly or press or ... facing forward. The Setup menu opens. 1/16 1/8 1/4 1/2 Repeat Shuffle Speed Transition Picture Setup JPEG Off Off 4 Sec. Using the DVD player DX-26LD150A11/DX-32LD150A11 35 Press or to highlight an option, then press or to select DVD, then press OK/ENTER. You can select On or Off. • ...
...Press to highlight Setup. You can select: • Repeat-You can select On or Off. • Shuffle-You can also press DVD on the remote control to the USB port on your TV/DVD combo, then press INPUT. The Input Source menu opens. 2 Press INPUT repeatedly or press or ... facing forward. The Setup menu opens. 1/16 1/8 1/4 1/2 Repeat Shuffle Speed Transition Picture Setup JPEG Off Off 4 Sec. Using the DVD player DX-26LD150A11/DX-32LD150A11 35 Press or to highlight an option, then press or to select DVD, then press OK/ENTER. You can select On or Off. • ...

User Manual (English)
Page 46
...that the antenna or cable TV is connected correctly. Note: If the problem is connected correctly. For more information, see "Installing remote control batteries" on your TV/DVD combo away from noise sources, such as a cordless phone, away from the channel list. ... This is plugged into an AC power outlet. This causes the cabinet to repair your universal remote control and contact the manufacturer if problems persist. 42 DX-26LD150A11/DX-32LD150A11 Troubleshooting Troubleshooting Warning: Do not try to expand or contract, which produces the creaking noise. ...
...that the antenna or cable TV is connected correctly. Note: If the problem is connected correctly. For more information, see "Installing remote control batteries" on your TV/DVD combo away from noise sources, such as a cordless phone, away from the channel list. ... This is plugged into an AC power outlet. This causes the cabinet to repair your universal remote control and contact the manufacturer if problems persist. 42 DX-26LD150A11/DX-32LD150A11 Troubleshooting Troubleshooting Warning: Do not try to expand or contract, which produces the creaking noise. ...


