
Quick Setup Guide (English)
Page 1
..." LCD TV QUICK SETUP GUIDE DX-32L151A11/DX-37L130A11 Remote control Power sensor indicator Installing the stand 1 Remove the stand from damages and scratches. 2 Remove the four screws holding the TV to its stand column, then remove the stand column. 3 Secure the wall-mount bracket (not included) to the back of your TV screen face-down ) on the back of the TV, then connect the other end to a power outlet. Make sure that the + and - Using digital audio cable...
..." LCD TV QUICK SETUP GUIDE DX-32L151A11/DX-37L130A11 Remote control Power sensor indicator Installing the stand 1 Remove the stand from damages and scratches. 2 Remove the four screws holding the TV to its stand column, then remove the stand column. 3 Secure the wall-mount bracket (not included) to the back of your TV screen face-down ) on the back of the TV, then connect the other end to a power outlet. Make sure that the + and - Using digital audio cable...

Quick Setup Guide (English)
Page 2
... channel number directly using the number buttons. ^ On-screen menu overview Picture menu Picture Mode Contrast Brightness Color Tint Sharpness Backlight Advanced Video Move Picture Audio Setup Channel Custom 70 40 60 0 50 30 Select MENU Exit AUDIO menu Press to a different channel in the channel list, press CH^ or CH . The information banner shows the current program information such as channel number, video input source, and resolution. • Digital mode information-Displays the channel number, station name, channel label, broadcast program name, TV rating, signal type, audio...
... channel number directly using the number buttons. ^ On-screen menu overview Picture menu Picture Mode Contrast Brightness Color Tint Sharpness Backlight Advanced Video Move Picture Audio Setup Channel Custom 70 40 60 0 50 30 Select MENU Exit AUDIO menu Press to a different channel in the channel list, press CH^ or CH . The information banner shows the current program information such as channel number, video input source, and resolution. • Digital mode information-Displays the channel number, station name, channel label, broadcast program name, TV rating, signal type, audio...
Firmware Installation Guide (English)
Page 1
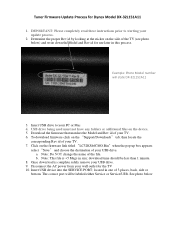
... corresponding Rev id of your USB drive. Click on the "Support/Downloads" tab; b. Note: This file is Tuner Firmware Update Process for use later in this process. IMPORTANT: Please completely read these instructions prior to your TV. 7. Example: Photo Model number will state DX‐32L151A11 3. To download firmware click on the firmware link titled "LC32KS46CMO.Bin"when the pop up box appears select "Save" and choose the...
... corresponding Rev id of your USB drive. Click on the "Support/Downloads" tab; b. Note: This file is Tuner Firmware Update Process for use later in this process. IMPORTANT: Please completely read these instructions prior to your TV. 7. Example: Photo Model number will state DX‐32L151A11 3. To download firmware click on the firmware link titled "LC32KS46CMO.Bin"when the pop up box appears select "Save" and choose the...

User Manual (English)
Page 2
... the stand 4 Removing the stand column 4 Installing a wall-mount bracket 4 TV components 4 Accessories 4 Front 5 Side 5 Back 6 Remote control 6 Using the remote control 7 Installing remote control batteries 7 Aiming the remote control 8 Programming a universal remote control to work with your TV 8 Making connections 8 Selecting a location 8 Connecting the power 8 Connecting an HDMI device 9 Connecting a component video device 9 Connecting an antenna, cable TV, or satellite TV box 9 Connecting a VCR, camcorder, or game console 10 Connecting a computer 10 Connecting a home...
... the stand 4 Removing the stand column 4 Installing a wall-mount bracket 4 TV components 4 Accessories 4 Front 5 Side 5 Back 6 Remote control 6 Using the remote control 7 Installing remote control batteries 7 Aiming the remote control 8 Programming a universal remote control to work with your TV 8 Making connections 8 Selecting a location 8 Connecting the power 8 Connecting an HDMI device 9 Connecting a component video device 9 Connecting an antenna, cable TV, or satellite TV box 9 Connecting a VCR, camcorder, or game console 10 Connecting a computer 10 Connecting a home...
User Manual (English)
Page 3
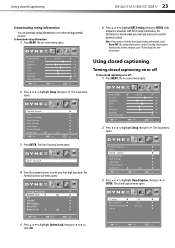
... 19 Turning parental controls on or off 19 Setting or changing the password 20 Turning the button lock on or off 20 Setting parental control levels 21 Using closed captioning 23 Turning closed captioning on or off 23 Selecting the closed captioning mode 24 Customizing digital TV closed captioning styles 24 Adjusting time settings 25 Setting the date and time 25 Setting the sleep timer 26 Adjusting menu settings 26 Selecting the menu language and transparency 26 Labeling an input source 27 Restoring default settings 27 Troubleshooting 28 Video and audio 28 Remote control 28...
... 19 Turning parental controls on or off 19 Setting or changing the password 20 Turning the button lock on or off 20 Setting parental control levels 21 Using closed captioning 23 Turning closed captioning on or off 23 Selecting the closed captioning mode 24 Customizing digital TV closed captioning styles 24 Adjusting time settings 25 Setting the date and time 25 Setting the sleep timer 26 Adjusting menu settings 26 Selecting the menu language and transparency 26 Labeling an input source 27 Restoring default settings 27 Troubleshooting 28 Video and audio 28 Remote control 28...
User Manual (English)
Page 5
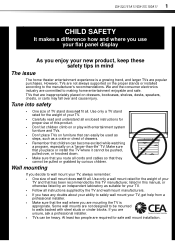
... installed according to the manufacturer's recommendations. Tune into safety • One size of your TV and that has been recommended by this TV manufacturer, listed in mind The issue The home theater entertainment experience is appropriate. Use only a TV stand rated for the weight of your TV. • Carefully read and understand all enclosed instructions for proper use your flat panel display...
... installed according to the manufacturer's recommendations. Tune into safety • One size of your TV and that has been recommended by this TV manufacturer, listed in mind The issue The home theater entertainment experience is appropriate. Use only a TV stand rated for the weight of your TV. • Carefully read and understand all enclosed instructions for proper use your flat panel display...

User Manual (English)
Page 11
... heat such as the video input source. Press to close the on page 15. Press to select the TV as sunshine, fire, or other heat sources. For more information, see "Turning closed captioning on or off " on -screen menus. Press to display the information banner. Press to select the sound mode. Using the remote control DX-32L151A11/DX-37L130A11 7 Item Name Description 3 HDMI Press once to select a device connected to set the sleep timer.
... heat such as the video input source. Press to close the on page 15. Press to select the TV as sunshine, fire, or other heat sources. For more information, see "Turning closed captioning on or off " on -screen menus. Press to display the information banner. Press to select the sound mode. Using the remote control DX-32L151A11/DX-37L130A11 7 Item Name Description 3 HDMI Press once to select a device connected to set the sleep timer.

User Manual (English)
Page 12
... universal remote control that can operate both your set -top box manufacturer, or call technical support for your universal remote control's instructions and try codes for the TV: • Where direct light does not reflect on the screen • That has indirect and soft lighting • Where the TV has access to an antenna or cable TV connection • Where the TV has access to a power outlet Note: Watching TV in image or color problems...
... universal remote control that can operate both your set -top box manufacturer, or call technical support for your universal remote control's instructions and try codes for the TV: • Where direct light does not reflect on the screen • That has indirect and soft lighting • Where the TV has access to an antenna or cable TV connection • Where the TV has access to a power outlet Note: Watching TV in image or color problems...
User Manual (English)
Page 13
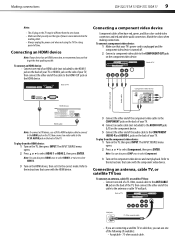
... the power cord when not using the TV for a long period of your TV. To connect an HDMI device: • Connect one end of an HDMI cable (not included) to the HDMI 1 jack on the back of your TV or HDMI 2 jack on the side of time. To play from the component video device: 1 Turn on the TV, then press INPUT. The INPUT SOURCE menu opens. 2 Press or to select HDMI 1 or HDMI...
... the power cord when not using the TV for a long period of your TV. To connect an HDMI device: • Connect one end of an HDMI cable (not included) to the HDMI 1 jack on the back of your TV or HDMI 2 jack on the side of time. To play from the component video device: 1 Turn on the TV, then press INPUT. The INPUT SOURCE menu opens. 2 Press or to select HDMI 1 or HDMI...
User Manual (English)
Page 14
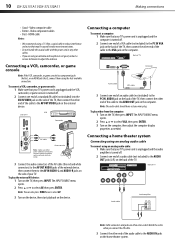
... TV, then press INPUT. Back of TV Camcorder AV cable Game console Note: Cables are often color-coded. Video component cables • Best - VCR Side of TV Audio cable Audio amplifier Note: Cable connectors and jacks are often color-coded to select VGA, then press ENTER. 3 Turn on the home theater system. Connecting a home theater system Connecting using an analog audio cable To connect using the best available connection. Video composite cable • Better - 10 DX-32L151A11/DX-37L130A11 Making connections AV IN VIDEO L AUDIO R HDMI 2 SERVICE PORT • Good -
... TV, then press INPUT. Back of TV Camcorder AV cable Game console Note: Cables are often color-coded. Video component cables • Best - VCR Side of TV Audio cable Audio amplifier Note: Cable connectors and jacks are often color-coded to select VGA, then press ENTER. 3 Turn on the home theater system. Connecting a home theater system Connecting using an analog audio cable To connect using the best available connection. Video composite cable • Better - 10 DX-32L151A11/DX-37L130A11 Making connections AV IN VIDEO L AUDIO R HDMI 2 SERVICE PORT • Good -

User Manual (English)
Page 15
... your time zone. Turning on your TV for the first time To configure your TV: 1 Make sure that your TV). AV IN VIDEO L AUDIO R HDMI 2 SERVICE PORT Digital optical cable 3 Connect the other end of the audio cable to the digital optical input jack on the home theater system and select the TV sound source, then adjust the volume to the TV, and connected the AC power. 2 Press (Power), then wait several seconds. To connect headphones: • Plug the headphones...
... your time zone. Turning on your TV for the first time To configure your TV: 1 Make sure that your TV). AV IN VIDEO L AUDIO R HDMI 2 SERVICE PORT Digital optical cable 3 Connect the other end of the audio cable to the digital optical input jack on the home theater system and select the TV sound source, then adjust the volume to the TV, and connected the AC power. 2 Press (Power), then wait several seconds. To connect headphones: • Plug the headphones...

User Manual (English)
Page 16
... the channel number you selected Antenna or Cable, your TV through the INPUT SOURCE menu. Selecting the video input source To select the video input source: 1 Turn on your TV, then press the INPUT key on the remote, or the INPUT button on the type of your cable is still receiving power. Note: Button presses must be scanned first, then analog programs. When all available digital programs have been searched, the screen will need analog channel scan." If you selected Cable/Satellite Box, the auto scan is...
... the channel number you selected Antenna or Cable, your TV through the INPUT SOURCE menu. Selecting the video input source To select the video input source: 1 Turn on your TV, then press the INPUT key on the remote, or the INPUT button on the type of your cable is still receiving power. Note: Button presses must be scanned first, then analog programs. When all available digital programs have been searched, the screen will need analog channel scan." If you selected Cable/Satellite Box, the auto scan is...

User Manual (English)
Page 17
... Setup menu Parental Controls T ime Closed Caption Menu Settings VGA Settings Input Label Restore Default Audio Only Move Channel menu Picture Audio Setup Channel Off Select MENU Exit TV Source Auto Scan F avorites Show/Hide Channel No. Press MUTE again to temporarily turn off all sound. The information banner shows current program information such as channel number, video input source, and resolution. • Digital signal information-Displays channel number, station name, channel label (if preset), broadcast program name, TV rating, signal type, audio information, resolution, CC mode...
... Setup menu Parental Controls T ime Closed Caption Menu Settings VGA Settings Input Label Restore Default Audio Only Move Channel menu Picture Audio Setup Channel Off Select MENU Exit TV Source Auto Scan F avorites Show/Hide Channel No. Press MUTE again to temporarily turn off all sound. The information banner shows current program information such as channel number, video input source, and resolution. • Digital signal information-Displays channel number, station name, channel label (if preset), broadcast program name, TV rating, signal type, audio information, resolution, CC mode...
User Manual (English)
Page 18
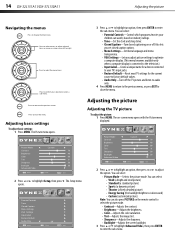
... detailed picture) • Energy Saving (the backlight brightness is connected to the television.) • Input Label-Create a unique name for a device connected to your TV's input jacks. • Restore Default-Reset most TV settings for the current source to factory default values. • Audio Only-Turn off . Press to enter the sub-menu. Picture Mode Contrast Brightness Color T int Sharpness Backlight Advanced Video Move Picture Audio Custom Setup Channel 70 40 60 0 50 30 Select MENU...
... detailed picture) • Energy Saving (the backlight brightness is connected to the television.) • Input Label-Create a unique name for a device connected to your TV's input jacks. • Restore Default-Reset most TV settings for the current source to factory default values. • Audio Only-Turn off . Press to enter the sub-menu. Picture Mode Contrast Brightness Color T int Sharpness Backlight Advanced Video Move Picture Audio Custom Setup Channel 70 40 60 0 50 30 Select MENU...

User Manual (English)
Page 19
...; Cinema (stretches the picture at the edges, but maintains a good aspect ratio at the center of the picture. • Noise Reduction-Selects the noise reduction mode to close the menu. You can select Warm (to enhance the reds), Cool (to close the menu. You can select: • Color Temperature-Selects the color temperature. The on -screen menu opens. Parental Controls T ime Closed Caption Menu Settings VGA Settings Input Label Restore Default Audio Only Move Picture Audio Setup Channel Off Select MENU Exit 4 Press or to...
...; Cinema (stretches the picture at the edges, but maintains a good aspect ratio at the center of the picture. • Noise Reduction-Selects the noise reduction mode to close the menu. You can select Warm (to enhance the reds), Cool (to close the menu. You can select: • Color Temperature-Selects the color temperature. The on -screen menu opens. Parental Controls T ime Closed Caption Menu Settings VGA Settings Input Label Restore Default Audio Only Move Picture Audio Setup Channel Off Select MENU Exit 4 Press or to...

User Manual (English)
Page 20
...-Adjusts the balance between the left and right audio channels. • Surround-Turns the surround sound effect on or off. • AVC-(Auto volume control) Equalizes the overall volume levels for analog channels. Parental Controls T ime Closed Caption Menu Settings VGA Settings Input Label Restore Default Audio Only Move Picture Audio Setup Channel On Select MENU Exit 3 Press or to highlight Audio Only, then press or to select On. 4 Press EXIT to close the menu. Sound Mode Bass Treble Balance Surround AVC Digital Output Audio Language Move Picture Audio Setup Channel...
...-Adjusts the balance between the left and right audio channels. • Surround-Turns the surround sound effect on or off. • AVC-(Auto volume control) Equalizes the overall volume levels for analog channels. Parental Controls T ime Closed Caption Menu Settings VGA Settings Input Label Restore Default Audio Only Move Picture Audio Setup Channel On Select MENU Exit 3 Press or to highlight Audio Only, then press or to select On. 4 Press EXIT to close the menu. Sound Mode Bass Treble Balance Surround AVC Digital Output Audio Language Move Picture Audio Setup Channel...
User Manual (English)
Page 24
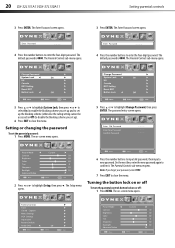
...the number buttons to enter the four-digit password. Note: If you set the parental password: 1 Press MENU. Parental Controls T ime Closed Caption Menu Settings VGA Settings Input Label Restore Default Audio Only Move Picture Audio Setup Channel Off Select MENU Exit Picture Mode Contrast Brightness Color T int Sharpness Backlight Advanced Video Move Picture Audio Custom Setup Channel 70 40 60 0 50 30 Select MENU Exit The default password is 0000. Enter Old Password Enter New Password Confirm Password Picture Audio Setup Channel Picture Mode Contrast Brightness Color...
...the number buttons to enter the four-digit password. Note: If you set the parental password: 1 Press MENU. Parental Controls T ime Closed Caption Menu Settings VGA Settings Input Label Restore Default Audio Only Move Picture Audio Setup Channel Off Select MENU Exit Picture Mode Contrast Brightness Color T int Sharpness Backlight Advanced Video Move Picture Audio Custom Setup Channel 70 40 60 0 50 30 Select MENU Exit The default password is 0000. Enter Old Password Enter New Password Confirm Password Picture Audio Setup Channel Picture Mode Contrast Brightness Color...
User Manual (English)
Page 27
... program is broadcast with RRT5 rating information, the information is cleared. The on or off To turn closed caption menu opens. Picture Mode Contrast Brightness Color T int Sharpness Backlight Advanced Video Move Picture Audio Custom Setup Channel 70 40 60 0 50 30 Select MENU Exit 2 Press or to highlight Setup, then press . Parental Controls T ime Closed Caption Menu Settings VGA Settings Input Label Restore Default Audio Only Move Picture Audio Setup Channel Off Select MENU Exit 3 Press or to clear the downloaded rating information, select Reset...
... program is broadcast with RRT5 rating information, the information is cleared. The on or off To turn closed caption menu opens. Picture Mode Contrast Brightness Color T int Sharpness Backlight Advanced Video Move Picture Audio Custom Setup Channel 70 40 60 0 50 30 Select MENU Exit 2 Press or to highlight Setup, then press . Parental Controls T ime Closed Caption Menu Settings VGA Settings Input Label Restore Default Audio Only Move Picture Audio Setup Channel Off Select MENU Exit 3 Press or to clear the downloaded rating information, select Reset...

User Manual (English)
Page 30
...to close the menu. The Setup menu opens. 4 Press or to highlight Sleep Timer, then press or to select the amount of time before it automatically turns off. Parental Controls T ime Closed Caption Menu Settings VGA Settings Input Label Restore Default Audio Only Move Picture Audio Setup Channel Off Select MENU Exit 3 Press or to highlight Setup, then press . 26 DX-32L151A11/DX-37L130A11 Adjusting menu settings 5 If your TV automatically turns off. Picture Mode Contrast Brightness Color T int Sharpness Backlight Advanced Video Move Picture Audio Custom Setup Channel 70...
...to close the menu. The Setup menu opens. 4 Press or to highlight Sleep Timer, then press or to select the amount of time before it automatically turns off. Parental Controls T ime Closed Caption Menu Settings VGA Settings Input Label Restore Default Audio Only Move Picture Audio Setup Channel Off Select MENU Exit 3 Press or to highlight Setup, then press . 26 DX-32L151A11/DX-37L130A11 Adjusting menu settings 5 If your TV automatically turns off. Picture Mode Contrast Brightness Color T int Sharpness Backlight Advanced Video Move Picture Audio Custom Setup Channel 70...

User Manual (English)
Page 32
... User Guide that accompanied your existing universal remote control. • Make sure that the power cord is plugged in the current video input mode. • When the TV is connected correctly and securely. Trouble programming your universal remote control and contact the manufacturer if problems persist. For more information, see "Hiding channels" on page 17. • Enter 9999 to access parental controls, then set to qualified repair personnel. For more information, see "Adjusting the TV picture...
... User Guide that accompanied your existing universal remote control. • Make sure that the power cord is plugged in the current video input mode. • When the TV is connected correctly and securely. Trouble programming your universal remote control and contact the manufacturer if problems persist. For more information, see "Hiding channels" on page 17. • Enter 9999 to access parental controls, then set to qualified repair personnel. For more information, see "Adjusting the TV picture...


