
Firmware Installation Guide (English)
Page 1
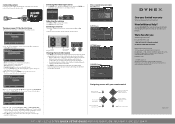
... not help, call Dynex Customer Support at (800) 305‐2204 for TV Models: DX‐15L150A11, DX‐19L150A11, DX‐22L150A11, DX‐40L150A11 System requirements: a computer with a USB Flash Drive (Stick) 1. Note: File needs to your product model number; This option is securely plugged into the TV's USB service port located on the firmware link. 4. Verify that was downloaded into a wall outlet and the unit is approximately 3 MB. Download firmware; remove the USB flash...
... not help, call Dynex Customer Support at (800) 305‐2204 for TV Models: DX‐15L150A11, DX‐19L150A11, DX‐22L150A11, DX‐40L150A11 System requirements: a computer with a USB Flash Drive (Stick) 1. Note: File needs to your product model number; This option is securely plugged into the TV's USB service port located on the firmware link. 4. Verify that was downloaded into a wall outlet and the unit is approximately 3 MB. Download firmware; remove the USB flash...
Quick Setup Guide (English)
Page 1
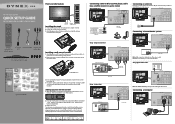
... cable Audio Cable Using S-video (fair) ANT/CABLE IN Back of TV Remote control and 2 AAA batteries AC power L/R Audio cable Component cord video cable TV stand and 4 M4 screws Installing a wall-mount bracket 1 Carefully place your TV by screwing four M4 screws provided with your remote or need a di erent remote control code, visit www.dynexproducts.com for the latest remote control code information. 15"/19"/22" LCD TV QUICK SETUP GUIDE DX-15L150A11/DX-19L150A11 /DX-22L150A11 Front and side features Power Remote indicator control sensor Installing the stand 1 Remove the stand...
... cable Audio Cable Using S-video (fair) ANT/CABLE IN Back of TV Remote control and 2 AAA batteries AC power L/R Audio cable Component cord video cable TV stand and 4 M4 screws Installing a wall-mount bracket 1 Carefully place your TV by screwing four M4 screws provided with your remote or need a di erent remote control code, visit www.dynexproducts.com for the latest remote control code information. 15"/19"/22" LCD TV QUICK SETUP GUIDE DX-15L150A11/DX-19L150A11 /DX-22L150A11 Front and side features Power Remote indicator control sensor Installing the stand 1 Remove the stand...
Quick Setup Guide (English)
Page 2
...: Setup Wizard Mode Time Zone Daylight Savings Year Month Day Time Time Auto Pacitic On 2010 Jan 1 12 : 04 AM MOVE ENTER SELECT MENU PREVIOUS Mode-Select Manual to set date/time manually or Auto to have them set top box. 6 Press EXIT to close the menu. 15" • 19" • 22" LCD TV I QUICK SETUP GUIDE I DX-15L150A11/DX-19L150A11 /DX-22L150A11 English 09-1037 09-0xxx Selecting the video input source 1 Press INPUT, press or to enter a sub-menu. Connecting power Connect the power cable to...
...: Setup Wizard Mode Time Zone Daylight Savings Year Month Day Time Time Auto Pacitic On 2010 Jan 1 12 : 04 AM MOVE ENTER SELECT MENU PREVIOUS Mode-Select Manual to set date/time manually or Auto to have them set top box. 6 Press EXIT to close the menu. 15" • 19" • 22" LCD TV I QUICK SETUP GUIDE I DX-15L150A11/DX-19L150A11 /DX-22L150A11 English 09-1037 09-0xxx Selecting the video input source 1 Press INPUT, press or to enter a sub-menu. Connecting power Connect the power cable to...
User Manual (English)
Page 2
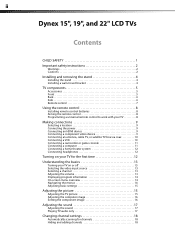
... and removing the stand 4 Installing the stand 4 Installing a wall-mount bracket 4 TV components 5 Accessories 5 Front 5 Back 6 Side 6 Remote control 7 Using the remote control 8 Installing remote control batteries 8 Aiming the remote control 8 Programming a universal remote control to work with your TV 8 Making connections 9 Selecting a location 9 Connecting the power 9 Connecting an HDMI device 9 Connecting a component video device 9 Connecting an antenna, cable TV, or satellite TV box via coax 10 Connecting a VCR 10 Connecting a camcorder or game console 11 Connecting...
... and removing the stand 4 Installing the stand 4 Installing a wall-mount bracket 4 TV components 5 Accessories 5 Front 5 Back 6 Side 6 Remote control 7 Using the remote control 8 Installing remote control batteries 8 Aiming the remote control 8 Programming a universal remote control to work with your TV 8 Making connections 9 Selecting a location 9 Connecting the power 9 Connecting an HDMI device 9 Connecting a component video device 9 Connecting an antenna, cable TV, or satellite TV box via coax 10 Connecting a VCR 10 Connecting a camcorder or game console 11 Connecting...

User Manual (English)
Page 3
... or changing a channel label 19 Checking digital TV signal strength 20 Setting parental controls 20 Setting or changing the password 20 Setting parental control levels 21 Using closed captioning 24 Turning closed captioning on or off 24 Selecting the closed captioning mode 24 Customizing digital TV closed captioning styles 24 Adjusting time settings 25 Setting the clock 25 Setting the sleep timer 26 Adjusting menu settings 26 Selecting the menu language and transparency 26 Labeling an input source 27 Restoring default settings 27 Troubleshooting 28 Video and audio 28 Remote...
... or changing a channel label 19 Checking digital TV signal strength 20 Setting parental controls 20 Setting or changing the password 20 Setting parental control levels 21 Using closed captioning 24 Turning closed captioning on or off 24 Selecting the closed captioning mode 24 Customizing digital TV closed captioning styles 24 Adjusting time settings 25 Setting the clock 25 Setting the sleep timer 26 Adjusting menu settings 26 Selecting the menu language and transparency 26 Labeling an input source 27 Restoring default settings 27 Troubleshooting 28 Video and audio 28 Remote...
User Manual (English)
Page 4
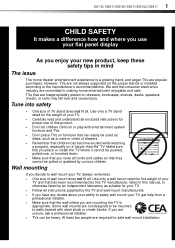
DX-15L150A11/DX19L150A11/DX-22L150A11 1 f CHILD SAFETY It makes a difference how and where you use of this TV manufacturer, listed in mind The issue The home theater entertainment experience is appropriate. However, TVs are not always supported on or play with steel studs or cinder blocks. Use only a wall mount rated for your TV, get help from a professional installer. • Make sure that the...
DX-15L150A11/DX19L150A11/DX-22L150A11 1 f CHILD SAFETY It makes a difference how and where you use of this TV manufacturer, listed in mind The issue The home theater entertainment experience is appropriate. However, TVs are not always supported on or play with steel studs or cinder blocks. Use only a wall mount rated for your TV, get help from a professional installer. • Make sure that the...
User Manual (English)
Page 5
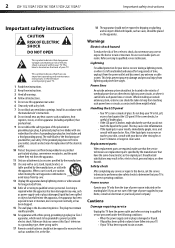
... consult with a three-prong, grounding-type plug is a Class I television to a grounding-type, three-prong outlet. 17 Remote control batteries should not be taken to determine that your TV or hit, jolt, or press hard against the LCD panel. This label is located on the marking label. 2 DX-15L150A11/DX19L150A11/DX-22L150A11 Important safety instructions Important safety instructions CAUTION RISK OF ELECTRIC SHOCK...
... consult with a three-prong, grounding-type plug is a Class I television to a grounding-type, three-prong outlet. 17 Remote control batteries should not be taken to determine that your TV or hit, jolt, or press hard against the LCD panel. This label is located on the marking label. 2 DX-15L150A11/DX19L150A11/DX-22L150A11 Important safety instructions Important safety instructions CAUTION RISK OF ELECTRIC SHOCK...
User Manual (English)
Page 7
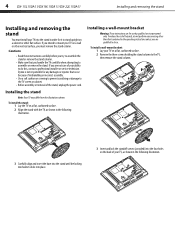
... in the following illustration. To install a wall-mount bracket: 1 Lay your TV on a flat, cushioned surface. 2 Remove the three screws holding the stand column to the TV, then remove the stand column. 3 Carefully align and insert the base into the stand until the locking mechanism clicks into place. 3 Insert and lock the standoff screws (provided) into the stand in the operating instructions unless you are qualified to do...
... in the following illustration. To install a wall-mount bracket: 1 Lay your TV on a flat, cushioned surface. 2 Remove the three screws holding the stand column to the TV, then remove the stand column. 3 Carefully align and insert the base into the stand until the locking mechanism clicks into place. 3 Insert and lock the standoff screws (provided) into the stand in the operating instructions unless you are qualified to do...
User Manual (English)
Page 8
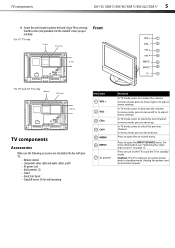
... menu mode, press to move right or to adjust menu settings. Unplug the power cord to decrease the volume. TV components DX-15L150A11/DX19L150A11/DX-22L150A11 5 4 Secure the wall-mount bracket to the back of your TV: • Remote control • Component video cable and audio cable L and R • AC power cord • AAA batteries (2) • Stand • Quick Start Guide • Standoff screws (4) for wall mounting Item Name 1 VOL + 2 VOL 3 CH 4 CH 5 MENU 6 INPUT 7 (power) Description In TV mode, press to increase the volume...
... menu mode, press to move right or to adjust menu settings. Unplug the power cord to decrease the volume. TV components DX-15L150A11/DX19L150A11/DX-22L150A11 5 4 Secure the wall-mount bracket to the back of your TV: • Remote control • Component video cable and audio cable L and R • AC power cord • AAA batteries (2) • Stand • Quick Start Guide • Standoff screws (4) for wall mounting Item Name 1 VOL + 2 VOL 3 CH 4 CH 5 MENU 6 INPUT 7 (power) Description In TV mode, press to increase the volume...
User Manual (English)
Page 10
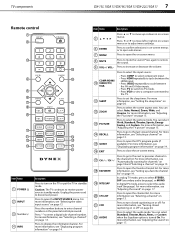
... disconnect power. Unplug the power cord to select the audio mode. Press "-" to open the channel list. For more information, see "Selecting a channel" on page 13. 15 GUIDE Press to enter a digital sub-channel number. TV components DX-15L150A11/DX19L150A11/DX-22L150A11 7 Remote control 1 2 3 14 4 15 5 6 7 16 8 9 17 18 10 11 19 12 20 13 21 22 Item Name 1 POWER 2 INPUT 3 Numbers/4 INFO Description Press to turn closed captioning on or off . For moreinformation, see "Displaying program information...
... disconnect power. Unplug the power cord to select the audio mode. Press "-" to open the channel list. For more information, see "Selecting a channel" on page 13. 15 GUIDE Press to enter a digital sub-channel number. TV components DX-15L150A11/DX19L150A11/DX-22L150A11 7 Remote control 1 2 3 14 4 15 5 6 7 16 8 9 17 18 10 11 19 12 20 13 21 22 Item Name 1 POWER 2 INPUT 3 Numbers/4 INFO Description Press to turn closed captioning on or off . For moreinformation, see "Displaying program information...
User Manual (English)
Page 11
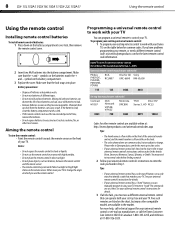
... a time. If you have problems programming your remote, or need to try codes for an extended period of time, remove the batteries. • Do not expose batteries to work if direct sunlight or bright light shines on the front of new batteries and can cause a rash. If the batteries leak, clean the battery compartment with your universal remote control's instructions for details. 3 If all Dynex TVs...
... a time. If you have problems programming your remote, or need to try codes for an extended period of time, remove the batteries. • Do not expose batteries to work if direct sunlight or bright light shines on the front of new batteries and can cause a rash. If the batteries leak, clean the battery compartment with your universal remote control's instructions for details. 3 If all Dynex TVs...

User Manual (English)
Page 12
... . 2 Connect a component video cable to the COMPONENT OUT jacks on the TV. • Make sure that all plugs are securely inserted into jacks on the component video device. The INPUT SOURCE menu opens. 2 Press or to the correct mode. Back of the TV, then connect the other end to a power outlet. Power outlet Power cord Notes: • The AC plug on the TV may cause eye strain. Refer to select HDMI. 3 Turn...
... . 2 Connect a component video cable to the COMPONENT OUT jacks on the TV. • Make sure that all plugs are securely inserted into jacks on the component video device. The INPUT SOURCE menu opens. 2 Press or to the correct mode. Back of the TV, then connect the other end to a power outlet. Power outlet Power cord Notes: • The AC plug on the TV may cause eye strain. Refer to select HDMI. 3 Turn...
User Manual (English)
Page 13
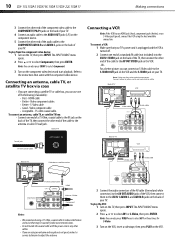
... to yellow, red to red, and white to the antenna or cable TV wall jack. Back of the cable to the AV OUT VIDEO jack on the VCR. -ORFor a better picture, you can also press COMP to select Component. 3 Turn on the back of the TV, then connect the other end of TV Connecting a VCR Note: If the VCR has an HDMI jack (best), component jacks (better), or an S-Video jack (good), connect the VCR using a 75-Ohm...
... to yellow, red to red, and white to the antenna or cable TV wall jack. Back of the cable to the AV OUT VIDEO jack on the VCR. -ORFor a better picture, you can also press COMP to select Component. 3 Turn on the back of the TV, then connect the other end of TV Connecting a VCR Note: If the VCR has an HDMI jack (best), component jacks (better), or an S-Video jack (good), connect the VCR using a 75-Ohm...
User Manual (English)
Page 14
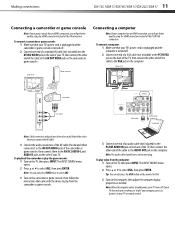
... standby mode, your TV or remote control. The INPUT SOURCE menu opens. 2 Press or to select AV2, then press ENTER. Side of TV Game console Connecting a computer Note: If your TV. To play the game console: 1 Turn on the TV, then press INPUT. Match the colors when you connect the AV cable. 3 Connect the audio connectors of the AV cable (the red and white connectors) to the AV OUT AUDIO jacks...
... standby mode, your TV or remote control. The INPUT SOURCE menu opens. 2 Press or to select AV2, then press ENTER. Side of TV Game console Connecting a computer Note: If your TV. To play the game console: 1 Turn on the TV, then press INPUT. Match the colors when you connect the AV cable. 3 Connect the audio connectors of the AV cable (the red and white connectors) to the AV OUT AUDIO jacks...
User Manual (English)
Page 15
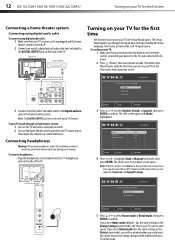
... included) into the (headphone) jack on the side of TV Audio amplifier Turning on the home theater system and select the TV sound source, then adjust the volume to highlight Auto or Manual time mode, then press ENTER. Note: The DIGITAL OUTPUT jack only works with Mode highlighted. 4 Press or to a comfortable level. To play TV sound through setting up basic settings including the menu language, time mode, picture mode, and TV signal source. The Setup Wizard guides you chose Home mode (default -
... included) into the (headphone) jack on the side of TV Audio amplifier Turning on the home theater system and select the TV sound source, then adjust the volume to highlight Auto or Manual time mode, then press ENTER. Note: The DIGITAL OUTPUT jack only works with Mode highlighted. 4 Press or to a comfortable level. To play TV sound through setting up basic settings including the menu language, time mode, picture mode, and TV signal source. The Setup Wizard guides you chose Home mode (default -
User Manual (English)
Page 16
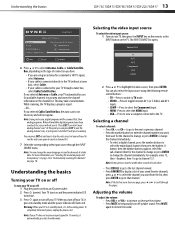
.../DX19L150A11/DX-22L150A11 13 Selecting the video input source To select the video input source: 1 Turn on your TV. This may take several minutes. Note: During auto scan, digital programs will need analog channel scan." At this point you turn your TV, it is connected to create a channel list. 7 Select the corresponding video input source through the pages. Understanding the basics Turning your TV on or off To turn off your TV on or off : 1 Plug the power cord...
.../DX19L150A11/DX-22L150A11 13 Selecting the video input source To select the video input source: 1 Turn on your TV. This may take several minutes. Note: During auto scan, digital programs will need analog channel scan." At this point you turn your TV, it is connected to create a channel list. 7 Select the corresponding video input source through the pages. Understanding the basics Turning your TV on or off To turn off your TV on or off : 1 Plug the power cord...
User Manual (English)
Page 17
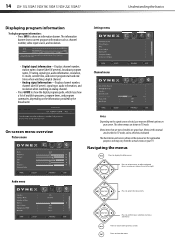
...screen. Settings menu • Digital signal information-Displays channel number, station name, channel label (if present), broadcast program name, TV rating, signal type, audio information, resolution, CC mode, current time, and current program start and end times when watching a digital channel. • Analog signal information-Displays channel number, channel label (if preset), signal type, audio information, and resolution when watching an analog channel. • Press GUIDE to show an information banner. Press to display the Main menu. 14 DX-15L150A11/DX19L150A11/DX-22L150A11...
...screen. Settings menu • Digital signal information-Displays channel number, station name, channel label (if present), broadcast program name, TV rating, signal type, audio information, resolution, CC mode, current time, and current program start and end times when watching a digital channel. • Analog signal information-Displays channel number, channel label (if preset), signal type, audio information, and resolution when watching an analog channel. • Press GUIDE to show an information banner. Press to display the Main menu. 14 DX-15L150A11/DX19L150A11/DX-22L150A11...
User Manual (English)
Page 18
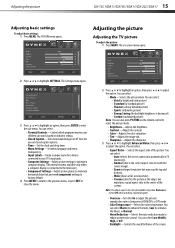
... aspect ratio automatically in Component, HDMI/DVI, or DTV mode. • Color Temperature-Selects the color temperature. You can also press PICTURE on the remote control to select the picture mode. • Brightness-Adjusts the brightness. • Contrast-Adjusts the contrast. • Color-Adjusts the color saturation. • Tint-Adjusts the image tint. • Sharpness-Adjusts the sharpness. 3 Press or to highlight Advanced Video, then press or to adjust the option. Also lets you set closed captioning on -screen menu...
... aspect ratio automatically in Component, HDMI/DVI, or DTV mode. • Color Temperature-Selects the color temperature. You can also press PICTURE on the remote control to select the picture mode. • Brightness-Adjusts the brightness. • Contrast-Adjusts the contrast. • Color-Adjusts the color saturation. • Tint-Adjusts the image tint. • Sharpness-Adjusts the sharpness. 3 Press or to highlight Advanced Video, then press or to adjust the option. Also lets you set closed captioning on -screen menu...
User Manual (English)
Page 31
...; Adjust the contrast and brightness. • Make sure that the correct video mode is selected. • Make sure that the correct picture mode is plugged in. • Press POWER on your existing universal remote control. • See instructions and a table of common codes in . • Make sure that the power cord is selected. "Ghost" or double images. • Use a highly directional outdoor antenna or cable TV. For more information, see "Playing TV audio...
...; Adjust the contrast and brightness. • Make sure that the correct video mode is selected. • Make sure that the correct picture mode is plugged in. • Press POWER on your existing universal remote control. • See instructions and a table of common codes in . • Make sure that the power cord is selected. "Ghost" or double images. • Use a highly directional outdoor antenna or cable TV. For more information, see "Playing TV audio...

User Manual (English)
Page 32
... display. Analog standard Digital standard Screen Channel coverage Power source Power consumption Audio power S-Video input Video/audio input Component input HDMI input VGA input NTSC ATSC, 8-VSB, Clear-QAM DX-15L150A11 - 15" DX-19L150A11 - 19" DX-22L150A11 - 22" VHF: 2 - 13 UHF: 14 - 69 CATV: Mid band - Password is not solved by pressing the number buttons or you can tune to the channel by using these troubleshooting instructions, try turning off your TV, then turning it on the TV. • Make sure that the Button Lock...
... display. Analog standard Digital standard Screen Channel coverage Power source Power consumption Audio power S-Video input Video/audio input Component input HDMI input VGA input NTSC ATSC, 8-VSB, Clear-QAM DX-15L150A11 - 15" DX-19L150A11 - 19" DX-22L150A11 - 22" VHF: 2 - 13 UHF: 14 - 69 CATV: Mid band - Password is not solved by pressing the number buttons or you can tune to the channel by using these troubleshooting instructions, try turning off your TV, then turning it on the TV. • Make sure that the Button Lock...


