
Firmware Installation Guide (English)
Page 1
... of your product model number; remove the USB flash drive from your computer. Second: Upgrading the TV Software with a 1.5 Mbps broadband connection). 5. Insert the USB flash drive containing the firmware that you may need to your USB flash drive. Note: This port maybe covered by a red indicator light on the front of the TV. First: Download the update file 1. Verify that was downloaded into a wall outlet and the unit is turned off. This...
... of your product model number; remove the USB flash drive from your computer. Second: Upgrading the TV Software with a 1.5 Mbps broadband connection). 5. Insert the USB flash drive containing the firmware that you may need to your USB flash drive. Note: This port maybe covered by a red indicator light on the front of the TV. First: Download the update file 1. Verify that was downloaded into a wall outlet and the unit is turned off. This...
Quick Setup Guide (English)
Page 1
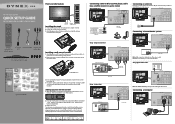
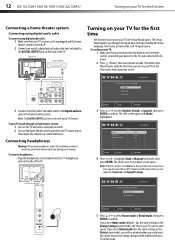
.../CABLE IN HDMI device HDMI cable (not included) Connecting a home theater system Using analog audio cable: Back of TV Remote control and 2 AAA batteries AC power L/R Audio cable Component cord video cable TV stand and 4 M4 screws Installing a wall-mount bracket 1 Carefully place your remote control 1 While pressing the release button on the battery compartment cover on the batteries align with digital TV channels. symbols on the back of TV ANT/CABLE IN ANT/CABLE IN Note: The DIGITAL OUTPUT jack only works with the + and - Connecting...
.../CABLE IN HDMI device HDMI cable (not included) Connecting a home theater system Using analog audio cable: Back of TV Remote control and 2 AAA batteries AC power L/R Audio cable Component cord video cable TV stand and 4 M4 screws Installing a wall-mount bracket 1 Carefully place your remote control 1 While pressing the release button on the battery compartment cover on the batteries align with digital TV channels. symbols on the back of TV ANT/CABLE IN ANT/CABLE IN Note: The DIGITAL OUTPUT jack only works with the + and - Connecting...
Quick Setup Guide (English)
Page 2
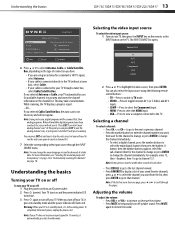
...; Enter the channel number directly using the number buttons. Need additional help? All other end to close the menu. 15" • 19" • 22" LCD TV I QUICK SETUP GUIDE I DX-15L150A11/DX-19L150A11 /DX-22L150A11 English 09-1037 09-0xxx If you selected Home Mode, the Choose your TV automatically scans for available channels. If you are asked to select the correct input source for the rst time 1 Plug in your area uses daylight savings If you select Manual, press or...
...; Enter the channel number directly using the number buttons. Need additional help? All other end to close the menu. 15" • 19" • 22" LCD TV I QUICK SETUP GUIDE I DX-15L150A11/DX-19L150A11 /DX-22L150A11 English 09-1037 09-0xxx If you selected Home Mode, the Choose your TV automatically scans for available channels. If you are asked to select the correct input source for the rst time 1 Plug in your area uses daylight savings If you select Manual, press or...
User Manual (English)
Page 2
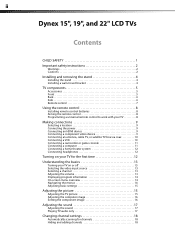
... and removing the stand 4 Installing the stand 4 Installing a wall-mount bracket 4 TV components 5 Accessories 5 Front 5 Back 6 Side 6 Remote control 7 Using the remote control 8 Installing remote control batteries 8 Aiming the remote control 8 Programming a universal remote control to work with your TV 8 Making connections 9 Selecting a location 9 Connecting the power 9 Connecting an HDMI device 9 Connecting a component video device 9 Connecting an antenna, cable TV, or satellite TV box via coax 10 Connecting a VCR 10 Connecting a camcorder or game console 11 Connecting...
... and removing the stand 4 Installing the stand 4 Installing a wall-mount bracket 4 TV components 5 Accessories 5 Front 5 Back 6 Side 6 Remote control 7 Using the remote control 8 Installing remote control batteries 8 Aiming the remote control 8 Programming a universal remote control to work with your TV 8 Making connections 9 Selecting a location 9 Connecting the power 9 Connecting an HDMI device 9 Connecting a component video device 9 Connecting an antenna, cable TV, or satellite TV box via coax 10 Connecting a VCR 10 Connecting a camcorder or game console 11 Connecting...

User Manual (English)
Page 3
... or changing a channel label 19 Checking digital TV signal strength 20 Setting parental controls 20 Setting or changing the password 20 Setting parental control levels 21 Using closed captioning 24 Turning closed captioning on or off 24 Selecting the closed captioning mode 24 Customizing digital TV closed captioning styles 24 Adjusting time settings 25 Setting the clock 25 Setting the sleep timer 26 Adjusting menu settings 26 Selecting the menu language and transparency 26 Labeling an input source 27 Restoring default settings 27 Troubleshooting 28 Video and audio 28 Remote...
... or changing a channel label 19 Checking digital TV signal strength 20 Setting parental controls 20 Setting or changing the password 20 Setting parental control levels 21 Using closed captioning 24 Turning closed captioning on or off 24 Selecting the closed captioning mode 24 Customizing digital TV closed captioning styles 24 Adjusting time settings 25 Setting the clock 25 Setting the sleep timer 26 Adjusting menu settings 26 Selecting the menu language and transparency 26 Labeling an input source 27 Restoring default settings 27 Troubleshooting 28 Video and audio 28 Remote...
User Manual (English)
Page 4
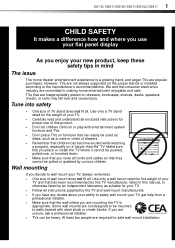
... proper use your flat panel display As you enjoy your new product, keep these safety tips in this product. • Don't let children climb on or play with steel studs or cinder blocks. Some wall mounts are unsure, ask a professional installer. • TVs can easily be used as steps, such as suitable for your TV. • Follow all cords and cables...
... proper use your flat panel display As you enjoy your new product, keep these safety tips in this product. • Don't let children climb on or play with steel studs or cinder blocks. Some wall mounts are unsure, ask a professional installer. • TVs can easily be used as steps, such as suitable for your TV. • Follow all cords and cables...
User Manual (English)
Page 5
..., or other . No user-serviceable parts are provided for replacement of time. 14 Refer all instructions. 5 Do not use this TV from touching such power lines or circuits as contact with a dry cloth. 7 Do not block any antenna or cable system. This helps prevent property damage and personal injury from tip-over. Handling the LCD panel • Your TV's screen is damaged or frayed...
..., or other . No user-serviceable parts are provided for replacement of time. 14 Refer all instructions. 5 Do not use this TV from touching such power lines or circuits as contact with a dry cloth. 7 Do not block any antenna or cable system. This helps prevent property damage and personal injury from tip-over. Handling the LCD panel • Your TV's screen is damaged or frayed...
User Manual (English)
Page 7
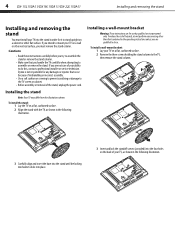
... operating instructions unless you handle the TV carefully when attempting to do so. 4 DX-15L150A11/DX19L150A11/DX-22L150A11 Installing and removing the stand Installing and removing the stand You must remove the stand column. If you are for it to mount your TV on a flat, cushioned surface. 2 Remove the three screws holding the stand column to the TV, then remove the stand column. 3 Carefully align and insert the base into the stand...
... operating instructions unless you handle the TV carefully when attempting to do so. 4 DX-15L150A11/DX19L150A11/DX-22L150A11 Installing and removing the stand Installing and removing the stand You must remove the stand column. If you are for it to mount your TV on a flat, cushioned surface. 2 Remove the three screws holding the stand column to the TV, then remove the stand column. 3 Carefully align and insert the base into the stand...
User Manual (English)
Page 8
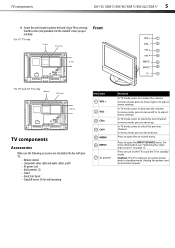
...; Remote control • Component video cable and audio cable L and R • AC power cord • AAA batteries (2) • Stand • Quick Start Guide • Standoff screws (4) for wall mounting Item Name 1 VOL + 2 VOL 3 CH 4 CH 5 MENU 6 INPUT 7 (power) Description In TV mode, press to increase the volume. Unplug the power cord to select the previous channel. In menu mode, press to move right or to open the INPUT SOURCE menu. Press to adjust menu settings. For more information, see "Selecting the video input source...
...; Remote control • Component video cable and audio cable L and R • AC power cord • AAA batteries (2) • Stand • Quick Start Guide • Standoff screws (4) for wall mounting Item Name 1 VOL + 2 VOL 3 CH 4 CH 5 MENU 6 INPUT 7 (power) Description In TV mode, press to increase the volume. Unplug the power cord to select the previous channel. In menu mode, press to move right or to open the INPUT SOURCE menu. Press to adjust menu settings. For more information, see "Selecting the video input source...
User Manual (English)
Page 10
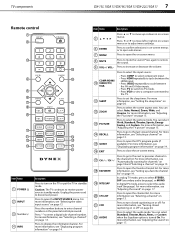
.... 13 PICTURE Press to select the picture mode. For more information, see "Selecting a channel" on the TV or put the TV in standby mode. TV components DX-15L150A11/DX19L150A11/DX-22L150A11 7 Remote control 1 2 3 14 4 15 5 6 7 16 8 9 17 18 10 11 19 12 20 13 21 22 Item Name 1 POWER 2 INPUT 3 Numbers/4 INFO Description Press to turn closed captioning on or off . In analog TV mode, press to increase or decrease the volume...
.... 13 PICTURE Press to select the picture mode. For more information, see "Selecting a channel" on the TV or put the TV in standby mode. TV components DX-15L150A11/DX19L150A11/DX-22L150A11 7 Remote control 1 2 3 14 4 15 5 6 7 16 8 9 17 18 10 11 19 12 20 13 21 22 Item Name 1 POWER 2 INPUT 3 Numbers/4 INFO Description Press to turn closed captioning on or off . In analog TV mode, press to increase or decrease the volume...
User Manual (English)
Page 11
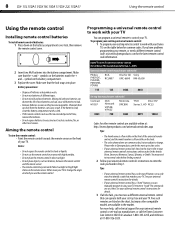
... 8 DX-15L150A11/DX19L150A11/DX-22L150A11 Using the remote control Using the remote control Installing remote control batteries To install remote control batteries: 1 Press down on the battery compartment cover lock, then remove the remote control cover. 2 Insert two AAA batteries into place. Aiming the remote control To aim the remote control: • Point the remote control towards the remote sensor on the front of the universal remote control, and the model number is not used for your universal remote control or set -top box and your universal remote control's instructions and...
... 8 DX-15L150A11/DX19L150A11/DX-22L150A11 Using the remote control Using the remote control Installing remote control batteries To install remote control batteries: 1 Press down on the battery compartment cover lock, then remove the remote control cover. 2 Insert two AAA batteries into place. Aiming the remote control To aim the remote control: • Point the remote control towards the remote sensor on the front of the universal remote control, and the model number is not used for your universal remote control or set -top box and your universal remote control's instructions and...

User Manual (English)
Page 12
... blue color-coded video connectors and red and white audio connectors. Selecting a location You should select a location for a long period of time. To connect a component video device: 1 Make sure that you only use a DVI to HDMI adapter cable to connect to the HDMI jack on the TV, then connect an audio cable to the PC/DVI AUDIO IN jack on the TV, then press INPUT. Back of the TV. Power outlet Power cord Notes: • The AC plug on...
... blue color-coded video connectors and red and white audio connectors. Selecting a location You should select a location for a long period of time. To connect a component video device: 1 Make sure that you only use a DVI to HDMI adapter cable to connect to the HDMI jack on the TV, then connect an audio cable to the PC/DVI AUDIO IN jack on the TV, then press INPUT. Back of the TV. Power outlet Power cord Notes: • The AC plug on...
User Manual (English)
Page 13
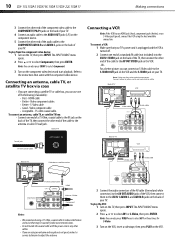
... satellite TV box via coax • If you are using the best available connection. Back of the cable to the AV OUT VIDEO jack on the VCR. -ORFor a better picture, you can also press VIDEO once to select Component. 3 Turn on the back of the cable to adjust the antenna. To play from the component video device: 1 Turn on the TV, then press INPUT. Refer to the instructions that your TV's power cord is...
... satellite TV box via coax • If you are using the best available connection. Back of the cable to the AV OUT VIDEO jack on the VCR. -ORFor a better picture, you can also press VIDEO once to select Component. 3 Turn on the back of the cable to adjust the antenna. To play from the component video device: 1 Turn on the TV, then press INPUT. Refer to the instructions that your TV's power cord is...
User Manual (English)
Page 14
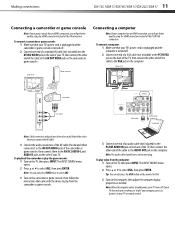
... also press the VGA button on the remote for VGA. 3 Turn on the computer. Side of TV Game console Connecting a computer Note: If your TV or remote control. The INPUT SOURCE menu opens. 2 Press or to select VGA, then press ENTER. Note: When the computer enters standby mode, your TV turns off . 2 Connect one end of a standard AV cable (not included) into the AV IN 2 VIDEO jack on the...
... also press the VGA button on the remote for VGA. 3 Turn on the computer. Side of TV Game console Connecting a computer Note: If your TV or remote control. The INPUT SOURCE menu opens. 2 Press or to select VGA, then press ENTER. Note: When the computer enters standby mode, your TV turns off . 2 Connect one end of a standard AV cable (not included) into the AV IN 2 VIDEO jack on the...
User Manual (English)
Page 15
.... Connecting headphones Warning: When using digital audio cable: 1 Make sure that you through a home theater system: 1 Turn on the TV and select a program to watch. 2 Turn on the home theater system. Digital audio cable ANT/CABLE IN 3 Connect the other end of a digital optical audio cable (not included) to the DIGITAL OUTPUT jack on a time signal received from a DTV channel and the only options you really want this mode. To play TV sound through setting up basic settings including the menu language, time mode, picture mode, and...
.... Connecting headphones Warning: When using digital audio cable: 1 Make sure that you through a home theater system: 1 Turn on the TV and select a program to watch. 2 Turn on the home theater system. Digital audio cable ANT/CABLE IN 3 Connect the other end of a digital optical audio cable (not included) to the DIGITAL OUTPUT jack on a time signal received from a DTV channel and the only options you really want this mode. To play TV sound through setting up basic settings including the menu language, time mode, picture mode, and...
User Manual (English)
Page 16
... need analog channel scan." If you selected Antenna or Cable, your TV automatically scans for 15 minutes, it and the TV will not appear. Understanding the basics DX-15L150A11/DX19L150A11/DX-22L150A11 13 Selecting the video input source To select the video input source: 1 Turn on your TV on or off: 1 Plug the power cord into an AC power outlet. 2 Press (power). The INPUT SOURCE list opens. 6 Press or to select Antenna, Cable, or Cable/Satellite Box, depending on the type...
... need analog channel scan." If you selected Antenna or Cable, your TV automatically scans for 15 minutes, it and the TV will not appear. Understanding the basics DX-15L150A11/DX19L150A11/DX-22L150A11 13 Selecting the video input source To select the video input source: 1 Turn on your TV on or off: 1 Plug the power cord into an AC power outlet. 2 Press (power). The INPUT SOURCE list opens. 6 Press or to select Antenna, Cable, or Cable/Satellite Box, depending on the type...
User Manual (English)
Page 17
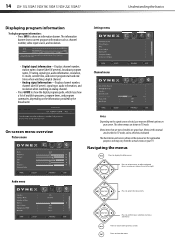
..., signal type, audio information, resolution, CC mode, current time, and current program start and end times when watching a digital channel. • Analog signal information-Displays channel number, channel label (if preset), signal type, audio information, and resolution when watching an analog channel. • Press GUIDE to close the menu. Press to select menus, to confirm your screen. The above menus are for explanation purposes and may show an information banner. The illustrations and screens shown in the manual are...
..., signal type, audio information, resolution, CC mode, current time, and current program start and end times when watching a digital channel. • Analog signal information-Displays channel number, channel label (if preset), signal type, audio information, and resolution when watching an analog channel. • Press GUIDE to close the menu. Press to select menus, to confirm your screen. The above menus are for explanation purposes and may show an information banner. The illustrations and screens shown in the manual are...
User Manual (English)
Page 18
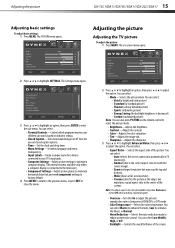
... aspect ratios are all available only when Overscan is connected to the television.) • Component Settings-Adjust picture phase (to minimize horizontal distortion and reset component settings to factory default. 4 Press MENU to return to the previous menu, or press EXIT to close the menu. 2 Press or to highlight an option, then press or to reduce picture noise (snow). You can select: • Parental Controls-Control which programs/movies your TV's input jacks. • Computer Settings-Adjust picture settings...
... aspect ratios are all available only when Overscan is connected to the television.) • Component Settings-Adjust picture phase (to minimize horizontal distortion and reset component settings to factory default. 4 Press MENU to return to the previous menu, or press EXIT to close the menu. 2 Press or to highlight an option, then press or to reduce picture noise (snow). You can select: • Parental Controls-Control which programs/movies your TV's input jacks. • Computer Settings-Adjust picture settings...
User Manual (English)
Page 31
... existing universal remote control. • See instructions and a table of common codes in . • Press POWER on page 10. • Adjust the color saturation. For more information, see "Installing remote control batteries" on again. 28 DX-15L150A11/DX19L150A11/DX-22L150A11 Troubleshooting Troubleshooting Before calling for service, check the following information for an extended period of time. If none of the channel. Video and audio Problem Solution No power. • Make sure that the sound mode...
... existing universal remote control. • See instructions and a table of common codes in . • Press POWER on page 10. • Adjust the color saturation. For more information, see "Installing remote control batteries" on again. 28 DX-15L150A11/DX19L150A11/DX-22L150A11 Troubleshooting Troubleshooting Before calling for service, check the following information for an extended period of time. If none of the channel. Video and audio Problem Solution No power. • Make sure that the sound mode...

User Manual (English)
Page 32
.... For more information, see "Setting parental controls" on page 21. • Make sure that the channels are approximate. Specifications Specifications subject to Off. TV cabinet creaks. You can tune to the channel by using these troubleshooting instructions, try turning off your TV, then turning it on Analog standard Digital standard Screen Channel coverage Power source Power consumption Audio power S-Video input Video/audio input Component input HDMI input VGA input NTSC ATSC, 8-VSB, Clear-QAM DX-15L150A11 - 15" DX-19L150A11 - 19" DX-22L150A11 - 22" VHF: 2 - 13...
.... For more information, see "Setting parental controls" on page 21. • Make sure that the channels are approximate. Specifications Specifications subject to Off. TV cabinet creaks. You can tune to the channel by using these troubleshooting instructions, try turning off your TV, then turning it on Analog standard Digital standard Screen Channel coverage Power source Power consumption Audio power S-Video input Video/audio input Component input HDMI input VGA input NTSC ATSC, 8-VSB, Clear-QAM DX-15L150A11 - 15" DX-19L150A11 - 19" DX-22L150A11 - 22" VHF: 2 - 13...


