
User Guide 1
Page 2
Contents About Your New Label Maker 5 Product Registration 5 Getting Started 5 Connecting the Power 5 Inserting the Batteries 5 Connecting the Optional Power Adapter 6 Inserting the Tape Cassette 6 Using the Label Maker for the First Time 7 Getting to Know the Label Maker 7 Power ...7 LCD Display 8 Format ...8 Insert ...8 Settings ...8 CAPS Mode 8 Num Lock 9 Backspace 9 Clear ...9 Navigation Keys 9 Cancel ...9 Formatting Your Label 9 Changing the Font Size 9 Adding Font Styles 10 Adding Borders and Underline Styles 10 Creating Two-Line Labels 11 2
Contents About Your New Label Maker 5 Product Registration 5 Getting Started 5 Connecting the Power 5 Inserting the Batteries 5 Connecting the Optional Power Adapter 6 Inserting the Tape Cassette 6 Using the Label Maker for the First Time 7 Getting to Know the Label Maker 7 Power ...7 LCD Display 8 Format ...8 Insert ...8 Settings ...8 CAPS Mode 8 Num Lock 9 Backspace 9 Clear ...9 Navigation Keys 9 Cancel ...9 Formatting Your Label 9 Changing the Font Size 9 Adding Font Styles 10 Adding Borders and Underline Styles 10 Creating Two-Line Labels 11 2
User Guide 1
Page 4
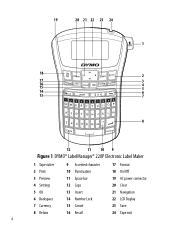
19 20 21 22 23 24 1 18 2 17 16 15 3 4 5 14 6 13 7 Caps 8 Accent 12 11 10 9 Figure 1 DYMO® LabelManager® 220P Electronic Label Maker 1 Tape cutter 9 Accented character 17 Format 2 Print 10 Punctuation 18 On/Off 3 Preview 11 Space bar 19 AC power connector 4 Settings 12 Caps 20 Clear 5 OK 13 Insert 21 Navigation 6 Backspace 14 Number Lock 22 LCD Display 7 Currency 15 Cancel 23 Save 8 Return 16 Recall 24 Tape exit 4
19 20 21 22 23 24 1 18 2 17 16 15 3 4 5 14 6 13 7 Caps 8 Accent 12 11 10 9 Figure 1 DYMO® LabelManager® 220P Electronic Label Maker 1 Tape cutter 9 Accented character 17 Format 2 Print 10 Punctuation 18 On/Off 3 Preview 11 Space bar 19 AC power connector 4 Settings 12 Caps 20 Clear 5 OK 13 Insert 21 Navigation 6 Backspace 14 Number Lock 22 LCD Display 7 Currency 15 Cancel 23 Save 8 Return 16 Recall 24 Tape exit 4
User Guide 1
Page 5
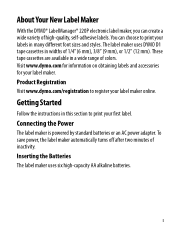
...The label maker uses six high-capacity AA alkaline batteries. 5 The label maker uses DYMO D1 tape cassettes in widths of colors. Product Registration Visit www.dymo.com/registration to print your first label. Visit www.dymo.com for information on obtaining labels and accessories for your label maker. To save power... two minutes of high-quality, self-adhesive labels. You can create a wide variety of inactivity. About Your New Label Maker With the DYMO® LabelManager® 220P electronic label maker, you can choose to print your labels in many different font sizes and styles.
...The label maker uses six high-capacity AA alkaline batteries. 5 The label maker uses DYMO D1 tape cassettes in widths of colors. Product Registration Visit www.dymo.com/registration to print your first label. Visit www.dymo.com for information on obtaining labels and accessories for your label maker. To save power... two minutes of high-quality, self-adhesive labels. You can create a wide variety of inactivity. About Your New Label Maker With the DYMO® LabelManager® 220P electronic label maker, you can choose to print your labels in many different font sizes and styles.
User Guide 1
Page 7
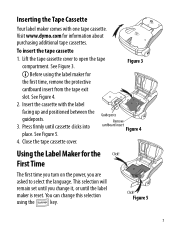
.... You can change it, or until cassette clicks into place. Inserting the Tape Cassette Your label maker comes with the label facing up and positioned between the guideposts. 3. Visit www.dymo.com for the Click! Figure 3 Ç Before using the key. See Figure 5. First Time The first time... you turn on the power, you change this selection using the label maker for the first time, remove the protective cardboard insert from the tape exit slot. See ...
.... You can change it, or until cassette clicks into place. Inserting the Tape Cassette Your label maker comes with the label facing up and positioned between the guideposts. 3. Visit www.dymo.com for the Click! Figure 3 Ç Before using the key. See Figure 5. First Time The first time... you turn on the power, you change this selection using the label maker for the first time, remove the protective cardboard insert from the tape exit slot. See ...
User Guide 1
Page 8
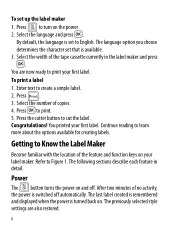
... }. Select the width of no activity, the power is available. 3. The previously selected style settings are now ready to English. After two minutes of the tape cassette currently in detail. Press } to Know the Label Maker Become familiar with the location of copies. 4. Getting to print. 5.
... }. Select the width of no activity, the power is available. 3. The previously selected style settings are now ready to English. After two minutes of the tape cassette currently in detail. Press } to Know the Label Maker Become familiar with the location of copies. 4. Getting to print. 5.
User Guide 1
Page 19
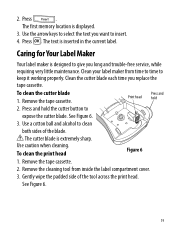
... See Figure 6. 19 2. Use the arrow keys to select the text you replace the tape cassette. Clean your label maker from inside the label compartment cover. 3. Press and hold 2. Press . Remove the tape cassette. 2. Gently wipe the padded side of the blade. è The cutter blade ...is designed to insert. 4. Press }. To clean the cutter blade 1. See Figure 6. 3. Remove the tape cassette. Use a cotton ball and alcohol to clean both sides of the tool across the print head. Clean the cutter blade each time you want...
... See Figure 6. 19 2. Use the arrow keys to select the text you replace the tape cassette. Clean your label maker from inside the label compartment cover. 3. Press and hold 2. Press . Remove the tape cassette. 2. Gently wipe the padded side of the blade. è The cutter blade ...is designed to insert. 4. Press }. To clean the cutter blade 1. See Figure 6. 3. Remove the tape cassette. Use a cotton ball and alcohol to clean both sides of the tool across the print head. Clean the cutter blade each time you want...
User Guide 1
Page 20
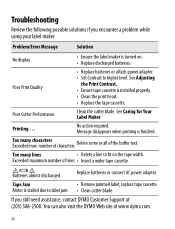
... adapter. • Set Contrast to fit on . • Replace discharged batteries. See Adjusting the Print Contrast. • Ensure tape cassette is turned on the tape width. Batteries almost discharged. You can also visit the DYMO Web site at (203) 588-2500. No action required. Too many characters Exceeded max. Printing . . . Too many lines...
... adapter. • Set Contrast to fit on . • Replace discharged batteries. See Adjusting the Print Contrast. • Ensure tape cassette is turned on the tape width. Batteries almost discharged. You can also visit the DYMO Web site at (203) 588-2500. No action required. Too many characters Exceeded max. Printing . . . Too many lines...


