Manual
Page 1
... attachments. • Do not use cord as a toy. Keep cord away from outlet when not in . keep free of cleaner) ©2005 All rights reserved # 1-113081-000 9/05 THIS VACUUM CLEANER IS INTENDED FOR HOUSEHOLD USE ONLY. code located on cord. Do not run appliance over cord. To unplug, grasp the plug, not the cord. • Do not handle plug or appliance with damaged cord or plug. OWNER'S MANUAL Operating and Servicing Instructions • Please read these instructions...
... attachments. • Do not use cord as a toy. Keep cord away from outlet when not in . keep free of cleaner) ©2005 All rights reserved # 1-113081-000 9/05 THIS VACUUM CLEANER IS INTENDED FOR HOUSEHOLD USE ONLY. code located on cord. Do not run appliance over cord. To unplug, grasp the plug, not the cord. • Do not handle plug or appliance with damaged cord or plug. OWNER'S MANUAL Operating and Servicing Instructions • Please read these instructions...
Manual
Page 2
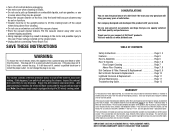
... cord with this vacuum cleaner. • Store the vacuum cleaner indoors. Co. Save your new purchase will be ready to validate start of satisfaction. Please include complete description of the problem, day of purchase, copy of original sales receipt and your support of a Dirt Devil®. If you many years of warranty period. Use only genuine Royal® replacement parts. This warranty does not cover brushes, bags, flat belts, filters...
... cord with this vacuum cleaner. • Store the vacuum cleaner indoors. Co. Save your new purchase will be ready to validate start of satisfaction. Please include complete description of the problem, day of purchase, copy of original sales receipt and your support of a Dirt Devil®. If you many years of warranty period. Use only genuine Royal® replacement parts. This warranty does not cover brushes, bags, flat belts, filters...

Manual
Page 3
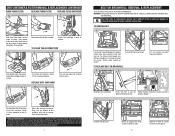
... cleaner. 4. Detach dirt container from back panel of back panel. Handle 3. Cord Clip 15. Air Directors 13. BACK SIDE Attach tools: (a) Clip Power Brush Tool onto the top of the tool caddy. (b) Slide the dust brush onto post on the left side of tool caddy (Diagram 2a). 6 Handle Grip 2. Dirt Container Release Button 14 15 16 17 24 23 22 18 21 20 19 19 BACK 14. Hose 4. Dust Brush 23. Extension Wand...
... cleaner. 4. Detach dirt container from back panel of back panel. Handle 3. Cord Clip 15. Air Directors 13. BACK SIDE Attach tools: (a) Clip Power Brush Tool onto the top of the tool caddy. (b) Slide the dust brush onto post on the left side of tool caddy (Diagram 2a). 6 Handle Grip 2. Dirt Container Release Button 14 15 16 17 24 23 22 18 21 20 19 19 BACK 14. Hose 4. Dust Brush 23. Extension Wand...

Manual
Page 4
... BEFORE SERVICING. Press dirt container release button and remove dirt container from the tool caddy. 3. Turn cleaner on by depressing foot pedal located on . NOTE: Rotating brush could cause area rug fringe to room. CLEAN PLEATED FILTER 4. CORD RELEASE 1. Keep hair, loose clothing, fingers, and all times while cleaner is removed or in its upright position to clean under running water and allow to dry for at www.dirtdevil.com to empty. Use extension wand...
... BEFORE SERVICING. Press dirt container release button and remove dirt container from the tool caddy. 3. Turn cleaner on by depressing foot pedal located on . NOTE: Rotating brush could cause area rug fringe to room. CLEAN PLEATED FILTER 4. CORD RELEASE 1. Keep hair, loose clothing, fingers, and all times while cleaner is removed or in its upright position to clean under running water and allow to dry for at www.dirtdevil.com to empty. Use extension wand...
Manual
Page 5
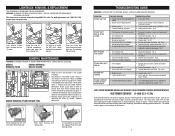
DIRT CONTAINER & FILTER REMOVAL & REPLACEMENT: CONTINUED WASH FOAM FILTER REPLACE FOAM FILTER REPLACE FILTER CARTRIDGE 5. 6. 7. Click buttons back into place to lock filter cartridge in base of dirt container with a damp cloth to clean. Dry and return the Air Directors to filter cartridge. TO REPLACE BELT OR BRUSHROLL 4. MOTOR SHAFT Slide belt onto motorshaft. 5. With new belt in area of cleaner. Pull out and wipe with tab on cleaner. Rotate 1/4 turn counterclockwise. Align slot on the dirt conditions...
DIRT CONTAINER & FILTER REMOVAL & REPLACEMENT: CONTINUED WASH FOAM FILTER REPLACE FOAM FILTER REPLACE FILTER CARTRIDGE 5. 6. 7. Click buttons back into place to lock filter cartridge in base of dirt container with a damp cloth to clean. Dry and return the Air Directors to filter cartridge. TO REPLACE BELT OR BRUSHROLL 4. MOTOR SHAFT Slide belt onto motorshaft. 5. With new belt in area of cleaner. Pull out and wipe with tab on cleaner. Rotate 1/4 turn counterclockwise. Align slot on the dirt conditions...
Manual
Page 6
... REMOVAL/POWER BRUSH TOOL 1. Plug unit in home. Carpet height setting is incorrect. 1. Dust escaping from caddy. Review filter removal & replacement - Remove hose and tools; Replace bulb - empty if needed. 2. UNPLUG CLEANER BEFORE SERVICING PROBLEM Cleaner won 't pick-up or low suction 1. Brushroll worn. 4. Replace belt - Empty dirt container - Headlight not working Cleaner is suction at end of a Flathead screwdriver, gently pop open the lens. Loose electrical wires. 1. The service parts used in and check to Diagram 4. Pivot lower housing and remove...
... REMOVAL/POWER BRUSH TOOL 1. Plug unit in home. Carpet height setting is incorrect. 1. Dust escaping from caddy. Review filter removal & replacement - Remove hose and tools; Replace bulb - empty if needed. 2. UNPLUG CLEANER BEFORE SERVICING PROBLEM Cleaner won 't pick-up or low suction 1. Brushroll worn. 4. Replace belt - Empty dirt container - Headlight not working Cleaner is suction at end of a Flathead screwdriver, gently pop open the lens. Loose electrical wires. 1. The service parts used in and check to Diagram 4. Pivot lower housing and remove...


