Manual
Page 1
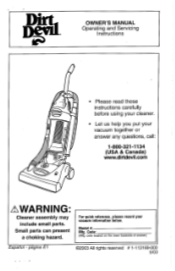
For quick reference, please record your vacuum together or answer any questions, call: 1-800-321-1134 (USA & Canada) www.dirtdevil.com 0 /WARNING: Cleaner assembly may include small parts. Model #: Mfg. code located on the lower backside of cleaner) Espanol - pagina El ©2003 All rights reserved # 1-113169-000 5/03 Code: (Mfg. Small parts can present a choking hazard. OWNER'S MANUAL Operating and Servicing Instructions • Please read these instructions carefully before using your cleaner. • Let us help you put your vacuum information below.
For quick reference, please record your vacuum together or answer any questions, call: 1-800-321-1134 (USA & Canada) www.dirtdevil.com 0 /WARNING: Cleaner assembly may include small parts. Model #: Mfg. code located on the lower backside of cleaner) Espanol - pagina El ©2003 All rights reserved # 1-113169-000 5/03 Code: (Mfg. Small parts can present a choking hazard. OWNER'S MANUAL Operating and Servicing Instructions • Please read these instructions carefully before using your cleaner. • Let us help you put your vacuum information below.
Manual
Page 2
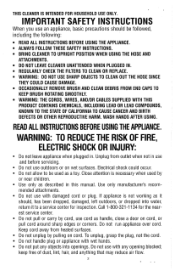
... THESE SAFETY INSTRUCTIONS. • BRING CLEANER TO UPRIGHT POSITION WHEN USING THE HOSE AND ATTACHMENTS. • DO NOT LEAVE CLEANER UNATTENDED WHEN PLUGGED IN. • REGULARLY CHECK THE FILTERS TO CLEAN OR REPLACE. • WARNING: DO NOT USE SHARP OBJECTS TO CLEAN OUT THE HOSE SINCE THEY COULD CAUSE DAMAGE. • OCCASIONALLY REMOVE BRUSH AND CLEAN DEBRIS FROM END CAPS TO KEEP BRUSH ROTATING SMOOTHLY. • WARNING: THE CORDS, WIRES, AND/OR...
... THESE SAFETY INSTRUCTIONS. • BRING CLEANER TO UPRIGHT POSITION WHEN USING THE HOSE AND ATTACHMENTS. • DO NOT LEAVE CLEANER UNATTENDED WHEN PLUGGED IN. • REGULARLY CHECK THE FILTERS TO CLEAN OR REPLACE. • WARNING: DO NOT USE SHARP OBJECTS TO CLEAN OUT THE HOSE SINCE THEY COULD CAUSE DAMAGE. • OCCASIONALLY REMOVE BRUSH AND CLEAN DEBRIS FROM END CAPS TO KEEP BRUSH ROTATING SMOOTHLY. • WARNING: THE CORDS, WIRES, AND/OR...

Manual
Page 3
... the upright position to use. Do not change the plug in the outlet, reverse the plug. Only the hand-held vacuum cleaners may be set on furniture. • Cleaner must remain unplugged during the 30 minute cooling period. 3 Empty the dirt container and clean filters. NOTE: the cleaner must be present. • Keep the vacuum cleaner on the cleaner plate. • Unplug before unplugging. • Use extra care when cleaning on...
... the upright position to use. Do not change the plug in the outlet, reverse the plug. Only the hand-held vacuum cleaners may be set on furniture. • Cleaner must remain unplugged during the 30 minute cooling period. 3 Empty the dirt container and clean filters. NOTE: the cleaner must be present. • Keep the vacuum cleaner on the cleaner plate. • Unplug before unplugging. • Use extra care when cleaning on...

Manual
Page 4
... switch to your cleaning pace, thanks to your desired speed and the vacuum will repair or replace any ROYAL° Authorized Sales & Warranty Service Station. For effortless cleaning with total control, nothing beats a Dirt Devil° Self-Propelled vacuum! The warranty does not include unusual wear, damage resulting from state to Assemble How To Operate Floor/Carpet Cleaning Self-Propelled Feature Above Floor Cleaning Dirt Container & Filtration: Removal and Replacement Belt or Brush: Removal & Replacement Lightbulb: Removal & Replacement General Maintenance Troubleshooting Guide...
... switch to your cleaning pace, thanks to your desired speed and the vacuum will repair or replace any ROYAL° Authorized Sales & Warranty Service Station. For effortless cleaning with total control, nothing beats a Dirt Devil° Self-Propelled vacuum! The warranty does not include unusual wear, damage resulting from state to Assemble How To Operate Floor/Carpet Cleaning Self-Propelled Feature Above Floor Cleaning Dirt Container & Filtration: Removal and Replacement Belt or Brush: Removal & Replacement Lightbulb: Removal & Replacement General Maintenance Troubleshooting Guide...
Manual
Page 5
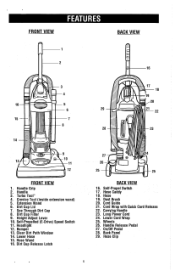
... VIEW 16. Carrying Handle 23. Handle Release Pedal 27. On/Off Pedal 28. Crevice Tool (inside extension wand) 5. Clear Dirt Path Window 14. Lower Hose 15. Long Power Cord 24. Lower Cord Wrap 25. Wheels 26. Self-Propelled (E-Drive) Speed Switch 11. Handle 3. Bumper 13. Hose Caddy 18. Cord Wrap with Quick Cord Release 22. Self-Propel Switch 17. Hose 19. See Through Dirt Cup 8. Back Panel 29. Handle Grip 2. Dirt Cup Lid 7. Hose Clip 5 Headlight 12. Cord Guide 21. Dust Brush 20. Dirt Cup Filter...
... VIEW 16. Carrying Handle 23. Handle Release Pedal 27. On/Off Pedal 28. Crevice Tool (inside extension wand) 5. Clear Dirt Path Window 14. Lower Hose 15. Long Power Cord 24. Lower Cord Wrap 25. Wheels 26. Self-Propelled (E-Drive) Speed Switch 11. Handle 3. Bumper 13. Hose Caddy 18. Cord Wrap with Quick Cord Release 22. Self-Propel Switch 17. Hose 19. See Through Dirt Cup 8. Back Panel 29. Handle Grip 2. Dirt Cup Lid 7. Hose Clip 5 Headlight 12. Cord Guide 21. Dust Brush 20. Dirt Cup Filter...
Manual
Page 6
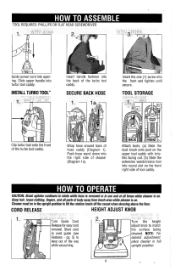
... rotation brush off the carpet when cleaning above the floor. NOTE: For Features - Turn Quick Cord 2. Store cord the surface being in full while vacuuming. upright position. Guide power cord into the back of tool caddy. INSTALL TURBO TOOL"' 1. L nsert handle fastener into opening. b a Clip turbo tool onto the front of hose caddy (Diagram 1). Push hose wand down into the front and tighten until secure. Cleaner must be in the upright position to easiest adjustment, keep out of cleaner (Diagram...
... rotation brush off the carpet when cleaning above the floor. NOTE: For Features - Turn Quick Cord 2. Store cord the surface being in full while vacuuming. upright position. Guide power cord into the back of tool caddy. INSTALL TURBO TOOL"' 1. L nsert handle fastener into opening. b a Clip turbo tool onto the front of hose caddy (Diagram 1). Push hose wand down into the front and tighten until secure. Cleaner must be in the upright position to easiest adjustment, keep out of cleaner (Diagram...
Manual
Page 7
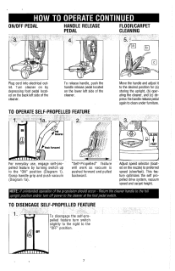
... feature turn off power to clean under furniture. Turn cleaner on the back left side of the cleaner. SLOW FAST For everyday use, engage self-propelled feature by depressing foot pedal located on by turning switch up to the "ON" position (Diagram 1). NOTE: If unintended operation of the cleaner. To release handle, push the handle release pedal located on the nozzle) to the "OFF" position. Grasp handle grip and push vacuum (Diagram...
... feature turn off power to clean under furniture. Turn cleaner on the back left side of the cleaner. SLOW FAST For everyday use, engage self-propelled feature by depressing foot pedal located on by turning switch up to the "ON" position (Diagram 1). NOTE: If unintended operation of the cleaner. To release handle, push the handle release pedal located on the nozzle) to the "OFF" position. Grasp handle grip and push vacuum (Diagram...
Manual
Page 8
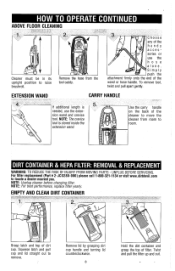
... and out. • Remove the hose from room to remove. NOTE: Unplug cleaner before changing filter. HOW TO OPERATE CONTINUED ABOVE FLOOR CLEANING ■ 0 Cleaner must be in its upright position to locate a dealer nearest you. extension wand. Squeeze latch and pull cup and lid straight out to tool is 5. EXTENSION WAND CARRY HANDLE 4. DIRT CONTAINER & HEPA FILTER: REMOVAL & REPLACEMENT WARNING: TO REDUCE THE RISK OF INJURY FROM MOVING PARTS - Simply push the...
... and out. • Remove the hose from room to remove. NOTE: Unplug cleaner before changing filter. HOW TO OPERATE CONTINUED ABOVE FLOOR CLEANING ■ 0 Cleaner must be in its upright position to locate a dealer nearest you. extension wand. Squeeze latch and pull cup and lid straight out to tool is 5. EXTENSION WAND CARRY HANDLE 4. DIRT CONTAINER & HEPA FILTER: REMOVAL & REPLACEMENT WARNING: TO REDUCE THE RISK OF INJURY FROM MOVING PARTS - Simply push the...
Manual
Page 9
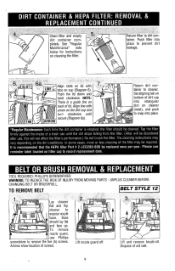
... cleaner to record replacement date. Arrows show location of old belt. 9 The cleaning instructions may be cleaned. In some cases, more or less cleaning of lid. UNPLUG CLEANER BEFORE CHANGING BELT OR BRUSHROLL. Set aligning tab on bottom of a trash can until secure (Diagram 6a). Tap the filter firmly against the inside of dirt cup into retangular slot on the dirt conditions. It is recommended that the HEPA filter Part...
... cleaner to record replacement date. Arrows show location of old belt. 9 The cleaning instructions may be cleaned. In some cases, more or less cleaning of lid. UNPLUG CLEANER BEFORE CHANGING BELT OR BRUSHROLL. Set aligning tab on bottom of a trash can until secure (Diagram 6a). Tap the filter firmly against the inside of dirt cup into retangular slot on the dirt conditions. It is recommended that the HEPA filter Part...

Manual
Page 10
.... Secure the headlight lens by replacing the two (2) screws. 10 Rotate brushroll manually to secure nozzle guard. Pull bulb out of the headlight lens. MOTOR SHAFT 5. UNPLUG CLEANER BEFORE REMOVING OR REPLACING LIGHTBULB. END CAP 0 0 Slide belt onto motorshaft. a Place new belt in the correct orientation (6a inset). Reattach nozzle guard. TOOL REQUIRED:SMALL PHILLIPS HEAD SCREWDRIVER 2. 0 Lean cleaner handle back Remove the two (2) screws ocated...
.... Secure the headlight lens by replacing the two (2) screws. 10 Rotate brushroll manually to secure nozzle guard. Pull bulb out of the headlight lens. MOTOR SHAFT 5. UNPLUG CLEANER BEFORE REMOVING OR REPLACING LIGHTBULB. END CAP 0 0 Slide belt onto motorshaft. a Place new belt in the correct orientation (6a inset). Reattach nozzle guard. TOOL REQUIRED:SMALL PHILLIPS HEAD SCREWDRIVER 2. 0 Lean cleaner handle back Remove the two (2) screws ocated...

Manual
Page 11
... remove clog. empty if needed. 1. 2. 2. Check to see if dirt cup is any obstructions and remove. DEBRIS REMOVAL/ NOZZLE GUARD 3. Remove brushroll if necessary. DEBRIS REMOVAL/HOSE 1. LOCKING RING Rotate locking ring 180° and turn turbo tool over. DEBRIS REMOVAL/TURBO TOOL 4. 5. Remove obstruction. If there is no suction at end of hose (Diagram 1). Look for any suction at the end of hose, move on to see Diagram 1) by removing the five (5) screws. Plug cleaner in and check...
... remove clog. empty if needed. 1. 2. 2. Check to see if dirt cup is any obstructions and remove. DEBRIS REMOVAL/ NOZZLE GUARD 3. Remove brushroll if necessary. DEBRIS REMOVAL/HOSE 1. LOCKING RING Rotate locking ring 180° and turn turbo tool over. DEBRIS REMOVAL/TURBO TOOL 4. 5. Remove obstruction. If there is no suction at end of hose (Diagram 1). Look for any suction at the end of hose, move on to see Diagram 1) by removing the five (5) screws. Plug cleaner in and check...
Manual
Page 12
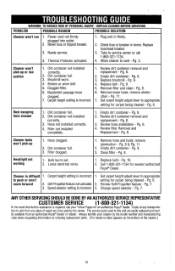
TROUBLESHOOTING GUIDE WARNING: TO REDUCE RISK OF PERSONAL INJURY - UNPLUG CLEANER BEFORE SERVICING PROBLEM POSSIBLE REASON POSSIBLE SOLUTION Cleaner won 't pick-up or low suction 1. Thermal Protector activated. 1. Plug unit in this unit are to push or won 't pick-up Headlight not working 1. Broken or worn belt. 5. Replace brushroll - Filter not installed completely. 1. Pg. 8. 2. Review dirt container removal and replacement - Pg. 8. 3. Pg. 6. 4. Pg. 8. Cleaner tools won 't run 1. Filter clogged. 1. remove obstruction - Clean filter - Carpet height ...
TROUBLESHOOTING GUIDE WARNING: TO REDUCE RISK OF PERSONAL INJURY - UNPLUG CLEANER BEFORE SERVICING PROBLEM POSSIBLE REASON POSSIBLE SOLUTION Cleaner won 't pick-up or low suction 1. Thermal Protector activated. 1. Plug unit in this unit are to push or won 't pick-up Headlight not working 1. Broken or worn belt. 5. Replace brushroll - Filter not installed completely. 1. Pg. 8. 2. Review dirt container removal and replacement - Pg. 8. 3. Pg. 6. 4. Pg. 8. Cleaner tools won 't run 1. Filter clogged. 1. remove obstruction - Clean filter - Carpet height ...


