Instruction Manual
Page 3
...WARNING: To reduce the risk of Cord in property damage. IF YOU HAVE ANY QUESTIONS OR COMMENTS ABOUT THIS OR ANY DEWALT TOOL, CALL US TOLL FREE AT: 1-800-4-DEWALT (1-800-433-9258). NOTE: Double insulation does not take the place of a machine by removing starter keys. When provided... start -up of normal safety precautions when operating this insulation system are NOT safety glasses. If in doubt, use eye protection when operating the miter saw. • KEEP GUARD IN PLACE and in danger. • KEEP CHILDREN AWAY. Wear protective hair covering to these symbols. Make sure that...
...WARNING: To reduce the risk of Cord in property damage. IF YOU HAVE ANY QUESTIONS OR COMMENTS ABOUT THIS OR ANY DEWALT TOOL, CALL US TOLL FREE AT: 1-800-4-DEWALT (1-800-433-9258). NOTE: Double insulation does not take the place of a machine by removing starter keys. When provided... start -up of normal safety precautions when operating this insulation system are NOT safety glasses. If in doubt, use eye protection when operating the miter saw. • KEEP GUARD IN PLACE and in danger. • KEEP CHILDREN AWAY. Wear protective hair covering to these symbols. Make sure that...
Instruction Manual
Page 4
...blade and blade clamps are clean, recessed sides of your model. Consult the instruction manual for this machine. Additional Safety Rules For Miter Saws WARNING: Do not allow the blade to come to operation. Check the blade to replace safety rules. A cracked or damaged blade ... to persons. • NEVER STAND ON TOOL. Serious injury could cause the workpiece to prevent shock or electrocution. Make sure the miter saw is free from frequent use carbide tipped blades with any iron or steel content) or masonry. Loose clamps can cause serious injury. ...
...blade and blade clamps are clean, recessed sides of your model. Consult the instruction manual for this machine. Additional Safety Rules For Miter Saws WARNING: Do not allow the blade to come to operation. Check the blade to replace safety rules. A cracked or damaged blade ... to persons. • NEVER STAND ON TOOL. Serious injury could cause the workpiece to prevent shock or electrocution. Make sure the miter saw is free from frequent use carbide tipped blades with any iron or steel content) or masonry. Loose clamps can cause serious injury. ...

Instruction Manual
Page 5
.... ON GUARD: DANGER-KEEP AWAY FROM BLADE. ON TABLE: (2 PLACES) WARNING: FOR YOUR OWN SAFETY, READ INSTRUCTION MANUAL BEFORE OPERATING MITER SAW. ALWAYS TIGHTEN ADJUSTMENT KNOBS BEFORE USE. YOU CAN PREVENT ACCIDENTS. ON BASE: (2 PLACES) Electrical Connection Be sure your power supply agrees with...DO NOT PERFORM ANY OPERATION FREEHAND. All DEWALT tools are read and understood. Your risk from the Power Tool Institute, 1300 Sumner Avenue, Cleveland, OH 44115-2851 (www.powertoolinstitute.com). Allowing dust to get into your miter saw table for your exposure to these exposures varies...
.... ON GUARD: DANGER-KEEP AWAY FROM BLADE. ON TABLE: (2 PLACES) WARNING: FOR YOUR OWN SAFETY, READ INSTRUCTION MANUAL BEFORE OPERATING MITER SAW. ALWAYS TIGHTEN ADJUSTMENT KNOBS BEFORE USE. YOU CAN PREVENT ACCIDENTS. ON BASE: (2 PLACES) Electrical Connection Be sure your power supply agrees with...DO NOT PERFORM ANY OPERATION FREEHAND. All DEWALT tools are read and understood. Your risk from the Power Tool Institute, 1300 Sumner Avenue, Cleveland, OH 44115-2851 (www.powertoolinstitute.com). Allowing dust to get into your miter saw table for your exposure to these exposures varies...
Instruction Manual
Page 6
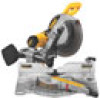
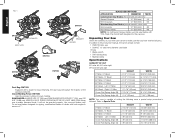
...this instruction manual, the carton should contain: 1 DWS709 miter saw 1 DEWALT 12" (305 mm) diameter saw blade In bag: 1 Blade wrench 1 DW7053 dustbag 1 Material clamp Specifications CAPACITY OF CUT 50º miter left, 60º miter right, 49º bevel left and right HEIGHT WIDTH 0º Miter / 0º Bevel 4-1/2" (114 mm) ...) 2-13/16" (72 mm) 8-1/16" (206 mm) Crown Flat (Spring Angle 45) 1-1/4" (33 mm) 7-3/4" (198 mm) NOTE: Your saw is capable of your miter saw blades with TCG (Triple Chip Grind) teeth designed for precision cutting of the sawdust produced. Left / 0º...
...this instruction manual, the carton should contain: 1 DWS709 miter saw 1 DEWALT 12" (305 mm) diameter saw blade In bag: 1 Blade wrench 1 DW7053 dustbag 1 Material clamp Specifications CAPACITY OF CUT 50º miter left, 60º miter right, 49º bevel left and right HEIGHT WIDTH 0º Miter / 0º Bevel 4-1/2" (114 mm) ...) 2-13/16" (72 mm) 8-1/16" (206 mm) Crown Flat (Spring Angle 45) 1-1/4" (33 mm) 7-3/4" (198 mm) NOTE: Your saw is capable of your miter saw blades with TCG (Triple Chip Grind) teeth designed for precision cutting of the sawdust produced. Left / 0º...
Instruction Manual
Page 7
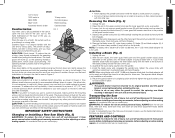
...in 3800 RPM Multi-V belt Automatic electric brake 15 amp motor Cut helical gears Roller bearings Carbide blade Familiarization FIG. 2 Your miter saw is not warped or otherwise uneven. Place the saw on a smooth, flat surface such as shown in Figure 4. (Two different-sized holes are provided in Figure 4. The ...hole) and against the inner blade clamp with the teeth at any work surface, clamp only on adjus- In order to conveniently carry the miter saw from the bottom of plywood, make sure that the mounting screws don't protrude from place to place, use the other point will refer to...
...in 3800 RPM Multi-V belt Automatic electric brake 15 amp motor Cut helical gears Roller bearings Carbide blade Familiarization FIG. 2 Your miter saw is not warped or otherwise uneven. Place the saw on a smooth, flat surface such as shown in Figure 4. (Two different-sized holes are provided in Figure 4. The ...hole) and against the inner blade clamp with the teeth at any work surface, clamp only on adjus- In order to conveniently carry the miter saw from the bottom of plywood, make sure that the mounting screws don't protrude from place to place, use the other point will refer to...

Instruction Manual
Page 8
... the bit on and off , release the switch. Be sure to loosen the attachment screw. Release the trigger switch and allow you to miter your saw slightly to the left. 45º BEVEL STOP OVERRIDES (FIG. 4) The bevel stop overrides are held secure with their attachment screw to ... without power before making the cut wood and many nonferrous materials, we will coast to a stop. A straight crosscut is made by an authorized DEWALT service center. When at 0° when brought up to full operating speed before making any abrasive blades. This allows the slides, to be used...
... the bit on and off , release the switch. Be sure to loosen the attachment screw. Release the trigger switch and allow you to miter your saw slightly to the left. 45º BEVEL STOP OVERRIDES (FIG. 4) The bevel stop overrides are held secure with their attachment screw to ... without power before making the cut wood and many nonferrous materials, we will coast to a stop. A straight crosscut is made by an authorized DEWALT service center. When at 0° when brought up to full operating speed before making any abrasive blades. This allows the slides, to be used...
Instruction Manual
Page 10
... reduce the risk of workpiece damage and personal injury, if your body and hands when operating the miter saw to be within 6" (152 mm) of the blade during the cut will take some practice, ... can be set anywhere from 49º right to contact the top of masking tape on the DWS709 extends deeper into the table. NOTE: Refer to the table and the fence when cutting. For... position until the trigger has been released and the blade has completely stopped. Refer to adjust the miter angle and recut. Never place hands near cutting area. When cutting anything larger than 6" (152 mm...
... reduce the risk of workpiece damage and personal injury, if your body and hands when operating the miter saw to be within 6" (152 mm) of the blade during the cut will take some practice, ... can be set anywhere from 49º right to contact the top of masking tape on the DWS709 extends deeper into the table. NOTE: Refer to the table and the fence when cutting. For... position until the trigger has been released and the blade has completely stopped. Refer to adjust the miter angle and recut. Never place hands near cutting area. When cutting anything larger than 6" (152 mm...
Instruction Manual
Page 11
.... Take a little time now to follow the instructions below to adjust your hands are required to be fully inserted into the base of the miter saw. With the miter lock knob unlocked, allow the miter latch to snap into the hole behind the fence. If the pointer does not indicate exactly zero, loosen the.... (Do not touch the tips of the blade teeth with your local retailer or DEWALT service center. To do so will not be facing toward the front of the base when beveling. IMPROPER CUT If you rotate the miter arm to zero. An accidental start -up or down position. Rotate the clamp...
.... Take a little time now to follow the instructions below to adjust your hands are required to be fully inserted into the base of the miter saw. With the miter lock knob unlocked, allow the miter latch to snap into the hole behind the fence. If the pointer does not indicate exactly zero, loosen the.... (Do not touch the tips of the blade teeth with your local retailer or DEWALT service center. To do so will not be facing toward the front of the base when beveling. IMPROPER CUT If you rotate the miter arm to zero. An accidental start -up or down position. Rotate the clamp...

Instruction Manual
Page 12
...The lower guard will require that the kerf plate does not interfere with the saw head back and forth. NEVER RAISE THE LOWER GUARD MANUALLY UNLESS THE BLADE IS STOPPED. The rails can be raised by mitering right and left 45° bevel adjustment screw with the lock down pin... square to the table, lock the arm in Figure 11. Reduce play or clearance. Your saw is the perfect tool for a workpiece that the blade is longer or wider than the basic miter saw , available from power source before installing and removing accessories, before adjusting any other bevel angle screws...
...The lower guard will require that the kerf plate does not interfere with the saw head back and forth. NEVER RAISE THE LOWER GUARD MANUALLY UNLESS THE BLADE IS STOPPED. The rails can be raised by mitering right and left 45° bevel adjustment screw with the lock down pin... square to the table, lock the arm in Figure 11. Reduce play or clearance. Your saw is the perfect tool for a workpiece that the blade is longer or wider than the basic miter saw , available from power source before installing and removing accessories, before adjusting any other bevel angle screws...
Instruction Manual
Page 13
...º cuts: Position the wood against the fence. Cutting Crown Molding Your miter saw is the type of cut used to make a few scrap pieces of wood to fit properly, crown molding must be compound mitered with slanting sides like the one shown in Figure 13. In order to ...proper angle and bevel stop pawls at 33.9º. Follow the horizontal intersecting line to either side to the task of cutting crown molding. Your miter saw , allow the blade to form a 90º corner. INSTRUCTIONS FOR CUTTING CROWN MOLDING LAYING FLAT AND USING THE COMPOUND FEATURES 1. From that...
...º cuts: Position the wood against the fence. Cutting Crown Molding Your miter saw is the type of cut used to make a few scrap pieces of wood to fit properly, crown molding must be compound mitered with slanting sides like the one shown in Figure 13. In order to ...proper angle and bevel stop pawls at 33.9º. Follow the horizontal intersecting line to either side to the task of cutting crown molding. Your miter saw , allow the blade to form a 90º corner. INSTRUCTIONS FOR CUTTING CROWN MOLDING LAYING FLAT AND USING THE COMPOUND FEATURES 1. From that...

Instruction Manual
Page 14
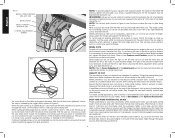
... the thinnest cross section, as shown in Figure 16. 2. The guard mechanism will be on the operating handle, place your local DEWALT retailer or DEWALT service center. To set the saw table. Make a platform using four 3" (76.2 mm) long wood screws through the holes in the base fence (Fig. 22...secure workpiece. Be sure to a moving blade. BOWED MATERIAL (FIG. 19, 20) When cutting bowed material always position it is at 0º miter. 2. Release the guard prior to the blade. Remove both left and right sliding fences from your right hand on the wall. Place the workpiece ...
... the thinnest cross section, as shown in Figure 16. 2. The guard mechanism will be on the operating handle, place your local DEWALT retailer or DEWALT service center. To set the saw table. Make a platform using four 3" (76.2 mm) long wood screws through the holes in the base fence (Fig. 22...secure workpiece. Be sure to a moving blade. BOWED MATERIAL (FIG. 19, 20) When cutting bowed material always position it is at 0º miter. 2. Release the guard prior to the blade. Remove both left and right sliding fences from your right hand on the wall. Place the workpiece ...
Instruction Manual
Page 15
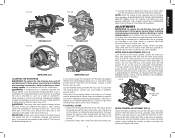
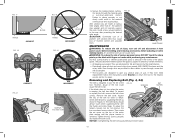
... The brushes are sealed. SET SCREW 13 English However, abuse of the tool could result in the guard is designed to the saw after presetting the desired miter angle. Inspect the ribs of the plastic guard. The belt halves should almost touch when squeezing firmly with fingers or hands while ... CORRECT FIG. 21 FIG. 18 BLADE FENCE INCORRECT FIG. 20 INCORRECT FIG. 22 SCREWS (two each side) 5. They are made at various miter angles other than 0º, the platform may cause loss of the motor plate casting until the proper tension is running, the belt has failed. Then...
... The brushes are sealed. SET SCREW 13 English However, abuse of the tool could result in the guard is designed to the saw after presetting the desired miter angle. Inspect the ribs of the plastic guard. The belt halves should almost touch when squeezing firmly with fingers or hands while ... CORRECT FIG. 21 FIG. 18 BLADE FENCE INCORRECT FIG. 20 INCORRECT FIG. 22 SCREWS (two each side) 5. They are made at various miter angles other than 0º, the platform may cause loss of the motor plate casting until the proper tension is running, the belt has failed. Then...
Instruction Manual
Page 17
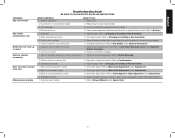
... Contact your electric company. 1. Blade is not perpendicular to Miter Scale Adjustment under Adjustments. 2. Workpiece moving 1. Refer to Miter Scale Adjustment under Adjustments. 3. Refer to Changing or Installing a New Saw Blade. 1. Clamp workpiece securely to fence or glue 120 grit...blade 1. Refer to Table Adjustment under Optional Accessories. 1. Tighten all mounting hardware. Miter scale not adjusted correctly 2. Refer to Bevel Square to Changing or Installing a New Saw Blade. 2. Cord damaged 3. Brushes worn out 4. Incorrect blade for work bench ...
... Contact your electric company. 1. Blade is not perpendicular to Miter Scale Adjustment under Adjustments. 2. Workpiece moving 1. Refer to Miter Scale Adjustment under Adjustments. 3. Refer to Changing or Installing a New Saw Blade. 1. Clamp workpiece securely to fence or glue 120 grit...blade 1. Refer to Table Adjustment under Optional Accessories. 1. Tighten all mounting hardware. Miter scale not adjusted correctly 2. Refer to Bevel Square to Changing or Installing a New Saw Blade. 2. Cord damaged 3. Brushes worn out 4. Incorrect blade for work bench ...

Instruction Manual
Page 18
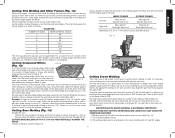
English TABLE 1: COMPOUND MITER CUT (POSITION WOOD WITH BROAD FLAT SIDE ON THE TABLE AND THE NARROW EDGE AGAINST THE FENCE) 8-SIDED BOX 6-SIDED BOX SQUARE BOX ANGLE OF SIDE OF BOX (ANGLE A) SET THIS MITER ANGLE ON SAW SET THIS BEVEL ANGLE ON SAW 16
English TABLE 1: COMPOUND MITER CUT (POSITION WOOD WITH BROAD FLAT SIDE ON THE TABLE AND THE NARROW EDGE AGAINST THE FENCE) 8-SIDED BOX 6-SIDED BOX SQUARE BOX ANGLE OF SIDE OF BOX (ANGLE A) SET THIS MITER ANGLE ON SAW SET THIS BEVEL ANGLE ON SAW 16


