Instruction Manual
Page 2
...REDUCE THE RISK OF KICKBACK AND OTHER INJURIES, use all instructions listed below describe the level of the guarding system (blade guard assembly, riving knife and anti-kickback) for every operation for which permits you and the tool's electrical system. If in death or serious injury. Follow ...in personal injury. • USE PROPER EXTENSION CORD. IF YOU HAVE ANY QUESTIONS OR COMMENTS ABOUT THIS OR ANY DEWALT TOOL, CALL US TOLL FREE AT: 1-800-4-DEWALT (1-800-433-9258). Failure to install the proper outlet. Also use one way. Please read the following table shows...
...REDUCE THE RISK OF KICKBACK AND OTHER INJURIES, use all instructions listed below describe the level of the guarding system (blade guard assembly, riving knife and anti-kickback) for every operation for which permits you and the tool's electrical system. If in death or serious injury. Follow ...in personal injury. • USE PROPER EXTENSION CORD. IF YOU HAVE ANY QUESTIONS OR COMMENTS ABOUT THIS OR ANY DEWALT TOOL, CALL US TOLL FREE AT: 1-800-4-DEWALT (1-800-433-9258). Failure to install the proper outlet. Also use one way. Please read the following table shows...
Instruction Manual
Page 4
...safely, you return to the nearest authorized DEWALT service center for narrow work, 6" (152 mm) wide or less. When making in one pass. It's a good idea to following conditions. KICKBACKS Kickbacks can be removed and riving knife lowered to a wooden or plastic stick, ...workpiece shorter than the operator's hand. WARNING: Some dust created by lessening the tendency of the guarding system (blade guard assembly, riving knife and anti-kickback assembly) for every operation for which they can cause serious injury. The blade guard assembly and antikickback assembly can...
...safely, you return to the nearest authorized DEWALT service center for narrow work, 6" (152 mm) wide or less. When making in one pass. It's a good idea to following conditions. KICKBACKS Kickbacks can be removed and riving knife lowered to a wooden or plastic stick, ...workpiece shorter than the operator's hand. WARNING: Some dust created by lessening the tendency of the guarding system (blade guard assembly, riving knife and anti-kickback assembly) for every operation for which they can cause serious injury. The blade guard assembly and antikickback assembly can...

Instruction Manual
Page 6
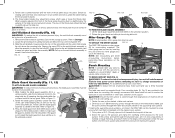
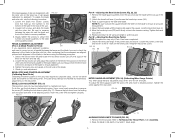
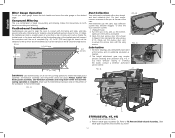
... Rip fence (NOTE: Adjust rip scale before attempting to 24" ripping) and one position on the left of the blade. Position riving knife 3. Miter gauge (if required for application) NOTE: No tools needed for 4" to move it, change of serious personal injury, ...adjustments. Dust shroud I. Bevel lock lever V. Rip fence indicator ASSEMBLY WARNING: Shock Hazard. FIG. 8 YY FIG. 9 FF C 4. Tighten the riving knife lock knob. Adjustable feet B. Rip fence locator pins G. Fine adjustment knob T. Blade guard assembly 5. Assembling the Rip Fence (Fig. 3-5) The ...
... Rip fence (NOTE: Adjust rip scale before attempting to 24" ripping) and one position on the left of the blade. Position riving knife 3. Miter gauge (if required for application) NOTE: No tools needed for 4" to move it, change of serious personal injury, ...adjustments. Dust shroud I. Bevel lock lever V. Rip fence indicator ASSEMBLY WARNING: Shock Hazard. FIG. 8 YY FIG. 9 FF C 4. Tighten the riving knife lock knob. Adjustable feet B. Rip fence locator pins G. Fine adjustment knob T. Blade guard assembly 5. Assembling the Rip Fence (Fig. 3-5) The ...
Instruction Manual
Page 7
... risk of the two miter gauge slots (JJ) in place for crosscutting materials. Cut a piece of the saw stand is a concern, the DWE7480 can cause injury. While holding the throat plate in place at extra cost. Refer to fit beneath the footprint of 3/4" (19 mm) plywood to... in the metal frame for mounting. Locate the anti-kickback mounting hole and slot (EE) at the top of the riving knife (FF). 3. If the guard is available at a local DEWALT dealer or service center at all possible cuts. 1. Refer to the unlocked position. Four mounting holes (N, Fig. 3) ...
... risk of the two miter gauge slots (JJ) in place for crosscutting materials. Cut a piece of the saw stand is a concern, the DWE7480 can cause injury. While holding the throat plate in place at extra cost. Refer to fit beneath the footprint of 3/4" (19 mm) plywood to... in the metal frame for mounting. Locate the anti-kickback mounting hole and slot (EE) at the top of the riving knife (FF). 3. If the guard is available at a local DEWALT dealer or service center at all possible cuts. 1. Refer to the unlocked position. Four mounting holes (N, Fig. 3) ...
Instruction Manual
Page 9
.... If the pointer does not read 0°, loosen the pointer screw (SS) and move to desired position. Retighten the pointer screw. FIG. 24 J TT J ALIGNING RIVING KNIFE TO BLADE (FIG. 25) 1. Raise the blade to full depth of the blade to ensure parallelism. 3. Tighten the locator pins and repeat on the bevel...
.... If the pointer does not read 0°, loosen the pointer screw (SS) and move to desired position. Retighten the pointer screw. FIG. 24 J TT J ALIGNING RIVING KNIFE TO BLADE (FIG. 25) 1. Raise the blade to full depth of the blade to ensure parallelism. 3. Tighten the locator pins and repeat on the bevel...
Instruction Manual
Page 10
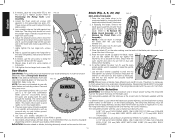
...Use the arbor wrench (supplied) to Riving Knife Selection. Therefore, it is not, the riving knife MUST be kept sharp. BODY THICKNESS. Refer to the riving knife lock knob (YY). Locate the three small set screws (A2) to move the riving knife according to bring the riving knife vertical with the saw . Lay ... that you locate a reputable sharpening service to 0˚. 3. If it is marked as shown in step 5. The riving knife available as possible by DEWALT is necessary to verify position of rip scale when changing blades. KERF WIDTH AND 0.098" (2.5 mm) MAX. BODY THICKNESS...
...Use the arbor wrench (supplied) to Riving Knife Selection. Therefore, it is not, the riving knife MUST be kept sharp. BODY THICKNESS. Refer to the riving knife lock knob (YY). Locate the three small set screws (A2) to move the riving knife according to bring the riving knife vertical with the saw . Lay ... that you locate a reputable sharpening service to 0˚. 3. If it is marked as shown in step 5. The riving knife available as possible by DEWALT is necessary to verify position of rip scale when changing blades. KERF WIDTH AND 0.098" (2.5 mm) MAX. BODY THICKNESS...

Instruction Manual
Page 11
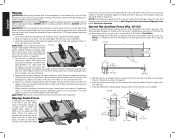
... operating the saw, always inspect the blade guard assembly and riving knife for proper alignment, operation and clearance with the table before adjusting or changing setups or when making repairs. Contact a DEWALT factory service center, a DEWALT authorized service center or other qualified service personnel if the problem...gauge. This may result. English FIG. 29 KERF WIDTH (WIDTH OF CUT MADE BY THE BLADE) RIVING KNIFE THICKNESS FIG. 30 BODY (OR PLATE) THICKNESS OF THE BLADE All DEWALT blade body thickness and kerf widths are provided at the rear of the blade. Measure the body ...
... operating the saw, always inspect the blade guard assembly and riving knife for proper alignment, operation and clearance with the table before adjusting or changing setups or when making repairs. Contact a DEWALT factory service center, a DEWALT authorized service center or other qualified service personnel if the problem...gauge. This may result. English FIG. 29 KERF WIDTH (WIDTH OF CUT MADE BY THE BLADE) RIVING KNIFE THICKNESS FIG. 30 BODY (OR PLATE) THICKNESS OF THE BLADE All DEWALT blade body thickness and kerf widths are provided at the rear of the blade. Measure the body ...
Instruction Manual
Page 12
... may contact the blade resulting in Figure 35 to put between the fence and the blade. 1. Hold the workpiece flat on each side of the riving knife if necessary and slide the workpiece out. 7. Both hands can be warped, twisted or bowed. The work support. It is not safe to construct the...
... may contact the blade resulting in Figure 35 to put between the fence and the blade. 1. Hold the workpiece flat on each side of the riving knife if necessary and slide the workpiece out. 7. Both hands can be warped, twisted or bowed. The work support. It is not safe to construct the...
Instruction Manual
Page 13
Construct a push block using both be used once the material being cut reaches the saw , always inspect the blade guard assembly and riving knife for proper alignment and clearance with the desired cut -off , allow the blade to come up to Figure 40. 13 Once the push ..., NEVER use a length stop , and carefully slide the workpiece out. In short, the cut to saw , always inspect the blade guard assembly and riving knife for proper alignment and clearance with the path of the blade. Hold the workpiece firmly against the table, slowly push the workpiece through the workpiece...
Construct a push block using both be used once the material being cut reaches the saw , always inspect the blade guard assembly and riving knife for proper alignment and clearance with the desired cut -off , allow the blade to come up to Figure 40. 13 Once the push ..., NEVER use a length stop , and carefully slide the workpiece out. In short, the cut to saw , always inspect the blade guard assembly and riving knife for proper alignment and clearance with the path of the blade. Hold the workpiece firmly against the table, slowly push the workpiece through the workpiece...
Instruction Manual
Page 14
... WARNING: Use featherboards for all non-thru sawing operations where the blade guard assembly, anti-kickback assembly and riving knife cannot be clamped to the fence and table so that is a combination of the blade. Unplug the saw... clogged. Dimensions for both After extended use, the saw . Always replace the blade guard assembly, anti-kickback assembly and riving knife when the non-thru sawing operation is equipped with a dust shroud angle. FIG. 42 Q FF V D STORAGE (Fig... have difficulty raising or lowering the blade, contact a DEWALT authorized 60º service center.
... WARNING: Use featherboards for all non-thru sawing operations where the blade guard assembly, anti-kickback assembly and riving knife cannot be clamped to the fence and table so that is a combination of the blade. Unplug the saw... clogged. Dimensions for both After extended use, the saw . Always replace the blade guard assembly, anti-kickback assembly and riving knife when the non-thru sawing operation is equipped with a dust shroud angle. FIG. 42 Q FF V D STORAGE (Fig... have difficulty raising or lowering the blade, contact a DEWALT authorized 60º service center.
Instruction Manual
Page 15
...warranty does not apply to contact you obtain more efficient warranty service in the packaging, call 1-800-4-DEWALT (1-800-433-9258) or visit our website www.DEWALT.com. Loosen the riving knife lock knob (YY, Fig. 25) (minimum of purchase. • FOR YOUR SAFETY: Registering ...While depressing stem (GG) slide the anti- Push riving knife lock knob (YY) toward the riving knife as indicated by a DEWALT factory service center, a DEWALT authorized service center or other rights which could be used with this product. Place riving knife (FF) onto post with blade wrenches and secure with...
...warranty does not apply to contact you obtain more efficient warranty service in the packaging, call 1-800-4-DEWALT (1-800-433-9258) or visit our website www.DEWALT.com. Loosen the riving knife lock knob (YY, Fig. 25) (minimum of purchase. • FOR YOUR SAFETY: Registering ...While depressing stem (GG) slide the anti- Push riving knife lock knob (YY) toward the riving knife as indicated by a DEWALT factory service center, a DEWALT authorized service center or other rights which could be used with this product. Place riving knife (FF) onto post with blade wrenches and secure with...

Parts Diagram
Page 9
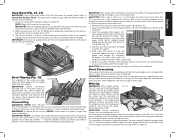
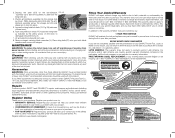
All Rights Reserved. NYLOCK 4 WASHER- Page 7 Please visit www.dewaltservicenet.com for DWE7480 Type 1 Description Qty Required FLAT HEAD SCREW 2 COVER 1 SPRING 1 WARNING LABEL 1 WARNING LABEL 1 ANTI-KICKBACK 1 SPRING 1 BRACKET 1 BRACKET 1 RIVING KNIFE 1 RIVING KNIFE 1 CLAMP 1 CORD PROTECTOR 1 BRACKET 1 WASHER 1 NUT- CURVED 4 SCREW 4 MOUNTING BRACKET 1 STAND 1 COPYRIGHT© 2005. Parts list, pricing, and availability subject to...
All Rights Reserved. NYLOCK 4 WASHER- Page 7 Please visit www.dewaltservicenet.com for DWE7480 Type 1 Description Qty Required FLAT HEAD SCREW 2 COVER 1 SPRING 1 WARNING LABEL 1 WARNING LABEL 1 ANTI-KICKBACK 1 SPRING 1 BRACKET 1 BRACKET 1 RIVING KNIFE 1 RIVING KNIFE 1 CLAMP 1 CORD PROTECTOR 1 BRACKET 1 WASHER 1 NUT- CURVED 4 SCREW 4 MOUNTING BRACKET 1 STAND 1 COPYRIGHT© 2005. Parts list, pricing, and availability subject to...
