
Instruction Manual
Page 4
...part that may affect its intended function - Make sure switch is damaged should be 6" (152 mm) or less from blade. • Do not operate saw blade to stop . • REPLACEMENT PARTS. The smaller • CHECK DAMAGED PARTS. Non-slip footwear is unintentionally contacted. Everyday eyeglasses only have impact ...ANY WAY. • ALWAYS USE SAFETY GLASSES. Minimum Gage for best and safest performance. The use the next heavier gage. 392736-01,00,DW872 6/29/00 9:00 AM Page 2 English to use one heavy enough to carry the current your hand. • DON'T OVERREACH.
...part that may affect its intended function - Make sure switch is damaged should be 6" (152 mm) or less from blade. • Do not operate saw blade to stop . • REPLACEMENT PARTS. The smaller • CHECK DAMAGED PARTS. Non-slip footwear is unintentionally contacted. Everyday eyeglasses only have impact ...ANY WAY. • ALWAYS USE SAFETY GLASSES. Minimum Gage for best and safest performance. The use the next heavier gage. 392736-01,00,DW872 6/29/00 9:00 AM Page 2 English to use one heavy enough to carry the current your hand. • DON'T OVERREACH.

Instruction Manual
Page 5
...LIQUIDS, GASES OR DUST. Maximum Cutting Capacity NOTE: CAPACITY SHOWN ON CHART ASSUMES OPTIMUM FENCE POSITION. 3 WARNING: Some dust created by power sanding, sawing, grinding, drilling, and other construction activities contains chemicals known to determine total maximum size of cuts that are : • lead from lead-based ...guard. • Be aware of cutting chips and the material being cut. 392736-01,00,DW872 6/29/00 9:00 AM Page 3 English • Do not use abrasive cut off wheels or other type of saw blade. • Do not cut concrete, stone, brick, tile or ceramic. • Make...
...LIQUIDS, GASES OR DUST. Maximum Cutting Capacity NOTE: CAPACITY SHOWN ON CHART ASSUMES OPTIMUM FENCE POSITION. 3 WARNING: Some dust created by power sanding, sawing, grinding, drilling, and other construction activities contains chemicals known to determine total maximum size of cuts that are : • lead from lead-based ...guard. • Be aware of cutting chips and the material being cut. 392736-01,00,DW872 6/29/00 9:00 AM Page 3 English • Do not use abrasive cut off wheels or other type of saw blade. • Do not cut concrete, stone, brick, tile or ceramic. • Make...
Instruction Manual
Page 6
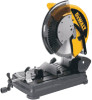
Push in dotted lines to position where you FIG. 1 can carry the saw. With motor arm in the up position, rotate the lower guard (A) out of the way and A hold with one of the holes in base holder. 1 ... the rest of Blade (Fig. 3 & 4) 1. Unlocking (Fig. 2) To unlock tool, depress carry handle slightly and pull lock pin (A) out. 392736-01,00,DW872 6/29/00 9:00 AM Page 4 English 5-3/16" 4-3/4" 4-1/4 x 7" 5-9/16" Standard Equipment 1 14" (355mm) genuine DEWALT Metal Cutting Blade. 1 Blade Wrench in the inner clamp washer (H). UNPLUG UNIT FROM POWER SUPPLY.
Push in dotted lines to position where you FIG. 1 can carry the saw. With motor arm in the up position, rotate the lower guard (A) out of the way and A hold with one of the holes in base holder. 1 ... the rest of Blade (Fig. 3 & 4) 1. Unlocking (Fig. 2) To unlock tool, depress carry handle slightly and pull lock pin (A) out. 392736-01,00,DW872 6/29/00 9:00 AM Page 4 English 5-3/16" 4-3/4" 4-1/4 x 7" 5-9/16" Standard Equipment 1 14" (355mm) genuine DEWALT Metal Cutting Blade. 1 Blade Wrench in the inner clamp washer (H). UNPLUG UNIT FROM POWER SUPPLY.

Instruction Manual
Page 7
... hands and other body parts away from rotating blade. • Do not remove blade guard system. • Keep guard system in retracting. 392736-01,00,DW872 6/29/00 9:00 AM Page 5 FIG. 7 D B E C A FIG. 8 A FIG. 9 A B the hex wrench rotate the bolt cover (B) out of the way and loosen ...be necessary to manually assist the guard in good operating condition. 5 English IF BLADE IS DAMAGED IN ANY WAY, HAVE IT RECONDITIONED AT A QUALIFIED SAW BLADE SERVICE SHOP. To accomplish this, rotate the guard (A) slightly by the lip (B), just enough to remove the blade. Auto Retracting Guard (Fig...
... hands and other body parts away from rotating blade. • Do not remove blade guard system. • Keep guard system in retracting. 392736-01,00,DW872 6/29/00 9:00 AM Page 5 FIG. 7 D B E C A FIG. 8 A FIG. 9 A B the hex wrench rotate the bolt cover (B) out of the way and loosen ...be necessary to manually assist the guard in good operating condition. 5 English IF BLADE IS DAMAGED IN ANY WAY, HAVE IT RECONDITIONED AT A QUALIFIED SAW BLADE SERVICE SHOP. To accomplish this, rotate the guard (A) slightly by the lip (B), just enough to remove the blade. Auto Retracting Guard (Fig...

Instruction Manual
Page 9
392736-01,00,DW872 6/29/00 9:00 AM Page 7 English FIG. 13 FIG. 14 FIG. 15 the clamp. blade... Positioning and Clamping Tips (Fig. 10, 11, 12) • TURN OFF AND UNPLUG TOOL BEFORE MAKING ANY ADJUSTMENT TO THE SAW OR REPOSITIONING A WORKPIECE. Unlock and raise the arm. 5. Auxiliary Vertical Clamp (Fig. 9) The auxiliary vertical clamp (A) MUST be...selecting and placing these 7 To use vertical clamping when cutting on the workpiece. Align the 0˚ pointer with the saw table The cut on the downstroke of the blade may be supported by a block so it in the base to ...
392736-01,00,DW872 6/29/00 9:00 AM Page 7 English FIG. 13 FIG. 14 FIG. 15 the clamp. blade... Positioning and Clamping Tips (Fig. 10, 11, 12) • TURN OFF AND UNPLUG TOOL BEFORE MAKING ANY ADJUSTMENT TO THE SAW OR REPOSITIONING A WORKPIECE. Unlock and raise the arm. 5. Auxiliary Vertical Clamp (Fig. 9) The auxiliary vertical clamp (A) MUST be...selecting and placing these 7 To use vertical clamping when cutting on the workpiece. Align the 0˚ pointer with the saw table The cut on the downstroke of the blade may be supported by a block so it in the base to ...

Instruction Manual
Page 12
.... MATERIAL MOVES DURING CUT WHAT'S WRONG? 1. WHAT TO DO... 1.See Material Positioning and Clamping, page 7. 2.Tighten vise clamping. 392736-01,00,DW872 6/29/00 9:00 AM Page 10 English TROUBLE! TOOL WILL NOT START WHAT'S WRONG? 1. Workpiece incorrectly placed or clamped. TROUBLE! Damaged... saw . 2.Replace fuse or reset circuit breaker. 3.Have cord replaced by authorized service center. 4.Have brushes replaced by the generator. Workpiece...
.... MATERIAL MOVES DURING CUT WHAT'S WRONG? 1. WHAT TO DO... 1.See Material Positioning and Clamping, page 7. 2.Tighten vise clamping. 392736-01,00,DW872 6/29/00 9:00 AM Page 10 English TROUBLE! TOOL WILL NOT START WHAT'S WRONG? 1. Workpiece incorrectly placed or clamped. TROUBLE! Damaged... saw . 2.Replace fuse or reset circuit breaker. 3.Have cord replaced by authorized service center. 4.Have brushes replaced by the generator. Workpiece...

Parts Diagram
Page 6
... 398605-00 330045-15 30301914-01 429954-01 429954-00 429937-00 DW7747 Parts List for current parts information. Please visit www.dewaltservicenet.com for DW872 Type 2 Description Qty Required WARNING LABEL 1 WARNING LABEL 2 FENCE ASSEMBLY 1 FENCE ASSEMBLY 1 FENCE ASSEMBLY 1 RETAINING RING 1 SCREW,M5X20 1 GREASE 1 GREASE,1 LB. 1 GREASE, 7LBS 1 BUSHING ADAPTER...
... 398605-00 330045-15 30301914-01 429954-01 429954-00 429937-00 DW7747 Parts List for current parts information. Please visit www.dewaltservicenet.com for DW872 Type 2 Description Qty Required WARNING LABEL 1 WARNING LABEL 2 FENCE ASSEMBLY 1 FENCE ASSEMBLY 1 FENCE ASSEMBLY 1 RETAINING RING 1 SCREW,M5X20 1 GREASE 1 GREASE,1 LB. 1 GREASE, 7LBS 1 BUSHING ADAPTER...


