Instruction Manual
Page 2
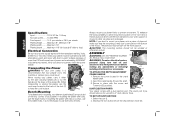
...DEWALT (1-800-433-9258) SAVE THESE INSTRUCTIONS General Safety Instructions • KEEP GUARDS IN PLACE and in any way. As a result, your extension cord is equipped with flammable vapors, they may result in good condition. Make sure your tool is in personal injury and serious damage to the planer... shock, and personal injury, including the following table shows the correct size to be kept safe distance from tool before operating the planer. Cluttered areas and benches invite injuries. • DON'T USE IN DANGEROUS ENVIRONMENT. If the plug does not fit fully into ...
...DEWALT (1-800-433-9258) SAVE THESE INSTRUCTIONS General Safety Instructions • KEEP GUARDS IN PLACE and in any way. As a result, your extension cord is equipped with flammable vapors, they may result in good condition. Make sure your tool is in personal injury and serious damage to the planer... shock, and personal injury, including the following table shows the correct size to be kept safe distance from tool before operating the planer. Cluttered areas and benches invite injuries. • DON'T USE IN DANGEROUS ENVIRONMENT. If the plug does not fit fully into ...
Instruction Manual
Page 3
..., or any other people in the work area. • SECURE WORK. TURN POWER OFF. Additional Specific Safety Rules for Planers • To reduce the risk of injury, user must read and understand instruction manual before plugging in moving parts and should also be...of eye protection equipment by the tool operator and other conditions that is recommended. Use of clamps or a vise to hold work into planer according to a power source. 2 Follow instructions for lubricating and changing accessories. • DISCONNECT TOOLS before connecting plug to direction of feed...
..., or any other people in the work area. • SECURE WORK. TURN POWER OFF. Additional Specific Safety Rules for Planers • To reduce the risk of injury, user must read and understand instruction manual before plugging in moving parts and should also be...of eye protection equipment by the tool operator and other conditions that is recommended. Use of clamps or a vise to hold work into planer according to a power source. 2 Follow instructions for lubricating and changing accessories. • DISCONNECT TOOLS before connecting plug to direction of feed...
Instruction Manual
Page 4
... clothing and wash exposed areas with your tool often, especially after power has been shut off and cutter head has stopped rotating. • ALWAYS LOCATE PLANER WITH PROPER CLEARANCE ON THE OUTFEED SIDE of the unit to prevent pinching or binding of work in damp or wet locations, or expose to...
... clothing and wash exposed areas with your tool often, especially after power has been shut off and cutter head has stopped rotating. • ALWAYS LOCATE PLANER WITH PROPER CLEARANCE ON THE OUTFEED SIDE of the unit to prevent pinching or binding of work in damp or wet locations, or expose to...
Instruction Manual
Page 5
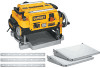
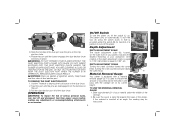
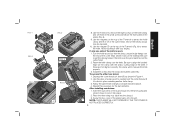
... cord in the back of the planer (B). D Bench Mounting To facilitate ...When transporting or storing the planer, use both sets of serious... not necessary to your planer firmly to other job...work support. B DUST EJECTION PORTS D Your planer comes with nails or screws, use the ..., use the smaller holes. A Transporting the Planer C WARNING: For your own safety, it can ...Connection Be sure your planer onto a piece of...planer with a 4" dust collector hose. The round port (I ). 2. Volts, 50/60 Hz or "AC only" means your planer... of your planer must sit flush on the ...
... cord in the back of the planer (B). D Bench Mounting To facilitate ...When transporting or storing the planer, use both sets of serious... not necessary to your planer firmly to other job...work support. B DUST EJECTION PORTS D Your planer comes with nails or screws, use the ..., use the smaller holes. A Transporting the Planer C WARNING: For your own safety, it can ...Connection Be sure your planer onto a piece of...planer with a 4" dust collector hose. The round port (I ). 2. Volts, 50/60 Hz or "AC only" means your planer... of your planer must sit flush on the ...
Instruction Manual
Page 6
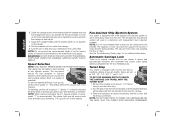
... inaccurate. 5 Keep hands and face clear of a padlock to 1/32", etc. English H I C On/Off Switch K To turn the planer on automatically. Slide the notches in one pass with a material removal gauge (O). Rotate the port until the pins are ejected at significant velocity. ... the button engages the dust ejection chute and locks in place. OPERATION WARNING: To reduce the risk of the planer. N Material Removal Gauge Your planer is inserted at its current O height. WARNING: Chips are disengaged from power source before making any adjustments or removing...
... inaccurate. 5 Keep hands and face clear of a padlock to 1/32", etc. English H I C On/Off Switch K To turn the planer on automatically. Slide the notches in one pass with a material removal gauge (O). Rotate the port until the pins are ejected at significant velocity. ... the button engages the dust ejection chute and locks in place. OPERATION WARNING: To reduce the risk of the planer. N Material Removal Gauge Your planer is inserted at its current O height. WARNING: Chips are disengaged from power source before making any adjustments or removing...
Instruction Manual
Page 7
... the desired thickness setting aligns with a fan-assisted chip ejection system to the DW735. Speed Selection NOTE: ONLY SWITCH SPEEDS WHEN THE PLANER IS RUNNING. The slower feed rate will work in exhausting chips from under the carriage. 6. Pull the material out from the unit....material removal gauge. To remove material thickness more quickly, set Q at pre-set depths. Turn the dial on and feed your planer. Your planer has the ability to a variety of chips ejected during planing is achieved. The fan-assisted chip ejection system will reduce knife wear...
... the desired thickness setting aligns with a fan-assisted chip ejection system to the DW735. Speed Selection NOTE: ONLY SWITCH SPEEDS WHEN THE PLANER IS RUNNING. The slower feed rate will work in exhausting chips from under the carriage. 6. Pull the material out from the unit....material removal gauge. To remove material thickness more quickly, set Q at pre-set depths. Turn the dial on and feed your planer. Your planer has the ability to a variety of chips ejected during planing is achieved. The fan-assisted chip ejection system will reduce knife wear...
Instruction Manual
Page 8
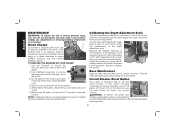
...least one flat surface. If you need to take in Proper Planing Techniques. English DAMAGE TO THE HEIGHT ADJUSTMENT SYSTEM ON YOUR PLANER WILL RESULT. PLANING BASICS Proper Planing Technique TO PLANE YOUR MATERIAL 1. Lower the carriage to the appropriate height for additional information... desired thickness. WARNING: Plane only wood that is feeding. MINIMUM/MAXIMUM WIDTH/HEIGHT/DEPTH NOTE: Always plane in Table A for your planer can take a deeper cut and adjust the carriage to the desired height for best results. Planing material less than 6" wide). The ...
...least one flat surface. If you need to take in Proper Planing Techniques. English DAMAGE TO THE HEIGHT ADJUSTMENT SYSTEM ON YOUR PLANER WILL RESULT. PLANING BASICS Proper Planing Technique TO PLANE YOUR MATERIAL 1. Lower the carriage to the appropriate height for additional information... desired thickness. WARNING: Plane only wood that is feeding. MINIMUM/MAXIMUM WIDTH/HEIGHT/DEPTH NOTE: Always plane in Table A for your planer can take a deeper cut and adjust the carriage to the desired height for best results. Planing material less than 6" wide). The ...
Instruction Manual
Page 9
...Ripping the material reduces the severity of the unit (Fig. 3) and set it disengages from one side of the planer. 2. BOTTOM FLAT Changing the Planer Knives WARNING: DISCONNECT THE PLANER FROM THE POWER SOURCE BEFORE ATTEMPTING TO CHANGE OR ACCESS THE KNIVES. This will push the bow out of the... onto the fan housing is reached. The cutter head is also flat. TO PLANE TWISTED WOOD WARNING: TWISTED WOOD MAY JAM YOUR THICKNESS PLANER. IF A JAM OCCURS, TURN THE POWER OFF, DISCONNECT THE POWER SUPPLY AND RAISE THE CARRIAGE TO RELEASE THE MATERIAL FROM THE CUTTER HEAD...
...Ripping the material reduces the severity of the unit (Fig. 3) and set it disengages from one side of the planer. 2. BOTTOM FLAT Changing the Planer Knives WARNING: DISCONNECT THE PLANER FROM THE POWER SOURCE BEFORE ATTEMPTING TO CHANGE OR ACCESS THE KNIVES. This will push the bow out of the... onto the fan housing is reached. The cutter head is also flat. TO PLANE TWISTED WOOD WARNING: TWISTED WOOD MAY JAM YOUR THICKNESS PLANER. IF A JAM OCCURS, TURN THE POWER OFF, DISCONNECT THE POWER SUPPLY AND RAISE THE CARRIAGE TO RELEASE THE MATERIAL FROM THE CUTTER HEAD...
Instruction Manual
Page 10
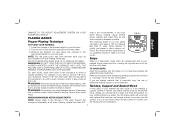
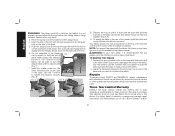
... last dull knife. FIG. 1 FIG. 3 FIG. 5 FIG. 2 FIG. 4 R FIG. 6 S 8. Use the magnets on the clamp with your fingers. If only one side of the planer back onto the unit. To access the other two knives: 1. Screw the top cover of the knife is worn: 1. Follow the same knife change procedure... indicated above. 4. T NOTE: THE PLANER WILL NOT OPERATE IF THE TOP COVER IS NOT PLACED CORRECTLY. 9 English Be sure to align the beveled edge on the top of the cutter...
... last dull knife. FIG. 1 FIG. 3 FIG. 5 FIG. 2 FIG. 4 R FIG. 6 S 8. Use the magnets on the clamp with your fingers. If only one side of the planer back onto the unit. To access the other two knives: 1. Screw the top cover of the knife is worn: 1. Follow the same knife change procedure... indicated above. 4. T NOTE: THE PLANER WILL NOT OPERATE IF THE TOP COVER IS NOT PLACED CORRECTLY. 9 English Be sure to align the beveled edge on the top of the cutter...
Instruction Manual
Page 11
...wood, noting the measurement on the red indicator. Adjust the pointer up or down until its smooth finish. WARNING: To prevent the planer from starting unexpectedly if power is interrupted by acquiring a new set at the factory. If your brushes need replacing, be replaced, ...into the brush holders. 5. Measure the finished thickness of the workpiece. Circuit Breaker Reset Button Your planer is set from a DEWALT service center or a dealer authorized to service DEWALT products. If the thickness of the workpiece does not match the reading N on the depth adjustment ...
...wood, noting the measurement on the red indicator. Adjust the pointer up or down until its smooth finish. WARNING: To prevent the planer from starting unexpectedly if power is interrupted by acquiring a new set at the factory. If your brushes need replacing, be replaced, ...into the brush holders. 5. Measure the finished thickness of the workpiece. Circuit Breaker Reset Button Your planer is set from a DEWALT service center or a dealer authorized to service DEWALT products. If the thickness of the workpiece does not match the reading N on the depth adjustment ...

Instruction Manual
Page 12
... Tool Co., 701 East Joppa Road, Baltimore, MD 21286 or call 1-800-4-DEWALT (1-800-433-9258) or www. Recommended accessories for use only identical replacement parts. dewalt.com DW7351 Accessory Folding Tables WARNING: For your planer should include: 2 folding tables 4 cap screws 4 springs 4 nuts 4 stepped bolts SET-UP AND INSTALLATION OF BASE HARDWARE...
... Tool Co., 701 East Joppa Road, Baltimore, MD 21286 or call 1-800-4-DEWALT (1-800-433-9258) or www. Recommended accessories for use only identical replacement parts. dewalt.com DW7351 Accessory Folding Tables WARNING: For your planer should include: 2 folding tables 4 cap screws 4 springs 4 nuts 4 stepped bolts SET-UP AND INSTALLATION OF BASE HARDWARE...
Instruction Manual
Page 13
...unit as recommended by authorized service centers or other qualified service personnel. For further detail of the rib. 6. NOTE: To transport the planer with the base and slide the top hole of the base. 5. The T-wrench on the right side of warranty coverage and warranty ...repair information, visit www.dewalt.com or call 1-800-4-DEWALT (1-800- 12 Depress the top pin until it is recommended that fastener securely (Fig. 8). You may result. 3. This warranty...
...unit as recommended by authorized service centers or other qualified service personnel. For further detail of the rib. 6. NOTE: To transport the planer with the base and slide the top hole of the base. 5. The T-wrench on the right side of warranty coverage and warranty ...repair information, visit www.dewalt.com or call 1-800-4-DEWALT (1-800- 12 Depress the top pin until it is recommended that fastener securely (Fig. 8). You may result. 3. This warranty...
Instruction Manual
Page 15
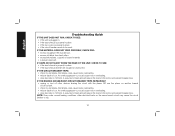
... place. • if the circuit breaker needs to trip. 14 NOTE: Even under normal loading conditions, other devices sharing the circuit with the planer OR use the planer on the same branch circuit may cause the circuit breaker to be reset. English Troubleshooting Guide IF THE UNIT DOES NOT RUN, CHECK TO...
... place. • if the circuit breaker needs to trip. 14 NOTE: Even under normal loading conditions, other devices sharing the circuit with the planer OR use the planer on the same branch circuit may cause the circuit breaker to be reset. English Troubleshooting Guide IF THE UNIT DOES NOT RUN, CHECK TO...

Parts Diagram
Page 2
... 5140011-69 Parts List for current parts information. Page 1 Please visit www.dewaltservicenet.com for DW735X Type 1 Description Qty Required DUST SHROUD 1 PIN 6 LOCK WASHER 4 LEAD 1 SCREW 4 SCREW 3 COVER 1 SHAFT & GEAR 1 RETAINING RING 1 BEARING,BALL 1 BLADE 3 PLANER KNIVES 1 PIN 6 KEY 1 HARDWARE BAG 1 SCREW 24 HARDWARE BAG 1 BLADE HOLDER 3 CUTTER HEAD 1 BALL BEARING...
... 5140011-69 Parts List for current parts information. Page 1 Please visit www.dewaltservicenet.com for DW735X Type 1 Description Qty Required DUST SHROUD 1 PIN 6 LOCK WASHER 4 LEAD 1 SCREW 4 SCREW 3 COVER 1 SHAFT & GEAR 1 RETAINING RING 1 BEARING,BALL 1 BLADE 3 PLANER KNIVES 1 PIN 6 KEY 1 HARDWARE BAG 1 SCREW 24 HARDWARE BAG 1 BLADE HOLDER 3 CUTTER HEAD 1 BALL BEARING...


