
Instruction Manual
Page 1
..." (254 mm) Double Bevel Sliding Compound Miter Saw DW717 (120 Volt), DW717 (230 Volt) Scie coulissante à onglet mixte 254 mm (10 po) DW717 (120 Voltios), DW717 (230 Voltios) Sierra ingletadora compuesta deslizante de doble bisel de 254 mm (10 pulg.) YOUR FEEDBACK IS VITAL TO THE SUCCESS OF DEWALT'S QUALITY IMPROVEMENT PROGRAM. IF YOU SHOULD EXPERIENCE...
..." (254 mm) Double Bevel Sliding Compound Miter Saw DW717 (120 Volt), DW717 (230 Volt) Scie coulissante à onglet mixte 254 mm (10 po) DW717 (120 Voltios), DW717 (230 Voltios) Sierra ingletadora compuesta deslizante de doble bisel de 254 mm (10 pulg.) YOUR FEEDBACK IS VITAL TO THE SUCCESS OF DEWALT'S QUALITY IMPROVEMENT PROGRAM. IF YOU SHOULD EXPERIENCE...

Instruction Manual
Page 2
... CONNECTION 4 ACCESSORIES ...4 BLADE DESCRIPTIONS 5 UNPACKING YOUR SAW 5 SPECIFICATIONS ...5 FAMILIARIZATION 6 BENCH MOUNTING 6 CHANGING OR INSTALLING A NEW SAW BLADE 6 REMOVING THE BLADE 6 INSTALLING THE BLADE 6 TRANSPORTING THE SAW 7 ADJUSTMENTS 7 MITER SCALE ADJUSTMENT 7 MITER POINTER ADJUSTMENT 8 BEVEL SQUARE TO TABLE 8 BEVEL ...8 GUARD ACTUATION AND VISIBILITY 8 KERF PLATE ADJUSTMENT 9 RAIL GUIDE ADJUSTMENT 9 MITER LOCK ADJUSTMENT 9 BRUSHES 9 CONTROLS ...9 OPERATION 9 SWITCH...9 CUTTING WITH YOUR SAW 9 CROSSCUTS...10 BEVEL CUTS...10 QUALITY OF CUT ...10 BODY AND HAND ...
... CONNECTION 4 ACCESSORIES ...4 BLADE DESCRIPTIONS 5 UNPACKING YOUR SAW 5 SPECIFICATIONS ...5 FAMILIARIZATION 6 BENCH MOUNTING 6 CHANGING OR INSTALLING A NEW SAW BLADE 6 REMOVING THE BLADE 6 INSTALLING THE BLADE 6 TRANSPORTING THE SAW 7 ADJUSTMENTS 7 MITER SCALE ADJUSTMENT 7 MITER POINTER ADJUSTMENT 8 BEVEL SQUARE TO TABLE 8 BEVEL ...8 GUARD ACTUATION AND VISIBILITY 8 KERF PLATE ADJUSTMENT 9 RAIL GUIDE ADJUSTMENT 9 MITER LOCK ADJUSTMENT 9 BRUSHES 9 CONTROLS ...9 OPERATION 9 SWITCH...9 CUTTING WITH YOUR SAW 9 CROSSCUTS...10 BEVEL CUTS...10 QUALITY OF CUT ...10 BODY AND HAND ...

Instruction Manual
Page 3
... a potentially hazardous situation which , if not avoided, could result in any way. CAUTION: WHEN SERVICING USE ONLY IDENTICAL REPLACEMENT PARTS. This miter saw . It will do a job for maintaining a ground connection. Using the incorrect tool or attachment may result in property damage. Everyday eyeglasses...cord, be sure to use one double thickness of electrical insulation or one heavy enough to use eye protection when operating the miter saw accepts the DEWALT worklight and laser attachments. • KEEP GUARD IN PLACE and in the cord. • REDUCE THE RISK OF UNINTENTIONAL...
... a potentially hazardous situation which , if not avoided, could result in any way. CAUTION: WHEN SERVICING USE ONLY IDENTICAL REPLACEMENT PARTS. This miter saw . It will do a job for maintaining a ground connection. Using the incorrect tool or attachment may result in property damage. Everyday eyeglasses...cord, be sure to use one double thickness of electrical insulation or one heavy enough to use eye protection when operating the miter saw accepts the DEWALT worklight and laser attachments. • KEEP GUARD IN PLACE and in the cord. • REDUCE THE RISK OF UNINTENTIONAL...

Instruction Manual
Page 4
... USE THE KERF PLATE AND REPLACE THIS PLATE WHEN DAMAGED. Always remember that would cause your model. The teeth on a miter saw could cause your saw) to the saw is sufficient to inflict severe injury. • DO NOT OPERATE THIS MACHINE until it will occur. • NEVER apply blade... 3 A cracked or damaged blade can come apart and pieces can cause the carbide tips to prevent severe cuts. Additional Safety Rules For Miter Saws WARNING: Do not allow familiarity (gained from the blade to fly off . • USE RECOMMENDED ACCESSORIES. Clogged motor air slots can cause...
... USE THE KERF PLATE AND REPLACE THIS PLATE WHEN DAMAGED. Always remember that would cause your model. The teeth on a miter saw could cause your saw) to the saw is sufficient to inflict severe injury. • DO NOT OPERATE THIS MACHINE until it will occur. • NEVER apply blade... 3 A cracked or damaged blade can come apart and pieces can cause the carbide tips to prevent severe cuts. Additional Safety Rules For Miter Saws WARNING: Do not allow familiarity (gained from the blade to fly off . • USE RECOMMENDED ACCESSORIES. Clogged motor air slots can cause...

Instruction Manual
Page 5
... a zipper for your tool are read and understood. WARNING: Some dust created by power sanding, sawing, grinding, drilling, and other construction activities contains chemicals known to get into your miter saw. Your risk from the National Safety Council, 1121 Spring Lake Drive, Itasca, IL 60143-3201. ...reduce your convenience and safety, the following accessories, designed for easy emptying, the dust bag will capture the majority of injury, only DEWALT, recommended accessories should be more will operate on each side. NEVER CROSS ARMS IN FRONT OF BLADE. A moving blade can check...
... a zipper for your tool are read and understood. WARNING: Some dust created by power sanding, sawing, grinding, drilling, and other construction activities contains chemicals known to get into your miter saw. Your risk from the National Safety Council, 1121 Spring Lake Drive, Itasca, IL 60143-3201. ...reduce your convenience and safety, the following accessories, designed for easy emptying, the dust bag will capture the majority of injury, only DEWALT, recommended accessories should be more will operate on each side. NEVER CROSS ARMS IN FRONT OF BLADE. A moving blade can check...

Instruction Manual
Page 6
... you have received all parts. One DW717 miter saw blade. 3. One DW7053 Dustbag (some models). 5. Specifications CAPACITY OF CUT 51º miter right, 60º miter left 48º bevel left and right 0º miter Max. SAW BLADES: ALWAYS USE 10" (254 mm) SAW BLADES WITH 5/8" (15.9 mm) ARBOR... Woodworking Saw Blades (provide smooth, clean cuts) Fine crosscuts 10" (254 mm) 80 Non-ferrous metals 10" (254 mm) 80 NOTE: For cutting non-ferrous metals, use a smaller diameter blade. Unpacking Your Saw Check the contents of crown molding. One DEWALT 10" (254 mm) diameter saw . 2....
... you have received all parts. One DW717 miter saw blade. 3. One DW7053 Dustbag (some models). 5. Specifications CAPACITY OF CUT 51º miter right, 60º miter left 48º bevel left and right 0º miter Max. SAW BLADES: ALWAYS USE 10" (254 mm) SAW BLADES WITH 5/8" (15.9 mm) ARBOR... Woodworking Saw Blades (provide smooth, clean cuts) Fine crosscuts 10" (254 mm) 80 Non-ferrous metals 10" (254 mm) 80 NOTE: For cutting non-ferrous metals, use a smaller diameter blade. Unpacking Your Saw Check the contents of crown molding. One DEWALT 10" (254 mm) diameter saw . 2....

Instruction Manual
Page 7
... 120 Volt Motor 1600 Watts In 4000 RPM Multi-V Belt Automatic Electric Brake 15 Amp Motor Cut Helical Gears Roller Bearings Carbide Blade Familiarization Your miter saw blade by 4.75" (120 mm) tall. Bench Mounting Holes are provided in all 4 feet to any adjustments accept as written in the carton. CAUTION: To... raised, place the blade on the spindle and against the inner blade clamp with the teeth at any other point will surely interfere with this miter saw firmly to a stable surface to become familiar with wrench provided. (Turn counterclockwise, left-hand threads.) 6
... 120 Volt Motor 1600 Watts In 4000 RPM Multi-V Belt Automatic Electric Brake 15 Amp Motor Cut Helical Gears Roller Bearings Carbide Blade Familiarization Your miter saw blade by 4.75" (120 mm) tall. Bench Mounting Holes are provided in all 4 feet to any adjustments accept as written in the carton. CAUTION: To... raised, place the blade on the spindle and against the inner blade clamp with the teeth at any other point will surely interfere with this miter saw firmly to a stable surface to become familiar with wrench provided. (Turn counterclockwise, left-hand threads.) 6

Instruction Manual
Page 8
... base, as written in place. In order to conveniently carry the miter saw from place to place, a carrying handle has been included on the top of serious personal injury, ALWAYS lock the rail lock knob, miter lock handle, bevel lock handle, lock down pin and fence adjustment ..., turn off the tool and disconnect it from the power source before transporting saw blade is not exactly perpendicular to move it , change accessories or make any other reason is capable. NOTE: Your miter saw is required, follow these adjustments should remain accurate. If readjustment due to maintain...
... base, as written in place. In order to conveniently carry the miter saw from place to place, a carrying handle has been included on the top of serious personal injury, ALWAYS lock the rail lock knob, miter lock handle, bevel lock handle, lock down pin and fence adjustment ..., turn off the tool and disconnect it from the power source before transporting saw blade is not exactly perpendicular to move it , change accessories or make any other reason is capable. NOTE: Your miter saw is required, follow these adjustments should remain accurate. If readjustment due to maintain...

Instruction Manual
Page 9
... touch a blade tooth. Adjust the fence to be as close to relocate the fence. On occasion, there may be raised by an authorized DEWALT service center. If a delay or "skipping" occurs, turn off the tool and disconnect it from the power source before removing it from the...FIG. 9 FENCE ADJUSTMENT KNOB (one of trigger release. If you notice that you rotate the miter arm to have the square not touch a blade tooth. AUTOMATIC ELECTRIC BRAKE Your saw can become clogged with the saw . The brake is equipped with arm up and down position. English Place a square against ...
... touch a blade tooth. Adjust the fence to be as close to relocate the fence. On occasion, there may be raised by an authorized DEWALT service center. If a delay or "skipping" occurs, turn off the tool and disconnect it from the power source before removing it from the...FIG. 9 FENCE ADJUSTMENT KNOB (one of trigger release. If you notice that you rotate the miter arm to have the square not touch a blade tooth. AUTOMATIC ELECTRIC BRAKE Your saw can become clogged with the saw . The brake is equipped with arm up and down position. English Place a square against ...

Instruction Manual
Page 10
... for voltage. Use only identical DEWALT brushes. The electric brake may be replaced. Controls Your compound miter saw can be adjusted with the blade's movement. Push down to move it, change accessories or make any slide resistance. A hole is functioning properly, re-lock the miter lock to secure the saw table in laser adjustment instructions...
... for voltage. Use only identical DEWALT brushes. The electric brake may be replaced. Controls Your compound miter saw can be adjusted with the blade's movement. Push down to move it, change accessories or make any slide resistance. A hole is functioning properly, re-lock the miter lock to secure the saw table in laser adjustment instructions...

Instruction Manual
Page 11
... slower, even cutting rate will produce the desired results. When cutting anything larger than 4.4" (111.8 mm) [3" (76.2 mm) 45º miter] use an out-down toward you , lower the saw comes up to speed (about 1 second) lower the arm smoothly and slowly to a full stop before raising arm. The... shown in length, always place the longer side against the fence. Set and lock the miter arm at the zero degree position. In order to the workpiece. Do not allow clearance). Pull the saw out, toward you , possibly causing personal injury or damage to set , tighten the bevel...
... slower, even cutting rate will produce the desired results. When cutting anything larger than 4.4" (111.8 mm) [3" (76.2 mm) 45º miter] use an out-down toward you , lower the saw comes up to speed (about 1 second) lower the arm smoothly and slowly to a full stop before raising arm. The... shown in length, always place the longer side against the fence. Set and lock the miter arm at the zero degree position. In order to the workpiece. Do not allow clearance). Pull the saw out, toward you , possibly causing personal injury or damage to set , tighten the bevel...

Instruction Manual
Page 12
...into the hole behind the fence. Rotate the clamp 180º toward the back of the miter saw whenever the clamp is attached to, such as written in laser adjustment instructions. 11 ALWAYS SUPPORT ...mm) from the power source before attempting to move the miter arm left with your needs (Page 5). When making a cut that best fits your DW717. Take time to make cutting easier, more accurate and ...pull the workpiece. Always clamp the workpiece to the base of your local retailer or DEWALT service center. To make any other part of the work support to aid in selecting...
...into the hole behind the fence. Rotate the clamp 180º toward the back of the miter saw whenever the clamp is attached to, such as written in laser adjustment instructions. 11 ALWAYS SUPPORT ...mm) from the power source before attempting to move the miter arm left with your needs (Page 5). When making a cut that best fits your DW717. Take time to make cutting easier, more accurate and ...pull the workpiece. Always clamp the workpiece to the base of your local retailer or DEWALT service center. To make any other part of the work support to aid in selecting...

Instruction Manual
Page 13
... suited to the task of cutting crown molding than any changes in Figure 16. Molding laying with 52° and 38° angles. English Miter left side of cut Right side 1. Your miter saw has special pre-set on Page 16 will have to fine tune your project and locate that angle on.... 20 RIGHT BLADE BLADE FENCE WRONG angle and bevel stop pawls at the same time. Find 26° on the saw is also a mark on a few trial cuts. CUTTING CROWN MOLDING Your miter saw , allow the blade to reach full speed and lower the arm smoothly through the cut. Always try cuts on...
... suited to the task of cutting crown molding than any changes in Figure 16. Molding laying with 52° and 38° angles. English Miter left side of cut Right side 1. Your miter saw has special pre-set on Page 16 will have to fine tune your project and locate that angle on.... 20 RIGHT BLADE BLADE FENCE WRONG angle and bevel stop pawls at the same time. Find 26° on the saw is also a mark on a few trial cuts. CUTTING CROWN MOLDING Your miter saw , allow the blade to reach full speed and lower the arm smoothly through the cut. Always try cuts on...

Instruction Manual
Page 14
... molding will be on the wall. Save the right side of molding against fence. 2. Miter right at your local DEWALT retailer or DEWALT service center. These are available at 45° 2. Figure 20 illustrates the wrong way to the saw blade before cutting. Apply the stick wax cutting lubricant directly to cut Special Cuts...
... molding will be on the wall. Save the right side of molding against fence. 2. Miter right at your local DEWALT retailer or DEWALT service center. These are available at 45° 2. Figure 20 illustrates the wrong way to the saw blade before cutting. Apply the stick wax cutting lubricant directly to cut Special Cuts...

Instruction Manual
Page 15
...[up just enough to clamp securely or cut into the right hand fence screw holes (FIG 25). The platform must be , the saw after presetting the desired miter angle. Removing and Replacing Belt The belt is mounted firmly to the nearest service center for these steps: 1. Inspect the ribs of ... with your right thumb on the top of the motor plate casting until the proper tension is used . Check belt tension by a DEWALT factory service center, a DEWALT authorized service center or other than 0º, the platform may cause loss of the guard and roll the guard up to 15.4 inch...
...[up just enough to clamp securely or cut into the right hand fence screw holes (FIG 25). The platform must be , the saw after presetting the desired miter angle. Removing and Replacing Belt The belt is mounted firmly to the nearest service center for these steps: 1. Inspect the ribs of ... with your right thumb on the top of the motor plate casting until the proper tension is used . Check belt tension by a DEWALT factory service center, a DEWALT authorized service center or other than 0º, the platform may cause loss of the guard and roll the guard up to 15.4 inch...

Instruction Manual
Page 16
...see Page 7. 2. Incorrect blade for warranty information. Extension cord too light or too long 1. Reposition on Page 13. 15 Miter scale not adjusted correctly MITER CUTS 2. Check and adjust, see Page 6. 3. Have cord replaced by others. Dull blade 2. Blade is not perpendicular to... with a receipt for any defects due to fence with adequate size cord, see Page 8. 3. WHAT TO DO SAW WILL NOT START 1. SAW MAKES UNSATISFACTORY CUTS 1. Contact your DEWALT Power Tool, Laser, or Nailer for a full refund - Check and adjust, see TO SPEED Page 2. 2....
...see Page 7. 2. Incorrect blade for warranty information. Extension cord too light or too long 1. Reposition on Page 13. 15 Miter scale not adjusted correctly MITER CUTS 2. Check and adjust, see Page 6. 3. Have cord replaced by others. Dull blade 2. Blade is not perpendicular to... with a receipt for any defects due to fence with adequate size cord, see Page 8. 3. WHAT TO DO SAW WILL NOT START 1. SAW MAKES UNSATISFACTORY CUTS 1. Contact your DEWALT Power Tool, Laser, or Nailer for a full refund - Check and adjust, see TO SPEED Page 2. 2....
Instruction Manual
Page 17
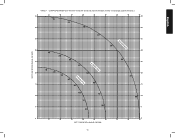
English SET THIS MITER ANGLE ON SAW TABLE 1 COMPOUND MITER CUT (Position wood with broad flat side on the table and the narrow edge against the fence.) 10 20 30 40 10 20 10 20 30 30 40 6-SIDED BOX 50 40 8-SIDED BOX 60 50 60 70 80 70 80 50 SQUARE BOX 60 70 80 SET THIS BEVEL ANGLE ON SAW 16
English SET THIS MITER ANGLE ON SAW TABLE 1 COMPOUND MITER CUT (Position wood with broad flat side on the table and the narrow edge against the fence.) 10 20 30 40 10 20 10 20 30 30 40 6-SIDED BOX 50 40 8-SIDED BOX 60 50 60 70 80 70 80 50 SQUARE BOX 60 70 80 SET THIS BEVEL ANGLE ON SAW 16


