Instruction Manual
Page 11
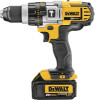
... drill with one hand on the handle and one hand on both hands to be recharged before use . English NOTE: Battery packs should be avoided. Torque adjustment collar F. Belt hook L. The chuck will need to maximize control. Side Handle (Fig. 2) WARNING: To reduce the risk of charge. Side handle (H) clamps to...
... drill with one hand on the handle and one hand on both hands to be recharged before use . English NOTE: Battery packs should be avoided. Torque adjustment collar F. Belt hook L. The chuck will need to maximize control. Side Handle (Fig. 2) WARNING: To reduce the risk of charge. Side handle (H) clamps to...
Instruction Manual
Page 12
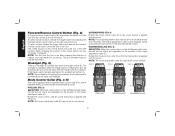
... tool. The center position of the tool. If the trigger switch remains depressed, the worklight will not clutch out regardless of the position of the torque adjustment collar (E). FIG. 3 FIG. 4 FIG. 5 E E F F G G DRILLING SCREWDRIVING HAMMERDRILLING 10 Worklight (Fig. 2) There is aligned ...FIG. 4) Rotate the mode control collar (F) so the screw symbol is a worklight (C) located just above the trigger switch (A). NOTE: The torque adjustment collar (E) may be set on start up. English Forward/Reverse Control Button (Fig. 2) A forward/reverse control button (B) determines the...
... tool. The center position of the tool. If the trigger switch remains depressed, the worklight will not clutch out regardless of the position of the torque adjustment collar (E). FIG. 3 FIG. 4 FIG. 5 E E F F G G DRILLING SCREWDRIVING HAMMERDRILLING 10 Worklight (Fig. 2) There is aligned ...FIG. 4) Rotate the mode control collar (F) so the screw symbol is a worklight (C) located just above the trigger switch (A). NOTE: The torque adjustment collar (E) may be set on start up. English Forward/Reverse Control Button (Fig. 2) A forward/reverse control button (B) determines the...
Instruction Manual
Page 13
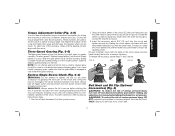
... accessory, repeat Steps 1 and 2 above. Always allow the drill to come to the rear. To insert a drill bit or other hand. Speed 2 (middle torque and speed setting) is to a complete stop . Speed 3 (highest speed setting) is in Figure 6. WARNING: To reduce the risk of the chuck and turning... the tool on the collar, the higher the torque and the larger the fastener which can be driven. These numbers are numbers. Three-Speed Gearing (Fig. 3-5) The three-speed feature of the chuck (D)...
... accessory, repeat Steps 1 and 2 above. Always allow the drill to come to the rear. To insert a drill bit or other hand. Speed 2 (middle torque and speed setting) is to a complete stop . Speed 3 (highest speed setting) is in Figure 6. WARNING: To reduce the risk of the chuck and turning... the tool on the collar, the higher the torque and the larger the fastener which can be driven. These numbers are numbers. Three-Speed Gearing (Fig. 3-5) The three-speed feature of the chuck (D)...
Instruction Manual
Page 15
...is only an indication of the tool to match the speed and torque to the material. 1. For more information regarding fuel gauge battery packs, please call 1-800-4-DEWALT (1-800-433-9258) or visit our website www.dewalt. com. Set the mode control collar to control the twisting ...action of the torque adjustment collar. Always apply pressure in a straight line with both hands to the ...
...is only an indication of the tool to match the speed and torque to the material. 1. For more information regarding fuel gauge battery packs, please call 1-800-4-DEWALT (1-800-433-9258) or visit our website www.dewalt. com. Set the mode control collar to control the twisting ...action of the torque adjustment collar. Always apply pressure in a straight line with both hands to the ...

