Instruction Manual
Page 4
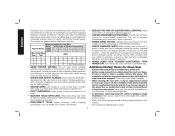
... STAND ON TOOL. If this manual. • Do not remove wheel guards or base. 2 Follow instructions for Chop Saw • Always wear proper eye and respiratory protection. • Before using more than using your chop saw periodically following table shows the correct size to contain long hair. English resulting in Feet (meters) Ampere Rating...
... STAND ON TOOL. If this manual. • Do not remove wheel guards or base. 2 Follow instructions for Chop Saw • Always wear proper eye and respiratory protection. • Before using more than using your chop saw periodically following table shows the correct size to contain long hair. English resulting in Feet (meters) Ampere Rating...

Instruction Manual
Page 5
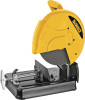
... cordset and materials away from face and body. Direct particles away from spark deflector. This will get into your Heavy-Duty 14" (355mm) Chop Saw: FOR SAFE OPERATION READ THE INSTRUCTION MANUAL. WARNING: Use of this type of workpiece. Other aids such as spring, bar, or C-clamps ... materials. • Do not use , noise from this tool. • NEVER CUT MAGNESIUM WITH THIS TOOL. • Use chop saw in a well-ventilated area. • Turn chop saw off before handling. • Do not attempt to cut off parts to cool before removing any pieces from these chemicals are: &#...
... cordset and materials away from face and body. Direct particles away from spark deflector. This will get into your Heavy-Duty 14" (355mm) Chop Saw: FOR SAFE OPERATION READ THE INSTRUCTION MANUAL. WARNING: Use of this type of workpiece. Other aids such as spring, bar, or C-clamps ... materials. • Do not use , noise from this tool. • NEVER CUT MAGNESIUM WITH THIS TOOL. • Use chop saw in a well-ventilated area. • Turn chop saw off before handling. • Do not attempt to cut off parts to cool before removing any pieces from these chemicals are: &#...

Instruction Manual
Page 10
... fully lowered. The approximate length of the screws should be supported on when replacing with the 8mm hex wrench (G). Do not make any adjustment while chop saw rests on stable, level, non-skid surface to prevent unexpected movement when operating. Loosen the bolt (T) counterclockwise in the base and through the work surface...
... fully lowered. The approximate length of the screws should be supported on when replacing with the 8mm hex wrench (G). Do not make any adjustment while chop saw rests on stable, level, non-skid surface to prevent unexpected movement when operating. Loosen the bolt (T) counterclockwise in the base and through the work surface...
Instruction Manual
Page 11
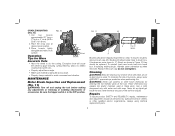
... material is in these parts. Brushes (X) should be regularly inspected for More Accurate Cuts • Allow the wheel to .2" (6mm) as when removed. Place the chop saw at least once a week. If brushes are worn down to do not overtighten). Replace the brush cap (do the cutting. Cut two boards approximately 20...
... material is in these parts. Brushes (X) should be regularly inspected for More Accurate Cuts • Allow the wheel to .2" (6mm) as when removed. Place the chop saw at least once a week. If brushes are worn down to do not overtighten). Replace the brush cap (do the cutting. Cut two boards approximately 20...

Instruction Manual
Page 12
... Three Year Limited Warranty DEWALT will maintain the tool and replace worn parts caused by DEWALT, have sufficient lubrication packed in locating your DEWALT Power Tool, Laser, or Nailer for three years from the date of the chop saw. In addition to the warranty, DEWALT tools are covered by our...: 1 YEAR FREE SERVICE DEWALT will repair, without charge...
... Three Year Limited Warranty DEWALT will maintain the tool and replace worn parts caused by DEWALT, have sufficient lubrication packed in locating your DEWALT Power Tool, Laser, or Nailer for three years from the date of the chop saw. In addition to the warranty, DEWALT tools are covered by our...: 1 YEAR FREE SERVICE DEWALT will repair, without charge...


