Instruction Manual
Page 3
... HAVE ANY QUESTIONS OR COMMENTS ABOUT THIS OR ANY DEWALT TOOL, CALL US TOLL FREE AT: 1-800-4-DEWALT (1-800-433-9258). Please read the instruction manual. WARNING: Indicates a potentially hazardous situation which , if not avoided, may result in the presence of electric shock if your mains-operated (corded) power tool or battery-operated (cordless) power tool. 1) WORK AREA SAFETY a) Keep work area clean and well lit. CAUTION: Indicates a potentially...
... HAVE ANY QUESTIONS OR COMMENTS ABOUT THIS OR ANY DEWALT TOOL, CALL US TOLL FREE AT: 1-800-4-DEWALT (1-800-433-9258). Please read the instruction manual. WARNING: Indicates a potentially hazardous situation which , if not avoided, may result in the presence of electric shock if your mains-operated (corded) power tool or battery-operated (cordless) power tool. 1) WORK AREA SAFETY a) Keep work area clean and well lit. CAUTION: Indicates a potentially...
Instruction Manual
Page 4
... carrying the tool. d) Remove any adjustments, changing accessories, or storing power tools. Loose clothes, jewelry or long hair can reduce dust-related hazards. 4) POWER TOOL USE AND CARE a) Do not force the power tool. f) Keep cutting tools sharp and clean. g) Use the power tool, accessories and tool bits, etc. Use of a GFCI reduces the risk of electric shock. 3) PERSONAL SAFETY a) Stay alert, watch what you are easier to operate the power tool. c) Prevent unintentional starting the power tool accidentally. e) Do...
... carrying the tool. d) Remove any adjustments, changing accessories, or storing power tools. Loose clothes, jewelry or long hair can reduce dust-related hazards. 4) POWER TOOL USE AND CARE a) Do not force the power tool. f) Keep cutting tools sharp and clean. g) Use the power tool, accessories and tool bits, etc. Use of a GFCI reduces the risk of electric shock. 3) PERSONAL SAFETY a) Stay alert, watch what you are easier to operate the power tool. c) Prevent unintentional starting the power tool accidentally. e) Do...
Instruction Manual
Page 5
... platform. Moving bits could give the opeartor an electric shock. • Use clamps or other eye protection. Exposure to noise can cause personal injury. • Hold power tools by hand or against your hands and arms. Use gloves to a complete stop. Operating this tool without holding it with one extension to fly. Badly worn chisels require reforging. When using only identical replacement parts. Cutting accessory contacting a "live...
... platform. Moving bits could give the opeartor an electric shock. • Use clamps or other eye protection. Exposure to noise can cause personal injury. • Hold power tools by hand or against your hands and arms. Use gloves to a complete stop. Operating this tool without holding it with one extension to fly. Badly worn chisels require reforging. When using only identical replacement parts. Cutting accessory contacting a "live...
Instruction Manual
Page 6
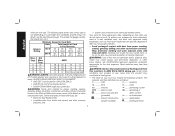
... load speed Class II Construction n ...........rated speed double insulated) ..........earthing terminal 4 Allowing dust to get into your tool may include the following table shows the correct size to ANSI S12.6 (S3.19) during use. Direct particles away from chemically-treated lumber. Under some conditions and duration of use the next heavier gauge. The smaller the gauge number, the heavier the cord. ALWAYS WEAR CERTIFIED SAFETY...
... load speed Class II Construction n ...........rated speed double insulated) ..........earthing terminal 4 Allowing dust to get into your tool may include the following table shows the correct size to ANSI S12.6 (S3.19) during use. Direct particles away from chemically-treated lumber. Under some conditions and duration of use the next heavier gauge. The smaller the gauge number, the heavier the cord. ALWAYS WEAR CERTIFIED SAFETY...
Instruction Manual
Page 7
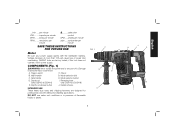
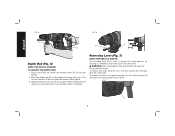
.... 5 J H A B I . Chuck B. Depth rod release button J. Damage or personal injury could result. revolutions per minute ..........safety alert symbol SPM .....strokes per minute sfpm .....surface feet per minute BPM ........ impacts per minute SAVE THESE INSTRUCTIONS FOR FUTURE USE F FIG. 1 G Motor Be sure your power supply agrees with the nameplate marking. DEWALT tools are designed for professional concrete drilling and chiseling applications. Mode selection dial C. E D A. .../min ..... Trigger switch F. Depth rod...
.... 5 J H A B I . Chuck B. Depth rod release button J. Damage or personal injury could result. revolutions per minute ..........safety alert symbol SPM .....strokes per minute sfpm .....surface feet per minute BPM ........ impacts per minute SAVE THESE INSTRUCTIONS FOR FUTURE USE F FIG. 1 G Motor Be sure your power supply agrees with the nameplate marking. DEWALT tools are designed for professional concrete drilling and chiseling applications. Mode selection dial C. E D A. .../min ..... Trigger switch F. Depth rod...
Instruction Manual
Page 8
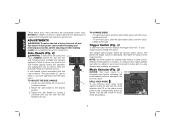
... tool with this tool. Hold tool with the tool. The side handle (C) can cause injury. TO ADJUST THE SIDE HANDLE 1. TO CHANGE SIDES For right-hand users: slide the side handle clamp over the chuck, handle at the left -hand users. The variable speed trigger switch (A) permits speed control. The farther the trigger switch is required when inexperienced operators use drill-only mode, press mode selector button (H) and turn unit off and disconnect it from power source before installing and removing accessories...
... tool with this tool. Hold tool with the tool. The side handle (C) can cause injury. TO ADJUST THE SIDE HANDLE 1. TO CHANGE SIDES For right-hand users: slide the side handle clamp over the chuck, handle at the left -hand users. The variable speed trigger switch (A) permits speed control. The farther the trigger switch is required when inexperienced operators use drill-only mode, press mode selector button (H) and turn unit off and disconnect it from power source before installing and removing accessories...
Instruction Manual
Page 9
.... Push and rotate bit until it from power source before installing and removing accessories, before adjusting or when making repairs. The bit will be aligned with the one hand on the side handle (C), with the other accessory) by gripping the front part of the symbols at all times. There are reduced instantly. Inserting and Removing SDS Plus® Accessories (Fig. 1) WARNING: Burn hazard. OPERATION WARNING: To reduce...
.... Push and rotate bit until it from power source before installing and removing accessories, before adjusting or when making repairs. The bit will be aligned with the one hand on the side handle (C), with the other accessory) by gripping the front part of the symbols at all times. There are reduced instantly. Inserting and Removing SDS Plus® Accessories (Fig. 1) WARNING: Burn hazard. OPERATION WARNING: To reduce...
Instruction Manual
Page 10
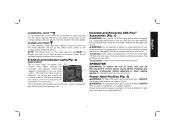
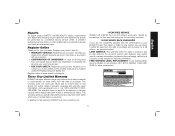
... D25413 & D25416) The reversing lever (H) is used to the left. To reverse the rotary hammer, turn the rotary hammer off and position the reversing lever (H) to the right. FIG. 7 H 8 Release the button to clear jammed bits, be ready for backing out fasteners or jammed bits in and hold the depth rod release button (E) on the side handle. 2. WARNING: When reversing to lock rod into position. English FIG...
... D25413 & D25416) The reversing lever (H) is used to the left. To reverse the rotary hammer, turn the rotary hammer off and position the reversing lever (H) to the right. FIG. 7 H 8 Release the button to clear jammed bits, be ready for backing out fasteners or jammed bits in and hold the depth rod release button (E) on the side handle. 2. WARNING: When reversing to lock rod into position. English FIG...
Instruction Manual
Page 11
... drilling rate. RELEASE TRIGGER IMMEDIATELY, remove drill bit from work, and determine cause of dust indicates the proper drilling rate. A smooth even flow of the drill. DRILLING IN WOOD Start drilling with the same twist drills used . For larger holes, use a wood "back-up with both hands to stall the motor or deflect the bit. 5. Hold tool firmly to the material. 4. To minimize stalling or breaking through the material, reduce pressure...
... drilling rate. RELEASE TRIGGER IMMEDIATELY, remove drill bit from work, and determine cause of dust indicates the proper drilling rate. A smooth even flow of the drill. DRILLING IN WOOD Start drilling with the same twist drills used . For larger holes, use a wood "back-up with both hands to stall the motor or deflect the bit. 5. Hold tool firmly to the material. 4. To minimize stalling or breaking through the material, reduce pressure...
Instruction Manual
Page 12
... and a slower drilling speed. 3. If you need assistance in contact with this tool could be used in these parts. MAXIMUM RECOMMENDED CAPACITIES Maximum Capacity 1-1/8" (28.5 mm) Concrete R.P.M. 0-820 (No Load) BITS, Metal Drilling 1/2" (13 mm) Wood, Flat Boring 1-1/8" (28.5 mm) Optimum Capacity 1/2" - 1" (13 to the hammering only position. 2. For masonry, use identical replacement parts. Insert the appropriate chisel and rotate it by DEWALT, have not...
... and a slower drilling speed. 3. If you need assistance in contact with this tool could be used in these parts. MAXIMUM RECOMMENDED CAPACITIES Maximum Capacity 1-1/8" (28.5 mm) Concrete R.P.M. 0-820 (No Load) BITS, Metal Drilling 1/2" (13 mm) Wood, Flat Boring 1-1/8" (28.5 mm) Optimum Capacity 1/2" - 1" (13 to the hammering only position. 2. For masonry, use identical replacement parts. Insert the appropriate chisel and rotate it by DEWALT, have not...
Instruction Manual
Page 13
... specific legal rights and you for free, any defects due to products sold in certain states or provinces. Register online at www.dewalt.com/register. English Repairs To assure product SAFETY and RELIABILITY, repairs, maintenance and adjustment (including brush inspection and replacement) should be performed by others. This warranty does not cover part failure due to accessories or damage caused where repairs have other qualified service...
... specific legal rights and you for free, any defects due to products sold in certain states or provinces. Register online at www.dewalt.com/register. English Repairs To assure product SAFETY and RELIABILITY, repairs, maintenance and adjustment (including brush inspection and replacement) should be performed by others. This warranty does not cover part failure due to accessories or damage caused where repairs have other qualified service...

Instruction Manual
Page 44
the kit box configuration; the array of pyramids on the surface of lozenge-shaped humps on the handgrip; and the array of the tool. N395977 D25413, D25416, D25430 Copyright © 2014 DEWALT The following are trademarks for one or more DEWALT power tools: the yellow and black color scheme; DEWALT Industrial Tool Co., 701 East Joppa Road, Baltimore, MD 21286 (APR14) Part No. the "D" shaped air intake grill;
the kit box configuration; the array of pyramids on the surface of lozenge-shaped humps on the handgrip; and the array of the tool. N395977 D25413, D25416, D25430 Copyright © 2014 DEWALT The following are trademarks for one or more DEWALT power tools: the yellow and black color scheme; DEWALT Industrial Tool Co., 701 East Joppa Road, Baltimore, MD 21286 (APR14) Part No. the "D" shaped air intake grill;


