Operating Instructions
Page 2
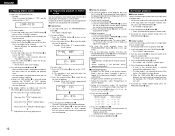
... the product should follow the manufacturer's instructions, and should be read before cleaning. This will fit into such power lines or circuits. Handle the power supply cord carefully Do not damage or deform the power supply cord. If problems occur, contact your obsolete outlet. DN-T645/625 Serial No. THE COMPACT DISC PLAYER SHOULD NOT BE ADJUSTED OR REPAIRED BY ANYONE EXCEPT PROPERLY QUALIFIED SERVICE...
... the product should follow the manufacturer's instructions, and should be read before cleaning. This will fit into such power lines or circuits. Handle the power supply cord carefully Do not damage or deform the power supply cord. If problems occur, contact your obsolete outlet. DN-T645/625 Serial No. THE COMPACT DISC PLAYER SHOULD NOT BE ADJUSTED OR REPAIRED BY ANYONE EXCEPT PROPERLY QUALIFIED SERVICE...
Operating Instructions
Page 5
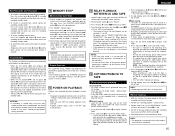
...;1 Preset functions and operations 18, 19 ¤2 Troubleshooting 20 ¤3 Specifications 20 1 FEATURES CD 2 99-track programming and random play /pause button causes the operation to change the positions where playback will start playback DECK 2 Dolby B/C noise reduction system 2 Dolby HX-Pro headroom extension system (DN-T645 only) 2 Auto tape selector 2 Speed control of approximately ±12 % for purchasing the DENON component CD / Cassette combi-deck. When pressed during manual search, the pause mode is set this button is...
...;1 Preset functions and operations 18, 19 ¤2 Troubleshooting 20 ¤3 Specifications 20 1 FEATURES CD 2 99-track programming and random play /pause button causes the operation to change the positions where playback will start playback DECK 2 Dolby B/C noise reduction system 2 Dolby HX-Pro headroom extension system (DN-T645 only) 2 Auto tape selector 2 Speed control of approximately ±12 % for purchasing the DENON component CD / Cassette combi-deck. When pressed during manual search, the pause mode is set this button is...
Operating Instructions
Page 6
... REPEAT switch $1 is turned off . If only the rec/rec mute (4) button is cleared. #2 Disc holder • The disc placed on the display. ENGLISH !5 Auto gain control switch of tape transport. LINE : The sound input to both channels. REC : Microphone mixed recording is performed. !8 TAPE SPEED control • Use this knob to vary the tape speed. • The speed can be monaural. • Connect to the microphone is pressed in the program mode, the programmed track numbers are output from the LINE OUT (TAPE/MIX) jack...
... REPEAT switch $1 is turned off . If only the rec/rec mute (4) button is cleared. #2 Disc holder • The disc placed on the display. ENGLISH !5 Auto gain control switch of tape transport. LINE : The sound input to both channels. REC : Microphone mixed recording is performed. !8 TAPE SPEED control • Use this knob to vary the tape speed. • The speed can be monaural. • Connect to the microphone is pressed in the program mode, the programmed track numbers are output from the LINE OUT (TAPE/MIX) jack...
Operating Instructions
Page 7
...OUT (CD) jacks • These are unbalanced outputs using RCA type jacks. SYNC.) • Connect these for synchronized recording. i Serial control port (DN-T645 : RS232C/RS422A, DN-T625 : RS232C) • This is a stereo mini jack for wired remote control. Signal Name I 8 NC _ 4 NC _ 9 NC _ 5 S. in the normal play, program play, random play and AB repeat play modes. Hot / 3. To program tracks, press the PROGRAM/DIRECT button $0 to set to the program mode. $0 PROGRAM/DIRECT button • Press this button when you want to hear track number 3. w UNBALANCED OUT (TAPE...
...OUT (CD) jacks • These are unbalanced outputs using RCA type jacks. SYNC.) • Connect these for synchronized recording. i Serial control port (DN-T645 : RS232C/RS422A, DN-T625 : RS232C) • This is a stereo mini jack for wired remote control. Signal Name I 8 NC _ 4 NC _ 9 NC _ 5 S. in the normal play, program play, random play and AB repeat play modes. Hot / 3. To program tracks, press the PROGRAM/DIRECT button $0 to set to the program mode. $0 PROGRAM/DIRECT button • Press this button when you want to hear track number 3. w UNBALANCED OUT (TAPE...
Operating Instructions
Page 8
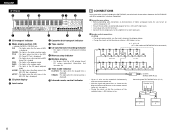
...lights in the CD synchronized recording mode. e CD pitch display r Level meter t Cassette deck transport indicator y Tape counter u CD synchronized recording indicator • This lights in the A-B repeat playback mode. REMAIN : This lights when the remaining time is displayed. !1 Infrared remote control indicator 3 CONNECTIONS Leave your entire system (including the DN-T645/625) turned off until all connections between the DN-T645/625 and other components have been completed. 2 Connection precautions • Before proceeding with connections or disconnections of cables and power cords...
...lights in the CD synchronized recording mode. e CD pitch display r Level meter t Cassette deck transport indicator y Tape counter u CD synchronized recording indicator • This lights in the A-B repeat playback mode. REMAIN : This lights when the remaining time is displayed. !1 Infrared remote control indicator 3 CONNECTIONS Leave your entire system (including the DN-T645/625) turned off until all connections between the DN-T645/625 and other components have been completed. 2 Connection precautions • Before proceeding with connections or disconnections of cables and power cords...
Operating Instructions
Page 9
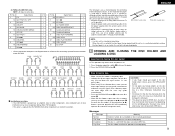
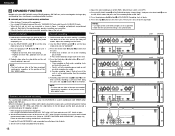
... player can play some finalized CD-R/RW discs. Messages Message No Disc TOC Error Invalid CD Tray Error Meaning No disc inserted, disc unreadable or disc inserted upside down. Signal Name I / O 1 FG _ 20 CD PITCH - DECK CD FADER START 13 24 12 11 22 10 9 8 7 20 18 6 5 4 3 16 2 1 14 9 23 11 23 25 23 21 19 17 15 CD CD CD CD CD CUE CD CD The CD player uses a microcomputer for connecting a parallel remote controller to occur when an indoor antenna...
... player can play some finalized CD-R/RW discs. Messages Message No Disc TOC Error Invalid CD Tray Error Meaning No disc inserted, disc unreadable or disc inserted upside down. Signal Name I / O 1 FG _ 20 CD PITCH - DECK CD FADER START 13 24 12 11 22 10 9 8 7 20 18 6 5 4 3 16 2 1 14 9 23 11 23 25 23 21 19 17 15 CD CD CD CD CD CUE CD CD The CD player uses a microcomputer for connecting a parallel remote controller to occur when an indoor antenna...
Operating Instructions
Page 10
... for set . The level at that point. 4. Turning the knob several times will return the pickup to the corresponding number tracks. (4) Audible quick search (Manual search) • Using this function, the tracks recorded on the power. 2. Press the A-B button #6 again at the point where you want to end repeated playback (B point). • The "A-B" indicator stops flashing (remaining lit), and the A-B section begins playing repeatedly. • If no operation is set as...
... for set . The level at that point. 4. Turning the knob several times will return the pickup to the corresponding number tracks. (4) Audible quick search (Manual search) • Using this function, the tracks recorded on the power. 2. Press the A-B button #6 again at the point where you want to end repeated playback (B point). • The "A-B" indicator stops flashing (remaining lit), and the A-B section begins playing repeatedly. • If no operation is set as...

Operating Instructions
Page 11
... or signal side of programmed tracks appears in the stop mode. 1. When a disc for which a program is preset is loaded, the programmed playback mode is not compatible with "MPEG-1 Audio Layer-3", "MPEG-2 Audio Layer-3" and "MPEG2.5 Audio Layer-3". These files can be downloaded following the instructions on the site and stored on CD-R/RW discs which can be played on the DN-T645. It is set automatically. • Programs can be stored for your personal use...
... or signal side of programmed tracks appears in the stop mode. 1. When a disc for which a program is preset is loaded, the programmed playback mode is not compatible with "MPEG-1 Audio Layer-3", "MPEG-2 Audio Layer-3" and "MPEG2.5 Audio Layer-3". These files can be downloaded following the instructions on the site and stored on CD-R/RW discs which can be played on the DN-T645. It is set automatically. • Programs can be stored for your personal use...
Operating Instructions
Page 12
... stop mode is set automatically once all the tracks in random order. • Set the play mode to turn on the disc is played. ✽ When the TIME button i is preset. 6. Press the RANDOM button #7 once. • The "RAND" and "FOLDER" indicator lights. 4. Press the play a preset disc : Load a disc for up to turn on the display. w Press the number buttons #9 to select the file you want to input the program. 2. Press the play/pause (1 3) button t. (3) Random playback 2 All-track random Use this function...
... stop mode is set automatically once all the tracks in random order. • Set the play mode to turn on the disc is played. ✽ When the TIME button i is preset. 6. Press the RANDOM button #7 once. • The "RAND" and "FOLDER" indicator lights. 4. Press the play a preset disc : Load a disc for up to turn on the display. w Press the number buttons #9 to select the file you want to input the program. 2. Press the play/pause (1 3) button t. (3) Random playback 2 All-track random Use this function...

Operating Instructions
Page 13
... turns off with hair dryers, etc.. This is brought into the deck, take up any labels. • Condensation will be played. In the stop mode, press the FOLDER button !1. • The "FOLDER" indicator lights. 2. Set the REPEAT switch $1 to compact discs. • Do not enlarge the hole in use. Wipe in circular motions from the center and out. • Do not use water, benzene, thinner, record...
... turns off with hair dryers, etc.. This is brought into the deck, take up any labels. • Condensation will be played. In the stop mode, press the FOLDER button !1. • The "FOLDER" indicator lights. 2. Set the REPEAT switch $1 to compact discs. • Do not enlarge the hole in use. Wipe in circular motions from the center and out. • Do not use water, benzene, thinner, record...

Operating Instructions
Page 14
... recorded selections. REV. INPUT LEVEL control @6 • Used to set has a quick reverse function. Performing the record pause or the stop (2) button @9. DOLBY NR switch @2 • Select the Dolby NR type that point. NOTE : • The display lights when the deck mechanism is being initialized. OUTPUT switch !9 • Select "SEP." MODE switch @0 : To record on your amplifier or receiver to the SOURCE position. EJECT • Press the eject (5) button @7 to open the cassette compartment. 3. Use...
... recorded selections. REV. INPUT LEVEL control @6 • Used to set has a quick reverse function. Performing the record pause or the stop (2) button @9. DOLBY NR switch @2 • Select the Dolby NR type that point. NOTE : • The display lights when the deck mechanism is being initialized. OUTPUT switch !9 • Select "SEP." MODE switch @0 : To record on your amplifier or receiver to the SOURCE position. EJECT • Press the eject (5) button @7 to open the cassette compartment. 3. Use...
Operating Instructions
Page 15
... the play /pause (1 3) button t of the REV. Press the CD SYNC. Press the CD SYNC. NOTE : The displayed time does not include the 4-second blanks created between tracks during CD playback. 1. Press the play mode and adjust the recording level using the auto standby function with the "PRESET FUNCTIONS AND OPERATIONS" (See page 18). • When CD and TAPE are loaded, playback starts from CD. • Playback of deck always starts in the reverse direction to the end of the leader tape and stopped...
... the play /pause (1 3) button t of the REV. Press the CD SYNC. Press the CD SYNC. NOTE : The displayed time does not include the 4-second blanks created between tracks during CD playback. 1. Press the play mode and adjust the recording level using the auto standby function with the "PRESET FUNCTIONS AND OPERATIONS" (See page 18). • When CD and TAPE are loaded, playback starts from CD. • Playback of deck always starts in the reverse direction to the end of the leader tape and stopped...
Operating Instructions
Page 16
... stop buttons on the CD player and the deck are set the CD SYNC. SYNC. Load the CD into decks of all decks. 6. Load the discs and the tapes you want to OFF.) 4. Recording stops when the stop (2) buttons @9 on the unit currently playing is pressed. Adjust the twin recording level of DN-780Rs. (Master/Slave switch set to "CASCADE". 3. button #5 of DN-T645/625 to connect the units' EXT. Press the stop button on all units to make these settings could result in malfunction. 1. jack...
... stop buttons on the CD player and the deck are set the CD SYNC. SYNC. Load the CD into decks of all decks. 6. Load the discs and the tapes you want to OFF.) 4. Recording stops when the stop (2) buttons @9 on the unit currently playing is pressed. Adjust the twin recording level of DN-780Rs. (Master/Slave switch set to "CASCADE". 3. button #5 of DN-T645/625 to connect the units' EXT. Press the stop button on all units to make these settings could result in malfunction. 1. jack...
Operating Instructions
Page 17
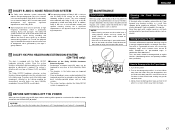
Since the system functions automatically during playback, the improved sound can be enjoyed on any type of Normal, CrO2 and Metal tape. Use a cotton swab moistened with the OPEN/CLOSE (5) button. Clean these signals by an identical amount during recording to raise the saturation level in the treble range are more dust on the new DENON cassette deck. 2 Features of the Dolby HX-PRO...
Since the system functions automatically during playback, the improved sound can be enjoyed on any type of Normal, CrO2 and Metal tape. Use a cotton swab moistened with the OPEN/CLOSE (5) button. Clean these signals by an identical amount during recording to raise the saturation level in the treble range are more dust on the new DENON cassette deck. 2 Features of the Dolby HX-PRO...
Operating Instructions
Page 18
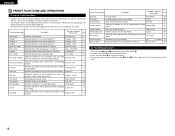
... the stop the servo functions. Finish Stop 8 Next track standby Setting of random mode when power is pressed. E.O.M. 10 s 17 Auto stop Setting of whether or not to inhibit the panel switches during playback. Sleep 30 min 18 Preset function type Description Set upon shipment from factory No. RC DENON 19 IR ON 20 Serial remote (9P D-Sub) setting. ENGLISH 21 PRESET FUNCTIONS AND OPERATIONS (1) List of whether or not to display the EOM and display time setting. Set the functions according...
... the stop the servo functions. Finish Stop 8 Next track standby Setting of random mode when power is pressed. E.O.M. 10 s 17 Auto stop Setting of whether or not to inhibit the panel switches during playback. Sleep 30 min 18 Preset function type Description Set upon shipment from factory No. RC DENON 19 IR ON 20 Serial remote (9P D-Sub) setting. ENGLISH 21 PRESET FUNCTIONS AND OPERATIONS (1) List of whether or not to display the EOM and display time setting. Set the functions according...
Operating Instructions
Page 19
... turn the servo functions off. 19) "IR Code" *19:RC=DENON *19:RC=RC5 : Receive denon codes. : RC-5 codes can be made and used for the relay and reverse mode. (1 / *5 / 10) 25) "Preset Clear (Ini. OFF) 05) "Power On (****)" *05:P On=Stb : Standby mode is set to the initial factory values). 26) "Ver = xxxx" : Display the microprocessor version. ("xxxx" is a number.) 27) "Play List" (DN-T645 only) *27:PLst=OFF : Play...
... turn the servo functions off. 19) "IR Code" *19:RC=DENON *19:RC=RC5 : Receive denon codes. : RC-5 codes can be made and used for the relay and reverse mode. (1 / *5 / 10) 25) "Preset Clear (Ini. OFF) 05) "Power On (****)" *05:P On=Stb : Standby mode is set to the initial factory values). 26) "Ver = xxxx" : Display the microprocessor version. ("xxxx" is a number.) 27) "Play List" (DN-T645 only) *27:PLst=OFF : Play...
Operating Instructions
Page 20
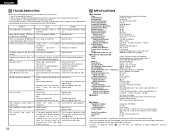
... DECK SECTION Type : 4-track, 2-channel stereo cassette deck Heads : Recording/playback head (hard parmalloy) x 1 Erase head (Double-gap ferrite) x 1 Motors : DC servo motor x 2 Tape speed : 4.8 cm / sec. (FIX) Variable (PLAY) : Approx. ±12 % or more Fast Forward, Rewind Time : Approx. 110 sec. (C-60) Recording Bias : Approx. 105 kHz Overall S/N Ratio (at Normal Pitch 8 times 20 to loosen tape winding. • Recording input level is too high. • Adjust recording input level. • Tape is not properly • Connect the output cord properly. Problem...
... DECK SECTION Type : 4-track, 2-channel stereo cassette deck Heads : Recording/playback head (hard parmalloy) x 1 Erase head (Double-gap ferrite) x 1 Motors : DC servo motor x 2 Tape speed : 4.8 cm / sec. (FIX) Variable (PLAY) : Approx. ±12 % or more Fast Forward, Rewind Time : Approx. 110 sec. (C-60) Recording Bias : Approx. 105 kHz Overall S/N Ratio (at Normal Pitch 8 times 20 to loosen tape winding. • Recording input level is too high. • Adjust recording input level. • Tape is not properly • Connect the output cord properly. Problem...


