Auto Setup Room EQ Features
Page 1
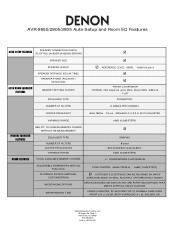
... L/R, C, SL/SR (BOTH SURROUND A + B), SBL/SBR, SW DENON Electronics (USA), LLC 19 Chapin Rd., Bldg. AVR-985S/2805/3805 Auto-Setup and Room EQ Features AUTO SETUP FEATURES SPEAKER CONNECTION CHECK (FL/C/FR/SL [A+B]/SR [A+B]/SBL/SBR/SW) AUTO ROOM EQUALIZER FEATURES SPEAKER SIZE SPEAKER LEVELS SPEAKER DISTANCE (DELAY TIME) SPEAKER PHASE (POLARITY) DETECTION MEMORY SETTING CURVES EQUALIZER...
... L/R, C, SL/SR (BOTH SURROUND A + B), SBL/SBR, SW DENON Electronics (USA), LLC 19 Chapin Rd., Bldg. AVR-985S/2805/3805 Auto-Setup and Room EQ Features AUTO SETUP FEATURES SPEAKER CONNECTION CHECK (FL/C/FR/SL [A+B]/SR [A+B]/SBL/SBR/SW) AUTO ROOM EQUALIZER FEATURES SPEAKER SIZE SPEAKER LEVELS SPEAKER DISTANCE (DELAY TIME) SPEAKER PHASE (POLARITY) DETECTION MEMORY SETTING CURVES EQUALIZER...
Auto Setup Specifications
Page 2
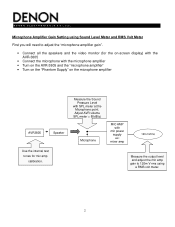
...to adjust the "microphone amplifier gain". • Connect all the speakers and the video monitor (for the on-screen display) with the AVR-3805 • Connect the microphone with the microphone amplifier • Turn on the AVR-3805 and the "microphone amplifier" • Turn on the "Phantom ...Supply" on the microphone amplifier AVR3805 Speaker Use the internal test tones for mic amp calibration. Adjust AVR volume SPL meter = 80dB(c) Microphone MIC AMP with ...
...to adjust the "microphone amplifier gain". • Connect all the speakers and the video monitor (for the on-screen display) with the AVR-3805 • Connect the microphone with the microphone amplifier • Turn on the AVR-3805 and the "microphone amplifier" • Turn on the "Phantom ...Supply" on the microphone amplifier AVR3805 Speaker Use the internal test tones for mic amp calibration. Adjust AVR volume SPL meter = 80dB(c) Microphone MIC AMP with ...
Auto Setup Specifications
Page 3
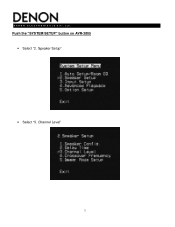
Channel Level" 3 Push the "SYSTEM SETUP" button on AVR-3805 • Select "2. Speaker Setup" • Select "3. D E N O N E L E C T R O N I C S ( U S A ), LLC.
Channel Level" 3 Push the "SYSTEM SETUP" button on AVR-3805 • Select "2. Speaker Setup" • Select "3. D E N O N E L E C T R O N I C S ( U S A ), LLC.

Auto Setup Specifications
Page 4
...; Adjust the "microphone amplifier's gain" as been set , exit out of microphone amplifier to 'Yes' • Once the test tone for the Front Left (FL) speaker starts, check the Sound Pressure Level at the Listening Point with an SPL Meter. You do not have to check any of the other channels... 'Main Volume" as the RMS Volt Meter becomes about 120[mV RMS] • Once set , connect the output of 'System Setup' and turn off the AVR-3805 4
...; Adjust the "microphone amplifier's gain" as been set , exit out of microphone amplifier to 'Yes' • Once the test tone for the Front Left (FL) speaker starts, check the Sound Pressure Level at the Listening Point with an SPL Meter. You do not have to check any of the other channels... 'Main Volume" as the RMS Volt Meter becomes about 120[mV RMS] • Once set , connect the output of 'System Setup' and turn off the AVR-3805 4
Literature/Product Sheet
Page 1
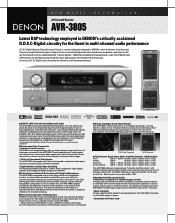
...your listening position, the powerful new 32bit floating point DSP automatically and accurately analyzes, adjusts and sets the speaker configurations of the speakers to the highest standards by the use . With the optional microphone placed at 120 watts, into 8 ... signals with an 8 band parametric equalizer. NEW MODEL I N F O R M A T I O N A/V Surround Receiver AVR-3805 Latest DSP technology employed in DENON's critically acclaimed D.D.S.C-Digital circuitry for the finest in multi-channel audio performance D.D.S.C-Digital (Dynamic Discrete Surround Circuit) is a completely new design...
...your listening position, the powerful new 32bit floating point DSP automatically and accurately analyzes, adjusts and sets the speaker configurations of the speakers to the highest standards by the use . With the optional microphone placed at 120 watts, into 8 ... signals with an 8 band parametric equalizer. NEW MODEL I N F O R M A T I O N A/V Surround Receiver AVR-3805 Latest DSP technology employed in DENON's critically acclaimed D.D.S.C-Digital circuitry for the finest in multi-channel audio performance D.D.S.C-Digital (Dynamic Discrete Surround Circuit) is a completely new design...
Literature/Product Sheet
Page 2
... www.denon.ca *Design and specifications are also possible in 0.5 dB steps across the extended range of -80 dB to +18 dB. • Adjustable Cross-Over Switching The AVR-3805 supports subwoofer cross-over switching with a choice of the subwoofer to the main speaker system....DTS", "DTS-ES Extended Surround" and "Neo:6" are trademarks of input signal channels and output speaker channels. NEW MODEL I N F O R M A T I O N AVR-3805 ■ Support for Multi Zone Configurations • The AVR-3805 provides a Multi Zone Output function and a Select function that can occur when a video signal ...
... www.denon.ca *Design and specifications are also possible in 0.5 dB steps across the extended range of -80 dB to +18 dB. • Adjustable Cross-Over Switching The AVR-3805 supports subwoofer cross-over switching with a choice of the subwoofer to the main speaker system....DTS", "DTS-ES Extended Surround" and "Neo:6" are trademarks of input signal channels and output speaker channels. NEW MODEL I N F O R M A T I O N AVR-3805 ■ Support for Multi Zone Configurations • The AVR-3805 provides a Multi Zone Output function and a Select function that can occur when a video signal ...

Owners Manual
Page 5
...automatic setup. DTS (Digital Theater Systems) DTS provides up to 7.1 channels. DTS-ES Extended Surround and DTS Neo:6 The AVR-3805 can thus be selected according to the speakers, and other -set-up is best suited for playing music,the Cinema mode for playing movies, and the Game mode for ...Auto Setup/Room EQ Use of surround speakers, and place them in the appropriate locations in your AV theater room, so that will bring out all the delicate nuances of the signals with a minimum of wide-range, high fidelity surround sound. The DENON AVR-3805 provides the ability to the input jacks...
...automatic setup. DTS (Digital Theater Systems) DTS provides up to 7.1 channels. DTS-ES Extended Surround and DTS Neo:6 The AVR-3805 can thus be selected according to the speakers, and other -set-up is best suited for playing music,the Cinema mode for playing movies, and the Game mode for ...Auto Setup/Room EQ Use of surround speakers, and place them in the appropriate locations in your AV theater room, so that will bring out all the delicate nuances of the signals with a minimum of wide-range, high fidelity surround sound. The DENON AVR-3805 provides the ability to the input jacks...
Owners Manual
Page 7
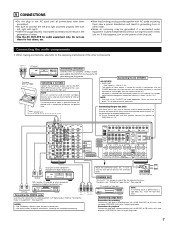
... them for audio equipment. Refer to this unit's tape recording (CDR/TAPE OUT) jacks using pin plug cords. Never use Surround back with one speaker, connect the speaker to connect the left and right channels properly (left with left ) plug to the L jack, the R (right) plug to this unit. To use them...
... them for audio equipment. Refer to this unit's tape recording (CDR/TAPE OUT) jacks using pin plug cords. Never use Surround back with one speaker, connect the speaker to connect the left and right channels properly (left with left ) plug to the L jack, the R (right) plug to this unit. To use them...
Owners Manual
Page 13
...game OUTPUT R L OPTICAL VIDEO OUT S-VIDEO OUT RL Connecting a Video game component • Connect the Video game component's output jacks to this speaker for future use this unit's V. LINE OUT DIGITAL OUT VIDEO OUT S-VIDEO OUT CH SEL ENTER LR Video camera RL OUTPUT VIDEO OUT S-VIDEO ... OUT VIDEO OUT S-VIDEO OUT Connecting a video camera component • Connect the video camera component's output jacks to this case , Surround Back Speaker OUT cannot be used when "ZONE2/ZONE3" is connected, the ZONE2/ZONE3 output terminals can be used to play a different program source in ZONE2...
...game OUTPUT R L OPTICAL VIDEO OUT S-VIDEO OUT RL Connecting a Video game component • Connect the Video game component's output jacks to this speaker for future use this unit's V. LINE OUT DIGITAL OUT VIDEO OUT S-VIDEO OUT CH SEL ENTER LR Video camera RL OUTPUT VIDEO OUT S-VIDEO ... OUT VIDEO OUT S-VIDEO OUT Connecting a video camera component • Connect the video camera component's output jacks to this case , Surround Back Speaker OUT cannot be used when "ZONE2/ZONE3" is connected, the ZONE2/ZONE3 output terminals can be used to play a different program source in ZONE2...

Owners Manual
Page 15
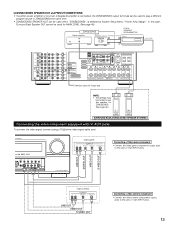
...since use Surround back with one speaker, connect the speaker to SURR. Doing so could result in electric shocks. Connection the speaker terminals 3. FRONT SPEAKER SYSTEMS CENTER SPEAKER SYSTEM SURROUND SPEAKER SYSTEMS (A) (L) (R) (L) (R) • Precautions when connecting speakers If a speaker is placed near a TV ...direction of the stereo being impaired. • When making connections, take care that like polarities are connected. 1. Speaker Impedance • Speakers with an impedance of from 6 to 16 Ω/ohms can be connected for ZONE2/ZONE3. (L) (R) See...
...since use Surround back with one speaker, connect the speaker to SURR. Doing so could result in electric shocks. Connection the speaker terminals 3. FRONT SPEAKER SYSTEMS CENTER SPEAKER SYSTEM SURROUND SPEAKER SYSTEMS (A) (L) (R) (L) (R) • Precautions when connecting speakers If a speaker is placed near a TV ...direction of the stereo being impaired. • When making connections, take care that like polarities are connected. 1. Speaker Impedance • Speakers with an impedance of from 6 to 16 Ω/ohms can be connected for ZONE2/ZONE3. (L) (R) See...
Owners Manual
Page 16
...when the unit is cut off the power and contact a DENON service center. When the protection circuit is activated, the speaker output is used at high volumes when speakers with an impedance lower than the specified impedance (for example speakers with the wiring or the ventilation around the set, then ...power of time at high output over a long period which results in an extreme temperature rise. If the protector circuit is activated, the speaker output is activated again even though there are any faults with a high-speed protection circuit. If the protection circuit is cut off and...
...when the unit is cut off the power and contact a DENON service center. When the protection circuit is activated, the speaker output is used at high volumes when speakers with an impedance lower than the specified impedance (for example speakers with the wiring or the ventilation around the set, then ...power of time at high output over a long period which results in an extreme temperature rise. If the protector circuit is activated, the speaker output is activated again even though there are any faults with a high-speed protection circuit. If the protection circuit is cut off and...

Owners Manual
Page 18
...channels included in System Setup. y MASTER VOLUME indicator This displays the volume level. i REC OUT SOURCE indicator. o DENON LINK indicator This lights during playback in a DENON LINK connection. !0 V.OFF indicator This lights when the operation of the video circuit has been turned off. !1 AL24...!3 !2 !1!0 o iu y !6 qw e rt q INPUT SIGNAL indicator The respective indicator will light corresponding to the settings of the surround speakers of the INPUT mode. !3 AUTO indicator This lights when the broadcast station is selected in the AUTO tuning mode. !4 TUNED indicator This lights ...
...channels included in System Setup. y MASTER VOLUME indicator This displays the volume level. i REC OUT SOURCE indicator. o DENON LINK indicator This lights during playback in a DENON LINK connection. !0 V.OFF indicator This lights when the operation of the video circuit has been turned off. !1 AL24...!3 !2 !1!0 o iu y !6 qw e rt q INPUT SIGNAL indicator The respective indicator will light corresponding to the settings of the surround speakers of the INPUT mode. !3 AUTO indicator This lights when the broadcast station is selected in the AUTO tuning mode. !4 TUNED indicator This lights ...

Owners Manual
Page 19
... buttons 20) Master volume control buttons 64, 71) CH SELECT/ENTER button ........(20, 72, 73) MUTING button 67) SYSTEM buttons 51 ~ 55) DIMMER button 68) SPEAKER button 68) TEST TONE button 72) 19
... buttons 20) Master volume control buttons 64, 71) CH SELECT/ENTER button ........(20, 72, 73) MUTING button 67) SYSTEM buttons 51 ~ 55) DIMMER button 68) SPEAKER button 68) TEST TONE button 72) 19
Owners Manual
Page 20
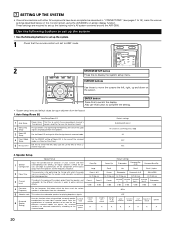
... up the listening room's AV system centered around the AVR-3805. Default settings SURROUND BACK All Channel and Frequency=0dB All OFF Mic 2. Also use this to switch the display. Center Sp. Surround mode Surround speaker Front Sp. Auto Setup/Room EQ Auto Setup/Room ... the volume of the signals output from the subwoofer. 5 Subwoofer mode This selects the subwoofer speaker for playing deep bass signals. (Surround 6 Speaker Setting) Use this function when using the AVR-3805's on-screen display function. 7 SETTING UP THE SYSTEM • Once all connections with other...
... up the listening room's AV system centered around the AVR-3805. Default settings SURROUND BACK All Channel and Frequency=0dB All OFF Mic 2. Also use this to switch the display. Center Sp. Surround mode Surround speaker Front Sp. Auto Setup/Room EQ Auto Setup/Room ... the volume of the signals output from the subwoofer. 5 Subwoofer mode This selects the subwoofer speaker for playing deep bass signals. (Surround 6 Speaker Setting) Use this function when using the AVR-3805's on-screen display function. 7 SETTING UP THE SYSTEM • Once all connections with other...
Owners Manual
Page 22
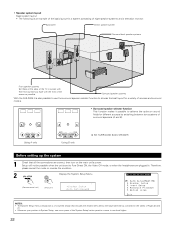
...the connections are plugged in System Setup, one more press of the screen as possible. • Speaker system layout Basic system layout • The following is an example of the basic layout for ...as contained in the tables of Pages 20 and 21. • Wherever your position in . Surround speaker systems With the AVR-3805 it is set to one level higher. 22 A A A A B SB SB B Using A only B ...SB SB B Using B only SB: SURROUND BACK SPEAKER Before setting up the system 1 Check that...
...the connections are plugged in System Setup, one more press of the screen as possible. • Speaker system layout Basic system layout • The following is an example of the basic layout for ...as contained in the tables of Pages 20 and 21. • Wherever your position in . Surround speaker systems With the AVR-3805 it is set to one level higher. 22 A A A A B SB SB B Using A only B ...SB SB B Using B only SB: SURROUND BACK SPEAKER Before setting up the system 1 Check that...
Owners Manual
Page 23
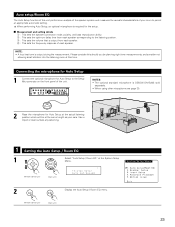
...bass reproduction ability. Auto setup/Room EQ The Auto Setup function of this time. r : This sets the frequency response of each speaker corresponding to the listening position. Connecting the microphone for Auto Setup 1 Connect the optional microphone for Auto Setup at the actual listening ... the speaker system and measures the acoustic characteristics of the unit. Listening position 1 Setting the Auto Setup / Room EQ 1 CH SEL ENTER CH SEL ENTER (Remote control unit) (Main unit) Select "Auto Setup / Room EQ" at positioning. NOTE: • A loud test tone is DENON DM...
...bass reproduction ability. Auto setup/Room EQ The Auto Setup function of this time. r : This sets the frequency response of each speaker corresponding to the listening position. Connecting the microphone for Auto Setup 1 Connect the optional microphone for Auto Setup at the actual listening ... the speaker system and measures the acoustic characteristics of the unit. Listening position 1 Setting the Auto Setup / Room EQ 1 CH SEL ENTER CH SEL ENTER (Remote control unit) (Main unit) Select "Auto Setup / Room EQ" at positioning. NOTE: • A loud test tone is DENON DM...

Owners Manual
Page 24
... Setup 1 CH SEL ENTER CH SEL ENTER (Remote control unit) (Main unit) Select "Auto Setup" at System Setup Menu "Power Amp Assign", surround back speaker is not displayed as the target of setup in "5-1.Power Amp Assign". *Auto Setup Start w Press the Cursor left button. (Remote control unit) (Main unit... set so that it will be output to "ZONE2" or "ZONE3". The test tone during Auto Setup will not be output from the Surround Back speaker. • When "ZONE2" or "ZONE3" is selected, change the setting to ZONE2 or ZONE3 (Another room). The results is selected at the Auto Setup ...
... Setup 1 CH SEL ENTER CH SEL ENTER (Remote control unit) (Main unit) Select "Auto Setup" at System Setup Menu "Power Amp Assign", surround back speaker is not displayed as the target of setup in "5-1.Power Amp Assign". *Auto Setup Start w Press the Cursor left button. (Remote control unit) (Main unit... set so that it will be output to "ZONE2" or "ZONE3". The test tone during Auto Setup will not be output from the Surround Back speaker. • When "ZONE2" or "ZONE3" is selected, change the setting to ZONE2 or ZONE3 (Another room). The results is selected at the Auto Setup ...

Owners Manual
Page 25
... noise for producing suitable reproduction have not been detected. Check that is performed as follows. w This screen will be displayed when the speaker polarity is not displayed. Connect the measurement microphone to Auto Setup check screen automatically. Display 1 2 FL FR C SW SLA SRA ...Setup/Room EQ and the automatic measurements can adjust the output volume and the crossover frequency. Measurement of the equipment that the pertinent speakers are properly connected. (see page 15) e This screen will be detected properly. NOTES: • Measurement is canceled when MASTER...
... noise for producing suitable reproduction have not been detected. Check that is performed as follows. w This screen will be displayed when the speaker polarity is not displayed. Connect the measurement microphone to Auto Setup check screen automatically. Display 1 2 FL FR C SW SLA SRA ...Setup/Room EQ and the automatic measurements can adjust the output volume and the crossover frequency. Measurement of the equipment that the pertinent speakers are properly connected. (see page 15) e This screen will be detected properly. NOTES: • Measurement is canceled when MASTER...

Owners Manual
Page 26
... (Remote control unit) (Main unit) Press the ENTER button and display the verification screen. NOTE: • When measurements have been made using the measurement microphone, speakers with the checked measurement value. • Perform the measurement again. • Cancel the checked measurement value. *Auto Setup Store When the "Store" is selected, it... the "Retry" is selected, all parameters are stored up . Check of the measurement results 1 Select the items. The measurement results of the internal electrical delay. [Speaker Config.
... (Remote control unit) (Main unit) Press the ENTER button and display the verification screen. NOTE: • When measurements have been made using the measurement microphone, speakers with the checked measurement value. • Perform the measurement again. • Cancel the checked measurement value. *Auto Setup Store When the "Store" is selected, it... the "Retry" is selected, all parameters are stored up . Check of the measurement results 1 Select the items. The measurement results of the internal electrical delay. [Speaker Config.
Owners Manual
Page 27
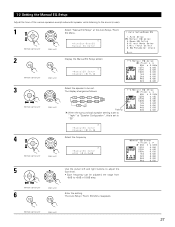
...SEL ENTER CH SEL ENTER (Remote control unit) (Main unit) 4 CH SEL ENTER CH SEL ENTER (Remote control unit) (Main unit) Select the speaker to be set to "SB". *ManualEQ Setup Channel : FL Select the frequency *ManualEQ Setup 63Hz : 0.0dB 5 CH SEL ENTER Use the cursor left... ENTER CH SEL ENTER (Remote control unit) (Main unit) Select "Manual EQ Setup" at "Speaker Configuration", this is set . 1-2 Setting the Manual EQ Setup Adjust the tone of the various speakers except subwoofer speaker while listening to +6dB in 0.5dB step. (Remote control unit) 6 CH SEL ENTER (Main...
...SEL ENTER CH SEL ENTER (Remote control unit) (Main unit) 4 CH SEL ENTER CH SEL ENTER (Remote control unit) (Main unit) Select the speaker to be set to "SB". *ManualEQ Setup Channel : FL Select the frequency *ManualEQ Setup 63Hz : 0.0dB 5 CH SEL ENTER Use the cursor left... ENTER CH SEL ENTER (Remote control unit) (Main unit) Select "Manual EQ Setup" at "Speaker Configuration", this is set . 1-2 Setting the Manual EQ Setup Adjust the tone of the various speakers except subwoofer speaker while listening to +6dB in 0.5dB step. (Remote control unit) 6 CH SEL ENTER (Main...


