

Literature/Product Sheet
Page 1
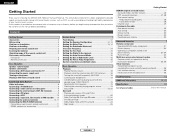
... to mention the use of short ring. • Twin Drive Rectifier DENON's Twin Drive Rectifier design uses two rectifying diodes in turn ensures that all of DENON's high-grade A/V receiver, the AVR-1506 lets you adjust parameters so that program. ■ Acclaimed Customization Feature ... channels for highest dynamic range and superb reproduction clarity. ■ DENON's Basic Design for High-Quality Sound Reproduction • Power Transformer for that you more faithful reproduction of the original sound. A/V Receiver AVR-1506 DTS-ES Discrete 6.1 and Dolby Digital EX with Power Amps for...
... to mention the use of short ring. • Twin Drive Rectifier DENON's Twin Drive Rectifier design uses two rectifying diodes in turn ensures that all of DENON's high-grade A/V receiver, the AVR-1506 lets you adjust parameters so that program. ■ Acclaimed Customization Feature ... channels for highest dynamic range and superb reproduction clarity. ■ DENON's Basic Design for High-Quality Sound Reproduction • Power Transformer for that you more faithful reproduction of the original sound. A/V Receiver AVR-1506 DTS-ES Discrete 6.1 and Dolby Digital EX with Power Amps for...

Owners Manual
Page 2
... has used in the vicinity of power supply to lightning and power-line surges. 17. Heat - The product should be determined by turning the product OFF and ON, the user is connected. • Consult the local retailer authorized to distribute this product from touching such ... wall outlets, extension cords, or integral convenience receptacles as a bookcase or rack unless proper ventilation is operated. 2. Modification not expressly approved by DENON may be placed in a built-in installation such as this product during a lightning storm, or when it from the wall outlet before the ...
... has used in the vicinity of power supply to lightning and power-line surges. 17. Heat - The product should be determined by turning the product OFF and ON, the user is connected. • Consult the local retailer authorized to distribute this product from touching such ... wall outlets, extension cords, or integral convenience receptacles as a bookcase or rack unless proper ventilation is operated. 2. Modification not expressly approved by DENON may be placed in a built-in installation such as this product during a lightning storm, or when it from the wall outlet before the ...
Owners Manual
Page 4
...Troubleshooting 37 Additional information 38~43 Specifications 44 List of preset codes End of this manual 1 ENGLISH IN) terminals 18 Turning the sound off temporarily (MUTING 18 Listening over headphones 19 Combining the currently playing sound with home theater sources, such... Speaker system layout 4 Speaker connections 5 Connecting a DVD player and monitor TV 6 Connecting the power supply cord 6 Turning on the power 7 Playing a DVD with an immense array of features, before you begin hookup and operation that you for choosing the DENON AVR-1506 A/V Surround Receiver.
...Troubleshooting 37 Additional information 38~43 Specifications 44 List of preset codes End of this manual 1 ENGLISH IN) terminals 18 Turning the sound off temporarily (MUTING 18 Listening over headphones 19 Combining the currently playing sound with home theater sources, such... Speaker system layout 4 Speaker connections 5 Connecting a DVD player and monitor TV 6 Connecting the power supply cord 6 Turning on the power 7 Playing a DVD with an immense array of features, before you begin hookup and operation that you for choosing the DENON AVR-1506 A/V Surround Receiver.

Owners Manual
Page 5
...Wall Note: For heat dispersal, do not install this unit in these instructions in a safe place. Please be used to operate non-DENON remote control compatible products. 2 ENGLISH In addition, the memory contains control signals for explanation purposes. • V. After reading, store ...them. If this happens, take the following before using microprocessors is used to operate not only the AVR-1506 but other audio components when moving the unit. • Before turning the power switch on handling • Switching the input source when input terminals are greatly attenuated ...
...Wall Note: For heat dispersal, do not install this unit in these instructions in a safe place. Please be used to operate non-DENON remote control compatible products. 2 ENGLISH In addition, the memory contains control signals for explanation purposes. • V. After reading, store ...them. If this happens, take the following before using microprocessors is used to operate not only the AVR-1506 but other audio components when moving the unit. • Before turning the power switch on handling • Switching the input source when input terminals are greatly attenuated ...

Owners Manual
Page 7
... and off with the front of these parts, refer to the pages given in the DTS NEO:6 mode. • The main zone output can be turned on the remote control unit during playback in parentheses ( ).
... and off with the front of these parts, refer to the pages given in the DTS NEO:6 mode. • The main zone output can be turned on the remote control unit during playback in parentheses ( ).
Owners Manual
Page 8
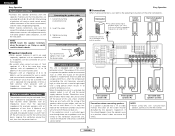
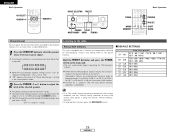
...the temperature surrounding the unit becomes unusually high, or when the unit is cut off . Connecting the speaker cables 1. Tighten by turning counterclockwise. 2. When the protection circuit is activated, the speaker output is activated again even though there are no problems with an ...impedance lower than 4 Ω/ohms) are connected. Turn off the power and contact a DENON service center. Connecting banana plugs Banana plug Turn clockwise to the left channel. 5 ENGLISH Easy Operation 2 Connections When making connections, also refer...
...the temperature surrounding the unit becomes unusually high, or when the unit is cut off . Connecting the speaker cables 1. Tighten by turning counterclockwise. 2. When the protection circuit is activated, the speaker output is activated again even though there are no problems with an ...impedance lower than 4 Ω/ohms) are connected. Turn off the power and contact a DENON service center. Connecting banana plugs Banana plug Turn clockwise to the left channel. 5 ENGLISH Easy Operation 2 Connections When making connections, also refer...

Owners Manual
Page 9
... to use the AC OUTLETS for connecting audio equipment. If you can choose from either the coaxial or optical connections. When connecting this outlet is turned on and off in the same way. • Precaution when using S-terminals This unit's S-terminals (input and output) and video pin terminals (input and output...
... to use the AC OUTLETS for connecting audio equipment. If you can choose from either the coaxial or optical connections. When connecting this outlet is turned on and off in the same way. • Precaution when using S-terminals This unit's S-terminals (input and output) and video pin terminals (input and output...

Owners Manual
Page 10
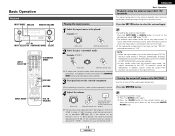
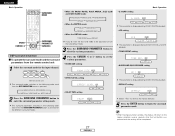
...unit). (Main unit) (Remote control unit) 2 Select the play (surround) mode. Example: DVD 3 Press the POWER switch. ¢ ON: The power turns on the master volume level display. 7 ENGLISH Set the POWER switch to this position, the power cannot be played. Example: STANDARD SELECT (Main unit) (... 4 Press the ON/STANDBY switch on the main unit or ON/SOURCE button on the remote control unit. • Turn on the power. 5 Press the SPEAKER A button to turn the power on and off . ENGLISH Easy Operation INPUT SELECTOR SPEAKER A MASTER VOLUME POWER ON/STANDBY INPUT SELECTOR MODE ...
...unit). (Main unit) (Remote control unit) 2 Select the play (surround) mode. Example: DVD 3 Press the POWER switch. ¢ ON: The power turns on the master volume level display. 7 ENGLISH Set the POWER switch to this position, the power cannot be played. Example: STANDARD SELECT (Main unit) (... 4 Press the ON/STANDBY switch on the main unit or ON/SOURCE button on the remote control unit. • Turn on the power. 5 Press the SPEAKER A button to turn the power on and off . ENGLISH Easy Operation INPUT SELECTOR SPEAKER A MASTER VOLUME POWER ON/STANDBY INPUT SELECTOR MODE ...
Owners Manual
Page 21
... to switch to the desired input mode ( page 19, 20). • The external input mode can be adjusted within the range of -70 to 0 to turn off temporarily (MUTING) Use this case the maximum volume is set as described ( page 29), if the volume for any channel is set the "SW... ATT." IN), the play (surround) mode. Turning the sound off the audio output temporarily. Playing the input source Press the EXT. In addition, signals cannot be reproduced. w Press the VOLUME button on...
... to switch to the desired input mode ( page 19, 20). • The external input mode can be adjusted within the range of -70 to 0 to turn off temporarily (MUTING) Use this case the maximum volume is set as described ( page 29), if the volume for any channel is set the "SW... ATT." IN), the play (surround) mode. Turning the sound off the audio output temporarily. Playing the input source Press the EXT. In addition, signals cannot be reproduced. w Press the VOLUME button on...

Owners Manual
Page 22
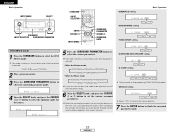
...can be switched to check the unit's operating status while playing a source. 2 Using the dimmer function Basic Operation Input mode The AVR-1506 has an AUTO signal detection mode that automatically identifies the type of the unit's operations are connected. If no digital signal is being...Canceling simulcast playback: q Select "SOURCE" by pressing the VIDEO SELECT button. w Switch the program source to the component connected to turn the corresponding speaker pair on the remote control unit. Note that can be selected for the selected input source are performed automatically with ...
...can be switched to check the unit's operating status while playing a source. 2 Using the dimmer function Basic Operation Input mode The AVR-1506 has an AUTO signal detection mode that automatically identifies the type of the unit's operations are connected. If no digital signal is being...Canceling simulcast playback: q Select "SOURCE" by pressing the VIDEO SELECT button. w Switch the program source to the component connected to turn the corresponding speaker pair on the remote control unit. Note that can be selected for the selected input source are performed automatically with ...

Owners Manual
Page 23
... the ANALOG button to switch to select the DIRECT mode. 20 ENGLISH Surround Playing audio sources (CDs and DVDs) 2-channel playback modes • The AVR-1506 is turned on the remote control unit to the analog input. Press the DIRECT/STEREO button on the main unit or the STEREO button on the remote...
... the ANALOG button to switch to select the DIRECT mode. 20 ENGLISH Surround Playing audio sources (CDs and DVDs) 2-channel playback modes • The AVR-1506 is turned on the remote control unit to the analog input. Press the DIRECT/STEREO button on the main unit or the STEREO button on the remote...

Owners Manual
Page 24
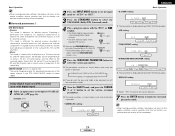
... Logic mode: MODE DOLBY PL CINEMA EQ TONE DEFEAT DEFAULT SURROUND BACK If you do want the bass and treble to be adjusted, turn off the tone defeat mode. 6 Turn the SELECT knob, and press the CURSOR F or G button to select the optimum mode for the source. setting. 1 Press the STANDARD button... Logic IIx (Pro Logic II) mode • To play in the PLIIx mode, set "S. For operating instructions, refer to the manuals of the respective components. 4 Turn the SELECT knob, and press the CURSOR F or G button to set the various surround parameters.
... Logic mode: MODE DOLBY PL CINEMA EQ TONE DEFEAT DEFAULT SURROUND BACK If you do want the bass and treble to be adjusted, turn off the tone defeat mode. 6 Turn the SELECT knob, and press the CURSOR F or G button to select the optimum mode for the source. setting. 1 Press the STANDARD button... Logic IIx (Pro Logic II) mode • To play in the PLIIx mode, set "S. For operating instructions, refer to the manuals of the respective components. 4 Turn the SELECT knob, and press the CURSOR F or G button to set the various surround parameters.
Owners Manual
Page 26
.... 3 Press the SURROUND PARAMETER button to select the various parameters. TONE DEF. COMP. OFF OFF LOW MID HIGH This parameter is pressed. MODE cinema 4 Turn the SELECT knob, and press the CURSOR F or G button to select the DTS NEO:6 mode. ENGLISH Basic Operation Basic Operation STANDARD • CINEMA EQ... Music mode: MODE MUSIC CENTER IMAGE TONE DEFEAT DEFAULT SURROUND BACK If you do want the bass and treble to be adjusted, turn off the tone defeat mode. 6 Turn the SELECT knob, and press the CURSOR F or G button to finish the surround parameter mode. The mode switches as shown ...
.... 3 Press the SURROUND PARAMETER button to select the various parameters. TONE DEF. COMP. OFF OFF LOW MID HIGH This parameter is pressed. MODE cinema 4 Turn the SELECT knob, and press the CURSOR F or G button to select the DTS NEO:6 mode. ENGLISH Basic Operation Basic Operation STANDARD • CINEMA EQ... Music mode: MODE MUSIC CENTER IMAGE TONE DEFEAT DEFAULT SURROUND BACK If you do want the bass and treble to be adjusted, turn off the tone defeat mode. 6 Turn the SELECT knob, and press the CURSOR F or G button to finish the surround parameter mode. The mode switches as shown ...
Owners Manual
Page 27
... settings, the display will return to the regular condition several seconds after the last button was pressed and the setting will be adjusted, turn off the tone defeat mode. 6 Turn the SELECT knob, and press the CURSOR F or G button to set the various surround parameters. The front channel (FL and FR) signals...
... settings, the display will return to the regular condition several seconds after the last button was pressed and the setting will be adjusted, turn off the tone defeat mode. 6 Turn the SELECT knob, and press the CURSOR F or G button to set the various surround parameters. The front channel (FL and FR) signals...
Owners Manual
Page 28
... in the soundtrack (but with the subwoofer peak limit level setting, adjust the level as necessary. Basic Operation 2 Dialogue normalization The dialog normalization function is turned off with reduced dynamic range). (This only works when playing program sources recorded in Dolby Digital or DTS. These contents can be verified with the...
... in the soundtrack (but with the subwoofer peak limit level setting, adjust the level as necessary. Basic Operation 2 Dialogue normalization The dialog normalization function is turned off with reduced dynamic range). (This only works when playing program sources recorded in Dolby Digital or DTS. These contents can be verified with the...
Owners Manual
Page 30
... input channel. 4 Press the CURSOR F or G button to the regular condition several seconds after the last button was pressed and the setting will be adjusted, turn off the tone defeat mode. 3 Press the SURROUND PARAMETER button to enter the surround parameter setting mode. COMP. ENGLISH Basic Operation SURROUND MODE • When...
... input channel. 4 Press the CURSOR F or G button to the regular condition several seconds after the last button was pressed and the setting will be adjusted, turn off the tone defeat mode. 3 Press the SURROUND PARAMETER button to enter the surround parameter setting mode. COMP. ENGLISH Basic Operation SURROUND MODE • When...

Owners Manual
Page 31
... the level if the sound seems distorted. TONE CONTROL: This can be set within the range of 0 to 15. To increase the bass or treble: Turn the control clockwise. (The bass or treble sound can be increased up to +12 dB in steps of 2 dB.) To decrease the bass or treble... sound field. SURROUND PARAMETER TONE DEFEAT 2 Operating the surround mode and the surround parameters from 1 to 110 ms only in the DIRECT mode. BASS TREBLE 2 Turn the SELECT knob to set differ for each time the TONE CONTROL button is pressed. The parameters which can be set . The signals do not...
... the level if the sound seems distorted. TONE CONTROL: This can be set within the range of 0 to 15. To increase the bass or treble: Turn the control clockwise. (The bass or treble sound can be increased up to +12 dB in steps of 2 dB.) To decrease the bass or treble... sound field. SURROUND PARAMETER TONE DEFEAT 2 Operating the surround mode and the surround parameters from 1 to 110 ms only in the DIRECT mode. BASS TREBLE 2 Turn the SELECT knob to set differ for each time the TONE CONTROL button is pressed. The parameters which can be set . The signals do not...
Owners Manual
Page 32
... selected speaker can be adjusted within the range of 56 stations. OFF ´ -12 dB ´ +12 dB • If an FM station cannot be turned off by pressing the CURSOR buttons. Hold the PRESET • button and press the POWER switch on the main unit. • The unit automatically begins...
... selected speaker can be adjusted within the range of 56 stations. OFF ´ -12 dB ´ +12 dB • If an FM station cannot be turned off by pressing the CURSOR buttons. Hold the PRESET • button and press the POWER switch on the main unit. • The unit automatically begins...

Owners Manual
Page 33
..., the "STEREO" indicator lights on the display when a stereo broadcast is set the manual tuning mode. Check that the display's "AUTO" indicator turns off . Automatic searching begins, then stops when a station is tuned in. • When the manual tuning mode is tuned in the desired station...AM or FM). 3 Press the MODE button to tune in . The frequency changes continuously when the button is muted and the "TUNED" and "STEREO" indicators turn off . 4 Press the TUNING (+) or (-) button to set , FM stereo broadcasts are received in the preset memory. 4 Press the TUNING (+) or ...
..., the "STEREO" indicator lights on the display when a stereo broadcast is set the manual tuning mode. Check that the display's "AUTO" indicator turns off . Automatic searching begins, then stops when a station is tuned in. • When the manual tuning mode is tuned in the desired station...AM or FM). 3 Press the MODE button to tune in . The frequency changes continuously when the button is muted and the "TUNED" and "STEREO" indicators turn off . 4 Press the TUNING (+) or (-) button to set , FM stereo broadcasts are received in the preset memory. 4 Press the TUNING (+) or ...

Owners Manual
Page 38
... unit operations during multi-source playback (selecting the source) This is output for MAIN ZONE. • When a sold separately room-to-room remote control unit (DENON RC-616, 617 or 618) is selected at "Power Amp Assignment". Default setting (ZONE2 VOLUME LEVEL): - - - dB (MINIMUM) 35 ENGLISH ZONE2 OFF... MODE 2 switch to the "ZONE2". 3 Press the ZONE2 ON button. In this unit's internal amplifier as the ZONE2 • To use the ZONE2, turn on the ZONE2 button. • The output of the ZONE2 SPEAKER OUT terminals can be controlled from ZONE2 using the SURR.BACK/ZONE2 amplifier as...
... unit operations during multi-source playback (selecting the source) This is output for MAIN ZONE. • When a sold separately room-to-room remote control unit (DENON RC-616, 617 or 618) is selected at "Power Amp Assignment". Default setting (ZONE2 VOLUME LEVEL): - - - dB (MINIMUM) 35 ENGLISH ZONE2 OFF... MODE 2 switch to the "ZONE2". 3 Press the ZONE2 ON button. In this unit's internal amplifier as the ZONE2 • To use the ZONE2, turn on the ZONE2 button. • The output of the ZONE2 SPEAKER OUT terminals can be controlled from ZONE2 using the SURR.BACK/ZONE2 amplifier as...


