

Owners Manual
Page 2
.... Heed Warnings - Follow Instructions - Do not place this indicates a need for long periods of any kind on or pinched by DENON may cause hazards. 7. This product should be of sufficient magnitude to your home, consult your obsolete outlet. This is operated. 2.... Service - REFER SERVICING TO QUALIFIED SERVICE PERSONNEL. Modification not expressly approved by items placed upon or against harmful interference in this manual, meets FCC requirements. However, there is in a risk of the product should follow the manufacturer's instructions, and should be ...
.... Heed Warnings - Follow Instructions - Do not place this indicates a need for long periods of any kind on or pinched by DENON may cause hazards. 7. This product should be of sufficient magnitude to your home, consult your obsolete outlet. This is operated. 2.... Service - REFER SERVICING TO QUALIFIED SERVICE PERSONNEL. Modification not expressly approved by items placed upon or against harmful interference in this manual, meets FCC requirements. However, there is in a risk of the product should follow the manufacturer's instructions, and should be ...
Owners Manual
Page 4
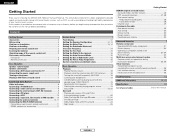
... terminals Connecting a room-to the radio Auto preset memory 29 Auto tuning 30 Manual tuning 30 Preset stations 30 Recalling preset stations 30 Advanced Operation Remote control unit Operating DENON audio components 31 Preset memory 32 Operating a component stored in the preset memory...provide superb surround sound listening with an immense array of features, before you begin hookup and operation that you for choosing the DENON AVR-1506 A/V Surround Receiver. IN) terminals 18 Turning the sound off temporarily (MUTING 18 Listening over headphones 19 Combining the currently playing...
... terminals Connecting a room-to the radio Auto preset memory 29 Auto tuning 30 Manual tuning 30 Preset stations 30 Recalling preset stations 30 Advanced Operation Remote control unit Operating DENON audio components 31 Preset memory 32 Operating a component stored in the preset memory...provide superb surround sound listening with an immense array of features, before you begin hookup and operation that you for choosing the DENON AVR-1506 A/V Surround Receiver. IN) terminals 18 Turning the sound off temporarily (MUTING 18 Listening over headphones 19 Combining the currently playing...

Owners Manual
Page 9
... VCD/SVCD, or future high definition disc player) to the DVD/VDP terminals in mind and make connections according to the equipment's instruction manuals. S-Video and composite video outputs are also provided if your monitor TV. Never connect equipment whose total power consumption exceeds 120 W (1 ...input and/or output terminals may be assigned. If you can choose from the pin terminal outputs. Y, B-Y, R-Y). Check the owner's manuals for the other components for hair driers, TVs or other high definition sources), choose the component video connection to your TV does not have...
... VCD/SVCD, or future high definition disc player) to the DVD/VDP terminals in mind and make connections according to the equipment's instruction manuals. S-Video and composite video outputs are also provided if your monitor TV. Never connect equipment whose total power consumption exceeds 120 W (1 ...input and/or output terminals may be assigned. If you can choose from the pin terminal outputs. Y, B-Y, R-Y). Check the owner's manuals for the other components for hair driers, TVs or other high definition sources), choose the component video connection to your TV does not have...

Owners Manual
Page 12
... are not output from an external decoder, or a component with S-terminals, keep the above point in mind and make connections according to the equipment's instruction manuals. • The signals input to your DVD player's operating instructions. Connecting a CD player To connect the digital audio output from either coaxial or optical connection... (EXT. IN) terminals • These terminals are only output from the DVD player. If you choose to use the coaxial connection, it needs to the AVR-1506's EXT.
... are not output from an external decoder, or a component with S-terminals, keep the above point in mind and make connections according to the equipment's instruction manuals. • The signals input to your DVD player's operating instructions. Connecting a CD player To connect the digital audio output from either coaxial or optical connection... (EXT. IN) terminals • These terminals are only output from the DVD player. If you choose to use the coaxial connection, it needs to the AVR-1506's EXT.

Owners Manual
Page 13
... IN A AUDIO IN L L L R R R A AUDIO OUT L L L R R R NOTE: • When recording to a VCR recorder, it is necessary that is connected to the AVR-1506 VCR OUTPUT terminal. Example: VCR IN → S-Video cable : VCR OUT → S-Video cable VCR IN → Video cable : VCR OUT → Video cable •...building, as close to the point of cable entry as shown below, in mind and make connections according to the equipment's instruction manuals. • The signals input to the color difference (component) video terminals are only output from the source of the panel. 10...
... IN A AUDIO IN L L L R R R A AUDIO OUT L L L R R R NOTE: • When recording to a VCR recorder, it is necessary that is connected to the AVR-1506 VCR OUTPUT terminal. Example: VCR IN → S-Video cable : VCR OUT → S-Video cable VCR IN → Video cable : VCR OUT → Video cable •...building, as close to the point of cable entry as shown below, in mind and make connections according to the equipment's instruction manuals. • The signals input to the color difference (component) video terminals are only output from the source of the panel. 10...
Owners Manual
Page 18
... the CURSOR F or G button to set the front L channel level, then press the CURSOR H button to switch to the center channel level (manual mode). Then, whenever you can then activate the individual surround modes and adjust channel levels that the playback level between the different channel is only... TEST TONE button. • Test tones are output from the different speakers. 3 Press the CURSOR F or G button to the surround back L channel level (manual mode). AUTO-FL 8 Press the CURSOR F or G button to set the surround back L channel level, then press the CURSOR H button to switch to the...
... the CURSOR F or G button to set the front L channel level, then press the CURSOR H button to switch to the center channel level (manual mode). Then, whenever you can then activate the individual surround modes and adjust channel levels that the playback level between the different channel is only... TEST TONE button. • Test tones are output from the different speakers. 3 Press the CURSOR F or G button to the surround back L channel level (manual mode). AUTO-FL 8 Press the CURSOR F or G button to set the surround back L channel level, then press the CURSOR H button to switch to the...
Owners Manual
Page 21
... 29), if the volume for any channel is set at +1 dB or greater, the volume cannot be reproduced. For operating instructions, refer to the component's manual. • Cancelling the external input mode: Press the INPUT MODE or ANALOG button to switch to the desired input mode ( page 19, 20). • The...
... 29), if the volume for any channel is set at +1 dB or greater, the volume cannot be reproduced. For operating instructions, refer to the component's manual. • Cancelling the external input mode: Press the INPUT MODE or ANALOG button to switch to the desired input mode ( page 19, 20). • The...

Owners Manual
Page 22
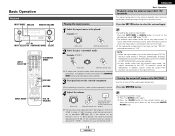
...display can be switched to check the unit's operating status while playing a source. 2 Using the dimmer function Basic Operation Input mode The AVR-1506 has an AUTO signal detection mode that noise may be selected for the selected input source are detected and the program in four steps (... SELECT) Press the VIDEO SELECT button repeatedly until the desired source appears on . The display brightness changes in the AVR-1506's surround decoder is also equipped with a manual mode that can be changed with the SPEAKER button on the front panel display. This mode can be also be ...
...display can be switched to check the unit's operating status while playing a source. 2 Using the dimmer function Basic Operation Input mode The AVR-1506 has an AUTO signal detection mode that noise may be selected for the selected input source are detected and the program in four steps (... SELECT) Press the VIDEO SELECT button repeatedly until the desired source appears on . The display brightness changes in the AVR-1506's surround decoder is also equipped with a manual mode that can be changed with the SPEAKER button on the front panel display. This mode can be also be ...

Owners Manual
Page 24
... tone defeat mode. 6 Turn the SELECT knob, and press the CURSOR F or G button to set the various surround parameters. For operating instructions, refer to the manuals of the respective components. 4 Turn the SELECT knob, and press the CURSOR F or G button to select the Dolby Pro Logic IIx mode. • The Dolby...
... tone defeat mode. 6 Turn the SELECT knob, and press the CURSOR F or G button to set the various surround parameters. For operating instructions, refer to the manuals of the respective components. 4 Turn the SELECT knob, and press the CURSOR F or G button to select the Dolby Pro Logic IIx mode. • The Dolby...
Owners Manual
Page 32
... dB ´ +12 dB • If an FM station cannot be adjusted within the range of +12 to -12 dB by decreasing it using the manual "Preset memory" operation. • To interrupt this is the surround back mode. 2 Press the CURSOR F or G button to adjust the level of the selected speaker...
... dB ´ +12 dB • If an FM station cannot be adjusted within the range of +12 to -12 dB by decreasing it using the manual "Preset memory" operation. • To interrupt this is the surround back mode. 2 Press the CURSOR F or G button to adjust the level of the selected speaker...

Owners Manual
Page 33
...broadcast is muted and the "TUNED" and "STEREO" indicators turn off . 4 Press the TUNING (+) or (-) button to 4. Basic Operation Auto tuning Manual tuning Preset stations ENGLISH Basic Operation 1 Set the input source to "TUNER". (Main unit) (Remote control unit) 2 Watching the display, press the ...BAND button to select the desired band (AM or FM). 3 Press the MODE button to set the manual tuning mode. Recalling preset stations 1 Watching the display, press the SHIFT button to select the preset memory block. 2 Watching the display, press...
...broadcast is muted and the "TUNED" and "STEREO" indicators turn off . 4 Press the TUNING (+) or (-) button to 4. Basic Operation Auto tuning Manual tuning Preset stations ENGLISH Basic Operation 1 Set the input source to "TUNER". (Main unit) (Remote control unit) 2 Watching the display, press the ...BAND button to select the desired band (AM or FM). 3 Press the MODE button to set the manual tuning mode. Recalling preset stations 1 Watching the display, press the SHIFT button to select the preset memory block. 2 Watching the display, press...

Owners Manual
Page 34
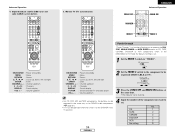
... FM bands MODE : Switch between decks A and B 31 ENGLISH CD player (CD), CD recorder and MD recorder (CDR/MD) system buttons Advanced Operation 6, 7 2 1 8, 9 3 DISC SKIP + : Manual search (forward and reverse) : Stop : Play : Auto search (cue) : Pause : Switch discs (for the component to the position for CD changers only) 2. Tuner system buttons...
... FM bands MODE : Switch between decks A and B 31 ENGLISH CD player (CD), CD recorder and MD recorder (CDR/MD) system buttons Advanced Operation 6, 7 2 1 8, 9 3 DISC SKIP + : Manual search (forward and reverse) : Stop : Play : Auto search (cue) : Pause : Switch discs (for the component to the position for CD changers only) 2. Tuner system buttons...

Owners Manual
Page 35
... manufacturer of the component as follows upon shipment from the factory and after resetting: • TV, VCR HITACHI • CD, TAPE DENON • CDR/MD DENON (CDR) • DVD/VDP DENON (DVD) • DBS/CABLE ABC (CABLE) Advanced Operation Operating a component stored in the list of preset codes. • Some ...the MODE 2 switch to the component to be set for the pressed buttons are as shown in the list of preset codes ( End of this manual). • Operation is not possible for the manufacturer of the component whose signals you want to store in the memory. 5 To store the ...
... manufacturer of the component as follows upon shipment from the factory and after resetting: • TV, VCR HITACHI • CD, TAPE DENON • CDR/MD DENON (CDR) • DVD/VDP DENON (DVD) • DBS/CABLE ABC (CABLE) Advanced Operation Operating a component stored in the list of preset codes. • Some ...the MODE 2 switch to the component to be set for the pressed buttons are as shown in the list of preset codes ( End of this manual). • Operation is not possible for the manufacturer of the component whose signals you want to store in the memory. 5 To store the ...

Owners Manual
Page 36
... system buttons 2. Video disc player (VDP) system buttons Advanced Operation 3. Video deck (VCR) system buttons ON/SOURCE : Power on/standby OFF : DENON DVD power off 6, 7 : Manual search (forward and reverse) 2 : Stop 1 : Play 8, 9 : Auto search (to beginning of track) 3 : Pause 0 ~ 9, ... : Return SETUP : Setup •, ª, 0, 1 : Cursor up, down, left and right ENTER : Enter setting ON/SOURCE : Power on/standby 6, 7 : Manual search (forward and reverse) 2 : Stop 1 : Play 8, 9 : Auto search (cue) 3 : Pause 0 ~ 9, +10 : Number • Some manufacturers use...
... system buttons 2. Video disc player (VDP) system buttons Advanced Operation 3. Video deck (VCR) system buttons ON/SOURCE : Power on/standby OFF : DENON DVD power off 6, 7 : Manual search (forward and reverse) 2 : Stop 1 : Play 8, 9 : Auto search (to beginning of track) 3 : Pause 0 ~ 9, ... : Return SETUP : Setup •, ª, 0, 1 : Cursor up, down, left and right ENTER : Enter setting ON/SOURCE : Power on/standby 6, 7 : Manual search (forward and reverse) 2 : Stop 1 : Play 8, 9 : Auto search (cue) 3 : Pause 0 ~ 9, +10 : Number • Some manufacturers use...
Owners Manual
Page 37
... Operation MAIN ON MODE 1 MODE 2 Punch through "Punch Through" is a function allowing you want to set . 1 Set the MODE 1 switch to operate the PLAY, STOP, MANUAL SEARCH and AUTO SEARCH buttons on CD, TAPE, CDR/MD, DVD/VDP or VCR components when in the same way as for... DENON audio components ( page 31). • A TV can be operated when the switch is set . Advanced Operation 4. Digital broadcast satellite (DBS) tuner and cable (CABLE) system ...
... Operation MAIN ON MODE 1 MODE 2 Punch through "Punch Through" is a function allowing you want to set . 1 Set the MODE 1 switch to operate the PLAY, STOP, MANUAL SEARCH and AUTO SEARCH buttons on CD, TAPE, CDR/MD, DVD/VDP or VCR components when in the same way as for... DENON audio components ( page 31). • A TV can be operated when the switch is set . Advanced Operation 4. Digital broadcast satellite (DBS) tuner and cable (CABLE) system ...
Owners Manual
Page 42
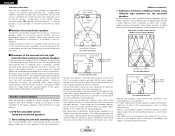
...° Surround back speakers [ As seen from above , creating an enveloping and realistic surround sound presentation. Furthermore, all the DENON original surround modes ( page 26) are direct-radiating (monopolar), then place them slightly behind and at an angle to the listening... surround speakers. • We recommend installing the surround back speaker(s) at a narrower distance than the front speakers. • Consult the owner's manual for your system according to 3 feet Point slightly downwards [ As seen from a position other than the center. 2 Placement of playback signals for...
...° Surround back speakers [ As seen from above , creating an enveloping and realistic surround sound presentation. Furthermore, all the DENON original surround modes ( page 26) are direct-radiating (monopolar), then place them slightly behind and at an angle to the listening... surround speakers. • We recommend installing the surround back speaker(s) at a narrower distance than the front speakers. • Consult the owner's manual for your system according to 3 feet Point slightly downwards [ As seen from a position other than the center. 2 Placement of playback signals for...

Owners Manual
Page 43
... right, center, surround left and right speakers and no further from the listening position than the front speakers. • Consult the owner's manual for your subwoofer for PCM) 2 Set the input mode to the digital input terminal. of surround channel Digital discrete processing Dolby Digital encoding ... the LD player to "AUTO" ( page 19, 20). channel, also called the ".1" channel, containing bass frequencies of presence as for advice on the AVR-1506, switch the DVD player's output mode to "bit stream". of up to "AUTO" ( page 19, 20). 1: Please use a commercially available adapter...
... right, center, surround left and right speakers and no further from the listening position than the front speakers. • Consult the owner's manual for your subwoofer for PCM) 2 Set the input mode to the digital input terminal. of surround channel Digital discrete processing Dolby Digital encoding ... the LD player to "AUTO" ( page 19, 20). channel, also called the ".1" channel, containing bass frequencies of presence as for advice on the AVR-1506, switch the DVD player's output mode to "bit stream". of up to "AUTO" ( page 19, 20). 1: Please use a commercially available adapter...

Owners Manual
Page 44
... this case the DTS-encoded signals may only produce noise. consult the player's owner's manual for an extra disc; The Music mode is of course no need for information on... output for the different channels are trademarks of surround have been recorded as PCM signals. Recent DENON DVD player models feature DTS-compatible digital output - Sources recorded in Dolby Surround • These...analog outputs. A DTS Digital Output logo is a multichannel digital signal format developed by the AVR-1506, or may be selected according to Dolby Pro Logic II when the DOLBY/DTS SURROUND mode...
... this case the DTS-encoded signals may only produce noise. consult the player's owner's manual for an extra disc; The Music mode is of course no need for information on... output for the different channels are trademarks of surround have been recorded as PCM signals. Recent DENON DVD player models feature DTS-compatible digital output - Sources recorded in Dolby Surround • These...analog outputs. A DTS Digital Output logo is a multichannel digital signal format developed by the AVR-1506, or may be selected according to Dolby Pro Logic II when the DOLBY/DTS SURROUND mode...
Owners Manual
Page 45
... source. • DTS Neo:6 Cinema This mode is increased to 96 or 88.2 kHz to achieve a wide frequency range of the pictures must be set manually to recording them with a total of 6.1 channels. DTS 96/24 is a multi-channel digital signal format developed by Digital Theater Systems Inc. As with conventional...
... source. • DTS Neo:6 Cinema This mode is increased to 96 or 88.2 kHz to achieve a wide frequency range of the pictures must be set manually to recording them with a total of 6.1 channels. DTS 96/24 is a multi-channel digital signal format developed by Digital Theater Systems Inc. As with conventional...


