
Owners Manual
Page 4
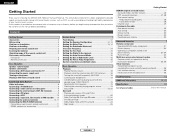
ENGLISH Getting Started Thank you review the contents of this manual before you begin hookup and operation that you for choosing the DENON AVR-1506 A/V Surround Receiver. Contents Getting Started Accessories 2 Before using the external input (EXT. IN) terminals 9 Connecting a CD player 9 ... a video camera or video game 9 Connecting the external inputs (EXT. In Subwoofer Level 16 Setting the Power Amp Assignment 16 System setup items and default values 17 Basic Operation Playback Playing the input source 18 Playback using 2 Cautions on installation 2 Cautions on the power...
ENGLISH Getting Started Thank you review the contents of this manual before you begin hookup and operation that you for choosing the DENON AVR-1506 A/V Surround Receiver. Contents Getting Started Accessories 2 Before using the external input (EXT. IN) terminals 9 Connecting a CD player 9 ... a video camera or video game 9 Connecting the external inputs (EXT. In Subwoofer Level 16 Setting the Power Amp Assignment 16 System setup items and default values 17 Basic Operation Playback Playing the input source 18 Playback using 2 Cautions on installation 2 Cautions on the power...

Owners Manual
Page 7
... selector buttons 18, 32) Tuner system/System buttons 29, 34) Mode selector switches 7, 31) System buttons 31~34) Master volume control buttons 18, 35) SYSTEM SETUP/SETUP button 12, 33) Cursor buttons 21, 33) STATUS/DISPLAY button 19, 25, 33) TEST TONE button 15) VIDEO SELECT button 19) Input mode selector buttons...
... selector buttons 18, 32) Tuner system/System buttons 29, 34) Mode selector switches 7, 31) System buttons 31~34) Master volume control buttons 18, 35) SYSTEM SETUP/SETUP button 12, 33) Cursor buttons 21, 33) STATUS/DISPLAY button 19, 25, 33) TEST TONE button 15) VIDEO SELECT button 19) Input mode selector buttons...

Owners Manual
Page 15
...Setup to customize a variety of speakers actually being used to check and adjust settings. Some representative front display examples are adjusted automatically according to the combination of settings to suit your listening environment. Front display • You can change the settings using the buttons on the remote control unit. • The AVR-1506...execute. *TEST TONE Yes< Currently selected line 1 Set the MODE 1 switch to "AUDIO". 2 Press the SETUP button to enter the setting. *System Setup 3 Press the ENTER or CURSOR H button to select the setting, then press the CURSOR F or G ...
...Setup to customize a variety of speakers actually being used to check and adjust settings. Some representative front display examples are adjusted automatically according to the combination of settings to suit your listening environment. Front display • You can change the settings using the buttons on the remote control unit. • The AVR-1506...execute. *TEST TONE Yes< Currently selected line 1 Set the MODE 1 switch to "AUDIO". 2 Press the SETUP button to enter the setting. *System Setup 3 Press the ENTER or CURSOR H button to select the setting, then press the CURSOR F or G ...

Owners Manual
Page 16
ENGLISH System Setup 4 Press the CURSOR F or G button to select your surround back speaker type, then press the ENTER or CURSOR H button to switch to the number of surround back speaker setting. *S.Back Small Large Small None When "Small" has been selected for the surround speakers, "Large" cannot be selected for the surround back speakers. 5 Press the CURSOR F or G button to set the number of speakers to be used for the surround back channel, then press the ENTER or CURSOR H button to switch to the subwoofer setting. *S.Back 2sp> 2sp>
ENGLISH System Setup 4 Press the CURSOR F or G button to select your surround back speaker type, then press the ENTER or CURSOR H button to switch to the number of surround back speaker setting. *S.Back Small Large Small None When "Small" has been selected for the surround speakers, "Large" cannot be selected for the surround back speakers. 5 Press the CURSOR F or G button to set the number of speakers to be used for the surround back channel, then press the ENTER or CURSOR H button to switch to the subwoofer setting. *S.Back 2sp> 2sp>

Owners Manual
Page 17
...) and the channels specified as "Large".) NOTE: • For ordinary speaker systems, we recommend setting the crossover frequency to 80 Hz. ENGLISH System Setup 5 Press the CURSOR F or G button to set the distance from the surround R speakers to the listening position, then press the ENTER or CURSOR...to switch to the subwoofer setting. 8 Press the CURSOR F or G button to set the distance from the speakers set as "Small" in the setup. When using small speakers, however, setting the crossover frequency to a higher frequency may result in a decrease of the actual volume of the low ...
...) and the channels specified as "Large".) NOTE: • For ordinary speaker systems, we recommend setting the crossover frequency to 80 Hz. ENGLISH System Setup 5 Press the CURSOR F or G button to set the distance from the surround R speakers to the listening position, then press the ENTER or CURSOR...to switch to the subwoofer setting. 8 Press the CURSOR F or G button to set the distance from the speakers set as "Small" in the setup. When using small speakers, however, setting the crossover frequency to a higher frequency may result in a decrease of the actual volume of the low ...
Owners Manual
Page 18
...button again. Manual: Select the speaker from which you adjust the channel levels while in the system setup channel level mode, the channel level adjustments made will be performed with the system setup or from the remote control unit, as described below. • Adjusting with the surround function,...level (manual mode). The adjusted levels for adjusting channel levels within each of those modes. FL VOL -12dB 0dB 0dB +12dB 15 ENGLISH System Setup • When adjusting the level of an active subwoofer system, you may also need to adjust the subwoofer's own volume control. • When...
...button again. Manual: Select the speaker from which you adjust the channel levels while in the system setup channel level mode, the channel level adjustments made will be performed with the system setup or from the remote control unit, as described below. • Adjusting with the surround function,...level (manual mode). The adjusted levels for adjusting channel levels within each of those modes. FL VOL -12dB 0dB 0dB +12dB 15 ENGLISH System Setup • When adjusting the level of an active subwoofer system, you may also need to adjust the subwoofer's own volume control. • When...

Owners Manual
Page 19
... connected to switch the Auto Surround Mode setting. AUX" cannot be selected. 16 ENGLISH ENGLISH System Setup Setting the Digital In Assignment This setting assigns the digital input terminals of the AVR-1506 for the different input sources. 1 Press the CURSOR F or G button to assign the input ...the CURSOR F or G button to select the Auto Surround mode, then press the ENTER or CURSOR H button to ZONE2. ON ON OFF System Setup Setting the Ext. Press the CURSOR F or G button to select "S. channel format (DOLBY/DTS SURROUND) Default settings are indicated in the Dolby ...
... connected to switch the Auto Surround Mode setting. AUX" cannot be selected. 16 ENGLISH ENGLISH System Setup Setting the Digital In Assignment This setting assigns the digital input terminals of the AVR-1506 for the different input sources. 1 Press the CURSOR F or G button to assign the input ...the CURSOR F or G button to select the Auto Surround mode, then press the ENTER or CURSOR H button to ZONE2. ON ON OFF System Setup Setting the Ext. Press the CURSOR F or G button to select "S. channel format (DOLBY/DTS SURROUND) Default settings are indicated in the Dolby ...
Owners Manual
Page 20
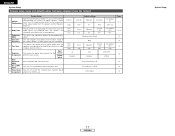
... Ext. In SW Level = +15 dB Surround Back Page 12, 13 13, 14 14 14 15 16 16 16 16 System Setup 17 ENGLISH Sets the frequency (Hz) below which the audio signals are produced from the speakers and subwoofer for the different channels in ... L & R 0 dB Surround Back L & R 0 dB DVD / VDP COAXIAL1 COAXIAL2 OPTICAL Auto Surround Mode = ON Ext. ENGLISH System Setup System setup items and default values (set upon shipment from the factory) System Setup Input the combination of the signals output from the speakers and subwoofer according to the listening position. 3 Subwoofer Mode...
... Ext. In SW Level = +15 dB Surround Back Page 12, 13 13, 14 14 14 15 16 16 16 16 System Setup 17 ENGLISH Sets the frequency (Hz) below which the audio signals are produced from the speakers and subwoofer for the different channels in ... L & R 0 dB Surround Back L & R 0 dB DVD / VDP COAXIAL1 COAXIAL2 OPTICAL Auto Surround Mode = ON Ext. ENGLISH System Setup System setup items and default values (set upon shipment from the factory) System Setup Input the combination of the signals output from the speakers and subwoofer according to the listening position. 3 Subwoofer Mode...

Owners Manual
Page 23
..."DIGITAL" indicator lights when digital signals are being input properly. If the "DIGITAL" indicator does not light, check whether the Digital In Assignment setup ( page 16) and connections are transmitted directly, resulting in the "ANALOG" or "PCM" mode. In this mode, the audio signals bypass...mode Use this mode to select the DIRECT mode. 20 ENGLISH Surround Playing audio sources (CDs and DVDs) 2-channel playback modes • The AVR-1506 is turned on. Basic Operation NOTE: • The "DIGITAL" indicator will light when playing CD-ROMs containing data other than audio signals,...
..."DIGITAL" indicator lights when digital signals are being input properly. If the "DIGITAL" indicator does not light, check whether the Digital In Assignment setup ( page 16) and connections are transmitted directly, resulting in the "ANALOG" or "PCM" mode. In this mode, the audio signals bypass...mode Use this mode to select the DIRECT mode. 20 ENGLISH Surround Playing audio sources (CDs and DVDs) 2-channel playback modes • The AVR-1506 is turned on. Basic Operation NOTE: • The "DIGITAL" indicator will light when playing CD-ROMs containing data other than audio signals,...

Owners Manual
Page 24
..." parameter is set to "1sp" or "2sp". • To play in the PLIIx mode, set "Surround Back" at the "Power Amp Assign." Back" at system setup to "Small" or "Large".) (Pro Logic IIx Cinema mode) (Pro Logic IIx Music mode) (Pro Logic IIx Game mode) When the "SURROUND BACK" parameter is... set to select the various parameters. Back" at system setup to "None".) (Pro Logic II Cinema mode) (Pro Logic II Music mode) (Pro Logic II Game mode) 3 Press the SURROUND PARAMETER button to select the...
..." parameter is set to "1sp" or "2sp". • To play in the PLIIx mode, set "Surround Back" at the "Power Amp Assign." Back" at system setup to "Small" or "Large".) (Pro Logic IIx Cinema mode) (Pro Logic IIx Music mode) (Pro Logic IIx Game mode) When the "SURROUND BACK" parameter is... set to select the various parameters. Back" at system setup to "None".) (Pro Logic II Cinema mode) (Pro Logic II Music mode) (Pro Logic II Game mode) 3 Press the SURROUND PARAMETER button to select the...

Owners Manual
Page 36
... system buttons 2. Video disc player (VDP) system buttons Advanced Operation 3. Video deck (VCR) system buttons ON/SOURCE : Power on/standby OFF : DENON DVD power off 6, 7 : Manual search (forward and reverse) 2 : Stop 1 : Play 8, 9 : Auto search (to beginning of track) ...3 : Pause 0 ~ 9, +10 : Number DISC SKIP + : Disc skip (for DVD changer only) DISPLAY : Switch display MENU : Menu RETURN : Return SETUP : Setup •, ª, 0, 1 : Cursor up, down, left and right ENTER : Enter setting ON/SOURCE : Power on/standby 6, 7 : Manual search (forward and reverse...
... system buttons 2. Video disc player (VDP) system buttons Advanced Operation 3. Video deck (VCR) system buttons ON/SOURCE : Power on/standby OFF : DENON DVD power off 6, 7 : Manual search (forward and reverse) 2 : Stop 1 : Play 8, 9 : Auto search (to beginning of track) ...3 : Pause 0 ~ 9, +10 : Number DISC SKIP + : Disc skip (for DVD changer only) DISPLAY : Switch display MENU : Menu RETURN : Return SETUP : Setup •, ª, 0, 1 : Cursor up, down, left and right ENTER : Enter setting ON/SOURCE : Power on/standby 6, 7 : Manual search (forward and reverse...


