
Service Manual
Page 1
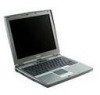
... Under the Keyboard Mini PCI Card Modem Hard Drive Removing the Hard Drive Installing the Hard Drive Removing the Interposer Replacing the Interposer Docking Doors Removing the Docking Doors Installing the Docking Doors Bluetooth™ Display Removing the Display Assembly Replacing the Display Latch Palm Rest Cooling Fan file:///F|/Service%20Manuals/Dell/Latitude/d400/index.htm (1 of 3) [2/28/2004 8:05:56...
... Under the Keyboard Mini PCI Card Modem Hard Drive Removing the Hard Drive Installing the Hard Drive Removing the Interposer Replacing the Interposer Docking Doors Removing the Docking Doors Installing the Docking Doors Bluetooth™ Display Removing the Display Assembly Replacing the Display Latch Palm Rest Cooling Fan file:///F|/Service%20Manuals/Dell/Latitude/d400/index.htm (1 of 3) [2/28/2004 8:05:56...
Service Manual
Page 37
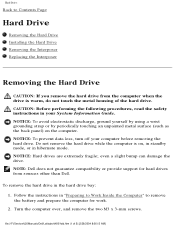
...hard drive bay: 1. To remove the hard drive in your computer before removing the hard drive. Turn the computer over, and remove the two M3 x 3-mm screws. NOTE: Dell does not guarantee compatibility or provide support for work. 2. file:///F|/Service%20Manuals/Dell/Latitude/d400/hdd.htm (1 of the hard drive. Do not remove the hard drive...Computer" to Contents Page Hard Drive Removing the Hard Drive Installing the Hard Drive Removing the Interposer Replacing the Interposer Removing the Hard Drive CAUTION: If you remove the hard drive from sources other than Dell. even a slight ...
...hard drive bay: 1. To remove the hard drive in your computer before removing the hard drive. Turn the computer over, and remove the two M3 x 3-mm screws. NOTE: Dell does not guarantee compatibility or provide support for work. 2. file:///F|/Service%20Manuals/Dell/Latitude/d400/hdd.htm (1 of the hard drive. Do not remove the hard drive...Computer" to Contents Page Hard Drive Removing the Hard Drive Installing the Hard Drive Removing the Interposer Replacing the Interposer Removing the Hard Drive CAUTION: If you remove the hard drive from sources other than Dell. even a slight ...

Service Manual
Page 39
Replace and tighten the two M3 x 3-mm screws. 4. Use the Operating System CD to remove the battery and prepare the computer for work. 2. Follow the instructions in "Preparing to Work Inside the Computer" to install the operating system for your computer. 5. Hard Drive: 2. Use the ...Interposer 1. Remove the two M3 x 3-mm screws from the side of 5) [2/28/2004 8:06:13 AM] Remove the hard drive. 3. Slide the hard drive into the bay until it is fully seated. 3. file:///F|/Service%20Manuals/Dell/Latitude/d400/hdd.htm (3 of the hard drive, and remove the hard drive carrier.
Replace and tighten the two M3 x 3-mm screws. 4. Use the Operating System CD to remove the battery and prepare the computer for work. 2. Follow the instructions in "Preparing to Work Inside the Computer" to install the operating system for your computer. 5. Hard Drive: 2. Use the ...Interposer 1. Remove the two M3 x 3-mm screws from the side of 5) [2/28/2004 8:06:13 AM] Remove the hard drive. 3. Slide the hard drive into the bay until it is fully seated. 3. file:///F|/Service%20Manuals/Dell/Latitude/d400/hdd.htm (3 of the hard drive, and remove the hard drive carrier.

Service Manual
Page 40
... from the old hard drive by pulling it straight onto the hard drive. Ensure that the pins are oriented correctly. Hard Drive: 1 M3 x 3-mm screws (2) 2864D 2 hard drive carrier 7X499 4. When the file:///F|/Service%20Manuals/Dell/Latitude/d400/hdd.htm (4 of 5) [2/28/2004 8:06:13 AM] Carefully remove the interposer by pushing it straight off the hard drive. 1 interposer 8267R Replacing the Interposer NOTICE...
... from the old hard drive by pulling it straight onto the hard drive. Ensure that the pins are oriented correctly. Hard Drive: 1 M3 x 3-mm screws (2) 2864D 2 hard drive carrier 7X499 4. When the file:///F|/Service%20Manuals/Dell/Latitude/d400/hdd.htm (4 of 5) [2/28/2004 8:06:13 AM] Carefully remove the interposer by pushing it straight off the hard drive. 1 interposer 8267R Replacing the Interposer NOTICE...

Service Manual
Page 48
... 5. Remove the two M2.5 x 6-mm screws next to remove the battery and prepare the computer for work. 2. Remove the hard drive. 4. file:///F|/Service%20Manuals/Dell/Latitude/d400/display.htm (1 of 4) [2/28/2004 8:06:16 AM] Follow the instructions in your System Information Guide. NOTICE: To avoid ...metal surface (such as the back panel) on the computer. 1. Display: Back to Contents Page Display Removing the Display Assembly Replacing the Display Latch Removing the Display Assembly CAUTION: Before performing the following procedures, read the safety instructions in "Preparing to Work ...
... 5. Remove the two M2.5 x 6-mm screws next to remove the battery and prepare the computer for work. 2. Remove the hard drive. 4. file:///F|/Service%20Manuals/Dell/Latitude/d400/display.htm (1 of 4) [2/28/2004 8:06:16 AM] Follow the instructions in your System Information Guide. NOTICE: To avoid ...metal surface (such as the back panel) on the computer. 1. Display: Back to Contents Page Display Removing the Display Assembly Replacing the Display Latch Removing the Display Assembly CAUTION: Before performing the following procedures, read the safety instructions in "Preparing to Work ...

Service Manual
Page 50
... bumpers 6U549 file:///F|/Service%20Manuals/Dell/Latitude/d400/display.htm (3 of 4) [2/28/2004 8:06:16 AM] Remove the hard drive. 3. Follow the instructions in your System Information Guide. Remove the keyboard. 4. Display: CAUTION: Before performing the following procedures, read the safety instructions in "Preparing to Work Inside the Computer." 2. To replace the display latch, you must...
... bumpers 6U549 file:///F|/Service%20Manuals/Dell/Latitude/d400/display.htm (3 of 4) [2/28/2004 8:06:16 AM] Remove the hard drive. 3. Follow the instructions in your System Information Guide. Remove the keyboard. 4. Display: CAUTION: Before performing the following procedures, read the safety instructions in "Preparing to Work Inside the Computer." 2. To replace the display latch, you must...


