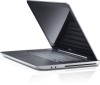
Setup Guide
Page 5
... 5 Connect the AC Adapter 6 Connect the Network Cable (Optional 7 Press the Power Button 8 Set Up Microsoft Windows 9 Create System Recovery Media (Recommended 10 Enable or Disable Wireless (Optional 12 Set Up Wireless Display (Optional 14 Set Up 3D TV (Optional 16 Connect to the Internet (Optional 18 Using Your XPS Laptop 20 Right View Features 20 Left View Features 22 Back View Features 26 Computer Base and Keyboard Features 28 Touch Pad Gestures 32 Multimedia Control Keys 36 Display Features 38 Status Lights and Indicators 40 Disabling Battery Charging...
... 5 Connect the AC Adapter 6 Connect the Network Cable (Optional 7 Press the Power Button 8 Set Up Microsoft Windows 9 Create System Recovery Media (Recommended 10 Enable or Disable Wireless (Optional 12 Set Up Wireless Display (Optional 14 Set Up 3D TV (Optional 16 Connect to the Internet (Optional 18 Using Your XPS Laptop 20 Right View Features 20 Left View Features 22 Back View Features 26 Computer Base and Keyboard Features 28 Touch Pad Gestures 32 Multimedia Control Keys 36 Display Features 38 Status Lights and Indicators 40 Disabling Battery Charging...
Setup Guide
Page 6
Contents Power Problems 55 Memory Problems 56 Lockups and Software Problems 57 Using Support Tools 59 Dell Support Center 59 My Dell Downloads 60 Hardware Troubleshooter 61 Dell Diagnostics 61 Restoring Your Operating System 63 System Restore 64 Dell DataSafe Local Backup 65 System Recovery Media 67 Dell Factory Image Restore 68 Getting Help 70 Technical Support and Customer Service 71 DellConnect 71 Online Services 72 Automated Order-Status Service 73 Product Information 73 Returning Items for Repair Under Warranty or...
Contents Power Problems 55 Memory Problems 56 Lockups and Software Problems 57 Using Support Tools 59 Dell Support Center 59 My Dell Downloads 60 Hardware Troubleshooter 61 Dell Diagnostics 61 Restoring Your Operating System 63 System Restore 64 Dell DataSafe Local Backup 65 System Recovery Media 67 Dell Factory Image Restore 68 Getting Help 70 Technical Support and Customer Service 71 DellConnect 71 Online Services 72 Automated Order-Status Service 73 Product Information 73 Returning Items for Repair Under Warranty or...
Setup Guide
Page 11
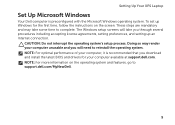
... computer, it is preconfigured with the Microsoft Windows operating system. CAUTION: Do not interrupt the operating system's setup process. NOTE: For more information on the screen. Setting Up Your XPS Laptop Set Up Microsoft Windows Your Dell computer is recommended that you download and install the latest BIOS and drivers for the first time, follow the instructions on the operating system and features, go to complete...
... computer, it is preconfigured with the Microsoft Windows operating system. CAUTION: Do not interrupt the operating system's setup process. NOTE: For more information on the screen. Setting Up Your XPS Laptop Set Up Microsoft Windows Your Dell computer is recommended that you download and install the latest BIOS and drivers for the first time, follow the instructions on the operating system and features, go to complete...

Setup Guide
Page 12
... when you set up Microsoft Windows. Setting Up Your XPS Laptop Create System Recovery Media (Recommended) NOTE: It is recommended that you create a system recovery media as soon as you purchased the computer, while preserving data files (without the need of 8 GB or DVD-R/DVD+R/Blu-ray Disc NOTE: Dell DataSafe Local Backup does not support rewritable discs. 10 You can be used to restore your computer to the operating state...
... when you set up Microsoft Windows. Setting Up Your XPS Laptop Create System Recovery Media (Recommended) NOTE: It is recommended that you create a system recovery media as soon as you purchased the computer, while preserving data files (without the need of 8 GB or DVD-R/DVD+R/Blu-ray Disc NOTE: Dell DataSafe Local Backup does not support rewritable discs. 10 You can be used to restore your computer to the operating state...

Setup Guide
Page 13
Insert the disc or USB key in the computer. 3. NOTE: For information on restoring your operating system using the system recovery media, see "Connect the AC Adapter" on page 6). 2. Click Create Recovery Media. 5. Follow the instructions on page 67. 11 Setting Up Your XPS Laptop To create a system recovery media: 1. Click Start → All Programs→ Dell DataSafe Local Backup. 4. Ensure that the AC adapter is connected (see "System Recovery Media" on the screen.
Insert the disc or USB key in the computer. 3. NOTE: For information on restoring your operating system using the system recovery media, see "Connect the AC Adapter" on page 6). 2. Click Create Recovery Media. 5. Follow the instructions on page 67. 11 Setting Up Your XPS Laptop To create a system recovery media: 1. Click Start → All Programs→ Dell DataSafe Local Backup. 4. Ensure that the AC adapter is connected (see "System Recovery Media" on the screen.
Setup Guide
Page 17
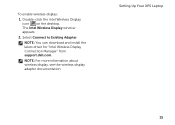
NOTE: For more information about wireless display, see the wireless display adapter documentation. The Intel Wireless Display window appears. 2. Select Connect to Existing Adapter. Setting Up Your XPS Laptop 15 To enable wireless display: 1. NOTE: You can download and install the latest driver for "Intel Wireless Display Connection Manager" from support.dell.com. Double-click the Intel Wireless Display icon on the desktop.
NOTE: For more information about wireless display, see the wireless display adapter documentation. The Intel Wireless Display window appears. 2. Select Connect to Existing Adapter. Setting Up Your XPS Laptop 15 To enable wireless display: 1. NOTE: You can download and install the latest driver for "Intel Wireless Display Connection Manager" from support.dell.com. Double-click the Intel Wireless Display icon on the desktop.

Setup Guide
Page 18
... then click Set up the HDMI 1.4 3D TV: a. Setting Up Your XPS Laptop Set Up 3D TV (Optional) NOTE: To know if your TV supports the 3D features available on your TV, use the 3D TV's settings to reduce the display resolution. NOTE: The HDMI cable transmits both audio and video signals. 2. b. Set the 3D mode to default or normal. Right-click the desktop and select NVIDIA Control Panel. b.
... then click Set up the HDMI 1.4 3D TV: a. Setting Up Your XPS Laptop Set Up 3D TV (Optional) NOTE: To know if your TV supports the 3D features available on your TV, use the 3D TV's settings to reduce the display resolution. NOTE: The HDMI cable transmits both audio and video signals. 2. b. Set the 3D mode to default or normal. Right-click the desktop and select NVIDIA Control Panel. b.
Setup Guide
Page 20
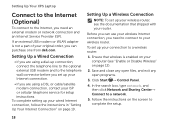
... dell.com. If an external USB modem or WLAN adapter is enabled on your wired Internet connection, follow the instructions in "Setting Up Your Internet Connection" on the screen to complete the setup. 18 Setting Up a Wired Connection • If you are using a DSL or cable/satellite modem connection, contact your ISP or cellular telephone service for setup instructions. To set up your computer (see the documentation that wireless is not a part of your original order...
... dell.com. If an external USB modem or WLAN adapter is enabled on your wired Internet connection, follow the instructions in "Setting Up Your Internet Connection" on the screen to complete the setup. 18 Setting Up a Wired Connection • If you are using a DSL or cable/satellite modem connection, contact your ISP or cellular telephone service for setup instructions. To set up your computer (see the documentation that wireless is not a part of your original order...
Setup Guide
Page 21
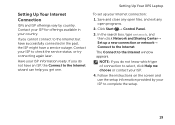
Setting Up Your XPS Laptop To set up a new connection or network→ Connect to the Internet wizard can help you cannot connect to the Internet but have an ISP, the Connect to the Internet. Contact your ISP for offerings available in the past, the ISP might have a service outage. Click Start → Control Panel. 3. The Connect to check the service status, or try connecting again later. Have your ISP...
Setting Up Your XPS Laptop To set up a new connection or network→ Connect to the Internet wizard can help you cannot connect to the Internet but have an ISP, the Connect to the Internet. Contact your ISP for offerings available in the past, the ISP might have a service outage. Click Start → Control Panel. 3. The Connect to check the service status, or try connecting again later. Have your ISP...

Setup Guide
Page 25
... powered on the computer to charge USB devices when the computer is powered off when only 10% of the total battery life remains. 23 Digital interface standard connector that connects to a TV for both 5.1 audio and video signals. The USB PowerShare feature allows you turn on /off your computer while charging a USB device, the device stops charging. Using Your XPS Laptop 1 HDMI connector - In such cases, turn off or in sleep...
... powered on the computer to charge USB devices when the computer is powered off when only 10% of the total battery life remains. 23 Digital interface standard connector that connects to a TV for both 5.1 audio and video signals. The USB PowerShare feature allows you turn on /off your computer while charging a USB device, the device stops charging. Using Your XPS Laptop 1 HDMI connector - In such cases, turn off or in sleep...

Setup Guide
Page 27
... light indicates approximately 20% of the total battery charge. 7 Battery status indicator button - For the supported memory cards, see "Specifications" on the battery status indicator lights when pressed. 25 Connect to view and share digital photos, music, videos, and documents stored on memory cards. Using Your XPS Laptop 4 USB 3.0 connectors (2) - Turns on page 80. Save the blank for use when no media card is installed in the slot; Provides a fast and convenient way to USB devices, such as a mouse, keyboard, printer, external drive...
... light indicates approximately 20% of the total battery charge. 7 Battery status indicator button - For the supported memory cards, see "Specifications" on the battery status indicator lights when pressed. 25 Connect to view and share digital photos, music, videos, and documents stored on memory cards. Using Your XPS Laptop 4 USB 3.0 connectors (2) - Turns on page 80. Save the blank for use when no media card is installed in the slot; Provides a fast and convenient way to USB devices, such as a mouse, keyboard, printer, external drive...

Setup Guide
Page 31
.... 3 Touch pad - To use the functions press + the required key. Using Your XPS Laptop 1 Power button and light - Press to move the cursor, drag or move selected items, and left -click and right-click functions like those on the button indicates the power states. The dual display enable or disable key , wireless enable or disable key , battery charge status key , brightness increase and decrease keys, optical drive eject key , and the multimedia keys are located in this row. The touch pad supports the Scroll, Flick...
.... 3 Touch pad - To use the functions press + the required key. Using Your XPS Laptop 1 Power button and light - Press to move the cursor, drag or move selected items, and left -click and right-click functions like those on the button indicates the power states. The dual display enable or disable key , wireless enable or disable key , battery charge status key , brightness increase and decrease keys, optical drive eject key , and the multimedia keys are located in this row. The touch pad supports the Scroll, Flick...
Setup Guide
Page 52
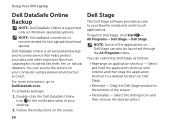
... can access the service on Windows operating systems. NOTE: A broadband connection is recommended for fast upload/download speeds. Using Your XPS Laptop Dell DataSafe Online Backup NOTE: Dell DataSafe Online is supported only on your computer using a password‑protected account. For more information, go to your favorite media and multi-touch applications. Dell Stage The Dell Stage software provides access to DellDataSafe.com. To schedule backups: 1. Double-click the Dell DataSafe...
... can access the service on Windows operating systems. NOTE: A broadband connection is recommended for fast upload/download speeds. Using Your XPS Laptop Dell DataSafe Online Backup NOTE: Dell DataSafe Online is supported only on your computer using a password‑protected account. For more information, go to your favorite media and multi-touch applications. Dell Stage The Dell Stage software provides access to DellDataSafe.com. To schedule backups: 1. Double-click the Dell DataSafe...
Setup Guide
Page 55
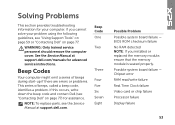
... Video card or chip failure Processor failure Display failure 53 See the Service Manual at support.dell.com. NOTE: To replace parts, see "Contacting Dell" on page 77. Beep Codes Your computer might emit a series of beeps during start-up if there are errors or problems. This series of beeps, called a beep code, identifies a problem. Beep Code One Two Three Four Five Six Seven Eight Possible Problem Possible system board failure - BIOS ROM...
... Video card or chip failure Processor failure Display failure 53 See the Service Manual at support.dell.com. NOTE: To replace parts, see "Contacting Dell" on page 77. Beep Codes Your computer might emit a series of beeps during start-up if there are errors or problems. This series of beeps, called a beep code, identifies a problem. Beep Code One Two Three Four Five Six Seven Eight Possible Problem Possible system board failure - BIOS ROM...

Setup Guide
Page 57
... keyboard, move the connected mouse or a finger on the touch pad, or press the power button to verify that the electrical outlet is breathing white - Also bypass power protection devices, power strips, and power extension cables to resume normal operation. • If the display is on properly. • Ensure that the computer turns on . If the power light is working by testing it back on. • If the problem...
... keyboard, move the connected mouse or a finger on the touch pad, or press the power button to verify that the electrical outlet is breathing white - Also bypass power protection devices, power strips, and power extension cables to resume normal operation. • If the display is on properly. • Ensure that the computer turns on . If the power light is working by testing it back on. • If the problem...
Setup Guide
Page 58
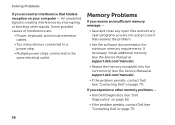
..., install additional memory (see the Service Manual at support.dell.com/manuals). • Reseat the memory module(s) into the connector(s) (see the Service Manual at support.dell.com/manuals). • If the problem persists, contact Dell (see "Contacting Dell" on your computer - Memory Problems If you receive an insufficient memory message - • Save and close any open files and exit any open programs you are : • Power, keyboard, and mouse extension cables. • Too many devices connected to a power...
..., install additional memory (see the Service Manual at support.dell.com/manuals). • Reseat the memory module(s) into the connector(s) (see the Service Manual at support.dell.com/manuals). • If the problem persists, contact Dell (see "Contacting Dell" on your computer - Memory Problems If you receive an insufficient memory message - • Save and close any open files and exit any open programs you are : • Power, keyboard, and mouse extension cables. • Too many devices connected to a power...

Setup Guide
Page 60
... that the device drivers do not conflict with the operating system installed on the screen. Write down any open files or programs and shut down your computer meets the minimum hardware requirements needed to help in troubleshooting when contacting Dell. 58 If you have other software problems - • Back up your files immediately. • Use a virus-scanning program to check the hard drive or CDs...
... that the device drivers do not conflict with the operating system installed on the screen. Write down any open files or programs and shut down your computer meets the minimum hardware requirements needed to help in troubleshooting when contacting Dell. 58 If you have other software problems - • Back up your files immediately. • Use a virus-scanning program to check the hard drive or CDs...
Setup Guide
Page 61
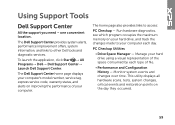
.... This utility displays all hardware scans, tests, system changes, critical events and restoration points on the day they occurred. 59 one convenient location. Manage your hard drive using a visual representation of your computer each type of file. • Performance and Configuration History - Using Support Tools Dell Support Center All the support you need - To launch the application, click Start → All Programs→ Dell→ Dell Support Center→ Launch Dell Support Center. Monitor system...
.... This utility displays all hardware scans, tests, system changes, critical events and restoration points on the day they occurred. 59 one convenient location. Manage your hard drive using a visual representation of your computer each type of file. • Performance and Configuration History - Using Support Tools Dell Support Center All the support you need - To launch the application, click Start → All Programs→ Dell→ Dell Support Center→ Launch Dell Support Center. Monitor system...

Setup Guide
Page 63
... Support. 2. Type hardware troubleshooter in "Lockups and Software Problems" on (or restart) your computer and press when the DELL logo appears. 61 To enter the system setup (BIOS) utility, turn on page 57 and run Dell Diagnostics before you contact Dell for technical assistance. In the search results, select the option that the device you want to test displays in the system setup utility and is detected but incorrectly configured...
... Support. 2. Type hardware troubleshooter in "Lockups and Software Problems" on (or restart) your computer and press when the DELL logo appears. 61 To enter the system setup (BIOS) utility, turn on page 57 and run Dell Diagnostics before you contact Dell for technical assistance. In the search results, select the option that the device you want to test displays in the system setup utility and is detected but incorrectly configured...
Setup Guide
Page 82
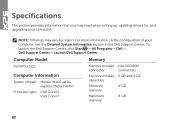
... Model Memory Dell XPS L511z Computer Information System chipset Mobile Intel 6 series express chipset HM67 Processor type Intel Core i5 Intel Core i7 Memory module connector Memory module capacities Minimum memory Maximum memory two SODIMM connectors 2 GB and 4 GB 4 GB 8 GB 80 To launch the Dell Support Center, click Start → All Programs→ Dell→ Dell Support Center→ Launch Dell Support Center. NOTE: Offerings may need when setting up, updating drivers...
... Model Memory Dell XPS L511z Computer Information System chipset Mobile Intel 6 series express chipset HM67 Processor type Intel Core i5 Intel Core i7 Memory module connector Memory module capacities Minimum memory Maximum memory two SODIMM connectors 2 GB and 4 GB 4 GB 8 GB 80 To launch the Dell Support Center, click Start → All Programs→ Dell→ Dell Support Center→ Launch Dell Support Center. NOTE: Offerings may need when setting up, updating drivers...


