
Owner's Manual
Page 4
... 38 Enabling S/PDIF Digital Audio 38 Enabling S/PDIF in the Windows Audio Driver 39 Setting Up the Cyberlink (CL) Headphones 39 5 Using the Optional Wireless Keyboard and Mouse 41 Media Control Keys 42 Using the Touch Pad 43 Customizing the Touch Pad 44 4 Contents
... 38 Enabling S/PDIF Digital Audio 38 Enabling S/PDIF in the Windows Audio Driver 39 Setting Up the Cyberlink (CL) Headphones 39 5 Using the Optional Wireless Keyboard and Mouse 41 Media Control Keys 42 Using the Touch Pad 43 Customizing the Touch Pad 44 4 Contents

Owner's Manual
Page 5
...47 Making Images and Text Look Bigger or Sharper . . . 47 7 Cleaning Your Computer 49 Computer and Display 49 CDs and DVDs 49 Keyboard and Touch Pad 50 8 Troubleshooting 51 Solving Problems 51 Battery Problems 51 Display Problems 51 Drive Problems 52 E-Mail and Internet Problems 53 Error Messages... 54 IEEE 1394 Device Problems 55 Keyboard Problems 55 Lockups and Software Problems 56 Memory Problems 58 Mouse Problems 58 Network Problems 60 Power Problems 60 Contents 5
...47 Making Images and Text Look Bigger or Sharper . . . 47 7 Cleaning Your Computer 49 Computer and Display 49 CDs and DVDs 49 Keyboard and Touch Pad 50 8 Troubleshooting 51 Solving Problems 51 Battery Problems 51 Display Problems 51 Drive Problems 52 E-Mail and Internet Problems 53 Error Messages... 54 IEEE 1394 Device Problems 55 Keyboard Problems 55 Lockups and Software Problems 56 Memory Problems 58 Mouse Problems 58 Network Problems 60 Power Problems 60 Contents 5

Owner's Manual
Page 18
... joysticks or cameras, or for bootable USB devices (see "System Setup Options" on page 70 for more information on when a device such as printers and keyboards. 4 headphone/lineout connector Use the headphone/line-out connector to a USB device). NOTICE: To avoid losing data, do not use the back USB connectors for...
... joysticks or cameras, or for bootable USB devices (see "System Setup Options" on page 70 for more information on when a device such as printers and keyboards. 4 headphone/lineout connector Use the headphone/line-out connector to a USB device). NOTICE: To avoid losing data, do not use the back USB connectors for...
Owner's Manual
Page 19
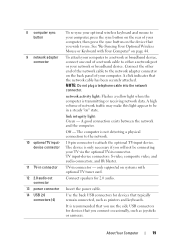
...of your computer. About Your Computer 19 Use the back USB connectors for 2.0 audio. See "Re-Syncing Your Optional Wireless Mouse or Keyboard with Your Computer" on systems with optional TV tuner card. Connect speakers for devices that you will not be in connector - link integrity...volume of network traffic may make this light appear to either a network port or your computer to a network or broadband device, connect one end of the network cable to use the side USB connectors for devices that typically remain connected, such as joysticks or cameras. only ...
...of your computer. About Your Computer 19 Use the back USB connectors for 2.0 audio. See "Re-Syncing Your Optional Wireless Mouse or Keyboard with Your Computer" on systems with optional TV tuner card. Connect speakers for devices that you will not be in connector - link integrity...volume of network traffic may make this light appear to either a network port or your computer to a network or broadband device, connect one end of the network cable to use the side USB connectors for devices that typically remain connected, such as joysticks or cameras. only ...

Owner's Manual
Page 32
Media Control Buttons NOTE: The media control buttons are capacitive buttons, and as such, may flash during startup. The top four media control buttons to the right of these media control buttons. 32 Using Multimedia Your keyboard may also incorporate some of the display. The media control buttons only light up when the user's hand is detected in close proximity to the right of your display may feel different from other buttons when pressed.
Media Control Buttons NOTE: The media control buttons are capacitive buttons, and as such, may flash during startup. The top four media control buttons to the right of these media control buttons. 32 Using Multimedia Your keyboard may also incorporate some of the display. The media control buttons only light up when the user's hand is detected in close proximity to the right of your display may feel different from other buttons when pressed.

Owner's Manual
Page 33
... control buttons to copy CDs, see the CD software that you follow all copyright laws when you have the optional optimized wireless keyboard, the media control buttons on your keyboard. Mute the sound. Play the next track. Disc and Disc-Slot Indicators Either the disc or disc-slot indicator lights up when...
... control buttons to copy CDs, see the CD software that you follow all copyright laws when you have the optional optimized wireless keyboard, the media control buttons on your keyboard. Mute the sound. Play the next track. Disc and Disc-Slot Indicators Either the disc or disc-slot indicator lights up when...

Owner's Manual
Page 41
Using the Optional Wireless Keyboard and Mouse Your Dell™ XPS™ computer supports a special wireless (non-Bluetooth) keyboard and mouse which may not be available on other devices that could be used with your computer. 1 2 1 optimized wireless keyboard 2 optimized wireless mouse Using the Optional Wireless Keyboard and Mouse 41 NOTE: The optional keyboard and mouse have special features which are optimized for use with your computer.
Using the Optional Wireless Keyboard and Mouse Your Dell™ XPS™ computer supports a special wireless (non-Bluetooth) keyboard and mouse which may not be available on other devices that could be used with your computer. 1 2 1 optimized wireless keyboard 2 optimized wireless mouse Using the Optional Wireless Keyboard and Mouse 41 NOTE: The optional keyboard and mouse have special features which are optimized for use with your computer.

Owner's Manual
Page 42
Press multiple times to skip forward one track/chapter. These buttons light up when you in "Using Multimedia" ... from other buttons when pressed. Press to start of volume and playback functions on page 31, the optional keyboard also incorporates the following keys. Press once to go back to change channels (increasing). Press to the start...rewind within the current track/chapter. Press to fast-forward within the current track/chapter. The optional wireless keyboard has media control keys to the basic media control keys shown in quick control of the current playing ...
Press multiple times to skip forward one track/chapter. These buttons light up when you in "Using Multimedia" ... from other buttons when pressed. Press to start of volume and playback functions on page 31, the optional keyboard also incorporates the following keys. Press once to go back to change channels (increasing). Press to the start...rewind within the current track/chapter. Press to fast-forward within the current track/chapter. The optional wireless keyboard has media control keys to the basic media control keys shown in quick control of the current playing ...

Owner's Manual
Page 43
... to allow you would use your thumb to press the left touch-pad button or the alternate left touch-pad button Using the Optional Wireless Keyboard and Mouse 43 Use the touch pad and touch-pad buttons as you to the left of the touch pad or use a mouse. 1 2 1 touch pad...; To move the cursor, lightly slide your finger over the touch pad. • To select an object, lightly tap once on the surface of the keyboard. 1 1 alternate left touchpad button to move the cursor on the display.
... to allow you would use your thumb to press the left touch-pad button or the alternate left touch-pad button Using the Optional Wireless Keyboard and Mouse 43 Use the touch pad and touch-pad buttons as you to the left of the touch pad or use a mouse. 1 2 1 touch pad...; To move the cursor, lightly slide your finger over the touch pad. • To select an object, lightly tap once on the surface of the keyboard. 1 1 alternate left touchpad button to move the cursor on the display.

Owner's Manual
Page 44
... Touch Pad You can also be used). Re-Syncing Your Optional Wireless Mouse or Keyboard with your computer, follow these instructions: 1 Turn the computer on. 2 Turn on the keyboard or mouse. 44 Using the Optional Wireless Keyboard and Mouse • To select and move the selected object by sliding your finger... pad or use your thumb to press the left touch-pad button twice (the alternate left touch-pad button to the left of the keyboard can use the Mouse Properties window to re-sync your computer is running Microsoft Windows Vista™ Operating System: Click the Windows Vista Start...
... Touch Pad You can also be used). Re-Syncing Your Optional Wireless Mouse or Keyboard with your computer, follow these instructions: 1 Turn the computer on. 2 Turn on the keyboard or mouse. 44 Using the Optional Wireless Keyboard and Mouse • To select and move the selected object by sliding your finger... pad or use your thumb to press the left touch-pad button twice (the alternate left touch-pad button to the left of the keyboard can use the Mouse Properties window to re-sync your computer is running Microsoft Windows Vista™ Operating System: Click the Windows Vista Start...

Owner's Manual
Page 45
If you experience any problems, see "Troubleshooting" on the mouse or keyboard. Using the Optional Wireless Keyboard and Mouse 45 The mouse or keyboard should now be paired with your computer's left speaker. 4 Press the sync button on page 51. 1 2 3 4 5 1 computer sync button 3 keyboard power switch 5 mouse sync button 2 keyboard sync button 4 mouse power button 3 Press the sync button to the rear of your computer.
If you experience any problems, see "Troubleshooting" on the mouse or keyboard. Using the Optional Wireless Keyboard and Mouse 45 The mouse or keyboard should now be paired with your computer's left speaker. 4 Press the sync button on page 51. 1 2 3 4 5 1 computer sync button 3 keyboard power switch 5 mouse sync button 2 keyboard sync button 4 mouse power button 3 Press the sync button to the rear of your computer.
Owner's Manual
Page 46
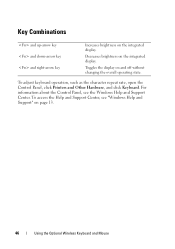
..., see the Windows Help and Support Center. Toggles the display on the integrated display. To adjust keyboard operation, such as the character repeat rate, open the Control Panel, click Printers and Other Hardware, and click Keyboard. For information about the Control Panel, see "Windows Help and Support" on the integrated display. Key...
..., see the Windows Help and Support Center. Toggles the display on the integrated display. To adjust keyboard operation, such as the character repeat rate, open the Control Panel, click Printers and Other Hardware, and click Keyboard. For information about the Control Panel, see "Windows Help and Support" on the integrated display. Key...

Owner's Manual
Page 49
Only use liquid or aerosol cleaners, which may contain flammable substances. If you notice problems, such as skipping, with water and wipe the computer and keyboard. NOTICE: To avoid damaging the computer or display, do not wipe in damage to seep between the touch pad and the surrounding palm rest. NOTE: A ...
Only use liquid or aerosol cleaners, which may contain flammable substances. If you notice problems, such as skipping, with water and wipe the computer and keyboard. NOTICE: To avoid damaging the computer or display, do not wipe in damage to seep between the touch pad and the surrounding palm rest. NOTE: A ...

Owner's Manual
Page 50
... products that clean discs and provide some protection from between the touch pad and the surrounding palm rest or keyboard surface. 50 Cleaning Your Computer Do not use on the keyboard. Cleaning products for CDs are also safe to use liquid or aerosol cleaners, which may contain flammable substances.... a soft, lint-free cloth with water. You can of compressed air to remove dust from dust, fingerprints, and scratches. CAUTION: Clean your keyboard has a power button, turn it gently across the surface of the touch pad. Do not allow water from the center to the outer edge of...
... products that clean discs and provide some protection from between the touch pad and the surrounding palm rest or keyboard surface. 50 Cleaning Your Computer Do not use on the keyboard. Cleaning products for CDs are also safe to use liquid or aerosol cleaners, which may contain flammable substances.... a soft, lint-free cloth with water. You can of compressed air to remove dust from dust, fingerprints, and scratches. CAUTION: Clean your keyboard has a power button, turn it gently across the surface of the touch pad. Do not allow water from the center to the outer edge of...
Owner's Manual
Page 55
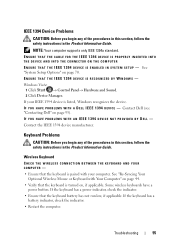
... IF YOU HAVE PROBLEMS WITH AN IEEE 1394 DEVICE NOT PROVIDED BY DELL - See "Re-Syncing Your Optional Wireless Mouse or Keyboard with your IEEE 1394 device is turned on page 44. • Verify that the keyboard is listed, Windows recognizes the device. IEEE 1394 Device Problems CAUTION...: Before you begin any of the procedures in this section, follow the safety instructions in the Product Information Guide. Keyboard Problems CAUTION: Before you begin any of the procedures in this section, follow the safety instructions in the Product Information Guide. Some ...
... IF YOU HAVE PROBLEMS WITH AN IEEE 1394 DEVICE NOT PROVIDED BY DELL - See "Re-Syncing Your Optional Wireless Mouse or Keyboard with your IEEE 1394 device is turned on page 44. • Verify that the keyboard is listed, Windows recognizes the device. IEEE 1394 Device Problems CAUTION...: Before you begin any of the procedures in this section, follow the safety instructions in the Product Information Guide. Keyboard Problems CAUTION: Before you begin any of the procedures in this section, follow the safety instructions in the Product Information Guide. Some ...

Owner's Manual
Page 56
... computer turns off), and then restart your computer. 56 Troubleshooting R U N T H E H A R D W A R E TR O U B L E S H O O T E R - S E E Y O U R K E Y B O A R D D O C U M E N T A T I O N - USB Keyboard CHECK THE KEYBOARD CABLE - • Ensure that the cable is firmly connected to perform an operating system shutdown. The computer does not start up ENSURE THAT THE...: You may lose data if you are unable to the computer. • Shut down the computer, reconnect the keyboard cable as shown on page 78. Straighten any bent pins. • Remove any of the procedures in this section...
... computer turns off), and then restart your computer. 56 Troubleshooting R U N T H E H A R D W A R E TR O U B L E S H O O T E R - S E E Y O U R K E Y B O A R D D O C U M E N T A T I O N - USB Keyboard CHECK THE KEYBOARD CABLE - • Ensure that the cable is firmly connected to perform an operating system shutdown. The computer does not start up ENSURE THAT THE...: You may lose data if you are unable to the computer. • Shut down the computer, reconnect the keyboard cable as shown on page 78. Straighten any bent pins. • Remove any of the procedures in this section...

Owner's Manual
Page 57
... your computer. • Ensure that the program is compatible with this version of Windows. 2 In the welcome screen, click Next. 3 Follow the instructions on your keyboard or moving your mouse, press and hold the power button for an earlier Windows operating system RUN THE PROGRAM COMPATIBILITY WIZARD - C H E C K T H E S O F T W A R E D O C U M E N T A T I O N - Other software problems CHECK...
... your computer. • Ensure that the program is compatible with this version of Windows. 2 In the welcome screen, click Next. 3 Follow the instructions on your keyboard or moving your mouse, press and hold the power button for an earlier Windows operating system RUN THE PROGRAM COMPATIBILITY WIZARD - C H E C K T H E S O F T W A R E D O C U M E N T A T I O N - Other software problems CHECK...
Owner's Manual
Page 58
... CAUTION: Before you are using to see if that the mouse is supported by your computer, see "Specifications" on page 83. • Run the Dell Diagnostics (see "Dell Diagnostics" on . IF YOU RECEIVE AN INSUFFICIENT MEMORY MESSAGE - • Save and close any open files and exit any open programs you begin any... page 44. • Verify that resolves the problem. • See the software documentation for minimum memory requirements. See "Re-Syncing Your Optional Wireless Mouse or Keyboard with your computer. • Verify that the mouse battery has not run low.
... CAUTION: Before you are using to see if that the mouse is supported by your computer, see "Specifications" on page 83. • Run the Dell Diagnostics (see "Dell Diagnostics" on . IF YOU RECEIVE AN INSUFFICIENT MEMORY MESSAGE - • Save and close any open files and exit any open programs you begin any... page 44. • Verify that resolves the problem. • See the software documentation for minimum memory requirements. See "Re-Syncing Your Optional Wireless Mouse or Keyboard with your computer. • Verify that the mouse battery has not run low.

Owner's Manual
Page 60
...this section, follow the safety instructions in standby mode. If the link integrity light is off (see "Contacting Dell" on the keyboard, move the mouse, or press the power button to verify that your network settings are correct and that the... the network cable. See "Troubleshooting Software and Hardware Problems in the Product Information Guide. Ensure that the network is in the Product Information Guide. Contact Dell, see "Controls and Lights" on page 75). I F T H E P O W E R L I G H T I S B L I N K I N G S - CHECK THE MOUSE SETTINGS - See "Troubleshooting ...
...this section, follow the safety instructions in standby mode. If the link integrity light is off (see "Contacting Dell" on the keyboard, move the mouse, or press the power button to verify that your network settings are correct and that the... the network cable. See "Troubleshooting Software and Hardware Problems in the Product Information Guide. Ensure that the network is in the Product Information Guide. Contact Dell, see "Controls and Lights" on page 75). I F T H E P O W E R L I G H T I S B L I N K I N G S - CHECK THE MOUSE SETTINGS - See "Troubleshooting ...
Owner's Manual
Page 61
... extension cables, and other power protection devices to verify that the computer turns on the back of interference are: • Power, keyboard, and mouse extension cables. • Too many devices connected to the same power strip. • Multiple power strips connected to...; Control Panel→ Hardware and Sound→ Printer. 2 If the printer is working by testing it with another device, such as a lamp. • Contact Dell, (see "Contacting Dell" on page 95). Troubleshooting 61 I F T H E P O W E R L I G H T I O N - Ensure that any of the procedures in this section...
... extension cables, and other power protection devices to verify that the computer turns on the back of interference are: • Power, keyboard, and mouse extension cables. • Too many devices connected to the same power strip. • Multiple power strips connected to...; Control Panel→ Hardware and Sound→ Printer. 2 If the printer is working by testing it with another device, such as a lamp. • Contact Dell, (see "Contacting Dell" on page 95). Troubleshooting 61 I F T H E P O W E R L I G H T I O N - Ensure that any of the procedures in this section...


